TIF support in ImageMagick #2404 #imagemagick
#Imagemagick
Reinterpreting some Conver-style #tarot cards in #svg using @velvetyne 's great #Basteleur font, #inkscape, #imagemagick and some #bash scripts!
--------------------
#fontsInUse
cPanel Shared Hosting Server Specs This article provides an in-depth analysis of our #cPanel Shared Hosting server specs and features powering the 100%-SSD cPanel Hosting services.
cPanel Shared Hosting Server Specs
The following features are included with ...
Continued 👉 https://blog.radwebhosting.com/cpanel-shared-hosting-server-specs/?utm_source=mastodon&utm_medium=social&utm_campaign=mastodon.raddemo.host #imagemagick #imap #csf #caldav #cloudsitebuilder #malwarescanner #gitversioncontrol #lscache #cloudlinux #ddosprotection #firewall #cagefs #malwareremoval #memcached #mailman #cardav #imunify360
cPanel Shared Hosting Server Specs This article provides an in-depth analysis of our #cPanel Shared Hosting server specs and features powering the 100%-SSD cPanel Hosting services.
cPanel Shared Hosting Server Specs
The ...
Continued 👉 https://blog.radwebhosting.com/cpanel-shared-hosting-server-specs/?utm_source=mastodon&utm_medium=social&utm_campaign=mastodon.social #gitversioncontrol #lscache #malwareremoval #imap #imunify360 #modsecurity #mailman #pgadmin #multiphp #firewall #cagefs #csf #ddosprotection #cloudsitebuilder #cloudlinux #imagemagick #memcached #nodejs #caldav #cardav #malwarescanner
Recent #android made %#system /bin" so hard to write to, that I can no longer reliably remount it in shell (as su)
Guess I need to use xbin now (Not sure if I should blame #Magisk or #Google .. :blobcatfrowningbig: )
Lets use #xbin from now on (and enjoy my bin's getting overwitten each boot ..
Hello zshaolin #imagemagick :blobcatfacepalm: )
#!/bin/bash
echo -n "Enter the binary name (must exist in Termux bin dir): "
read BIN_NAME
SRC_BIN="/data/data/com.termux/files/usr/bin/$BIN_NAME"
TARGET_BIN="/system_ext/xbin/$BIN_NAME"
if [ ! -f "$SRC_BIN" ]; then
echo "Error: Source binary '$SRC_BIN' does not exist."
exit 1
fi
echo "Remounting /system_ext as read-write..."
su -c "mount -o rw,remount /system_ext" || {
echo "Failed to remount /system_ext rw, trying /system..."
su -c "mount -o rw,remount /system" || {
echo "Failed to remount /system rw"
exit 1
}
}
if [ ! -d "/system_ext/xbin" ]; then
echo "Directory /system_ext/xbin does not exist, creating it..."
su -c "mkdir -p /system_ext/xbin" || { echo "Failed to create directory"; exit 1; }
su -c "chmod 755 /system_ext/xbin" || { echo "Failed to chmod directory"; exit 1; }
fi
if [ -f "$TARGET_BIN" ]; then
echo "Backing up existing $TARGET_BIN to ${TARGET_BIN}.bk"
su -c "mv $TARGET_BIN ${TARGET_BIN}.bk" || { echo "Failed to backup existing binary"; exit 1; }
fi
echo "Copying $SRC_BIN to $TARGET_BIN"
su -c "cp $SRC_BIN $TARGET_BIN" || { echo "Failed to copy binary"; exit 1; }
echo "Setting executable permission on $TARGET_BIN"
su -c "chmod 755 $TARGET_BIN" || { echo "Failed to chmod"; exit 1; }
echo "Remounting /system_ext as read-only..."
su -c "mount -o ro,remount /system_ext" || {
echo "Failed to remount /system_ext ro, trying /system..."
su -c "mount -o ro,remount /system" || echo "Warning: failed to remount /system ro"
}
echo "Done! You can now run $BIN_NAME from /system_ext/xbin/"
#termux
#repost •acws #acws #ImissKitKat
Why did no one just say that the #ImageMagick 7 CLI syntax is just RPN? Like, that's a weird choice, but if someone had just said "RPN" instead of whatever is going on in the explanation at https://imagemagick.org/script/command-line-processing.php , I would have been fluent nearly 10 years sooner.
Like, RPN is a weird choice. But once you've told me it's RPN, pages and pages of documentation are now obviated.
✨ New blog post ✨
Interactive ordering of dired items
🚀 Mastodon v4.3.10 veröffentlicht.
• 🔧 Abhängigkeiten aktualisiert.
• 📚 Datenbank-Backups vor Updates empfohlen.
• 🔧 `charlock_holmes` Gem-Build-Problem mit `gcc` möglich.
https://github.com/mastodon/mastodon/releases/tag/v4.3.10
#Mastodon #Ruby #PostgreSQL #Elasticsearch #Redis #Nodejs #LibreTranslate #ImageMagick #libvips
ImageMagick unter Linux
https://linuxnews.de/imagemagick-unter-linux/ #imagemagick #gimp #linux
:nkoSunglass:
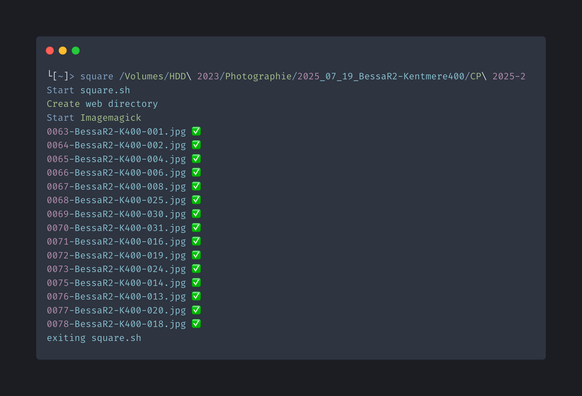
codeberg.org/KazukyAkayashi/square.sh
#Imagemagick
Export photos with a border from Lightroom Classic
This is how I add a nice thick black border to my photos after I export them from Lightroom Classic using free software.
This is for macOS, but since the same software exists on Windows, you can do something similar there, but I haven’t used that platform in years, so YMMV.
I’m going to presume you’re familiar with export presets in Lightroom Classic. You’re going to use one of them to run a small script that does the magick.
Take a deep breath. You’re going to learn a lot in the next couple of steps. Persist, and it will be worth it.
Installing ImageMagick
To add the border you need to install ImageMagick using brew. Think of ImageMagick as a Swiss Army knife for images. While Lightroom excels at organizing and editing individual photos, ImageMagick can automatically resize hundreds of images, create contact sheets, add watermarks, or convert file formats. You can do all this without you having to click through each image individually.
Step 1: Open Terminal (It’s Not as Scary as It Sounds!)
Terminal is like a text-based way to talk to your Mac. Instead of clicking buttons, you type commands. Here’s how to find it:
- Press
Command + Spaceto open Spotlight search - Type “Terminal” and press Enter
- A black window will open. This is Terminal
Don’t panic if it looks intimidating! Think of it like switching from Auto mode to Manual on your camera. It gives you more control once you know what you’re doing.
Step 2: Install Homebrew (Your New Best Friend)
Homebrew is like an App Store for command-line tools. It makes installing software like ImageMagick incredibly easy. Here’s how to install it:
- Copy this entire command (click and drag to select it all):
/bin/bash -c "$(curl -fsSL https://raw.githubusercontent.com/Homebrew/install/HEAD/install.sh)" - Paste it into Terminal (Command + V) and press Enter.
- You’ll be prompted to enter your Mac’s password (the same one you use to log in). Note: When you type your password, you won’t see any characters appear. This is normal for security reasons. Just type it and press Enter.
- The installation will take a few minutes. You’ll see lots of text scrolling by, and this is normal! Grab a coffee and let it do its thing.
- When it’s finished, you might see instructions about adding Homebrew to your PATH. If you see a message starting with “Run these two commands in your terminal,” copy and paste those commands one at a time.
Step 3: Install ImageMagick
Now that you have Homebrew installed, installing ImageMagick is incredibly simple:
- Type this command in Terminal:
brew install imagemagick - Press Enter and wait.
- This will download and install ImageMagick automatically. When it’s done, you’ll see your command prompt again (it looks like
YourName@YourMac ~ %or similar).
Step 4: Test Your Installation
Let’s make sure everything worked:
- Type this command:
magick -version - If you see version information appear (something like “Version: ImageMagick 7.1.x”), congratulations! You’ve successfully installed ImageMagick.
Apart from adding borders to images, ImageMagick can also resize images, convert RAW files to Jpeg, add watermarks and more.
Your first ImageMagick script
Open TextEdit or your favourite text editor to create your black borders script. If you use TextEdit, you need to adjust the settings as follows.
Go to TextEdit → Preferences and under “New Document”
- Select “Plain text”.
- Uncheck “Smart quotes” and “Smart dashes”.
Copy this code into your editor before saving it in your Documents folder as add_black_borders.sh
#!/bin/bash# Add black borders to export imagestoday=$(date +%F)open ~/Pictures/for file in "$@"do echo "Working on $file" > ~/export.log /opt/homebrew/bin/magick "$file" -bordercolor black -border 15 /tmp/out.jpg >> ~/export.log 2>> ~/err.log mv /tmp/out.jpg "$file" rm "$file"_originaldone
Your computer can’t run the script without making it executable, so use this command to do that:
chmod +x ~/Documents/add_black_borders.sh
Add it to Lightroom Classic
Lightroom Classic has an “after export” setting in the export dialog you can use to modify the photo(s) you just exported. You’re going to write a small computer programme called a “shell script” that uses ImageMagick to add the border.
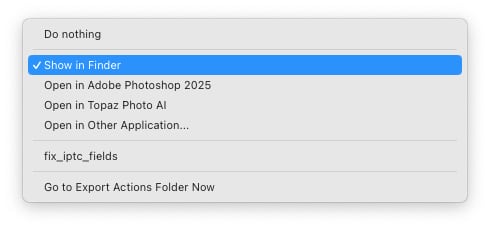
Right click on an image, go to Export and click on Export..... Select your export preset and scroll to the bottom, to “Post-Processing. It will look something like this. Click on the “After Export” setting and then on “Go to Export Actions Folder Now”.
A new Finder window will open there. It should be Library/Application Support/Adobe/Lightroom/Export Actions/ in your home directory.
Copy the script from your Documents folder to the Export Actions folder by dragging it from one folder to the other.
Export with Borders
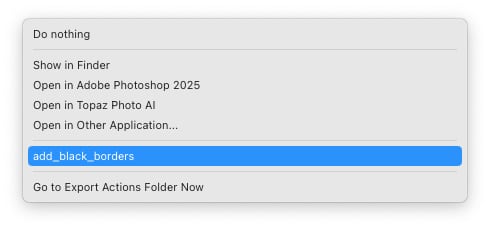
Go to your desired export action in the Export... menu in Lightroom Classic. Scroll to the end, and the After Export setting will have your add_black_borders script.
Select that, and remember to update the settings for your export preset.
Export an image, and it should have a black border. The Pictures folder will pop up too, but you can change that in the script in the line that says open ~/Pictures/. Change that to wherever you put your exported images.
Customize the output
You can change the border width and colour in the script. Look at the magick line.
- It’s 15 pixels by default.
-bordercolor blackcan be changed to whatever colour you want from this list.
Search online, and you’ll find other commands to further change how the border looks.
Bonus: split panoramas
Here’s a bonus script. Save it as panorama.sh in the Export Actions folder. Add it to an export action you use for horizontal panoramas. Vertical panoramas can be split using 100%x33.33% instead.
#!/bin/bashopen ~/Pictures/for file in "$@"; do base=$(basename "$file" .jpg) out=$(dirname "$file") /opt/homebrew/bin/magick "$file" -crop 33.33%x100% "${out}/${base}_split_%d.jpg"done Gobbledygook?
I hope that made some sense, and it works for you. It is unfortunately technical, but take things slowly and carefully, and you’ll have beautiful borders on your exported photos!
Apertureƒ/8CameraILCE-7RM5Focal length172mmISO100Shutter speed5sSo… Any alternative to #ImageMagick for indexed palette images?
I have an issue similar to this: https://github.com/ImageMagick/ImageMagick/discussions/3719
Ok, any #video folks out there who know how to do what I want to do? I don't know what words to search for because I don't know what this technique is called. Boosts welcome, suggestions welcome.
I have a pool cleaning robot. Like a roomba, but for the bottom of the pool. We call it poomba. Anyways, I want to shoot an MP4 video with a stationary camera (a GoPro) looking down on the pool while the robot does its work. So I will have this overhead video of like 3-4 hours.
I want to kinda overlay all the frames of the video into a single picture. So the areas where the robot drove will be dark streaks (the robot is black and purple). And any area the robot didn't cover would show the white pool bottom. Areas the robot went over a lot would be darker. Areas it went rarely would be lighter.
I'm just super curious how much coverage I actually get. This thing isn't a roomba. It has no map and it definitely doesn't have an internet connection at the bottom of the pool. (Finally! A place they can't get AI, yet!) It's just using lidar, motion sensors, attitude sensors and some kind of randomizing algorithm.
I think of it like taking every frame of the video and compositing it down with like 0.001 transparency. By the end of the video the things that never changed (the pool itself) would be full brightness and clear. While the robot's paths would be faint, except where it repeated a lot, which would be darker.
I could probably rip it into individual frames using #ffmpeg and then do this compositing with #ImageMagick or something (I'm doing this on #Linux). But 24fps x 3600 seconds/hour x 3 hours == about 260K frames. My laptop will take ages to brute force this. Any more clever ways to do it?
If I knew what this technique/process was called, I'd search for it.
At the office job I got so used to right click, convert to PDF (Acrobat creates this context menu in Windows) that I replicated it at home with #Xfce custom actions - #imagemagick and then xdg open for evince. I don't know why I didn't think of this sooner. Imagemagick is seriously cool stuff. #gnu #linux
Quant aux choix des dons, chaque salarié⋅e du 24ème a disposé de 14 tranches de 24€ à répartir aux projets libres de son choix. Ensuite, nous les avons mis en commun pour se répartir les paiements redondant. Une méthode bien efficace : en moins d'une demi journée, nous avons pu choisir et aider 30 projets.
Voici la liste des dons : https://github.com/24eme/banque/blob/master/data/dons.csv
(2/2)
#Yunohost #Framasoft #Debian #php #bigbluebutton #gnome #imagemagick #git #organicmaps #fdroid #weblate #kitty #signal #CopyPublique
ImageMagick rapidly soaked up all of my free RAM and the OS killed my console in self-defence. Maybe 84000 x 51500 is too much image for us mere mortals.
I like it when my glitch art experiments result in something useful happening in regular software https://github.com/ImageMagick/ImageMagick/discussions/8161#discussioncomment-13428106 #imagemagick
[Projet] Scripts
Petite collection de #script #bash accumulés au cours des années.
J'en ai perdu / abandonné pas mal.
Ceux qui restent permettent d'automatiser la manipulation d'images dans #Nautilus via #ImageMagick, entre autres.
cPanel Shared Hosting Server Specs This article provides an in-depth analysis of our #cPanel Shared Hosting server specs and features powering the 100%-SSD cPanel Hosting services.
cPanel Shared Hosting Server Specs
The following features are included with all ...
Continued 👉 https://blog.radwebhosting.com/cpanel-shared-hosting-server-specs/?utm_source=mastodon&utm_medium=social&utm_campaign=mastodon.raddemo.host #cagefs #gitversioncontrol #multiphp #imagemagick #cloudsitebuilder #caldav #imunify360 #malwareremoval #imap #malwarescanner #memcached #cardav #cloudlinux #csf #modsecurity #mailman #lscache
cPanel Shared Hosting Server Specs This article provides an in-depth analysis of our #cPanel Shared Hosting server specs and features powering the 100%-SSD cPanel Hosting services.
cPanel Shared Hosting Server Specs ...
Continued 👉 https://blog.radwebhosting.com/cpanel-shared-hosting-server-specs/?utm_source=mastodon&utm_medium=social&utm_campaign=mastodon.social #cardav #multiphp #mailman #cloudlinux #imagemagick #cagefs #csf #python #gitversioncontrol #caldav #imunify360 #nodejs #malwareremoval #phpmyadmin #pgadmin #modsecurity #imap #memcached #cloudsitebuilder #lscache #pop3 #malwarescanner


