#ModernIonicCapital #Volute Construction
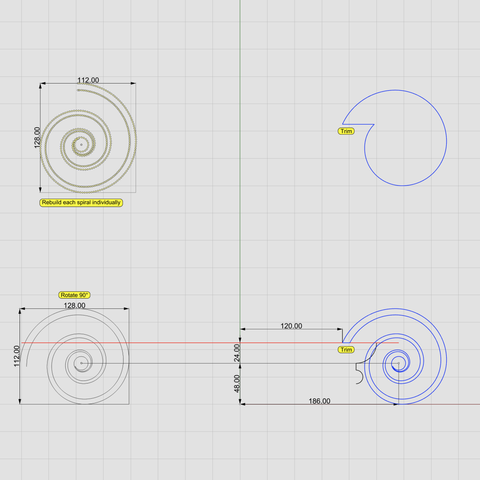
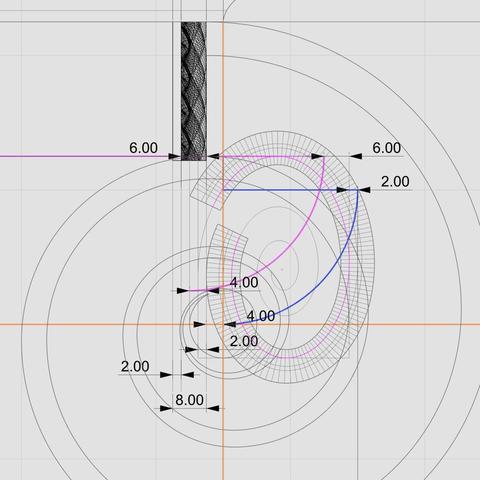
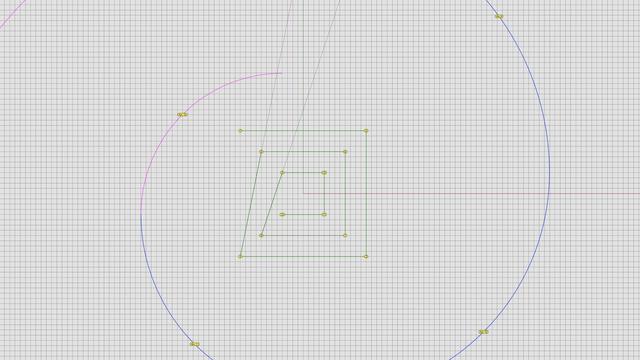
As mentioned in https://pixelfed.social/p/Splines/807933255910367093, we mentally rotate the floor plan of the modern #IonicCapital 45° so that the volute #spiral curves lie flat on the XZ plane.
The top-left diagram shows the original volute spirals from https://pixelfed.social/p/Splines/800383518517869430. If you haven't already rebuilt them from disjointed arcs to seamless #NURBS curves as described in https://pixelfed.social/p/Splines/794199123072358090, do so now. Explode the whole spiral into constituent arcs, select all arcs for the outer spiral and join them separately, and repeat this step for the inner spiral. Then, rebuild both spirals with 256 segments each.
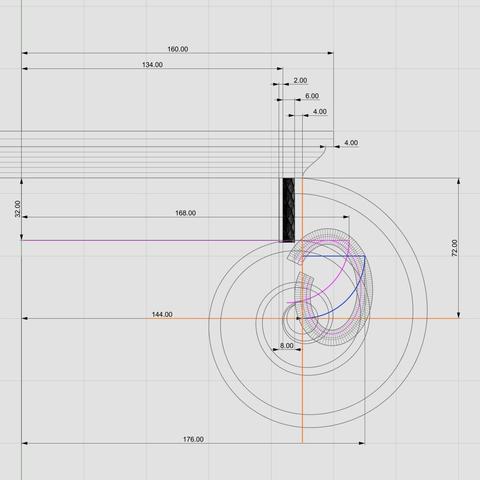
Volute spirals for the classic and modern variants are the exact same size, but the ones in the modern version appear smaller. That's an optical illusion because the spirals are rotated 90° in the modern version as shown in the bottom left diagram.
The bottom right diagram shows the placement of the volute spirals relative to the #profileCurves of the lower portion of the modern capital. The #voluteEye is slightly above and far to the right of the #astragal profile in the modern version compared to the classic version.
At this point, we make two copies of the volute spirals and trim them to the top of the #ovolo. In one copy we only trim away the outermost arms of the spirals while maintaining the inner spirals, as shown in the bottom right figure. In the other copy, we trim away the inner spirals as shown in the top right image.
The bottom right figure in https://babel.hathitrust.org/cgi/pt?id=mdp.39015031201190&view=1up&seq=142 shows the eye 6.5 parts (52 units) from column shaft. That's not an error, but poor documentation. See floor plan in https://pixelfed.social/p/Splines/807782440025967685 where x = 198 on the square is homologous to x = 250 on the circle. To reconcile, scale 52 by 250/198 = 65.656, or 66, and offset by 120 to get 186 units.
#IonicCapital
Plan for the #ModernIonicCapital
If the design in https://pixelfed.social/p/Splines/807569519962747338 looks daunting, let me assure you it is far simpler than the work that went into the reconstruction of just the #scroll for the #classicIonicCapital. Be sure to check out #MileStone4 at https://pixelfed.social/p/Splines/795361973789834465.
With the modern #IonicCapital, the designers went back to the basics of using just straight lines and circular arcs to define the geometry of the essential elements of the capital. No #braids, #keystones, or #modillions, and no #helix curves or #sinusoids.
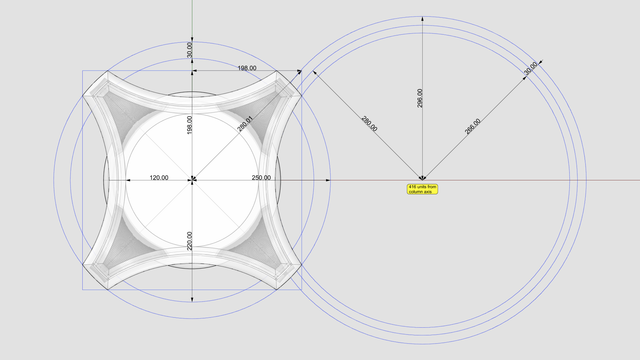
We start the floorplan for the modern ionic capital with a circle of radius 5/6 of µ (120 when µ = 144) which marks the neck of the #columnShaft.
Tangent to this circle is a large circle of radius 296 units centered on the X axis exactly 416 units from the column axis. This is the circle that marks the curve of the #abacus, which is always tangential to the column shaft at the neck. This circle also marks the curved faces of the interior portion of the #volute wedge. Without the raised volute spirals, the interior wedge appears flush with the abacus as they follow the same circular arc.
Concentric to this large circle is another circle with a radius of 280 units to mark the extent of the raised volute spirals which are 16 units thick. Another concentric circle of radius 266 units marks the outer edge of the top of the capital.
The gap between the outermost large circle and the innermost concentric circle is 30 units, and that is reflected in another pair of circles centered on the column axis with radius of 250 units and 220 units to define the four corners.
The capital footprint fits in a square 396 units wide — or 24.75 parts horizontally from axis, per #Scarlata in https://babel.hathitrust.org/cgi/pt?id=mdp.39015031201190&view=1up&seq=45.
Use this with the sketch in https://babel.hathitrust.org/cgi/pt?id=mdp.39015031201190&view=1up&seq=142
#ModernIonicCapital sketch
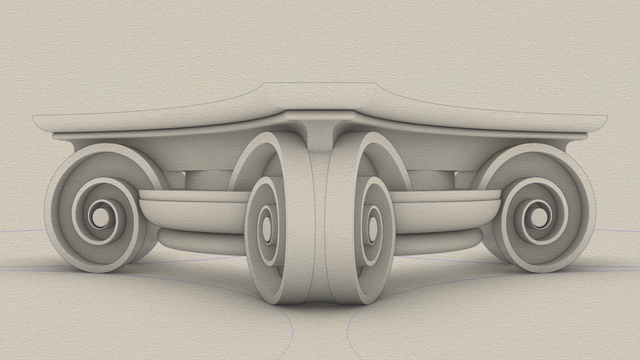
The modern #IonicCapital with curved faces and radial symmetry is a drop-in replacement for the classic Ionic capital with flat faces.
Unlike the classic variant, which has a rectangular footprint, the modern variant has a footprint that fits in a square. In the classic variant, the volutes and scrolls project out so that they are visible from the top. In the modern variant, there are no scrolls, the volutes have a curved face, and they are completely nestled under the top.
The sketch omits the #fillet at the bottom because we added that to the column #shaft in https://pixelfed.social/p/Splines/791794072490907090.
So, we start at the bottom with an #astragal which is exactly the same size as in the classic variant.
Next up from the bottom is the #ovolo which is shorter than in the classic variant. It still has a #tectonicSurface on which #decorativeElements rest, and a #virtualSurface that envelops the decorative elements. In this case, I chose a minimalist design with no #eggsAndDarts. Instead, I use another plain ovolo as a substitute that is offset from the tectonic surface by 1 part (or 8 units, when µ = 144).
Above the ovolo is the #channel, which in this case is a round slab whose surface matches the neck of the column with a radius equal to 5/6 of µ (120 units).
Above the channel is the #abacus which has a curved face that is repeated on all four sides. There is an abacus with flat sides in the classic variant as well, but it is not visible from the front because it is hidden behind the #volute slab. In fact, the vertical #braidsAssembly in the classic variant is attached to the abacus.
Above the abacus is a #reed, and above that, another small Ovolo that tops the modern capital.
The curved volutes follow the blue circular arcs at the bottom of the sketch. The volutes are shaped like a wedge, as can be seen more clearly in the corner facing the front. The portion of the wedge between the outer rims has a concave surface.
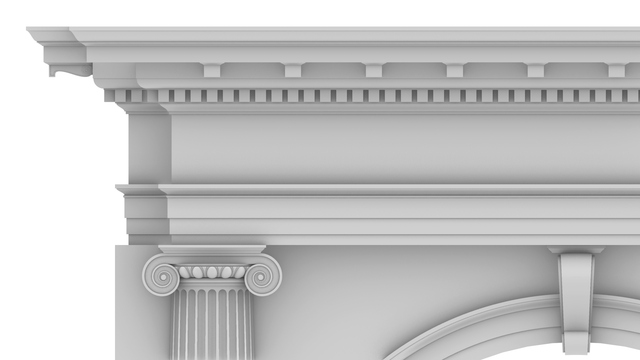
#ModernIonicEntablature with #modillions and #dentils adapted for #arcadeIntercolumnation.
This image shows modillions across the top of the entablature, including modillions visible on the side wall. The dentils are below the modillions and are a bit shorter than in the classic variant.
As with dentils, a #modillion must be centered on a column axis. In the front, there are two modillions directly above the two columns and eight other modillions equally spaced between them. The number is always 10. So the spacing is different for an #arch with no #pedestals.
This image also shows a skinnier #keystone. Its thickness is half that of the one shown in https://pixelfed.social/p/Splines/804548474524642209 but all other measurements remain the same. There is never a modillion directly above the keystone.
The #cymaReversa and #fillet above the keystone have #profileCurves identical to those in the #capital but the top is a square that is only µ x µ units. The top slab is centered front to back on the face of the arch.
In this image, the modern entablature is shown with the classic capital, but it goes really well with the #modernIonicCapital. As I mentioned in https://pixelfed.social/p/Splines/791065657488081419, the classic variant of the column capital has parallel flat #volute slabs only visible from the front and back, but not from the sides. Because of its lack of radial symmetry, the capital does not look as satisfying when viewed from the side, especially in a #colonnade, as seen in https://pixelfed.social/p/Splines/803089629244302486.
The modern variant has curved volute faces on all four sides with pointed ends at all corners and optimized for use in a corner column, but not limited to that. The modern #IonicCapital is the last remaining piece in our systematic look at the complete #IonicOrder.
This concludes our look at the entablature, both classic and modern, and both for #simpleIntercolumniation, or #Architravato, and #arcadeIntercolumniation.
More details on alignment of various elements in the classic #IonicCapital in https://pixelfed.social/p/Splines/800161382832200305
Here, we zoom in on the two #braids assemblies — the straight vertical one on the side of the #capital and the curved one around the neck of the #scroll.
In this diagram, the magenta curve for the curved braids is extended on both sides to show the full original #modulatingSpiral for the rear end of the scroll.
The diagram also shows the lines tangential to the full modulating spiral. As previously mentioned, the top tangent is coincident with the magenta line for the top of the #ovolo. Additionally, the bottom tangent is tangential to the bottom of the #eye of the #volute.
The right tangent of the modulating spiral bisects the curved braid assembly with 4 units on either side of the tangent, and the magenta #tectonic surface further bisects the gap between that tangent and the "underside" of the braids assembly on the right.
The top gap between magenta and blue arcs is split into 6 units and 2 units — same as the proportion of the braids channel above and below the tectonic surface.
Moving on to the bottom of the vertical braids assembly, follow the lines that divide the depth of the assembly (8 units) into 4 portions. The leftmost 2 units are, of course, sub-surface, buried inside the vertical wall of the capital.
The middle line is tangential to the left side of the eye of the volute. The next line, moving right, is tangential to the left side of the modulating spiral. The rightmost line is tangential to the outer surfaces of both braids assemblies, as already mentioned in the previous post.
Note the symmetry of 2 units and 4 units near the left side of the eye.
These meticulous details are what I call pure #poetryInGeometry.
In https://pixelfed.social/p/Splines/792499765146596723, I wrote that Dürer's approximation of #logarithmicSpirals comes close, but still doesn't fit the measurements of the #IonicCapital. This is why.
UPDATE: Alignment of various elements in the classic #IonicCapital
There is an error in the measurements for arc AD in https://pixelfed.social/p/Splines/792124787573855518 where it is shown concentric to the arc BC, with AD having a bigger radius than BC.
The two arcs are not concentric. Arc AD is shifted down and to the right by 1 part or 8 units and has the same radius as arc BC.
When revolved around the column axis, arc AD yields the #virtual surface that encloses #decorativeElements resting on the #tectonicSurface of the #ovolo. Revolving arc BC around the column axis gives the tectonic surface of the Ovolo.
The #eye of the #volute is centered exactly at µ = 144 away from the column axis and 1/2 µ, or 72 units directly below the #cymaReversa as shown by the orange crosshairs.
The top of the Ovolo's tectonic surface (shown in magenta) is tangential to the top of the tectonic surface of the curved #braids assembly. That latter surface is also shown in magenta.
The outer surface of the vertical braids assembly is 4 units inset from the cyma reversa and is also tangential to the outer surface of the curved braids assembly near the bottom of the Ovolo's tectonic surface.
The vertical braids assembly is 33 units tall, as described in https://pixelfed.social/p/Splines/799340150182400358. The bottom portion of it is shown buried 1 unit under the Ovolo surface.
#3DPrinting
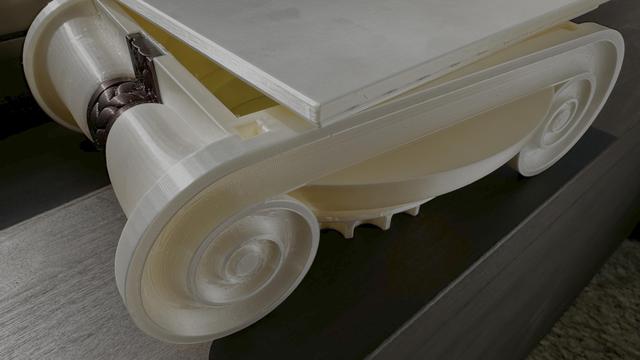
Early #3DPrinted prototype of #Classic #IonicCapital from a few years back using a #Prusa #MK4S #3DPrinter.
The length of the #volute from end-to-end is more than 10". I rotated the #voluteSlab 45° on the printer bed, and by the grace of #Pythagoras, I was able to print it inside the 8" build envelope of the MK4S.
This prototype has many imperfections, and some elements are just plain "wrong" -- like the curved inside of the volute channel (instead of flat).
The #ovolo is lacking #eggsAndDarts because I had not yet made the distinction between a #tectonicSurface on which the #decorativeElements rest, and a #virtualSurface that encloses the decorative elements. My calculations at the time always seemed to differ from those in #Scarlata's book. But as the physical #3DPrint shows, it is perfectly OK to go for a minimalistic look — even if it means a ribbon shorn of #braids. It's the distinctive design of the core tectonic elements that has the greatest impact.
I used brown silk filament for the braids, because, why not? For this prototype, I printed them separately and glued them to the #scroll.
Also, the scrolls are misshapen because I had not yet figured out the correct geometry. It would be another 4 years of tinkering with my #CAD design to finally get my #Eureka moment — and that's when I decided to start this series.
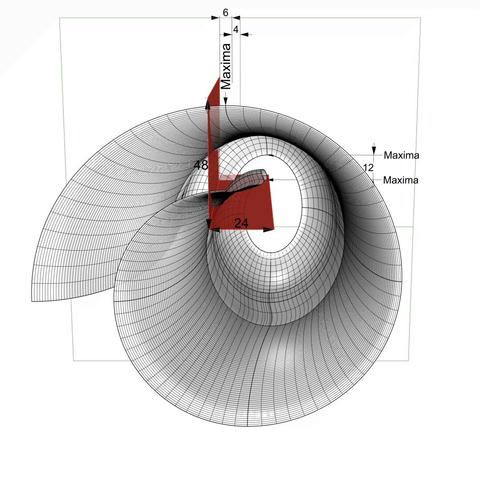
To create an #airtight solid object from the smooth surface in https://pixelfed.social/p/Splines/794868875707070193 that is suitable for #integration in the classic #IonicCapital, we need to trim the surface at specific points.
First draw an L shape that is 3 parts (24 units) wide and 6 parts (48 units) tall. The base of the L should align with the maxima of the last arc of the rear #spiral. The stem of the L should be 3/4 part (6 units) to the left of the maxima for the first arc of the front spiral, or 10 units to the left of the eye of the spiral.
#Extrude the L-shaped curve to create an L-shaped #cuttingSurface (shown here in red) that extends past both the front and the rear of the scroll surface.
Make a copy of the scroll surface so that you don't destroy the full original surface. Then, split the copy of the scroll surface with the cutting surface.
From the outside portion of the scroll surface, discard the portion to the left of the cutting surface, From the inside portion of the scroll surface, discard the portion immediately above the base of the cutting surface.
Save a copy of the cutting surface in case you need to repeat these steps, because in the next step we will carve out a portion of the cutting surface itself and join the flat faces of that carved out shape with the trimmed scroll surface.
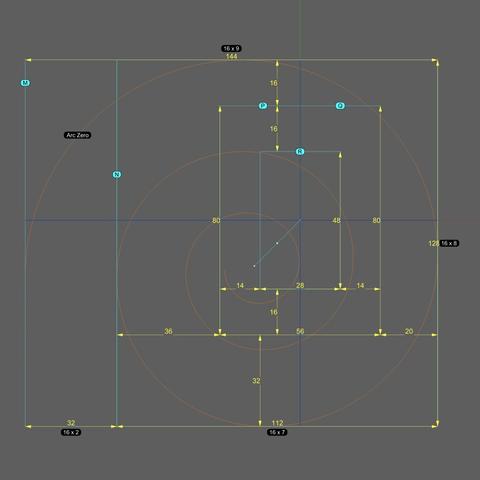
Classic #IonicScroll #Scaffolding
Take the time to understand the measurements of this scaffolding plan in the broader context of the #IonicCapital measurements, as this is the bedrock on which the #scroll reconstruction rests.
First, note that there are 5 rectangles labeled M, N, P, Q, and R, where M and N are coplanar with the large #volute at the front of the scroll. P and Q are congruent, with P exactly midway between the front and the back of the scroll, and Q exactly 3/4 of the way from front, or 1/4 from back. R is the smallest of them and lies at the back of the bell-shaped part of the scroll, but ahead of the ribbon bearing the 3-strand #braid.
M completely encloses the volute, including #ArcZero, but much of Arc zero is discarded later. So, the part of the volute that really matters is enclosed by N, whose width is 112 units, height the same as M at 128 units, and the width of M itself is exactly µ or 144 units. So these measurements are in the ratio 7:8:9.
The width of P and Q is 56 units, which is exactly half the width of N. Recall from the post on #IonicCapital #Tectonic Surfaces [https://pixelfed.social/p/Splines/792124787573855518] that the unadorned capital is also exactly 112 units, divided into two halves of 56 units each.
R is concentric with P and Q and its width is exactly half of the width of P and Q, which are exactly half the width of N.
Top of R is 32 units from top of N and 16 units from top of P and Q. Bottom of P and Q are 32 units from bottom of N and 16 units from bottom of R.
Finally note the diagonal line from the origin to the #eye with a point in the middle. That middle point is the center of rectangle labeled N. It shows that the volute #eye, the center of N and the centers of concentric rectangles P, Q, and R would be collinear if these rectangles were coplanar.
All of these constraints point to warrantable consistency and coherence of the scaffolding measurements, justifying their use in scroll reconstruction.
The #volute is the most striking element of the #IonicOrder, even more than the #scrolls, for there would be no scrolls without volutes.
The #IonicVolute is constructed as a spiral, of which there's a bewildering array of types that have fascinated artists, philosophers, and mathematicians alike for millennia. Most #CAD tools have a built-in primitive for spirals, but you will only waste your time with them because they strive for #continuous curvature changes, when only a #discrete spiral made from circular arcs will work in this design. I spent years trying different kinds and learned a lot in the process.
Even within the family of discrete spirals, there's only one that fits. Dürer's approximation of #logarithmicSpirals with 90° arcs comes close, but still doesn't fit. The only one that works is contrived to fit the measurements of the #IonicCapital, and it's not a general spiral. It's specifically designed for 3 turns, and you can only proceed in one direction — toward the eye. You cannot start at the eye and diverge outward.
The process is not complicated. I purposely left out the measurements in the sketch because they cluttered the area near the eye, but I describe them here.
When µ = 144, you will need to start with a square that is exactly 1 part (8 units) wide and divide it into smaller portions — initially 6, but eventually 24. This is the first time you might regret choosing µ = 144. If you had chosen a value 3x larger, then one part would be 24 units instead of 8. That would certainly have made understanding the volute a little easier but the other measurements would also be 3x and too unwieldy to work with.
There is a happy compromise: Temporarily scale everything up by 3x just for the volute, and once it has been constructed, scale it down to 1/3 to fit with the rest of the design.
So, the first step is to divide the square into a 24x24 grid. Then make 3 concentric squares 4 units apart and mark their ends with points 1 through 12 as shown here.
Classic #IonicCapital #Tectonic Surfaces Plan
We already made the 8 unit tall #fillet at the bottom of the #capital a part of the #shaft in https://pixelfed.social/p/Splines/791794072490907090. So, excluding that, the remainder of the capital is 14 parts or 112 units tall, for the bottom half of which we use the #revolve operation (like the #columnBase and #columnShaft), and for the top half we use the #extrude operation (like the #pedestal, #entablature, and #plinth).
Starting at the bottom, we have an #astragal that is 2 parts or 16 units tall and has the same profile as a #reed and #torus, falling in between the two in terms of size. The arc AD is shown in gray because it is an invisible #virtualSurface that envelops the decorations like #eggsAndDarts on the #ovolo. This is the measurement that is given in #Scarlata's #PracticalArchitecture, but it makes no mention of the #decorative and #tectonic surfaces. Arc BC with a radius of 4 parts or 32 units is the tectonic surface on which the Ovolo decorations rest. Such decorations have a variable or uneven surface which may not exceed 1 part or 8 units.
Points E and F mark the horizontal tangent or maxima of the second spiral and the first (outermost) spiral, respectively. The gap between them is exactly 4 parts or 32 units. GH is the profile for the vertical side surface on which part of the #ribbon and #braid lie flat, protruding exactly 6 units to coincide with the invisible virtual flat surface through EF.
The #cymaReversa is 2 parts or 16 units tall and 1.5 parts or 12 units wide. It starts 4 units to the right of F and stops 4 units short of the top fillet, which is one part or 8 units tall and 20 parts or 160 units from the #columnAxis.
Of the 4 parts or 32 units between G and H, the lower 3 parts or 24 units are part of the #voluteChannel groove and the top 1 part or 8 units is a fillet that follows the curve of the #volute and progressively gets narrower until it converges with the #eye of the volute.
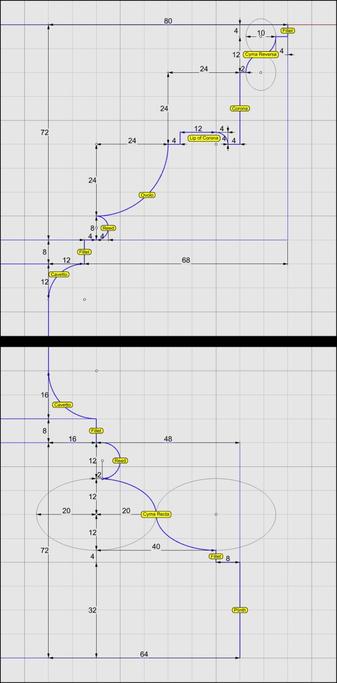
This shows the detailed measurements of the top and bottom portions of the #IonicPedestal. For macro-level measurements, see https://pixelfed.social/p/Splines/790571135473463588
Each of the blue curve segments (lines and arcs) that are marked with a yellow bubble is the #profileCurve for a #molding whose name is inside the bubble.
Starting at the bottom, we have a #plinth, a #fillet, a #cymaRecta, and a #reed as part of the #basement of an Ionic pedestal.
Next up, we have a #fillet and a #cavetto at the bottom of the #dado, and another cavetto and fillet at the top of the dado.
Moving higher up, a reed, an #ovolo, a #corona, a #cymaReversa, and a final fillet top off the cap of the pedestal.
They are called profile curves because each is the outline or silhouette of a 3D molding as seen from one side or in a cross section. In the case of a pedestal, these curves can be used directly to recreate the 3D shape of the pedestal. For this reason and in this case, I call them #primaryProfileCurves.
This is not always the case. For more complex shapes, such as the #scroll surface of an #IonicCapital shown in https://pixelfed.social/p/Splines/789956327130679640, the profile curves recovered by #reverseEngineering the image scans in #Vignola's book cannot be used directly to sweep the scroll surface because the scroll shape is not cylindrical. Like the inside of a rose, the scroll surface follows the outlines of spiral #volutes in the front and back, neither of which are circular. So, additional steps are necessary to derive the curves that we can actually use to reconstruct the surface.
In the case of the scroll surface, the derivation of these curves is not trivial and not obvious, but it is not difficult to understand, and no math is involved. There are multiple sets of curves, and each successive set is derived from a previous set. I call them secondary, tertiary, and quaternary curves.
For now, we stick with the primary profile curves for the pedestal.
Client Info
Server: https://mastodon.social
Version: 2025.07
Repository: https://github.com/cyevgeniy/lmst
