
From the same analogue series, photographed in Spain.
Medium format photographs made on Ilford HP5+ film, developed in Kodak HC-110.
Some of the film was affected during airport scanning — small traces of damage that have become part of the material record of the journey.
#analogphotography #mediumformat #blackandwhite #filmphotography #ilfordhp5 #streetphotography #photographypractice #spain
#PhotographyPractice


From the same analogue series, photographed in Spain.
Medium format photographs made on Ilford HP5+ film, developed in Kodak HC-110.
Working with film often becomes a way of registering places — fragments of movement, transitions, and the quiet presence of everyday environments.
#analogphotography #mediumformat #blackandwhite #filmphotography #ilfordhp5 #streetphotography #photographypractice #spain


From the same analogue series.
Medium format photographs made on Ilford HP5+ film, developed in Kodak HC-110.
Working with film often means recording what is already passing — light, weather, and moments that begin to turn into memory.
#analogphotography #mediumformat #blackandwhite #filmphotography #ilfordhp5 #portrait #photographypractice


Medium format photographs made with a Hasselblad on Ilford HP5+ film, developed in Kodak HC-110.
Working with film introduces friction — fewer frames, slower decisions, and greater attention to each exposure.
#analogphotography #mediumformat #blackandwhite #filmphotography #ilfordhp5 #portrait #photographypractice
Working with film introduces friction — fewer frames, slower decisions, and greater attention to each exposure.
#analogphotography #mediumformat #blackandwhite #filmphotography #ilfordhp5 #portrait #photographypractice


Hasselblad work from the past year.
Ilford HP5+ medium format film, developed in Kodak HC-110.
Working analogue introduces friction — limited frames, delayed feedback, slower attention.
#analogphotography #mediumformat #blackandwhite #filmphotography #ilfordhp5 #darkroom #photographypractice
Ilford HP5+ medium format film, developed in Kodak HC-110.
Working analogue introduces friction — limited frames, delayed feedback, slower attention.
#analogphotography #mediumformat #blackandwhite #filmphotography #ilfordhp5 #darkroom #photographypractice


Training in the Dark
Some birds seem determined to test a photographer’s patience — or their low-light technique. Lately I keep stumbling into the same situation: dark birds on dark water, surrounded by even darker environments. And this time the mystery guest was a Tufted Duck (Aythya fuligula), the Dutch kuifeend, calmly drifting through the shadows at Oranjezon in Zeeland.
Photographing a mostly black bird on black water is a bit like trying to sketch a raven at midnight with a broken pencil. But that’s where the fun begins. With the Canon 5D Mark IV paired with the Sigma 100–400mm, I went for the now-familiar approach: low shutter speed, high ISO, and careful handheld tracking. A balancing act between motion blur and noise, exposure and detail. But when it clicks, it clicks — and this frame caught the elegance of the bird without losing the texture of those inky ripples.
This moment was extra special because I was there with my son. He wanted to escape the pressure of school for a bit, so we drove off at 6:00 in the morning and reached the coast before sunrise. By the time I took this image — around 10:00 — the world had softened, he’d relaxed, and we were just two people sharing cold air, quiet water, and the calming rhythm of nature.
Honestly? Those father-son moments mean more than any perfect exposure ever will.
#TuftedDuck #AythyaFuligula #Kuifeend #Waterfowl #Zeeland #Oranjezon #DutchNature #BirdPhotography #WildlifePhotography #Canon5DMarkIV #Sigma100400 #LowLightPhotography #DarkWaterShots #HandheldPhotography #TrackingShots #NatureLovers #BirdWatching #AvianLife #WildlifeMoments #FatherSonTime #NatureAsTherapy #SchoolStressRelief #EarlyMorningPhotography #BeforeSunrise #CoastalWildlife #EuropeanBirds #BirdingNetherlands #ScientificCuriosity #FieldNotes #StoryBehindTheShot #PhotographyPractice #NatureJournal #ExposureChallenges #ISOHigh #ShutterSpeedLow #NaturalMood #MoodyNature #CalmWaters #WaterBirds #ByMaikeldeBakker


#PhotographyLovers
#PhotographyArt
#PhotoDaily
#PhotographyIsLife
#PhotographyAddict
#ThroughTheLens
#Visuals
#JustShoot
#CaptureTheMoment
#PicturePerfect
#ShotOfTheDay
#Photoshoot
#PhotographyEveryday
#InstaPhotography
#CameraReady
#PhotographySkills
#PhotographyPassion
#PhotographyJourney
#CreativePhotography
#PhotographyIsArt
#CapturedMoments
#PhotoArt
#PhotographyLife
#PhotoSession
#PhotographyLove
#PhotographyPractice
#PhotographyArtwork
#PhotographyIsMyTherapy
#PhotographyLifestyle
#PhotographyChallenge
#PhotographyInspiration
#PhotographyFun
#PhotographyAddicts
#PhotographyExperiment
#PhotographyExplorer
#PhotographyArtist
#PhotographyWorld
#PhotographyTips
#PhotographyMagic
#PhotographyGoals
#PhotographyDream
#PhotographyTime
#PhotographyLight
#PhotographyStudio
#PhotographySession
#PhotographyWork
#PhotographyProject
#PhotographyDaily
#PhotographyCommunity
#PhotographyTalent
#Photography


#BeginnerPhotographyTips 📚 Photography is an art you can master with practice! Set aside time each week to take photos, even if it's just in your backyard or neighborhood. Progress comes with persistence. 💪 #PhotographyPractice #ContinuousImprovement #Albuquerque #RioRancho #SantaFe #NewMexico


Inspiring Video Shows a Photographer’s Improvement Over a Decade
#culture #news #improvement #marinawilliams #photographypractice #photoimprovement #practice #tiktok #tiktokphotographer

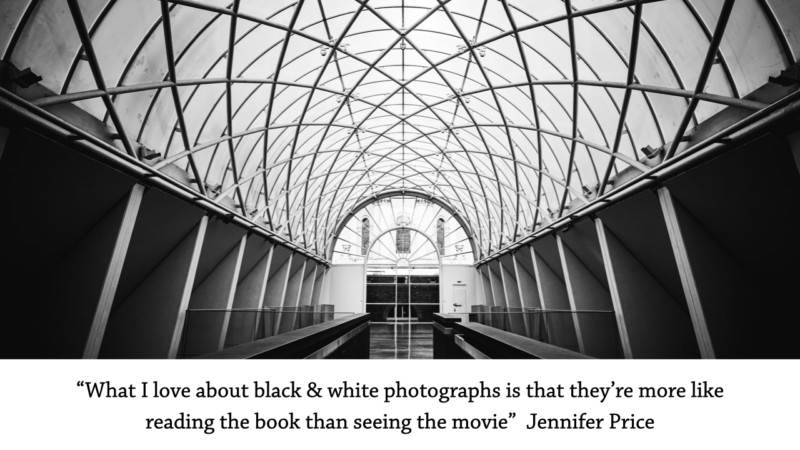
Photography Composition Tip: Try Black and White
In a world of color, why would you want to create black and white photos? There are many reasons to do so, from the timeless nature of the image to the way it enhances the mood and tones in the photo. It is also a way to see differently and grow your composition skills.
This is part five in a series of videos about composition tips based on assignments I use with Introduction to Photography students at Highline College near Seattle, Washington. Read parts one, two, three, and four here.
By removing the distraction of colors, we are left with lines, tones, and textures. The image is simplified and this can help improve your composition skills because it reduces many of the “easy” ways we usually create photos. Without color, we are forced to more carefully examine the tonal ranges of the light, how it interacts with the environment, and seek subjects that are most dramatically transformed by their interaction with the light.
Here are some things to look for in creating black and white photos:
First, I look for contrast. The image will be strongest in black and white when it has the deepest blacks and brightest whites. It is called “black and white,” not “dark gray and light gray.” Seek out shadows and highlights. More on contrast in a bit.
Second, look for texture. Subjects with texture will often have interesting interactions with light that creates shadows and increases the potential for story and mood in the image. Look for contrast in textures, too -- rough and smooth, old and new, organic and human-made.
Third, pay attention to colors. If the composition is mostly one color, that can often work well in black and white, as the image is already monochrome. Also, watch for contrasting colors, as that will give you more options when adjusting the color mixes when processing the images. More on that shortly.
It can be hard to visualize what the composition will look like when rendered in black and white, but with practice, that skill tends to develop over time. If you have a mirrorless camera, you can get a head start on visualizing your images in black and white by changing your film simulation or similar to “black and white” and your viewfinder and screen preview will be in monochrome. If your image is saved as a RAW file, when viewed in software on your computer you will still see a color image, as the film simulation information is an “overlay” of information added to the original image.
Speaking of software, processing your image will be a large part of creating your final black and white image. There is a lot more to processing a black and white image than just clicking on the “black and white” button and calling it good. Once you have converted a photo into black and white, the next step is to work on contrast and there are many ways to do this with most software. I use Lightroom Classic, but most software will have similar, or analogous control options.
Generally, I’ll start by increasing the contrast control directly -- usually, quite a bit and more than I would for a color image. Next, I will adjust the bright tones (highlights and whites in Lightroom) and the dark tones (shadows and blacks in Lightroom) to work with the original tones in the image.
There are two more ways to adjust contrast with software. In Lightroom, they are the effects controls and the color mix controls. Effects controls include Texture, Clarity, and Dehaze. Each of these will add varying amounts of detail and texture to your image, and the way they do this is by adjusting contrast. I tend to add a fair bit of Texture, a bit less Clarity, and then just a tiny amount of Dehaze. Your mileage will vary depending on your specific photos. The Color mix controls are similar to color filters used in film cameras to adjust the exposure of varying colors in film photos. For example, by adjusting the Color Mix of “Blue” in a photo with lots of sky, you can adjust the exposure (brightness) of the sky in your photo.
I hope you’ll give black and white photography a try, again or for the first time. It’s such a powerful way to view your compositions in a different way, and I hope you will find it helps you grow in your photography skills.
About the author: Michael Sladek teaches digital photography at Highline College near Seattle, Washington. He enjoys dad jokes, doughnuts, and helping others discover the fun of creating photos they love. Stay connected with Michael on his website, YouTube channel, and Instagram.
#educational #tips #blackandwhite #composition #compositiontechniques #compositiontips #michaelsladek #photographypractice #photographytip #practice #skills


Photography Composition Tip and Assignment: The Rule of Thirds
If you ever had an art history, drawing, graphic design or photography class, then you’ve probably learned about the “rule” of thirds as a composition technique to use in creating more interesting photos. Or, as I prefer to call it, the “suggestion” of thirds. More about that later.
This is part four in a series of videos about composition tips based on assignments I use with Introduction to Photography students at Highline College near Seattle, Washington. Read parts one, two, and three here.
What is the rule of thirds, and why is it such a big deal?
First, the rule of thirds is a way of organizing subjects in a photo and is a method of arranging content that divides the frame into a three-by-three grid of nine equal-sized boxes that create guidelines for the content. Using these guides, the content is arranged to align with a vertical or horizontal grid line on one of the thirds. For maximum impact, the main focal point of the image is aligned at one of the 4 intersecting points of the grid lines.
Second, the rule of thirds is a big deal because… it works.
Mostly.
The rule of thirds works because it scratches an itch in our brains that seems to instinctively enjoy content that has been arranged in thirds. It can help suggest hierarchy, it can help create structure, and it can help suggest motion or activity. But it is a composition technique that is not enough by itself and that needs a lot of help from an interesting subject and light. Often, I will combine the rule of thirds alignment with an interesting perspective or get closer to the subject to create a more interesting composition.
Examples of using the rule of thirds include:
- Landscape photos with the horizon placed at top third (when the foreground is more interesting) or at bottom third (when the sky or are elements above the horizon are more interesting)
- Portrait photos where the subject’s closest eye is arranged to align with one of the four intersections of the grid lines
- Product photos where the product is placed on left (or right third) in the foreground, with background element(s) placed in opposite third and background
Using the rule of thirds is a great compositional technique to use to start better arranging the content in your photo. It is easy to use (turn on the grid lines in your camera viewfinder as a nifty aid) and it allows for many different layout options within a given scene. If you’re not sure whether to use left third, right third, top third, or bottom third, try them all and see which works best for the story you’re creating with the photo.
But, as with all art and all rules, sometimes rules should be ignored or at least viewed as merely suggestions and guidelines. I tend to lean more to the idea of "rule of thirds-ish" in my compositions and lately, I’ve been trending towards preferring more center-aligned and symmetrical compositions. It’s likely that your compositional preferences will change over time. Additionally, using a “rule” or any layout technique that does not work well with your intended story should be avoided.
Assignments like this give a framework and a general direction to your photo session. They hopefully create just enough structure in which you can feel like you have a starting point for creating photos. Think of it like being given a topic for a short story, rather than “write about whatever you want…”
Here is the assignment:
- Over the next week, create photos utilizing the rule of thirds layout grid.
- Keep it simple and local so there are fewer excuses not to create photos. I did mine mostly around my condo.
- Try to do two tp three sessions of 15 minutes or more each.
- Select and edit five to ten of your favorite photos.
Think of these assignments as visual exercises and ways to develop your skills. Just as an athlete trains for their sport, it will help us to exercise our eyes and minds around the process of creating photos. This means that some photo sessions will be more “productive” from a keeper photo perspective, but all of the photo sessions will have the benefit of time spent creating images and practicing this craft.
About the author: Michael Sladek teaches digital photography at Highline College near Seattle, Washington. He enjoys dad jokes, doughnuts, and helping others discover the fun of creating photos they love. Stay connected with Michael on his website, YouTube channel, and Instagram.
#educational #tips #assignment #composition #homework #michaelsladek #photographypractice #photographytip #practice #ruleofthirds #skills


Photography Composition Tip and Assignment: Get Closer
The goal of most photography compositions is to create an image with a clear and distinct subject that creates interest for the viewer. There are many ways to create interest in a photo, but one of my favorites, and one of the easiest to accomplish, is to get closer to the subject and fill most or all of the frame.
This is part three in a series of videos about composition tips based on assignments I use with Introduction to Photography students at Highline College near Seattle, Washington. Read parts one and two.
There are several powerful things that happen in your image when you get closer to your subject. First, when you fill the frame with the subject, there’s less room for distracting background elements. Second, when you get closer, the subject can become more abstract and an interesting collection of textures and details, rather than a specific object. Third, when you get closer to your subject, you’re increasing the relative distance to the background, which will make any background elements less in focus. Fourth, getting closer has the potential to create a sense of intimacy and connection with your subject.
A technique I’ll use often is to get closer to a detailed portion of a subject, when a photo of the whole subject would be less interesting due to elements around it. An example of this is at car shows: there are lots of amazing and interesting subjects, but there’s no way to photograph an entire car without including other cars, people, reflections, and distracting background elements.
How close is close enough?
My suggestion and preference is to get as close as physically possible and still have my lens be able to focus on the subject. How close is that? It depends; in this type of photography you’ll be dealing with the minimum focusing distance for your lens. For most camera lenses, that distance is anywhere from six inches to two feet. This means, if you are closer to your subject than the lens’s minimum focusing distance, your subject will be out of focus.
If you find you really enjoy close-up photography, you might consider a macro lens, which has the ability to focus very close and produce images at one-to-one size or more. These specialized lenses can be expensive ($400 - thousands of dollars), but there is another option! My less expensive choice is to use extension tubes, attached to the back of any of my lenses, to achieve the ability to focus more closely. Extension tubes are usually less than $100 for a set. The more tubes you add between the lens and the camera, the closer you will be able to focus. It will take some experimenting to see which lens of yours works best.
Once your subject fills the frame, and the details are magnified, everything in the frame will be magnified. This includes motion in your subject (flowers in the breeze) or motion while holding the camera. Here’s some tips to help with that:
- For motion in the subject or from the camera - choose a shutter speed of 1/250 or faster. Use burst mode (multiple photos taken quickly with one shutter press) and take photos for a second or two. Also, turn on lens and/or camera image stabilization. Using a tripod will help even more.
- When the shutter speed is slower (longer duration) than 1/250 second - use a tripod.
- When the shutter speed is slower (longer duration) than 1/15 second - use a tripod and a remote shutter release (or self-timer) to avoid mitten in the camera from pressing the shutter button.
- Depth of field (what’s in focus) will be very shallow, so suggest using an aperture of at least f/8-f/11.
Assignments like this give a framework and a general direction to your photo session. They hopefully create just enough structure in which you can feel like you have a starting point for creating photos. Think of it like being given a topic for a short story, rather than “write about whatever you want.”
Here’s the assignment:
- Over the next week, create photos getting close to the subject and (mostly) filling the frame with your subject
- Keep it simple and local so less excuses not to do it. I did mine mostly around my condo…
- Figure out the minimum focusing distance for your lens(es). For zooms, check at several points in the zoom range as minimum focusing distance will likely be different at different focal lengths
- Try to do 2-3 sessions of 15+ minutes each
- Select and edit 5-10 favorite photos
Think of these assignments as visual exercises and ways to develop your skills. Just as an athlete trains for their sport, it will help us to exercise our eyes and minds around the process of creating photos. This means that some photo sessions will be more “productive” from a keeper photo perspective, but all of the photo sessions will have the benefit of time spent creating images and practicing this craft.
About the author: Michael Sladek teaches digital photography at Highline College near Seattle, Washington. He enjoys dad jokes, doughnuts, and helping others discover the fun of creating photos they love. Stay connected with Michael on his website, YouTube channel, and Instagram.
#tips #tutorials #assignment #composition #homework #michaelsladek #perspective #photographypractice #photographytip #practice #skills


Photography Composition Tip and Assignment: Interesting Point of View
What do you think are the two least used, and probably most important, pieces of your photography gear? I’ll give you a hint: you can’t buy them at a camera store.
This is part two in a series of videos about composition tips based on assignments I give to Introduction to Photography students at Highline College.Click here to read the first tip, "Embrace Repetition."
In my experience, the two least used pieces of photography gear are our arms and legs. It’s easy to stand in one spot and use the zoom. It’s easy to forget to look up or down. It’s easy to be satisfied with the first or second good enough photo and not create the fantastic photo that may be just a step or turn of the head away.
What’s so special about using our arms and legs to create interesting points of view for our cameras? Interesting perspectives provide us new and unique views of subjects that differ from the way we see the world at our normal standing height and head angle. Subjects look dramatically different from radical viewpoints above or below, and therefore can be transformed from ordinary into interesting. Using interesting perspectives on ordinary subjects is one of my favorite ways to take photos because I can create photos almost anywhere at almost any time, and not rely on light or location to build interest.
I really became aware of the power of interesting perspectives about 10 years ago. My son was completing his senior project in photography, and I noticed that he intuitively was laying down on the ground, kneeling, looking up vertically, and finding interesting places to place the camera in his compositions.
By doing this, he was creating interesting photos of ordinary subjects through the strength of the interest created by the camera point of view. I often remind students that the camera gives you permission to look at the world in ways you never would with your eye. One way to know you’re likely creating an interesting point of view is if you’re a little (or a lot) dirty, sweaty, or achy.
Below are some examples of interesting points of view to try.
- Look up
- Look down
- Get low - use your legs!
- Get above - use your arms. Or a ladder. Or a drone.
- Wide-angle (less than 18mm) - exaggerate sizes, shapes
- Telephoto (200mm+) - compress distance
- Macro
- Get to the “eye-level” of your subject
- Basically, avoid the viewpoint of normal standing height (You can get away with this ordinary point of view when the subject and light are bringing most of the interest)
Assignments like this give a framework and a general direction to your photo session. They hopefully create just enough structure in which you can feel like you have a starting point for creating photos. Think of it like being given a topic for a short story, rather than “write about whatever you want.”
Here is the assignment:
- Over the next week, create photos using an interesting point of view
- Keep it simple, local so less excuses not to do it.
- Try to do 2-3 sessions of 15+ minutes each
- Select and edit 5-10 favorite photos
- Share to your favorite social channels
Think of these assignments as visual exercises and ways to develop your skills. And, when you’re creating interesting points of view, it can also be physical exercise. Just as an athlete trains for their sport, it will help us to exercise our eyes and minds around the process of creating photos. This means that some photo sessions will be more “productive” from a keeper photo perspective, but all of the photo sessions will have the benefit of time spent creating images and practicing this craft.
About the author: Michael Sladek teaches digital photography at Highline College near Seattle, Washington. He enjoys dad jokes, doughnuts, and helping others discover the fun of creating photos they love. Stay connected with Michael on his website, YouTube channel, and Instagram.
#tips #tutorials #assignment #composition #homework #michaelsladek #perspective #photographypractice #photographytip #practice #skills


Client Info
Server: https://mastodon.social
Version: 2025.07
Repository: https://github.com/cyevgeniy/lmst