#TransformElement

2025-06-10

Display Product and Price Book Entry Fields in the Same Flow Data Table

The Salesforce Flow Data Table component is a powerful screen element that allows users to view and interact with records in a structured, spreadsheet-like format within a Flow. It supports features like record selection, sorting, and filtering, making it ideal for building guided user experiences. For example, in a product selection use case, a sales rep can launch a Flow that displays a list of products retrieved from the Product2 or PriceBookEntry objects. Using the data table, the rep can easily compare options and select multiple products to add to an opportunity, all within a single, streamlined Flow screen.

The data table component has been added to Salesforce based on the success of Eric Smith’s open source data table component published on UnofficialSF. The out of the box component is still not as powerful as the unofficialSF sibling.

In this post, I will show you how I leveraged the transform element inner join functionality to bring together Product2 or PriceBookEntry field values which I showed in the unofficial SF data table component.

The inner join functionality is a powerful one. It falls short of its full potential, because flow builder does not offer a way for us to generate custom data types to hold the information we bring together.

I created a placeholder Apex-defined data type which I used on the output side of the transform element. The unofficial SF data table supports the display of Apex-defined collection data. Leveraging this functionality, I brought the field values of both Product and Price Book Entry objects for the user to make an informed product selection.

🚨 Use case 👇🏼

User will select products and add them to the opportunity record. When making the selection, user should be able to see product information and price book entry information from the selected price book on the same row: Product name, code, family, description and unit price.

Apex-Defined Data Types in Flow

Apex-Defined Data Types allow developers to create custom, structured objects in Apex that can be used as inputs and outputs within Flow. These types enable more complex data handling than standard Flow variables, supporting multiple fields, including nested data, within a single variable. For example, you might define an Apex class that bundles together a product’s name, price, discount, and inventory status, then use it in a Flow to display custom pricing logic or pass structured data between Flow and Apex actions. This approach enhances flexibility and scalability when building advanced automation.

The key to defining an Apex-defined data type available for flow is the @AuraEnabled annotation in the Apex class. Once you write an Apex class that defines the fields in the Apex-defined object and deploy it to production, you don’t need to do anything in the flow builder to make this data type available in flow. In the areas where and Apex-defined resource selection is allowed, the new data type will be accessible.

I decided to create an Apex-defined data type with various multiple fields that I can use in the flow builder. The fields I generated are:

  • 4 strings
  • 2 numbers
  • 2 currency fields
  • 1 boolean (checkbox)

Here is the simple (the name says complex, but it is simple) Apex code that does the trick:

/** * ComplexDataCollection - Apex-defined data type for Salesforce Flow */public class ComplexDataCollection {        @AuraEnabled    public String string1 { get; set; }    @AuraEnabled    public String string2 { get; set; }    @AuraEnabled    public String string3 { get; set; }    @AuraEnabled    public String string4 { get; set; }    @AuraEnabled     public Decimal number1 { get; set; }       @AuraEnabled    public Decimal number2 { get; set; }       @AuraEnabled    public Decimal currency1 { get; set; }        @AuraEnabled    public Decimal currency2 { get; set; }     @AuraEnabled    public Boolean boolean1 { get; set; }  }

You will need a test class to deploy this code to production. That should be easy especially with the help of AI, but let me know if you need me post the test class.

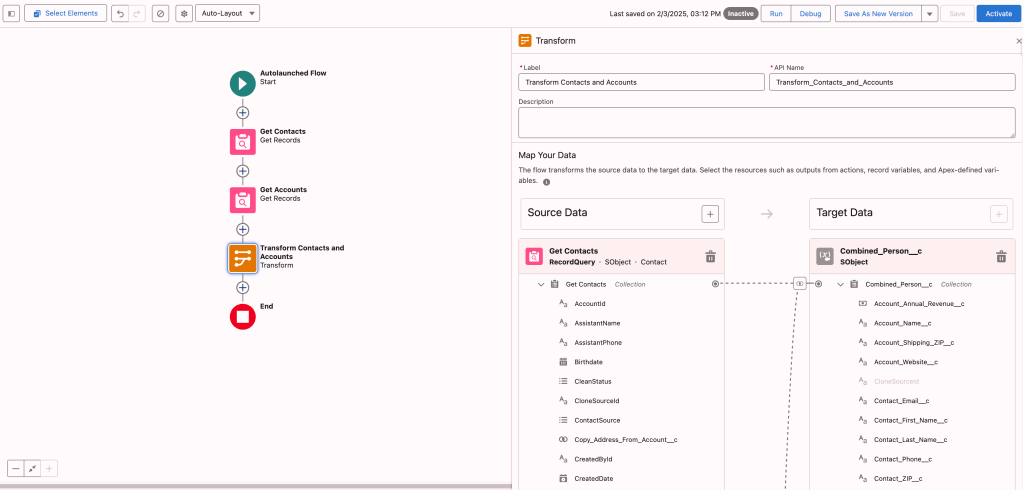
Transform and Join Product and Price Book Entry Field Values to Populate the Apex-Defined Data Type

Follow these steps to prepare your data for the data table component:

  1. Get all the Price Book Entries for one Price Book.
  2. Get all the Products in the Org (limit your get at 2,000 records for good measure).
  3. Join the two collections in the transform element using the Product2 Id.
  4. Map the fields from source collections to the Apex-defined data type.

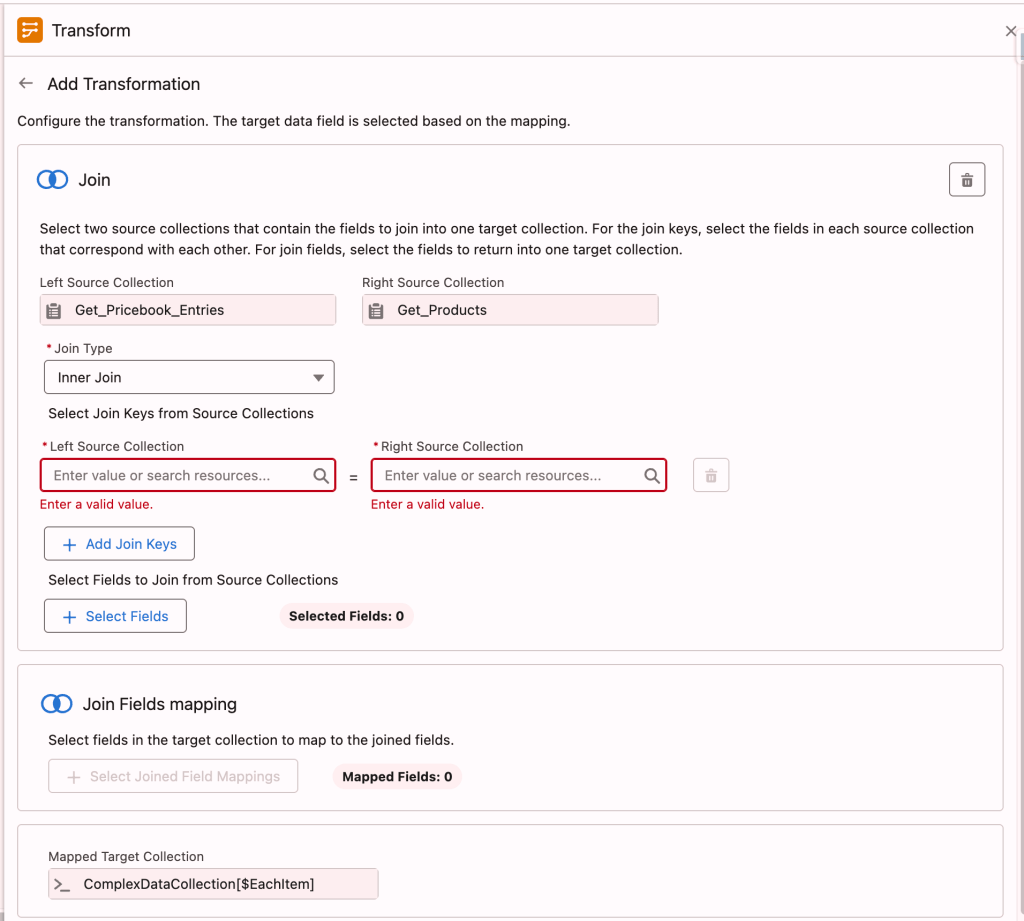
Here is more detail about the transform element configuration:

  1. Add the transform element.
  2. Add the price book entries collection from the get element on the left side.
  3. Add the product collection on the left side.
  4. Add an Apex-defined collection on the right side. In my case this is called “ComplexDataCollection“. Search by name. Make sure you check the collection checkbox.
  5. Click on the first collection on the left side at the top collection level (not next to the individual fields). Connect this to the collection on the right side. You will see instructions for inner join.
  6. Click on the second collection on the left side. You should see a join configuration screen. Configure your join. More instructions will follow.

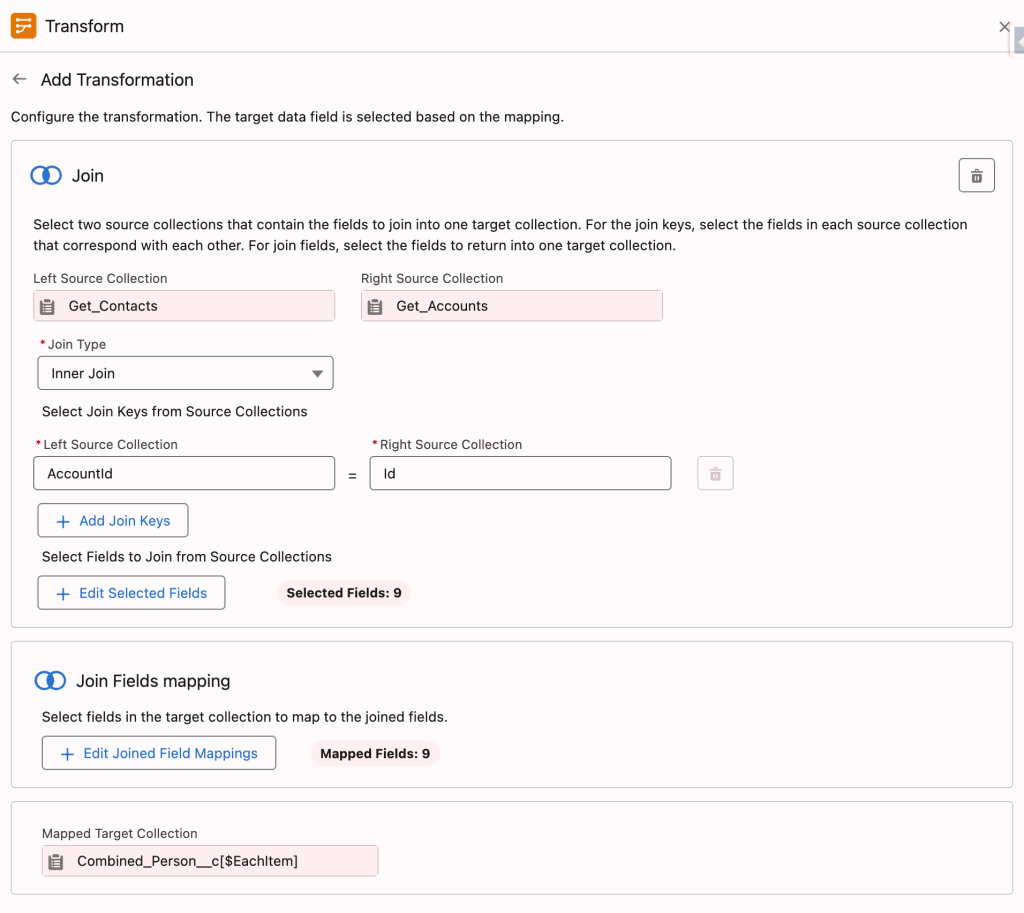
Configure your join:

  1. Left source and right source order does not matter for inner join. Select both collections on the left side.
  2. The join key will be Product2 on the PriceBookEntry and Id on the Product2.
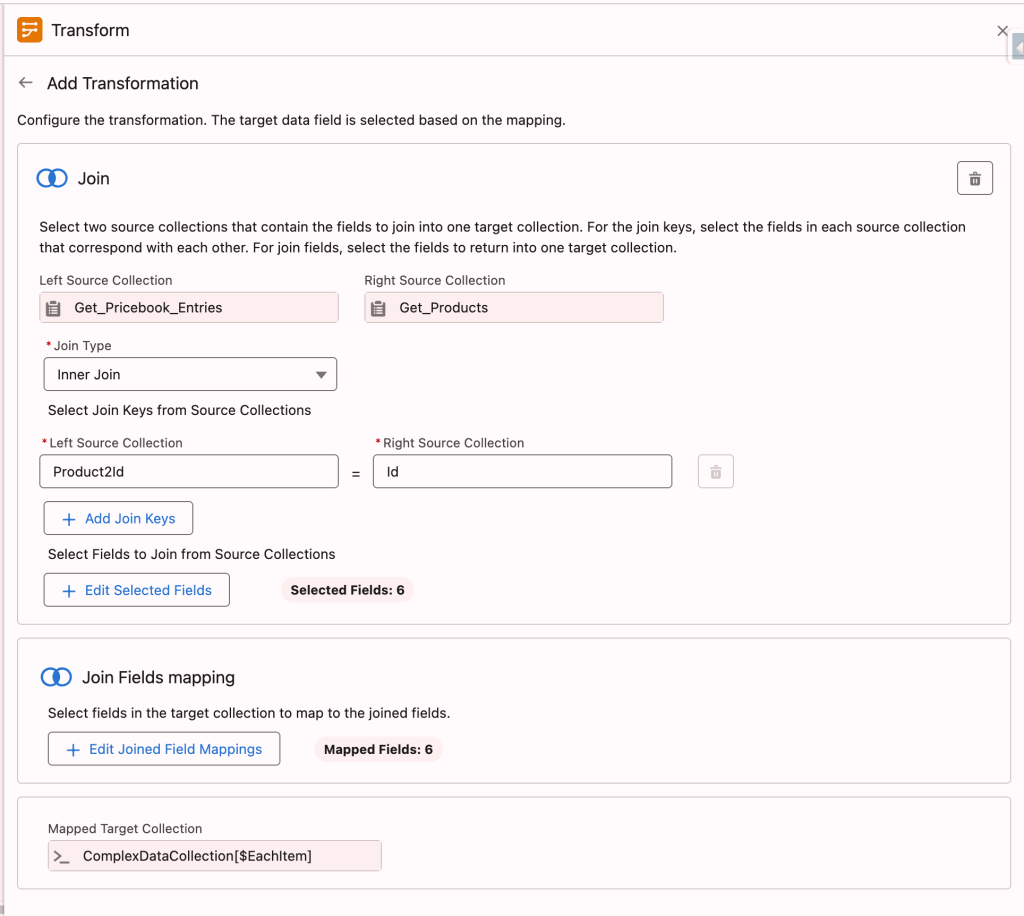
  3. Select the fields you want on the output. For me these are: Name, ProductCode, UnitPrice, Family, Description. I added also isActive which I did not end up using in the data table.
  4. Map these to your Apex-defined object fields: string1 through string4, currency1 and boolean1 (if you want isActive).

Your configured transform join should look like the screen image below.

Prepare the Apex-Defined Object Data for the Data Table

UnofficialSF data table supports Apex-Defined objects, but requires that the input is serialized. The data table cannot process Apex-Defined collection data as input. It expects a JSON format. More on that is available on Eric Smith’s post HERE.

To achieve this, you can either leverage Apex, or so the processing in flow. I tried both ways, and both methods works. Flow method requires looping.

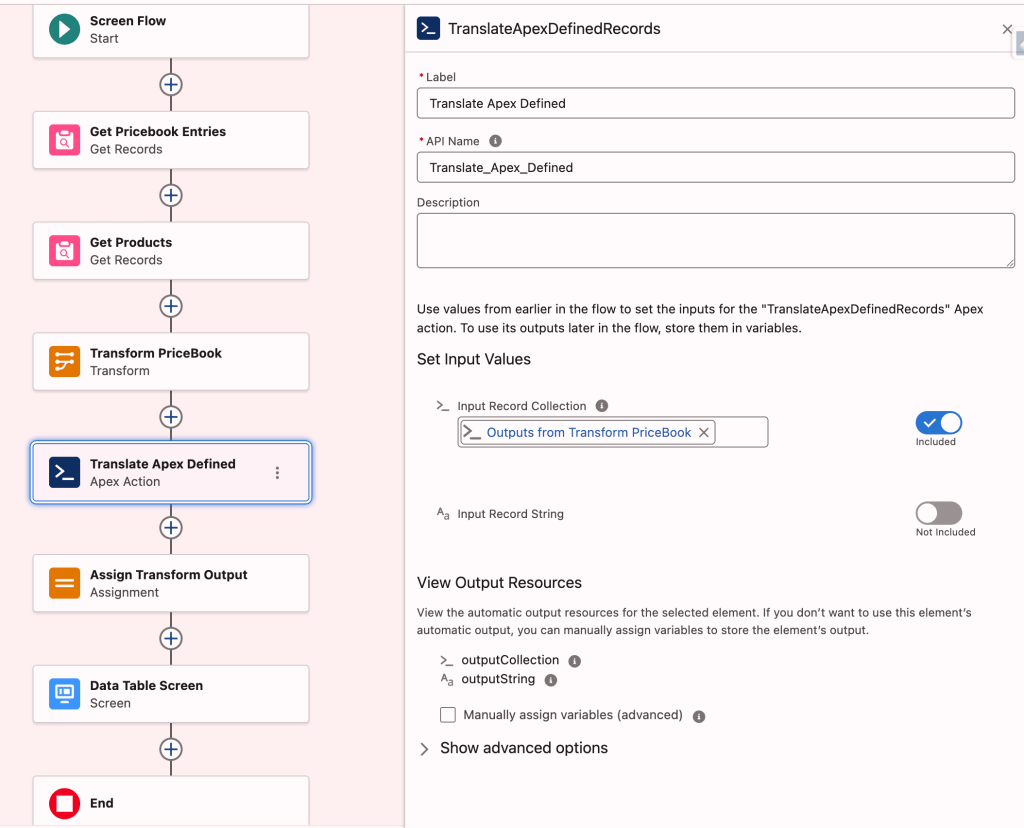
Here is the Apex code for the invocable action that serializes the data:

/**  *  *  Sample Apex Class Template to get data from a Flow,  *  Process the data, and Send data back to the Flow *  This example translates an Apex-Defined Variable  *  between a Collection of Object Records and a Seraialized String *  Eric Smith - May 2020 * **/ public with sharing class TranslateApexDefinedRecords {         // *** Apex Class Name ***    // Attributes passed in from the Flow    public class Requests {            @InvocableVariable(label='Input Record String')        public String inputString;        @InvocableVariable(label='Input Record Collection')        public List inputCollection;     // *** Apex-Defined Class Descriptor Name ***    }    // Attributes passed back to the Flow    public class Results {        @InvocableVariable        public String outputString;        @InvocableVariable        public List outputCollection;    // *** Apex-Defined Class Descriptor Name ***    }    // Expose this Action to the Flow    @InvocableMethod    public static List translateADR(List requestList) {        // Instantiate the record collection        List tcdList = new List();    // *** Apex-Defined Class Descriptor Name ***        // Prepare the response to send back to the Flow        Results response = new Results();        List responseWrapper = new List();        // Bulkify proccessing of multiple requests        for (Requests req : requestList) {            // Get Input Value(s)            String inputString = req.inputString;            tcdList = req.inputCollection;// BEGIN APEX ACTION PROCESSING LOGIC            // Convert Serialized String to Record Collection            List collectionOutput = new List();   // *** Apex-Defined Class Descriptor Name ***            if (inputString != null && inputString.length() > 0) {                collectionOutput = (List)System.JSON.deserialize(inputString, List.class);    // *** Apex-Defined Class Descriptor Name ***            }            // Convert Record Collection to Serialized String            String stringOutput = JSON.serialize(tcdList);// END APEX ACTION PROCESSING LOGIC            // Set Output Values            response.outputString = stringOutput;            response.outputCollection = collectionOutput;            responseWrapper.add(response);        }        // Return values back to the Flow        return responseWrapper;    }}

Please note that this code refers to the name of the first Apex class. If you change the name, you will need to replace the references here, as well. Source: Eric Smith’s Blog.

See how the action will be used and configured in the image below.

Data Table Configuration

Here is how you configure the data table for this data:

  1. Give your data table and API name
  2. Scroll down to the advanced section and check the checkbox titled Input data is Apex-Defined.
  3. Add the string variable you used to assign the value of the translate action output to Datatable Record String.
  4. For the required unique Key Field input use the string that has the product code. For me this is string2.
  5. To configure Column Fields add string1,string2,string3,string4,currency1 there.
  6. Add 1:Name,2:Code,3:Description,4:Family,5:Price for Column Labels.
  7. Configure Column Types by adding 1:text,2:text,3:text,4:text,5:currency there.

Once completed, you should see a similar output to this image below.

Conclusion

While this example illustrates the way Apex can boost the capabilities of flow, it is very cumbersome to set up this solution to leverage Apex-defined data types in the flow builder and in the data table.

This was more of an experiment than a solution I will use frequently.

If you don’t want to write code, you can easily create a custom placeholder object to achieve a similar result with the out of the box data table component.

I look forward to having this functionality built into the flow builder in the coming releases. I hope Salesforce product teams will prioritize this.

Explore related content:

How to Use the Data Table Component in Screen Flow

Send Salesforce Reports and Dashboards to Slack with Flow

How to Use the Repeater Component in Screen Flow

#DataTable #InnerJoin #Salesforce #SalesforceAdmins #SalesforceDevelopers #SalesforceTutorials #TransformElement

Display Product and Price Book Entry Fields in the Same Flow Data TableTransform Inner Join ConfigurationCompleted Transform Join ConfigurationTranslate and Serialize Action
2025-02-04

Transform Element Now Supports Join Collections

With the Salesforce Spring ’25 release, a new feature has been introduced for flow builders: the ability to join collections using the transform element. This functionality opens up new possibilities for combining related data in flows. It is now easier to analyze and present information in a structured way. For many flow builders, especially those who haven’t worked with joining collections before, this might seem like a complex new tool. But it allows users to merge datasets based on related keys or conditions, without needing to manually write complex logic or loops. Cool, right?

In this blog, we’ll dig into how this new feature works, the types of joins available, and how the transform element simplifies the process of joining collections. As described in the release notes, users can now combine source collections from related flow resources into a target collection. This could be particularly useful when you need to combine data from Salesforce with external systems, such as merging order records to create a more comprehensive view of customer transactions. The result? A single, unified dataset that can be displayed in a flow screen!

To grasp how this functionality works and how it can be applied, we’ll first explain the concept of join collections and what an INNER JOIN means. Then, we’ll explore a practical use case that demonstrates this new functionality in action.

Join Collections

Join functionality in collections allows you to combine data from two or more datasets based on a related key or condition. This makes it easier to analyze and correlate information. The most common types of joins are INNER JOIN, LEFT JOIN, and RIGHT JOIN. An INNER JOIN returns only the records that have matching keys in both collections, focusing solely on the intersection of datasets. A LEFT JOIN returns all records from the left collection and matches from the right collection, filling in NULL for non-matching right-side data. Conversely, a RIGHT JOIN returns all records from the right collection and matched records from the left, with NULL for any unmatched left-side data. This functionality is essential for tasks like merging customer data with transaction records, identifying missing information, and ensuring comprehensive reporting in data processing workflows. For now, the transform element only supports INNER JOIN.

Transform Element

Many of you will remember from my other posts, that the transform element is a welcome recent addition to the flow arsenal. It helps us to save loops, and makes many operations easy.

The transform element is a powerful tool that allows you to map and manipulate data between different data structures without needing complex logic or additional steps. It enables users to take data from one source, such as a record, collection, or variable, and reshape or reformat it to match the structure required by another destination, like a different object or variable. This includes mapping fields directly, applying formulas to modify values, and even handling nested data for more advanced scenarios. By simplifying data manipulation, the transform element reduces the need for multiple assignments or loops. This makes flows more efficient, easier to maintain, and visually streamlined. It’s particularly useful when integrating data between related objects or preparing data before updates or creation in Salesforce.

Essentially, transform element processes one or more collections on the source side. It outputs variables, or collections on the output side. Transform element can also process Apex defined variables, which are custom structures that are similar to custom objects, but can be generated by code or integrations.

The transform element can now take two source collections and use join keys to produce an inner join. This resulting collection includes field values from both source collections. This functionality is especially useful, when you have an Apex defined collection variable you need to send the data to as an output. This custom variable structure can not be defined and produced within the flow canvas, so far.

Combine Collections with Inner Join

Let’s follow a use case to see how this functionality works.

🚨 Use case 👇🏼

Let’s say I would like to combine Account fields and Contact fields joining the two collections using the AccountId and produce an output similar to person account.

Since I cannot create an output structure using flow builder for this use case, I created a custom object to store the results. In a normal business scenario, this would generally not make sense.

Follow the build for demonstration purposes:

  1. Create a custom object to hold a few field values from the contact and a few from the account.
  2. Create an autolaunched or screen flow.
  3. Add a get element to get the contacts in your dev org.
  4. Add a get element to get the accounts in your dev org.
  5. Add a transform element to create the join.

🔥 Bonus

If you have too many accounts (limit = 2,000), add a limit to your gets to avoid error. You could use the assignment element with equals count operator. This will allow you to see the count of records in source and output collections.

To build out this element, configure the join keys for each source collection (contacts and accounts). Then, select the join fields to return into the target collection (combined person custom object).

An INNER JOIN with multiple keys combines two source collections based on matching key pairs. You must ensure that all specified key pairs match for a record to be included in the result. This is called a composite key join, and it is ideal for complex data relationships. It’s useful when a single key can’t uniquely identify or relate records. In this case, we will use a single key.

Output Collection

Transform element only supports inner joins as this point, so left vs. right source selection doesn’t matter. However, the selection will matter once Salesforce expands the functionality beyond inner joins.

This element will produce one row of data for each contact that has an AccountId in the Account lookup. Output excludes contacts without accounts and accounts without contacts, focusing only on matched records.

Conclusion

This is yet another transform functionality that saves us loops. We can combine field values from two related collections, and output a single collection without having to loop.

The transform element is mainly designed to address integration use cases efficiently. This functionality will be especially useful for processing integration response data that is structured in an Apex-defined variable type.

Explore related content:

6 Things You Can Do With The Transform Element

How The Transform Element Saves You Loops

Transform Element and HTTP Callout for Random Test Data

The Orchestrator Vision

Collection Filter and Collection Sort Challenge

#Apex #LowCode #Salesforce #SalesforceAdmin #SalesforceDeveloper #TransformElement

Transform element join collections functionality combining contact and account fields.Transform Element Join Configuration Screen showing left and right join keys and fields.
2024-08-14

How The Transform Element Saves You Loops

Salesforce Flow Transform Element allows you to reshape data on the fly within your flow. Think of it as a tool that acts like a data transformer that adjusts, formats, and cleans up your data before it moves to the next step in your process. Transform Element gives you the superpower of applying formulas, performing calculations, or converting data into a different format that your flow or subsequent actions require.

With the Winter ’25 release, the transform element now supports primitive data types as well. This means you can start with a record collection, transform data, and update a text or a number collection.

The new functionality opens up a whole new area of applications for the transform element. First and foremost, you no longer need to loop each record in a record collection to extract just one field value.

Let’s say you want to update multiple records in one update element. Salesforce introduced the IN operator that you can use to specify which records will be updated. The use of the IN operator is very powerful, but it accepts a text collection of record Ids. And up until Winter ’25, the only way to populate this text collection from a record collection was by looping. Loops are no longer required.

Another helpful feature you can use is the “Add” operator in the assignment element. With “Add,” you can combine one text collection with another, allowing you to accumulate multiple text collections into one.

A Screen Flow Example

Let’s say you want to use the data table to allow the users to select multiple accounts for which they want to close all the open cases. You want to let them pick from the data table in multiple steps, adding all selected accounts to a single list of selected accounts. Once done and confirmed, you will close all open cases for all selected accounts in one shot.

Transform Instead Of Loop

Before Winter ’25, this solution required either looping or multiple update executions. With the new transform element, you can complete the whole operation in two SOQLs and one DML without looping.

Let’s Build This Flow Together:

  1. Start your screen flow.

2. Add a get to retrieve all the Accounts in your Org (For this example, I assumed there are less than 50K Accounts in the Org. Also bear in mind the data table limitations.)

3. Add a screen to show the Accounts to the user. Allow multi-selection and activate the search box.

4. Add a transform element and transform the selected records in the record variable to a text variable of Account Ids.

5. Add this text collection to another text collection you created that accumulates the final list of Accounts.

6. Add a screen with a toggle component that asks the user whether they finished selecting.

7. If the user hasn’t finished, send them back to the first screen. If they’re done, move on to the next step.

8. Get all Accounts where the Id is IN the text collection.

9. Show the user the final read-only data table of selected accounts. If they are OK, let them proceed to case closure by clicking next.

10. Add an Update element to close all cases where AccountId is IN the text collection.

11. Add a success screen to confirm the transaction has been completed.

Conclusion

You have successfully created a very efficient iterative UI experience. This method efficiently minimizes resource usage against Salesforce’s governor limits, making it ideal for record-triggered flows – as well as screen flows – where efficiency is crucial. Additionally, you can apply this approach to a list of cases to accumulate related recordIds without looping, such as with Contacts and Accounts.

If visual learning is more your style, check out this video tutorial 👇🏼

Explore related content:

Can You Use DML or SOQL Inside the Loop?

6 Things You Can Do With The Transform Element

How to Use the Repeater Component in Screen Flow

Integrating the New Flow Action Button From Summer ’24

#assignment #Collection #HowTo #Salesforce #ScreenFlow #Text #Transform #TransformElement #UI #Update #Winter25

Transform ElementTransform Element Configuration

Client Info

Server: https://mastodon.social
Version: 2025.04
Repository: https://github.com/cyevgeniy/lmst