From #PrimaryCurves to #SecondaryCurves for classic #IonicScroll
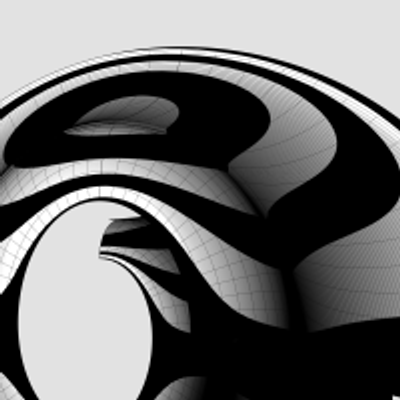
There's a lot to unpack in this diagram. For orientation, first note the 5 rectangles labeled M, N, P, Q, and R that we saw in https://pixelfed.social/p/Splines/792966507797633558, shown here in green.
The 6 blue curves are the primary curves we extracted from #imageScans in https://pixelfed.social/p/Splines/793169876757012827 and https://pixelfed.social/p/Splines/793215298082967733. The front ends of these blue primary curves are marked by points labeled F1 through F6, all of which make contact with the green rectangles of the scroll #scaffolding. The rear ends of the primary curves would be marked similarly by points R1 through R6, but they are not shown here to reduce clutter.
The orange points T1 through T5 mark where the large orange spiral is tangential to rectangles M and N. Point T6 marks the maxima for the second arm of the spiral, with the horizontal tangent shown in magenta.
In https://pixelfed.social/p/Splines/790571135473463588, I said that one way to think about #curveExtraction is to shine an imaginary bright light on an object from behind in a dark room to reveal its silhouette.
It is obvious that the blue primary curves that we extracted from image scans have NO contact with the orange spiral at any point. If you imagine shining a light on an object to #project its outline on a screen behind it, then it should also be obvious that no part of the object will be in contact with the projected outline.
So, here we are faced with the opposite problem. Instead of extracting the outlines from the #scroll, we want to recreate the scroll from the outlines that we extracted from image scans. We know the scroll exists because we can "see" its outline. Yet, like a visually-impaired person, we must "feel" our way to the scroll using the blue outlines as our #walkingStick.
Next, I show how we can feel our way around this scene to recover the secondary curves to reconstruct the scroll surface.
#curveExtraction

This shows macro-level measurements for the #IonicPedestal.
The key to #effectiveModeling is to simplify a complex shape into elementary components. Sometimes, this involves mentally flattening and reducing 3D shapes to 2D shapes, extracting elementary curves from them, and then recreating the 3D shapes from the extracted 2D curves.
This is not always easy for organic shapes (which can still be approximated by Bézier curves). I extracted the #primaryCurves for the #IonicScroll surface in https://pixelfed.social/p/Splines/789956327130679640 after a lengthy trial-and-error process that involved #curveFitting images from #Vignola’s book, #RegolaArchitettura. I had to #reverseEngineer the details because the measurements have either been lost, or are locked away in some library. Web search yields no details on these measurements.
Fortunately, for geometrical shapes like pedestals, this is very easy. Because of its square footprint, mentally slicing it through the middle from top to bottom, it is easy to “see” the outline. Another way to think about #curveExtraction is to shine an imaginary bright light on an object from behind in a dark room to reveal its silhouette.
For the pedestal, even this silhouette or outline can be further reduced because the shape is symmetrical about the #columnAxis. With this realization, we only need to focus on one half of the outline, and methodically proceed from bottom to top, marking every kink and inflection point on the outline.
Fortunately, the other authoritative book, #Scarlata’s #PracticalArchitecture, I mentioned in my introductory post already documents #VignolaProportions in tabular form. So we can skip everything else and go directly to that.
Total height of #IonicPedestal is 864 units (108 parts, or 6*µ) of which the #PedestalBasement and #PedestalCap are each 72 units (9 parts, or µ/2) and the #Dado is 720 units (90 parts, or µ*5) tall.

Client Info
Server: https://mastodon.social
Version: 2025.07
Repository: https://github.com/cyevgeniy/lmst