BMO

My friend shares with me interesting things he has discovered or created. Some of it is new to him, so he’s not very good at it, but I don't mind.

✍🏻 If you see a mistake, an error or a typo, feel free to correct me!

2024-10-02

@steele In many other areas, you can suggest that in order to learn, you go and look at what other people have done. It’s a bit tricky with SVG, because very often everything would be converted to <path>’s, and those are inscrutable. But the beauty of SVG is that it’s a text file that describes shapes. I would actually suggest that you do this: smash some shapes together! :) How they relate to each other, what properties you can add to them (this is similar to CSS and can even be CSS). Then clips and masks. And with those you can basically do anything.

Unless you are more comfortable with visual stuff, then something like alternativeto.net/software/god would be a good place to start before diving into Inkscape or similar editors.

But you know how *you* learn better than I do, so you’ll figure it out, I have no doubt.

2024-10-02

@steele I’m glad you like it!

I opened the color icon from the omg.lol site in Inkscape. It felt a bit too complicated for a smaller size of icons that in PaperMod, so I decided to alter it a bit: make the face bigger and remove the cheeks. I also looked at some icons in PaperMod to see what properties they had. In the end, I needed it to fit into 24×24 and have 2px lines (strokes). So I shrunk the heart shape to fit 22×22 (it would be 24×24 with a 2px line, strokes are centered), then shrunk the eyes and mouth to whatever size I wanted, just to make it feel right. I saved it as optimized SVG and then did a bit of tinkering in the text editor: removing color, adding stroke property, like in PaperMod icons, that sort of thing. I also ended up changing the eyes to just two circles. A lot of it doesn’t have a hard and fast rule, you kind of learn what you can do and what feels right, I guess.

2024-10-02

@steele I’m not familiar with PaperMod, but I guess you should add this:

{{- else if (eq $icon_name "omglol") -}}
<svg xmlns="w3.org/2000/svg" viewBox="0 0 24 24" fill="none" stroke="currentColor" stroke-width="2" stroke-linecap="round">
<path d="m12 21.1c-1.6891 0-3.3781-0.6444-4.6669-1.9331l-4.4-4.4c-2.5775-2.5775-2.5775-6.7563 0-9.3338 2.4903-2.4903 6.4755-2.5746 9.0669-0.2527 2.5915-2.3218 6.5767-2.2375 9.0669 0.2527 2.5775 2.5775 2.5775 6.7563 0 9.3338l-4.4 4.4c-1.2887 1.2887-2.9778 1.9331-4.6669 1.9331"/>
<path d="m8.4878 13.677c1.6071 2.6225 5.4172 2.6225 7.0243 0"/>
<circle cx="8.5" cy="9.5" r="1"/>
<circle cx="15.5" cy="9.5" r="1"/>
</svg>

to `layouts/partials/svg.html`. And then activate it, just as you have activated others. Feel free to ask further questions!

2024-09-20

Revisiting #typograf for #KateEditor. It’s actually a lot easier than I made it before. So, install typograf-cli

npm install typograf-cli -g

In Kate, add External Tool.

Name: Typograf (or anything)
Executable: typograf (with `-g` installation flag, it should be in your $PATH)
Arguments: --stdin -c /home/andrew/.config/typograf/typograf.json
Input: %{Document:Selection:Text}
Working directory: empty
Mime types: empty
Save: none
Trigger: none
Output: Replace selected text
Editor command: typograf

`-c` is for a settings file if you want to change the default behavior. It really wants a full path for some reason, so no `~/`.

You can customize these to process the entire document, for example. But I just add a keyboard shortcut, and it does the magic on a selected text.

---

Bonus, in #micro you can add

"Alt-y": "command:textfilter typograf --stdin -c /home/andrew/.config/typograf/typograf.json",

to `.config/micro/bindings.json` for the same result.

---

github.com/typograf/typograf-c

Screenshot of an Edit Tool window, everything is explained in the post itself.
2024-08-26

Index (an alphabetical listing of items and their location) for #hugo.

In front mater of each post:

items:
- Name of a thing
- Name of another thing
- Etc.

Then in a list.html in layouts/map/ folder we create a dictionary:

{{ $mapItems := dict }}

{{ range .Site.RegularPages }}
{{ $mapDate := .Date | time.Format "060102150405" }}
{{ $mapLink := .Permalink }}
{{ with .Params.items }}
{{ range . }}
{{ $mapItem := . }}
{{ $mapUnique := printf "%s%s" $mapItem $mapDate }}
{{ $mapItems = merge $mapItems ( dict $mapUnique ( slice $mapLink $mapItem ) ) }}
{{ end }}
{{ end }}
{{ end }}

$mapUnique (item+date) makes each key unique, so two posts with the same item will not override each other.

And render it:

<ul>
{{ range $key, $value := $mapItems }}
<li><a href="{{ index $value 0 }}">{{ index $value 1 }}</a></li>
{{ end }}
</ul>

With more detail and a couple of unnecessary but nice additions: no-pe.netlify.app/index-for-hu

2024-04-19

metatags.io

Website that lets you preview and create metadata tags for sharing on social media. You can even turn it into a search for a quick test. In Firefox, bookmark the URL `metatags.io/?url=%s`, add a keyword, for example `mt`, and then in the address bar you can just add `mt` in front of an URL (mt example.com), hit Enter and that’s it!

#WebDev #MetaData #MetaTags #sharing

2024-02-20

Idea for a very simple icon for Nintendo Switch. Tried to come up with icons for other devices in the same style, but there is not enough resolution for that (would love to be proven wrong!). For example, Xbox Series X|S is just a black or white box 🤷

#NintendoSwitch #Icon #LowPoly #WIP

The icon consists of three diagonally placed boxes, the large black one representing the Switch’s body, and two smaller ones, blue and red, as Joy-Cons, the red one slightly raised in the way it’s often depicted in Nintendo’s imagery.
2024-01-26

With libnotify you can send notifications from your console (so basically from anywhere). But what wasn’t obvious to me was how to make them behave like other “real” notifications, i.e. appear in the KDE notification widget. Answer is, you need to add parameter -h "string:desktop-entry:org.kde.konsole". For example, you can create a notification with text “It’s done!”, title “Backup”, icon for warning and normal urgency like this:

notify-send "It's done" -a Backup -i dialog-warning -u normal -h "string:desktop-entry:org.kde.konsole"

gitlab.gnome.org/GNOME/libnoti

#KDE #notifications #libnotify

Screenshot of the notification described in the post.
2024-01-18

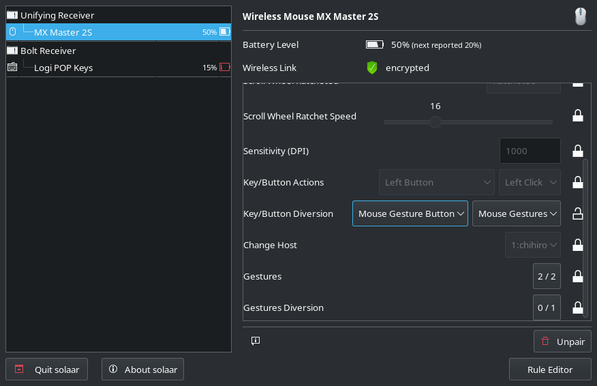
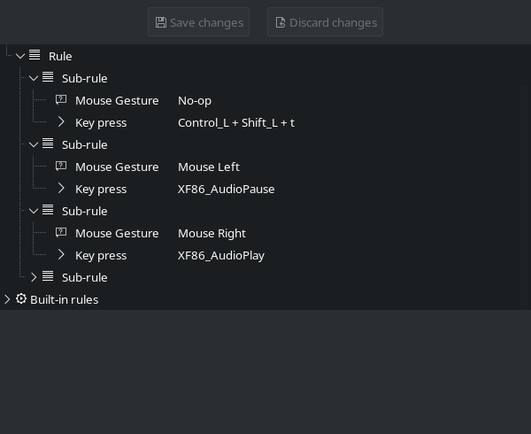
I finally figured out how to make gestures with my Logitech mouse in Solaar. First, you have to set a key to Mouse Gestures. Any button will do, but it has to be set to it, not Diverted. Then, in the Rule Editor, you make a rule with Condition set to Mouse Gesture, choose one of the 8 movements, and then add the desired action below it. If you delete the gesture, then it would work on that button press. So you can have 9 actions (8 movements + click) like this.

This helped: pwr-solaar.github.io/Solaar/ru

Still have no idea how to do the thumbwheel. 😕

#Solaar #Logitech #Logi

Main Solaar window showing Key/Button Diversion setting with Mouse Gesture Button set to Mouse Gesture.Solaar’s Rule Editor window showing three sub-rules for mouse gestures. The condition of the first one is set to No-op (so just click of the button), the second one to Mouse Left, and the third one to Mouse Right.
2023-11-09

SVG allows you to embed CSS.
CSS can detect dark mode.
Make your favicons in SVG!

Simple example:

<svg viewBox="0 0 16 16" xmlns="w3.org/2000/svg">
<style>
@media (prefers-color-scheme: dark) {
.r {fill: white}
}
</style>
<rect class="r" fill="black" width="16" height="16">
</svg>

#SVG #CSS #favicon #webdesign

2023-10-19

I am still trying to get my head around some of the features of #nushell. The best thing seems to be the ability to get data from one program and use it in another.

For example, “netsh” on Windows gives a bunch of information, then we just extract (“parse” and “get”) the IP from it and put it into the #hugo server command, so it will be available over the Wi-Fi.

“lanURL” just adds “http://” to the IP, so it is clickable for more convenience.

def HugoServer [?] {
let LanIP = netsh interface ip show address "Ethernet" | parse -r '(\d+\.\d+\.\d+\.\d+)' | get capture0.0
let LanURL = [ 'http://', $LanIP ] | str join
hugo server --bind $LanIP --baseURL $LanURL
}

The code is in the post itself.
2023-10-13

texteditor.com/character-modif

These things are fun, but as far as I understand, they do not work with screen readers (with at least two I have tried). I would not risk it.

#Accessability #ScreenReader

2023-09-25

Fate/Fudge 🎲Dice Roller in Nushell

def rollf [?] {
let dF1 = random integer (-1)..1
let dF2 = random integer (-1)..1
let dF3 = random integer (-1)..1
let dF4 = random integer (-1)..1
print "You rolled " ($dF1 + $dF2 + $dF3 + $dF4) " on 4dF (" $dF1 ", " $dF2 ", " $dF3 ", " $dF4 ")" --no-newline
}

> rollf
> You rolled -1 on 4dF (-1, -1, 1, 0)

#FateCore #FudgeDice #tRPG #Nushell

The code is in the post itself.
2023-09-25

Sometimes @alsorew does silly things for no reason.

Fate/Fudge 🎲Dice Roller in Powershell

function Fate-Dice-Roller {
$rollFateDie1 = -1, 0, 1 | Get-Random
$rollFateDie2 = -1, 0, 1 | Get-Random
$rollFateDie3 = -1, 0, 1 | Get-Random
$rollFateDie4 = -1, 0, 1 | Get-Random
$rollFateDice = $rollFateDie1 + $rollFateDie2 + $rollFateDie3 + $rollFateDie4
Write-Output "You rolled $rollFateDice on 4dF ($rollFateDie1, $rollFateDie2, $rollFateDie3, $rollFateDie4)"
}
Set-Alias -Name rollf -Value Fate-Dice-Roller

> rollf
> You rolled -1 on 4dF (0, 0, 0, -1)

#FateCore #FudgeDice #tRPG #PowerShell

The code is in the post itself.
2023-09-07

Some (most?) versions of #cron use 0 through 7 to represent days of the week, where both 0 and 7 are Sunday. That’s brilliant! If you think the week starts on Sunday, use 0; if you think the week ends on Sunday, use 7.

2023-09-06

The explanation of why the minus sign is important is very simple: the width of a minus sign is equal to the width of all digits, plus signs, equal signs, etc. So for people who use numbers a lot, it is easy to align them the way they want.

99−44−33−22=0
40+30+20+10=100

+0
−0 (minus)
=0
Nice column.

+0
-0 (dash)
–0 (en-dash)
—0 (em-dash)
=0
The “wave” of zeros.

2023-09-06

=IF(A1<0;"−"&A1*-1;A1)

It is silly that you have to do something like this to see an actual minus sign (−) and not a dash (-). En-dash (–) and em-dash (—) are also different things.

To explain a bit, you do your calculations in, say, Google Sheets, hide the result cell somewhere, and then put this formula where you want to see a result. A1 is the hidden cell.

#GoogleSheets #Typography

Client Info

Server: https://mastodon.social
Version: 2025.04
Repository: https://github.com/cyevgeniy/lmst