#Digispark

2024-11-22

Подключаем «крысу» от ЕС ПЭВМ к современному ПК

Приветствую всех! Этот шедевр советской компьютерной промышленности знаком любому интересующемуся компьютерной историей. А некоторые из тех, кому довелось с ним работать, называли его не иначе как «крысой». И вот спустя много десятилетий после его выпуска я задумался: а что, если подключить этот девайс к обычному компьютеру? Именно этим мы сегодня и займёмся. Итак, в сегодняшней статье поговорим про мышь от советского персонального компьютера ЕС1841. Узнаем, как заставить её работать и так ли она сурова, как можно подумать. Традиционно будет много интересного.

habr.com/ru/companies/timeweb/

#timeweb_статьи #ПК #ЕС_ПЭВМ #CGA #Intel #ЭВМ #GM6 #Apple #IDC #USB #Digispark #ATTiny85 #HID #arduino_pro_micro

2024-06-03

Welp it had to be. After failing to even get started with the , the , the piece of shit , the fuckin from , I gave in and bought two rpi2040. I spent today trying to figure out how to output a uart signal. I figured it out for 8 bit. But I learned that 9bit is something you can't do with Arduino X. So here I am doing what I didn't want to do... Gonna try a . Supposedly it can do . I highly doubt I will succeed.

2024-05-30

Their lousy documentation is phenomenal! is pissing me off. I'm just going to go find what other people have actually used successfully and use that. My never failed. never failed.

2024-05-30

It's almost here and I can't go on anymore. I'm exhausted. has never been this hard to use. I was trying to use a , then when I got it here and began reading about the "Arduino compatible" bullshit I find that it's another turd left to us by and their shit fucking shit microchip. I got those little wireless pieces of shit using the Kickstarter and they never worked. Now here I am again exhausted and with another brick set of shit chips.

Michal 🇨🇿michal@vltava.cloud
2024-02-09

Anti screen saver. It moves with mouse in loop.

#digispark #arduino

Digispark usb
GripNewsGripNews
2023-10-30

🌘 diziet | DigiSpark (ATTiny85) - Arduino, C, Rust, build systems
➤ 使用DigiSpark開發板時的經驗和困難
diziet.dreamwidth.org/16771.ht
這篇文章描述了作者在使用DigiSpark開發板時遇到的問題。作者嘗試使用Arduino IDE和C語言進行開發,但遇到了一些困難。最後,作者發現使用Rust語言可能是一個更好的選擇。
+ 我也遇到過類似的問題,使用Rust確實更方便。
+ 我一直在使用Arduino IDE和C語言,從未嘗試過Rust,也許我應該試試看。
systems

maruyukimaruyuki
2023-09-21

If you ever need a thingy, try , a tiny compatible board, rather than trying random proprietary products. You can achieve it & fully configure its behavior with a really simple program like this: gitlab.com/maruyuki/insomnia-d

2023-07-04

Quick look at the foot pedal I made for arting and farting. Used for the eraser mainly but I can remap it to anything based on context really. Looks like a hot mess but only on the inside. Note the telephone cable I used to extend usb lmao
I just used a little digispark board to send the F24 key to the pc, and then use autohotkey to remap that to anything I need

#DigitalArt #ArtTools #arduino #digispark #autohotkey #footpedal

Closeup of a cheap foot pedalCloseup of the guts inside of a cheap foot pedal. Featuring an Arduino board glued to the bottom and connected to a telephone cable
2023-04-06

"device with unknown new version of Micronucleus detected.This tool doesn't know how to upload to this new device. Updates may be available.Device reports version as: 2.2"

That's a really interesting error message. I'm getting that when I try to use my ATTiny88 on my Linux Mint laptop using the Arduino IDE .

Hmm.... This $2 SBC from China is proving most problematic! I'll probably give it another day or two before putting it in the box of problem devices which I'll probably go though in a couple of years when software has all caught up and rendered them useful.

To me, if it doesn't work pretty quickly then it's not worth more of my time as I could be spending that time on other devices that will work.

#attiny88 #digispark #linuxmint #sbc #cpp

2023-02-19

I don't know how many people still use #digispark for something. I still use this puppy a lot so I decided to give it an upgrade.

#Microcontroller

Have you heard about the Arduino Digispark?
It's a tiny microcontroller board that acts as a USB-RubberDucky alternative. Perfect for those who want to try out automated keystroke injections without buying a Hak5 Rubberducky.

#arduino #digispark

@makeratschool I love the #digispark ever since it was on Kickstarter.
It's perfect for all the small little things and with the on-board voltage regulator you can attach it to all kinds of power sources. Also, if you supply power through the 5V pin directly, the Attiny85 will work fine even down to 1.8V (on 4Mhz, 2.7V on 8MHz).
Just don't buy the ones with micro-/mini-USB plugs...

2022-09-02

Ich nutze für die @computertruhe und die Arbeit gerne einige -Platinchen von , um diese als Fake-Keyboards einzusetzen. Unter Linux gibt's hier keine Probleme, aber unter Windows braucht's hierfür zum einen einen Treiber, zum anderen zickt das OS gerne rum und erkennt die Teile dann einfach gar nicht mehr. Daher wäre ein USB-Stick interessant, der sich wirklich als Tastatur ausgibt. Gibt's hier etwas, das ähnlich preisgünstig ist wie ein Digispark?

2021-12-29

Build Your Own High-Temp Oven Thermometer

Looking to keep an eye on the temperature inside his wood-fired pizza oven, [Giovanni Bernardo] decided to skip the commercial offerings and build his own high-temperature thermometer using a type-K thermocouple. The end result is a no-nonsense handheld unit with a surprisingly low part count that, at least in theory, can read temperatures as high as 1023.75°C. Though we hope he'll be pulling the pizza out long before that.

Inside the 3D printed case we find just a handful of components. The 0.91″ OLED display mounted in the front panel is wired to a Digispark ATtiny85 development board, which in turn is connected to a MAX6675 breakout board. This takes the input from the thermocouple probe and converts it into a digital signal that can be read over SPI with an Arduino library from Adafruit. Rather than going through the added complication of adding a rechargeable pack, [Giovanni] is running this thermometer from a standard 9 V battery thanks to the 5 V regulator built into the Digispark.

We especially appreciate the attention to detail [Giovanni] put into his case design. Each component is nestled into a perfectly formed pocket in the bottom of the box, and he's even gone through the trouble of using heat-set inserts for the front panel screw holes. It would have been quicker and easier to just model up a basic box and hot glue his components in place, but he took the long way around and we respect that.

This project is another example of an interesting principle we've observed over the years. Put simply, if somebody is going through this much trouble to check an object's temperature, there's a higher than average chance they intend on eating it at some point.

#microcontrollers #toolhacks #digispark #ktypethermocouple #thermocouple #thermometer

image
2021-11-12

Low-Cost Computer Gesture Control with an I2C Sensor

Controlling your computer with a wave of the hand seems like something from science fiction, and for good reason. From Minority Report to Iron Man , we've seen plenty of famous actors controlling their high-tech computer systems by wildly gesticulating in the air. Meanwhile, we're all stuck using keyboards and mice like a bunch of chumps.

But it doesn't have to be that way. As [Norbert Zare] demonstrates in his latest project, you can actually achieve some fairly impressive gesture control on your computer using a $10 USD PAJ7620U2 sensor. Well not just the sensor, of course. You need some way to convert the output from the I2C-enabled sensor into something your computer will understand, which is where the microcontroller comes in.

Looking through the provided source code, you can see just how easy it is to talk to the PAJ7620U2. With nothing more exotic than a switch case statement, [Norbert] is able to pick up on the gesture flags coming from the sensor. From there, it's just a matter of using the Arduino Keyboard library to fire off the appropriate keycodes. If you're looking to recreate this we'd go with a microcontroller that supports native USB, but technically this could be done on pretty much any Arduino. In fact, in this case he's actually using the ATtiny85-based Digispark.

This actually isn't the first time we've seen somebody use a similar sensor to pull off low-cost gesture control, but so far, none of these projects have really taken off. It seems like it works well enough in the video after the break, but looks can be deceiving. Have any Hackaday readers actually tried to use one of these modules for their day-to-day futuristic computing?

#arduinohacks #peripheralshacks #arduino #digispark #gesturecontrol #i2c #sensor #usbhid

image
2021-11-01

Cherry Pomodoro Timer Forces You to Follow

If you have trouble staying focused and getting work done, the Pomodoro Technique of working in 25-minute intervals with 5-minute breaks is pretty hard to beat. The only problem is that it requires a lot of input from the user, and all that timer-setting can get in the way of actually getting down to business. The absolute worst is when you find yourself working hard, but see that forgot to set the damn timer (ask us how we know). In essence, the tomato itself can only do so much -- you have to actually use it and honor the timer, put in the work, and believe in the system.

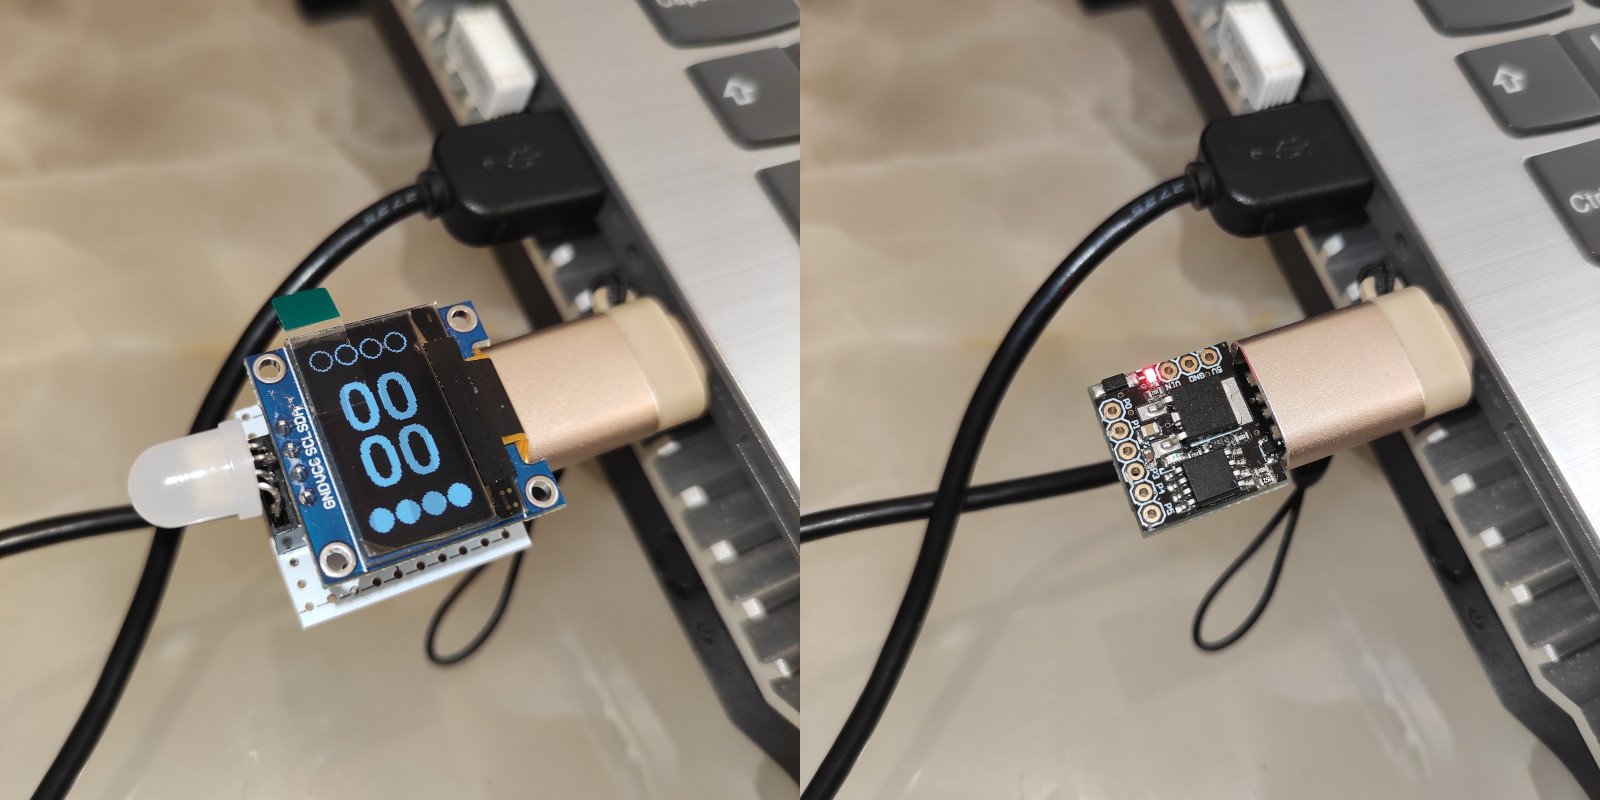
But what if you didn't have to do as much? With [Erfan Sn]'s design, all you have to do is plug it in to a USB port and the countdown starts automatically. Not only does this Pomodoro timer force you to get with the program, it also makes you take breaks from the screen by putting the computer into sleep mode when the 25 minutes (or whatever time you set in the software) are up. This thing even keeps track of your Pomodoro count.

At the heart of this build is the Digispark ATtiny85 dev board, which has a handy onboard USB plug. It can be built with or without the OLED screen, which is good if you are easily distracted by the timer itself. This cherry tomato only costs about $10 to make, it's tiny, and you can take it anywhere.

As you will see in the gifs on GitHub, [Erfan Sn] has it plugged into a female USB-A to male USB-C, which is probably better for the computer long-term, what with all the plugging and unplugging. When we make ours, we'll probably plug it into a hub that has power switches for each port.

If all of this sounds like too much work, check out this build that senses whether or not you're in the chair.

#attinyhacks #microcontrollers #attiny85 #digispark #oledscreen #pomodoro #thepomodorotechnique #timemanagement

image
2020-01-03

A little rainbow lamp I built between yesterday and today. #led #ws2812b #digispark

HashtagSecurity :verified:hashtagsecurity@infosec.exchange
2019-05-17

[friday video post (german)]

Im Anschluss an unser DigiSpark-Video, gibt es heute den Vergleich zwischen den beiden #Malduino Lite und Elite. Auch wenn das #DigiSpark im Grunde das gleiche kann, merkt man doch, dass die Malduinos weit komfortabler sind.

youtu.be/y4s_A3RG7aA

#pentest #hardware #youtube

HashtagSecurity :verified:hashtagsecurity@infosec.exchange
2019-05-10

weekly video post between all that other nonsense I'm posting.

[⚠️ company flavored & german]

Heute werfen wir einen Blick auf das #DigiSpark, eine kleine USB Platine, die sich gut für #Penetrationstests eignet. Die günstige Platine bietet sich für interessierte Einsteiger aber auch erfahrene #Pentester an.

youtu.be/kYBRofdY-Ms

#hardware #youtube #badusb #Sicherheit

Client Info

Server: https://mastodon.social
Version: 2025.04
Repository: https://github.com/cyevgeniy/lmst