I've found a neat VCO kit from #MitchElectronics that works nicely with my Synth Thing.
I've also hooked it up to my #Rakit8 #Baby8 sequencer.
Details here: https://diyelectromusic.com/2024/07/02/educational-diy-synth-thing-part-6/
I've found a neat VCO kit from #MitchElectronics that works nicely with my Synth Thing.
I've also hooked it up to my #Rakit8 #Baby8 sequencer.
Details here: https://diyelectromusic.com/2024/07/02/educational-diy-synth-thing-part-6/
My Educational DIY Synth Thing is meant to be a platform for experimenting and one easy way to get started on that is with the addition of some off-the-shelf audio and synthesizer-oriented electronics kits.
Optional additional things to try:
This post will collect together any kits I’ve bought that seem to work pretty well with my Synth Thing. I’ll come back and update it as I add more things I’ve found that work.
Important Note: In most cased I’ve just stumbled across these kits and bought them myself directly. I’ve not been asked to mention them or been sponsored in any way by the people who have made them. They are all just neat kits I’ve found that seem to work ok with my Synth Thing. No endorsement or fit for any purpose is implied. Other kits, I’m sure, are available! In fact feel free to drop me a note of any you know about in the comments. 🙂
Warning! I strongly recommend using old or second hand equipment for your experiments. I am not responsible for any damage to expensive instruments!
If you are new to electronics, see the Getting Started pages.
Mitch Electronics Synth Kits
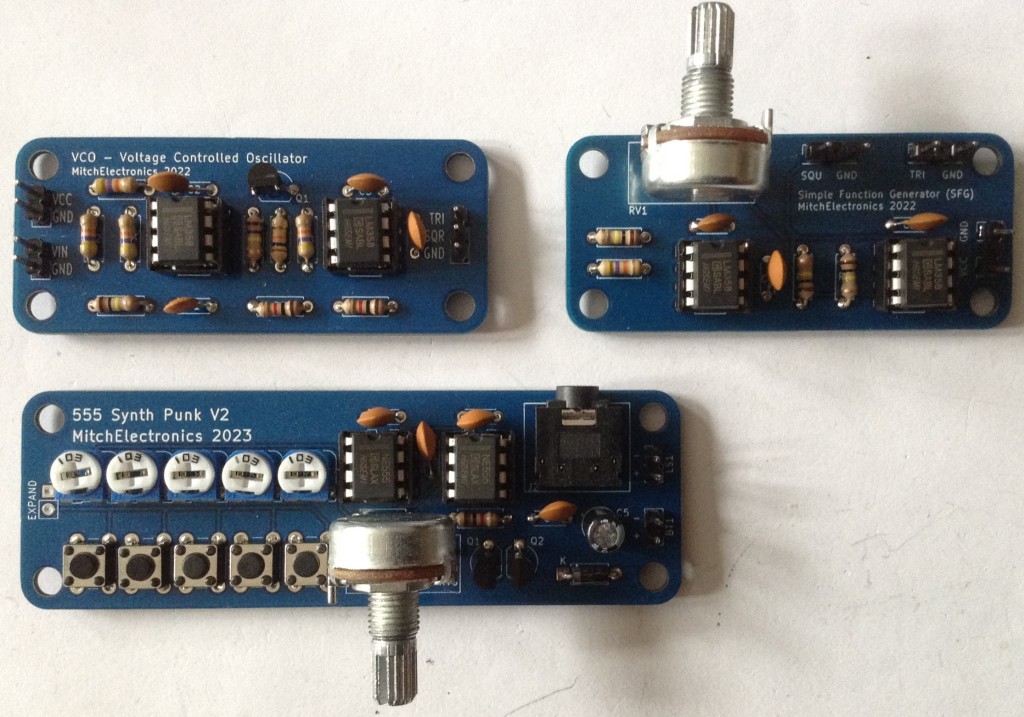
Mitch Electronics produce some pretty simple, inexpensive, soldering kits, several of which have audio or synthesizer related purposes. I picked up the following:
The build guides are very well done, schematics are published online and one feature I particularly liked is that each guide includes a link to an embedded version of what looks like Lush Projects Javascript based Circuit Simulator set up for the circuit for that kit. That is a really nice touch!
Each guide has a description of how the circuit works which again is really easy to follow. My only criticism is that it might have been useful to add the specs for each module to the guides too so that all the information you’d need for further integration can be found in one place. The specs are on the product page in the shop area at the time of writing, but not the guides themselves.
Notes about the kits:
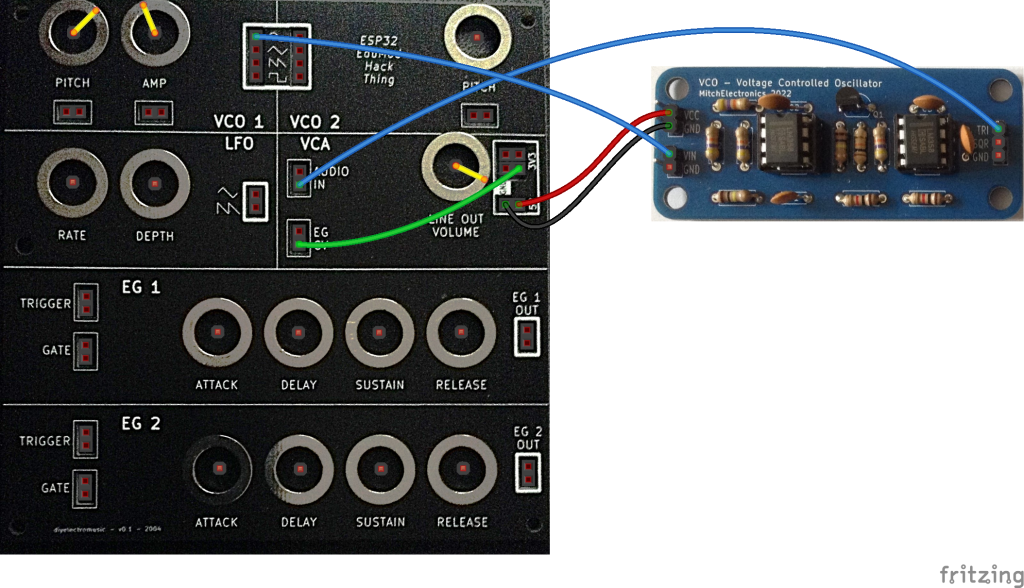
Voltage Controlled Oscillator
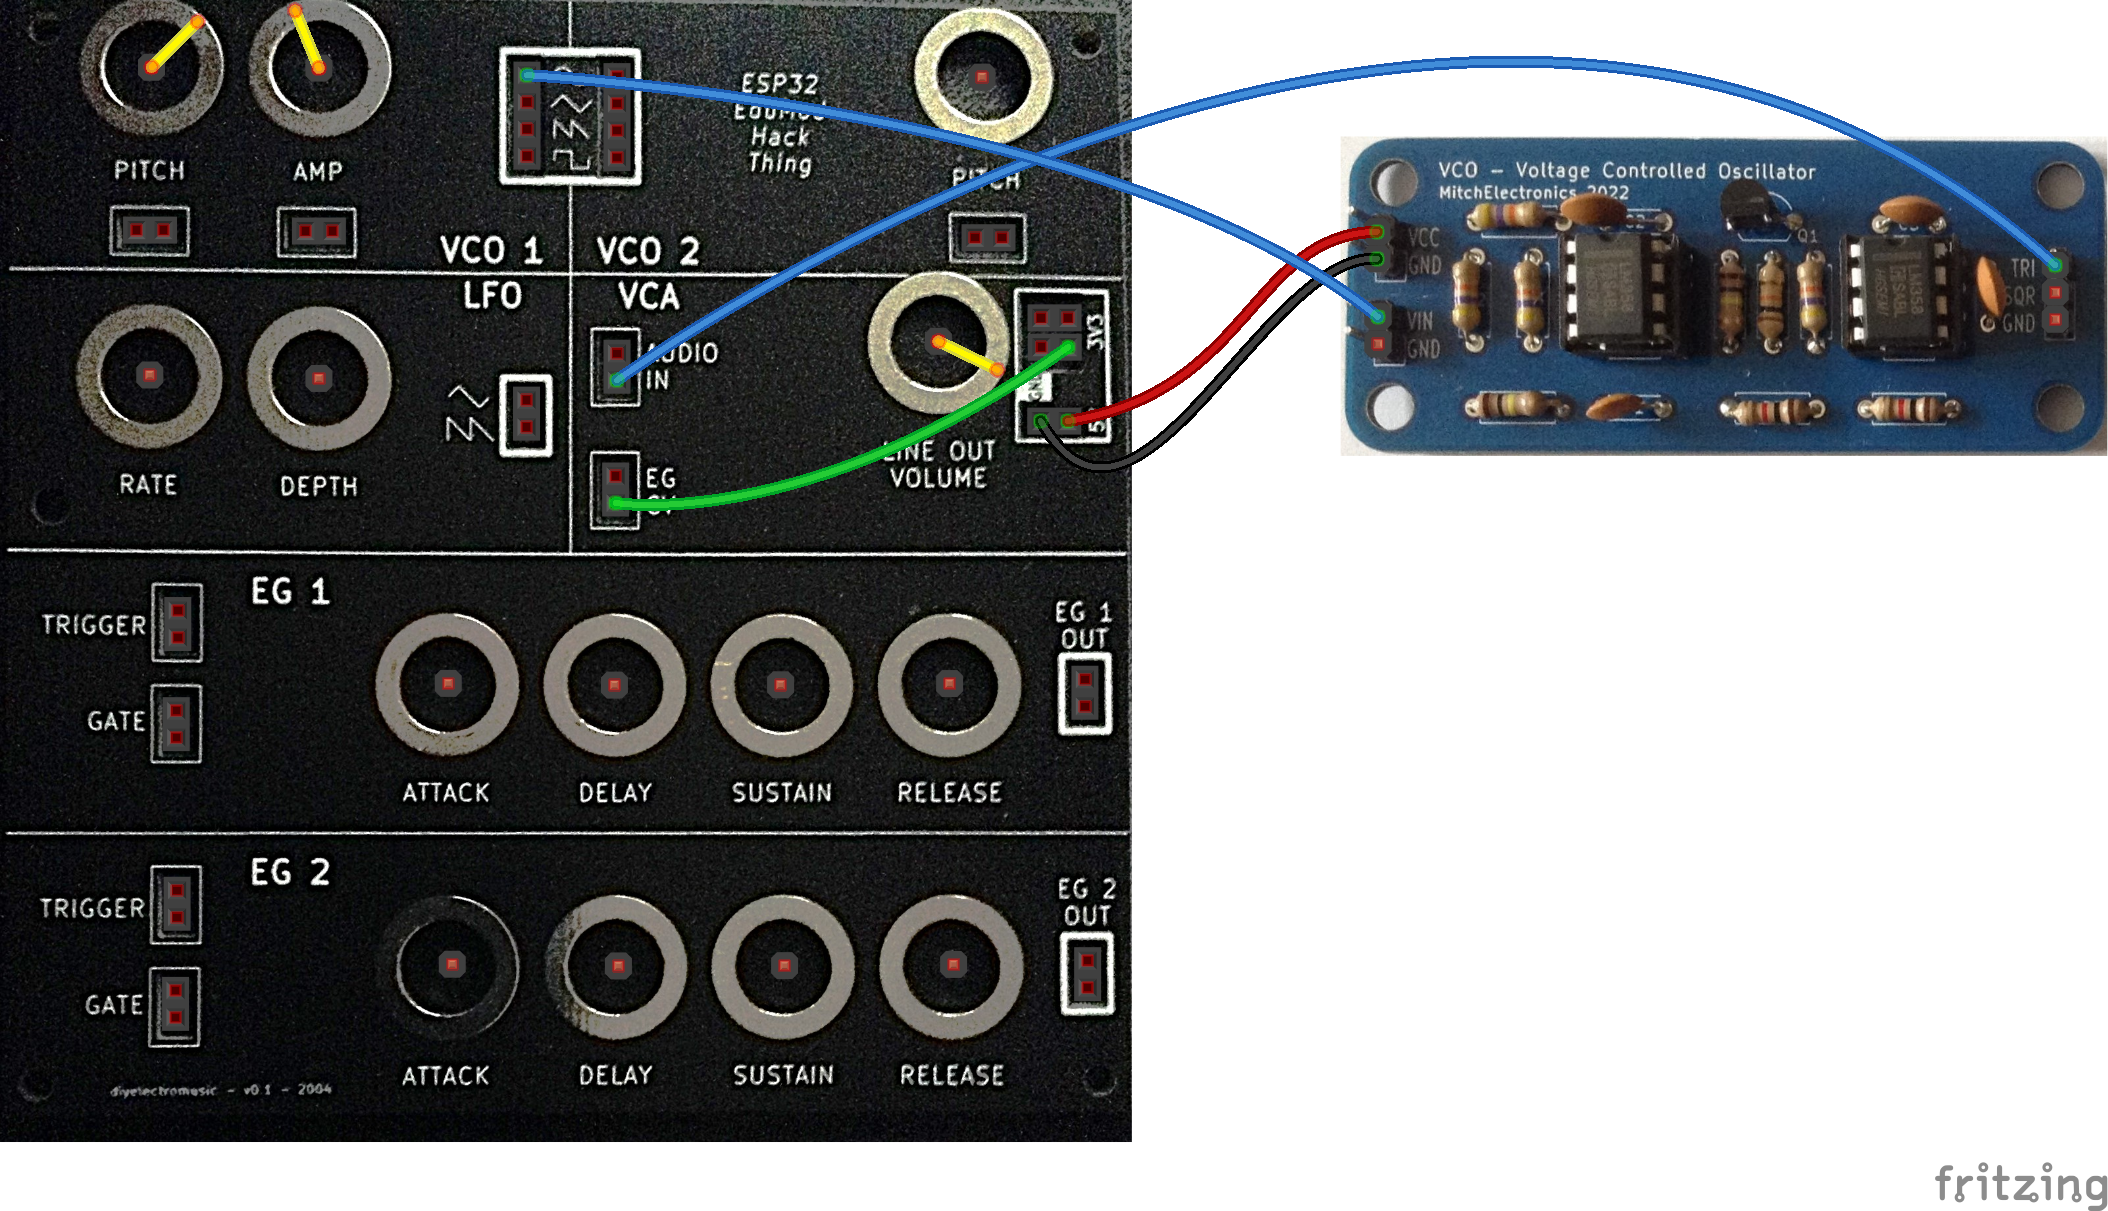
I’ve hooked this up to my Educational DIY Synth Thing as follows:
Note I’m using the 5V supply to power the board. This will give me a maximum voltage to feed back into the synth thing of ~3.5V.
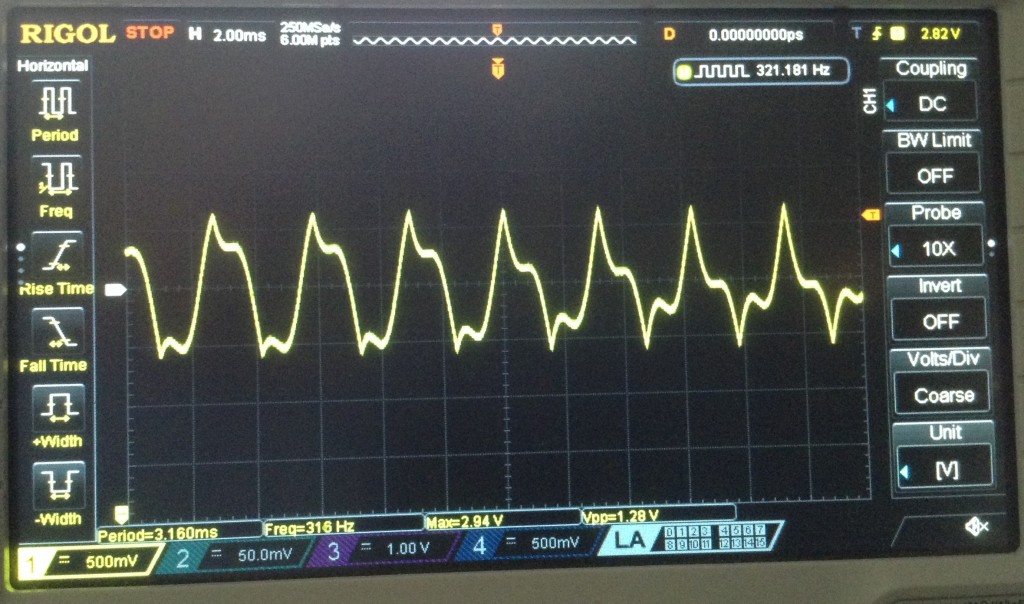
In use I found that the triangle wave has a much lower amplitude, but also a DC offset, so the signal is around ~1.3V pp with a DC bias of around 1.8V or thereabouts. Note this is still fine to get fed back into the audio input of the VCA stage of the synth thing.
I’ve configured it so that the Synth Thing VCO1 is acting as the control voltage for the Mitch Electronics VCO. Having control over the frequency and amplitude gives all sorts of possibilities for frequency modulation, as can be seen in the following oscilloscope trace. This is a trace at the audio input to the VCA, hence the bias in the signal is evident. This is a trace of the Synth Thing VCO outputting a sine wave into the Mitch Electronics VCO outputting a triangle wave.
The VCO is excellent for use with my Synth Thing. The only downside is that the square wave output is so much louder than the triangle wave, but that can be compensated for if required.
Simple Function Generator
The Simple Function Generator (SFG) works fine, but its application “out of the box” with the Synth Thing is a little limited. Given how the Synth Thing isn’t very good at modulating its own oscillators at audio frequencies, the SFG could be used as an independent oscillator but not much else.
However, if C1 (100nF) is replaced with a 10uF non-polar capacitor then the frequencies generated are in the range 0.5Hz to around 1kHz which is much more use to me as an additional LFO. Note I believe it has to be a non-polar capacitor rather than an electrolytic as I think the voltage is oscillating across the capacitor. But I could be wrong.
Here is how to use it as an LFO for the VCO1 pitch CV input. Notice that C1 has been changed.
555 Synth Punk
The 555 Synth Punk is a fun thing. This is essentially an Atari Punk Console with one of the pots replaced by a series of button-activated tunable presets. This in theory allows for five “notes” to be tuned up. In practice this isn’t as easy as it sounds due to the nature of the APC and the stepping function.
One minor annoyance for me is that the buttons are ordered so that the lowest note corresponds to the button on the right hand side. I really wish it was the left as you’d expect with a keyboard. There is room for expansion to more buttons, but as far as I can see no option for integrated this into my Synth Thing other than taking the audio output itself. There is no access to the voltage control for example. But this is a neat kit none-the-less.
Summary
The Simple Function Generator and 555 Punk Synth are neat kits for stand-alone purposes and general messing around as they stand.
But the VCO and a tweaked SFG are perfect for adding to my Synth Thing as an extra oscillator and LFO.
Rakit Baby8
The Baby8 sequencer is a pretty common circuit around the Internet and there are a number of kits available in a variety of form factors.
I have a Rakit version, which can be found here: https://www.rakits.co.uk/product/baby8-sequencer/
This is a pretty nice kit and can be used to generate a 0-5V CV and 5V gate signal for driving an analog synth. I’ve hooked it up to my Synth Thing as follows.
The Rakit Baby8 has a 6-way header which can be used to tap off the power, CV and gate signals and is designed to match up with the Rakit APC kit (which I also have). The header has the following pinout:
In this case, I’m not using the APC compatible CVs (I believe they are scaled to drive the APC in a more useful manner) or the 5V VCC connection. I’ve just connected the two GNDs together and then hooked up the normal CV and gate signals to my Synth Thing as follows:
Here is a short video of it in action. This is a great kit!
https://makertube.net/w/nB8uXAXsM3r5LXp5WT2Hqg
MiniMo
One of the existing synths that started me off down this page was the MiniMo synth, based on an ATtiny85 so naturally it is worth looking at how this can be used with the Synth Thing too.
This shows how to connect it up as an additional oscillator (in DCO mode).
Key points:
In the above, I’ve linked the LFO of the Synth Thing to the amplitude of the MiniMo; the VCO of the Synth Thing to the pitch; and used a constant input to the VCA (from 3V3 volts).
Some internal adjustments of levels on the MiniMo may be required as the Synth Thing is sending in 3V3 level control voltages, but in practice it seemed to work fine for me.
MiniMo as a Signal Processor
Several of the MiniMo programs perform signal processing:
In each of these cases, Input 3 is the modulation control and Input 4 is the audio signal in. These can be used by connecting Input 3 (modulator) to the Synth Thing for a control voltage – e.g. from the LFO; and connecting Input 4 (audio) to one of the Synth Thing’s audio signals – e.g. the output from the VCOs.
These will require the re-programming of the MiniMo. There are details of how to do that on the original MiniMo site here; and some details of how to get this working with a more recent Arduino environment here.
Closing Thoughts
I’m really pleased at how usable these integrations with other kits are. The Mitchelectronics VCO/LFO is a really useful addition. The Rakit Baby8 works great. The MiniMo has lots of possibilities for additional signal processing.
If you know of an interesting kit that might work well with the Synth Thing, be sure to let me know in the comments!
Kevin
https://diyelectromusic.com/2024/07/02/educational-diy-synth-thing-part-6/
#apc #baby8 #esp32 #mitchElectronics #oscillator #rakit #synthThing #vco