🎉Oh, joy! Yet another enlightening technical article that demands you sacrifice your browser's privacy settings at the altar of information. Spoiler alert: enabling #JavaScript and #cookies doesn't make servo motors more magical, but it does make your data disappear faster than servo torque!🔍🍪
https://www.jameco.com/Jameco/workshop/Howitworks/how-servo-motors-work.html #technicalarticles #dataprivacy #servomotors #HackerNews #ngated
#servomotors
Had a great virtual meeting with that artist I'm collaborating with. It's an exciting project that will see me using an Arduino with Servo motors. I can't say much more at this point as I'm under an artistic NDA :) #arduino #maker #servomotors #project #workshop #inmyhappyplace
Arduino take on a life and say "hello".
--
#Servomotors #Robotics #STEM
Servo Surgery Teaches Us DIY Encoder Implants
Today, we shall talk about how [Adam Bäckström] took a DS3225 servo and rebuilt it to improve its accuracy, then built a high-precision robot arm with those modified servos to show just how much of an improvement he's got - up to 36 times better positional accuracy. If this brings a déjà vu feeling, that's because we've covered his last demonstration video in an article a few weeks ago, but now, there's more. In a month's time since the last video came out, [Adam] has taken it to the next level, showing us how the modification is made, and how we ourselves can do it, in a newly released video embedded below.
After ordering replacement controller PCBs designed by [Adam] (assembled by your PCBA service of choice), you disassemble the servo, carefully setting the gearbox aside for now. Gutting the stock control board is the obvious next step, but from there, you don't just drop the new PCB in - there's more to getting a perfect servo than this, you have to add extra sensing, too. First, you have to print a spacer and a cover for the control board, as well as a new base for the motor. You also have to print (or perhaps, laser-cut) two flat encoder disks, one black and one white, the white one being eccentric. It only escalates from here!
Both of these disks go inside the motor. That is, you have to pry the servo's DC motor apart, take its base with brushes out, then insert the encoder disks. Then, you snip and file away at the base's plastic parts to free up as much space inside the motor's base as possible, and add the optical encoders in the space you freed. Once that's done, you solder the motor, the optocoupler and the potentiometer connections to the new controller PCB, and assemble the motor back together.
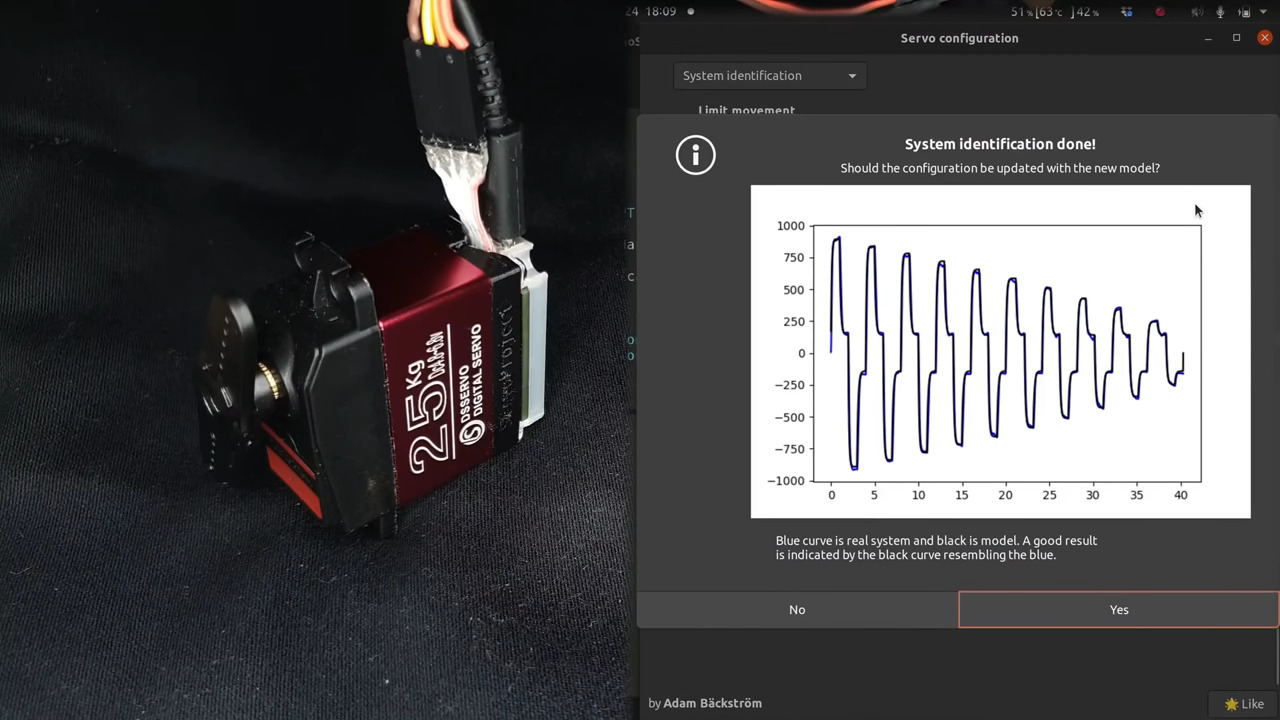
After you're finished with the surgery, you have to calibrate your servo, for which [Adam] shows how to properly set it up mechanically, provides the code you need to run, and even nice GUI tools with controls to tweak servo parameters - his firmware gives us way more power than we could ever expect from a servo like this. All the knobs and sliders available to control coefficients, limits and curves, show us that [Adam] really does understand what makes for proper servo movement. Enough care is put into the documentation, the explanations and the tools for this modification process, that we don't have to be anxious about being left behind if we are to follow these steps ourselves!
In a robot arm, small accuracy errors at the base scale into large errors at the arm's end. If what you crave is high accuracy on a budget, and you have a bit of time to devote to modifying stock servos, this approach might be just what you need, and [Adam] has basically laid all the groundwork for you. Last time we talked about these servo modifications, one of our commenters suggested that this could be a viable successor to the goals of the OpenServo project, and we definitely see where they're coming from. What if you wanted to go even less expensive than this? You could build a servo out of junk DC motors with a "3 cent" microcontroller, then.
We thank [sarinkhan], [Diede] and [BaldPower] for sharing this with us!
#robotshacks #closedloopservomotors #digitalservo #ds3225 #hobbyservo #opticalencoder #robotarm #roboticarm #servocontrol #servodriver #servomotor #servomotors #servos
A Whole Lot of Stepper Motors Make the Most Graceful 7-Segment Displays
Over the years we've seen many takes on the 7-segment display. Among the most interesting are the mechanical versions of what is most often an LED-based item. This week's offering is from [John Burd], who published a very odd video showing off the clock he made. But look beyond YouTuber antics and you'll see the stepper motors he used to turn the segments are dripping with graceful beauty. (Video, embedded below.)
Okay if you want to hear [Charlie Sheen] say "Raspberry P-eye", this is the video for you. [John] used Cameo to get the (former?) star to talk about what was used to build the clock. Like we said, the video is weird. Let's embrace that right away and then never talk about it again.
The thing is, the build is such a good idea. [John] went with some stepper motors you can source relatively cheaply from Ali Express and the like. Typically they're around a buck or two each and have a couple of wings for screw mounting brackets. This builds on the segment displays we've seen that use hobby servos by allowing you finer control of how the segments move. Sure, the 90° rotation isn't all that much to work with, but it will be much smoother and you can get fancy with the kinematics you choose. The only place we see room for improvement is the alignment of the segments when they are turned "off" as you can see the center segment in the video thumbnail below is not quite level. Maybe a linkage mechanism would allow for a hing mechanism that aligns more accurately while hiding the servos themselves behind the mounting plate? It's in your hands now!
In the demo video you'll also find some interesting test rigs built to proof out the project. One just endurance tests the mechanism, but the other two envision water-actuated segments. One pumps a hollow, transparent segment with colored liquid. The other tried to use water droplets sprayed in the air to illuminate laser segments. Both are cool and we'd like to see more of the oddball approaches which remind us of the ferrofluid clock.
#clockhacks #7segment #7segmentdisplay #charliesheen #mechanicaldisplay #servo #servomotors
https://github.com/rzr/webthing-iotjs/# #WebthingsIotJs implemented basic features of #NucleoF767zi as a #WebThings, so I add to configure 4 #PWM for #MeArm #ServoMotors

https://www.slideshare.net/rzrfreefr/digitaltwinswebthingsiotjs20190512rzr/14 #SG90 #ServoMotors are controlled by #PWM signals generated by #IoTjs or #NodeJs
Client Info
Server: https://mastodon.social
Version: 2025.04
Repository: https://github.com/cyevgeniy/lmst