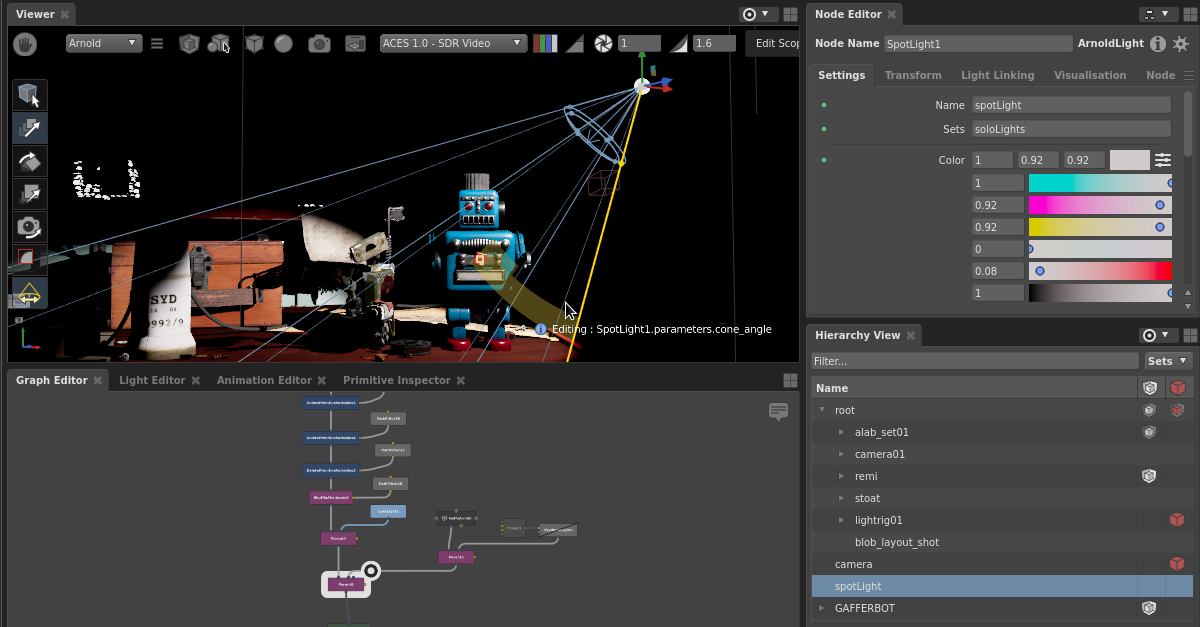
#compositing

Natron is a powerful, free, and open-source VFX compositing application geared towards digital post-production work. Natron sports a familiar UI, over 100 nodes, and support for OpenFX and community-made plugins. With its robust OpenFX-based engine and support for OpenImageIO and OpenColorIO, Natron can handle all of your VFX post-production needs.

Website
natrongithub.github.io/

#Natron #VFX #compositing #openFX #OpenImageIO #OpenColorIO

A screenshot of Natron application.
Stefan Ihringercompfu@mograph.social
2025-05-01

That post is about a free OpenFX plugin (so it'll work in Resolve or Nuke) for treating footage like NTSC video (it might not be clear from the 2 screenshots in that post...)

Haven't tried it yet. For Linux, it needs to be compiled (it's written in Rust).

post.lurk.org/@hellocatfood/11

#Nuke #compositing

2025-04-26

Although I'm relatively adept at editing footage with #DavinciResolve I'm quite a neophyte when it comes to 3D compositing in #Fusion. I've been putting together some promo films for my wife's new book (available for pre-order now DRM-free on Kobo and Amazon - sorry, but we gotta eat!) and wanted to try making a fly-past of the book in 3D. We don't have physical copies yet, so although there's a real fake stage (made from a scaffold plank) and a real green curtain in existence and we've used them in one of the other films, I decided to go fully virtual for this one.
One thing I'd never done was apply bump maps to objects in lit 3D space, but the difference it makes to the surface of the stage is pretty impressive. Because I understand a bit about the colour processing aspects, I was able to use the photo of the wood as both the image AND the generator for the bump map by taking a second output and turning it greyscale - I didn't see that in a tutorial anywhere!
The two images show the same shot with bump mapping enabled and disabled.
#production #compositing #FilmMaking #bookstodon #BehindTheScenes #IndieAuthor #IndieFilmMaking

A 3D rendering of a book on a wooden stage in front of a green curtain. The book is "The Players - Act 1" by Amy Sparkes and we're looking at the spine.
The wooden planks of the stage are created from a photograph of scaffold planks and in this image the stage is created simply by making the photograph into a floor.
There is also text on the image which is not important, but reads:
The Players Act 1
All The World's A Stage
England, 1715.
When society doesn't understand you,
and your family is out of the picture,
a strolling theatre company
could be your perfect home...A 3D rendering of a book on a wooden stage in front of a green curtain. The book is "The Players - Act 1" by Amy Sparkes and we're looking at the spine.
The wooden planks of the stage are created from a photograph of scaffold planks and in this image the stage has been given texture and looks much more like rough wood than the other image.
There is also text on the image which is not important, but reads:
The Players Act 1
All The World's A Stage
England, 1715.
When society doesn't understand you,
and your family is out of the picture,
a strolling theatre company
could be your perfect home...
Terry Hancock (Director/Producer)TerryHancock@m.filmfreedom.net
2025-03-26

I've never really understood why the "Shadow" pass produces the colors that it does. It seems to contrast with the scene colors (the orange spacesuit has a purple "shadow" here).

The shadow here is presumably cast by the shell of the spacecraft.

I set things up so that the "Shadow" pass from Blender Internal is rendered as a separate layer.

But that means I need to re-composite it. With trial and error, I settled on using the mix node with "Darken" mode. Which mostly works, but sometimes produces very odd-looking results.

So I wonder if this isn't really the right way to recombine the shadow layer.

And of course, Blender Internal rendering engine lore is getting harder to find.

Does anyone remember how to do this
correctly?
​:huh:​

The light source is now an "area light", but the effects are basically the same if I use "spot light". The original version of this used a spot light as the source -- I don't think area lights existed in that version of Blender, yet.

Weird stuff.
#Blender3D #BlenderInternal #Compositing

The "Shadow" pass as a RenderLayer from Blender Internal render.

The spacesuit appears purple here. Many things are sort of sepia. And the porthole and helmet visor look mostly white.The diffuse "combined" RenderLayer, with shadows, reflection, and some other things suppressed (to be re-added in composite).

The spacesuit has its basic orange color here. The visor is sort of pink-shaded.The composited result. The shadow layer is added using a "Mix" node, set to "Darken".

Now the spacesuit has kind of a mustard color, and the inside of the spacesuit visor looks blue.

That doesn't seem right to me. I've tried other mix modes, but they don't seem to look better. Still this just looks weird!
2025-03-18
The Book Fukushima 2: Banished from Paradise - #illustration the lost bible book on how we never ever learn from our mistakes - #photomontage #compositing #digitalart #photography #landscape #industryscape
2025-03-15
I like my landscapes, but they are supposed to be backgrounds for larger works, tell a story. It could also be backgrounds for a theatre play or movie.

#Swamp #Oderbruch #panorama #photography #thingsLeftBehind #traces #compositing #collapse
Christoph Werner 🔶️CWernerArt@mstdn.social
2025-03-14

If you sometimes work in DaVinci Resolve and need a solution to convert Blenders color settings into DaVinci, then this hint is THE best ever! Basically Blender already comes with a solution, but you just need to know where to find it. And this hint shows how:
#davinciresolve #blender #b3d #compositing #colorgrading

youtu.be/qfrseSxN6GU

Terry Hancock (Director/Producer)TerryHancock@m.filmfreedom.net
2025-03-06

This following shot shows the billboard masking better. The on-looking characters on left and right of the shot are actually pre-rendered flat billboard images. This saves quite a bit of render time.

But then it's necessary to mask the Freestyle ink lines so they don't draw background lines over them!

That's what the chain of nodes in green is doing in the above node tree (this shot uses a similar one).
#Blender3D #Compositing #LunaticsProject #Blender3D #Compositing #LunaticsProject

In this shot there are about a dozen "Billboard Extras" -- these are posed and rendered characters which I've scattered around the shot as onlookers on the action. They aren't animated, and they're actually flat images.

In many places, the characters appear "in front" of ink lines from background objects. This is actually achieved with masking.
Terry Hancock (Director/Producer)TerryHancock@m.filmfreedom.net
2025-03-06

Decided to move the compositing for this shot from Kdenlive to Blender. Originally I created the 2 animations and the intervening cel separately and then put them together on the Kdenlive timeline, but I decided it would be a little neater to do the job in the Blender compositing file. Also, I just wanted to test doing it.

I've learned a few things in this process.

First of all, yes, I was definitely applying masks in an overcomplicated way before -- this is just another application of the "Alpha Over" node, which I've used before. In fact, the billboard masking I was using before uses the same method.

Also, I either never learned or forgot that it is possible to copy and paste nodes and collections of nodes with Ctrl-C/Ctrl-V even in 2.79 and even between different scenes. This saves quite a bit of time.
#Blender3D #Compositing #LunaticsProject

Compositing of three distinct elements into the shot. At the top are the nodes for the background EXR, while the Gopher EXR element is at the bottom. In between is a still image cel that provides the foreground surface the gopher is sitting on.The resulting composited shot. We can see the Soyuz rolling down the track towards the launch pad in the background. In the foreground, a ground squirrel observes the activity.
Terry Hancock (Director/Producer)TerryHancock@m.filmfreedom.net
2025-02-28

"Oh... I forgot about YOU..."

Seriously, I forgot about these train wheels showing up through the platform. Masking that out just now...

I think the reason this happened is that the node for the edge of the platform has run out of frame. Freestyle is set up to cull edges that aren't in the shot, which it calculates by checking both end nodes. In this case one of them is now out of frame. So I think the platform has "disappeared" in Freestyle's model, allowing background geometry to show through.
#Blender3D #Compositing #LunaticsProject

BEFORE
Pre-compositing from the render process. The platform is not blocking the Freestyle lines from the train wheels.AFTER
Lines masked out in compositing (also the screen text is gone now, because this is the finished, composited output).

Nothing else has changed. We still see Georgiana and Hiromi walking along the platform in front of the train.
2025-02-20

Unintentionally dressed like Kitty -the main character from 'Where Is Anne Frank?', directed by Ari Folman. Back in #2020 I worked on this feature film as a #compositor .

Hard to believe that was already five years ago.

Trailer: youtube.com/watch?v=CiV7sR5VMR

#aftereffects #whereisannefrank #annefrank #behindthescenes #compositing #accidentalcosplay #redhead #freckles #vfx #animation #film #filmmaking #animationartist

Sitting behind my desk. Working in After Effects: compositing and VFX for the feature film 'Where Is Anne Frank?' from Oscar Winner Ari Folman. Wearing the same hat as Kitty, the main character in the film. I'm working on an iMac and Huion Tablet, back in the year 2020.
NicoRey (Forj)reytrace@mamot.fr
2025-01-29

#introduction
Bonjour je n'avais pas fait d'introduction, la voici :
J'exerce 2 activités,
1) depuis 1986 je travaille dans les #vfx où j'ai fait #3d, #compositing, #flame, #supervisionVFX, tournages, python, #pipeline architect.
2) en 2007 j'ai commencé la forge, j'ai suivi des stages, en 2019 j'ai fait un cap de ferronnerie d'art. Je fait #couteaux et #outils. 2020 formation de soudeur.
Je n'utilise des outils électriques qu'une fois que je sais le faire à la main façon old-school.

Christoph Werner 🔶️CWernerArt@mstdn.social
2025-01-28

Change Your Lighting Without Re-Rendering | Blender Light Groups Tutorial

youtu.be/IjFXi2axl-8 #b3d #blender3d #blender #compositing

Jarosław Dzedzej aka DJjaroslawdzedzej@mastodon.art
2025-01-28

Blender Light Groups and compositing! Powerful stuff: youtu.be/IjFXi2axl-8?si=SnsUA8 #b3d #blender3d #compositing

2025-01-18

Hot tip for using #Blender for #video compositing:

In the compositing view on the right hand side in the options tab, change the device to #GPU. Not sure why this isn't in the preferences or render settings, but now you know.

#VideoEditing #VFX #Compositing #Tips

A screenshot of the performance options tab in Blender's compositing view. The performance box allows you to select CPU or GPU as the compositing device.
Blender StudioBlenderStudio
2025-01-14

A real photography buff, Andy shares a quick technique to create lens dust specks in compositing. With also a free library! 📷

studio.blender.org/blog/compos

hugovangalen 🤖 🕹️ 😼hvangalen@mastodon.nl
2025-01-10

If you happen to wonder why #Compositing is broken under #KDE using the #X11 graphics platform, check your ~/.config/kwinrc file

Under the section [Compositing], make sure that the platform interface is set to `glx`:

GLPlatformInterface=glx

Of course making note of the current value in case this breaks things. There is perhaps a GUI but I couldn't find it quick enough and stopped looking.

Client Info

Server: https://mastodon.social
Version: 2025.04
Repository: https://github.com/cyevgeniy/lmst