Duppa I2C MIDI Controller – Part 4
This is revisiting my Duppa I2C MIDI Controller this time using a Waveshare Zero format device.
- Part 1 – getting to know the devices and testing them out.
- Part 2 – adding MIDI to the LED ring and I2C encoder.
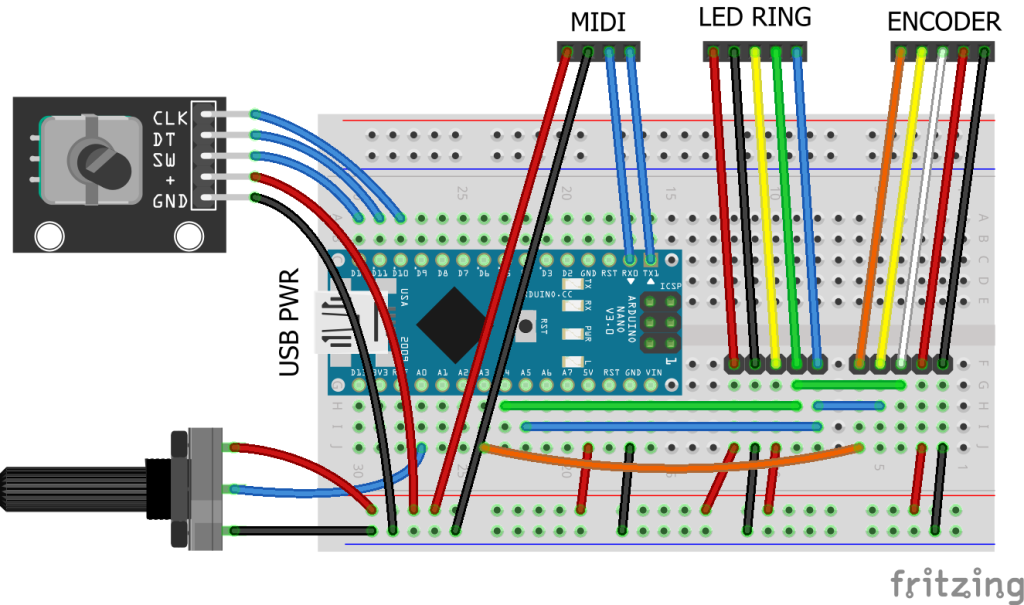
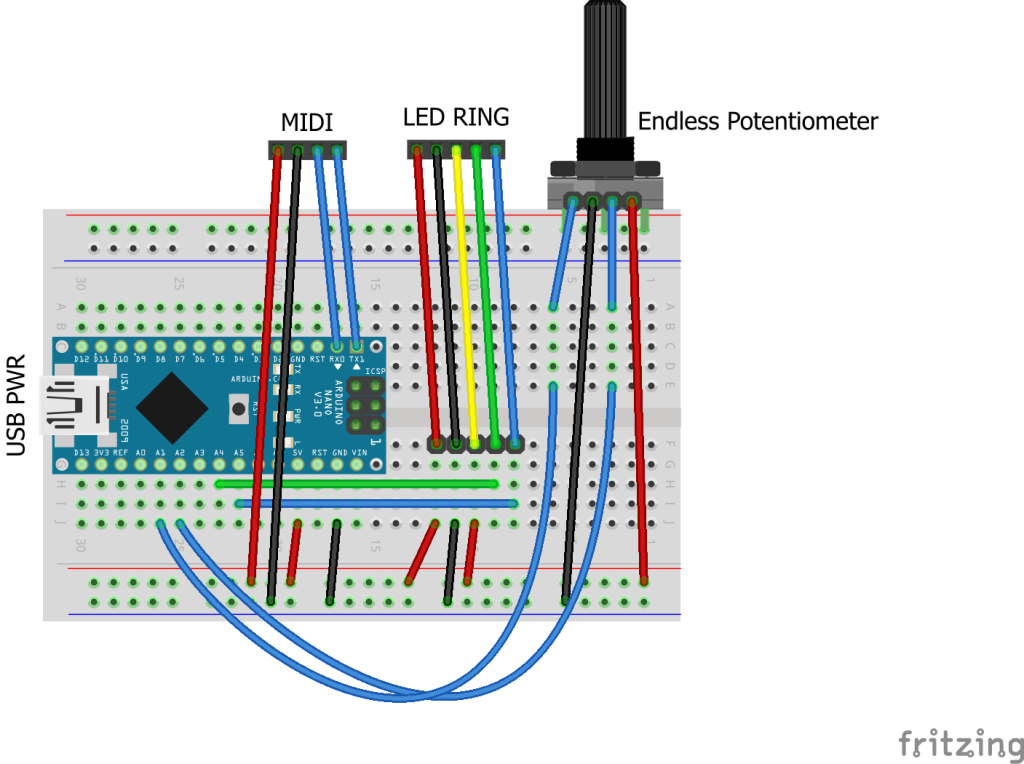
- Part 3 – adding normal encoder, plain potentiometer, and endless potentiometer control.
- Part 4 – revisits the idea with Waveshare Zero format devices and adds USB MIDI.
Warning! I strongly recommend using old or second hand equipment for your experiments. I am not responsible for any damage to expensive instruments!
If you are new to Arduino, see the Getting Started pages.
Parts list
- Waveshare Zero ESP32-S3 or RP2040.
- DuPPa small RGB LED Ring.
- 10K potentiometer.
- Bespoke hook-up wires (available from duppa.net).
- Optional: 3V3 MIDI Interface.
- Breadboard and jumper wires.
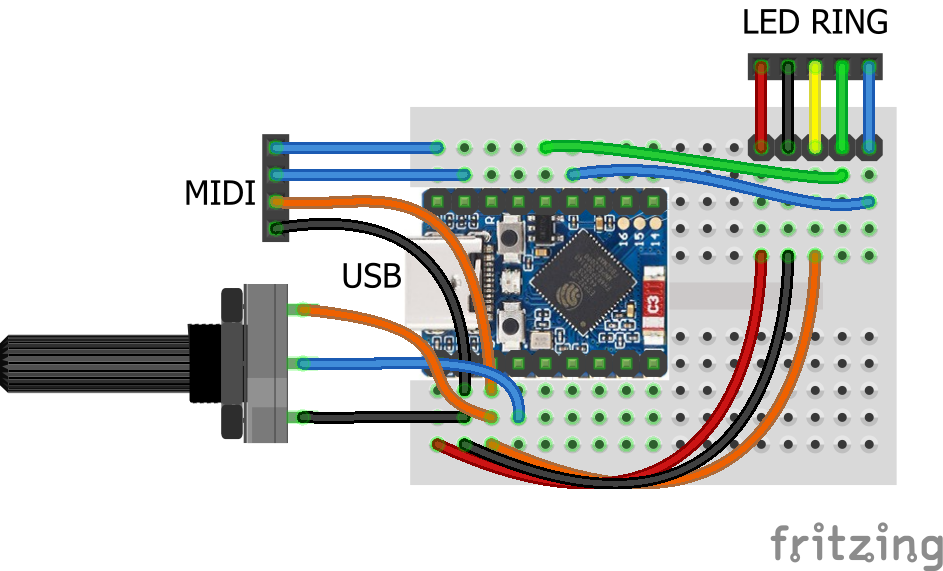
Waveshare Zero, Duppa LED Ring, Potentiometers
I’m planning on being able to use any Waveshare Zero format board that I have (so that includes ESP32-S3, ESP32-C3 and RP2040) with the Duppa Ring so that means finding common pins to support I2C.
From the various pinouts (see Waveshare Zero, Pimoroni Tiny, and Neopixels) I can see I can use two pins in the bottom right-hand (with the USB connector at the top) corner of the board.
I’ll also need an analog connection and potentially connecting RX/TX to MIDI.
The various pins I’ll be using are as follows:
PinFunctionESP32-S3ESP32-C3RP204015V2GND33V34ADCGP1GP0GP29/A313SCLGP10GP9GP514SDAGP11GP10GP417RXGP44GP20GP118TXGP43GP21GP0Note, I’m not using physical pins 11 and 12, even though they also support I2C, as for the RP2040, these are on I2C bus 1, not 0 (see note later).
As the Pimoroni Tiny2040 is largely compatible too, that could also be used, but it will be physical pins 11 and 12, corresponding to GP5 and GP4, and 15 and 16 for GP1, GP0 (RX,TX).
The LEDs on the LED ring are powered from 5V, which comes directly off the Waveshare Zero USB port. The logic “VIO” is powered from 3V3.
The Code
I2C LED Ring
As the I2C pins to be used are configurable, this means changing the Duppa example code (and any other Arduino code) to initialise the I2C bus on specific pins as follows:
Wire.begin(11,10);    // SDA, SCL for ESP32-S3
Wire.begin(10,9);     // SDA, SCL for ESP32-C3
Using the ESP32 Arduino Core, there is a specific board entry for the Waveshare Zero ESP32-S3. There isn’t one for the ESP32-C3 so I just used “ESP32C3 Dev Module”.
I used the Arduino core for RP2040 from here rather than the official core: https://github.com/earlephilhower/arduino-pico
But the I2C initialisation is a little different.
  Wire.setSDA(4);
  Wire.setSCL(5);
  Wire.begin();
If I’d have been using GP6 and GP7, then these would have required the initialisation of Wire1 rather than Wire with the RP2040 core.
Note: to use the serial port once a sketch has been loaded onto the board, requires the following to be set (via the Arduino Tools menu):
USB CDC On Boot -> Enabled
Once again, I’ve soldered the jumpers on the LED ring to enable pull-ups and set the address for S1 and S5, so that has to be changed in the demo code too.
Analog Potentiometer
In terms of analog read, the ESP32 has a resolution of 0..4095 compared to the Arduino’s 0..1023, so that has to be taken into account when calculating the MIDI CC values.
To do this, the reading has to be divided by the ratio of Pot Range / 128.
int newpot = algpot.avgeAnalogRead(PIN_ALG) / ((MAX_POT_VALUE+1)/128);
Serial MIDI
For these boards, the serial port has to be specified. There are different options depending on the board being used (more here).
To use the pins nominally designated as RX/TX on all of these boards, use:
// ESP32-S3 GP43,GP44 or ESP32-C3 GP20,GP21
MIDI_CREATE_INSTANCE(HardwareSerial, Serial0, MIDI);
// RP2040 GP1,GP0
MIDI_CREATE_INSTANCE(HardwareSerial, Serial1, MIDI);
It is a quirk of the RP2040 Arduino core that UART0 appears on Serial1 and UART1 on Serial2. Serial0 does not exist but USB is Serial (more here).
Also, for the RP2040 the pins can be changed prior to calling MIDI.begin() if required as follows:
Serial1.setRX(rxpin);
Serial1.setTX(txpin);
MIDI.begin();
MIDI USB
I want to make this a fairly stand-alone MIDI USB device, so for the ESP32 and RP2040 this means using the TinyUSB stack. There is an Adafruit library for Arduino that supports both and also works with the Arduino MIDI Library. References:
- Adafruit_TinyUSB – https://github.com/adafruit/Adafruit_TinyUSB_Arduino/tree/master
- USB MIDI Transport – https://github.com/lathoub/Arduino-USBMIDI (for AVR)
- Arduino MIDI Library – https://github.com/FortySevenEffects/arduino_midi_library
I’ve cribbed most of the code from: https://github.com/adafruit/Adafruit_TinyUSB_Arduino/blob/master/examples/MIDI/midi_test/midi_test.ino
And added the appropriate parts to my own midiSetup() and midiLoop() functions.
MIDI USB – ESP32-S3
For this to work on the ESP32-S3, the board settings (via the Arduino Tools menu) need to be changed as follows:
USB CDC On Boot -> Enabled
USB Mode -> USB-OTG (TinyUSB)
USB Firmware MSC On Boot=Disabled
USB DFU On Boot=Disabled
Naturally this means USB can’t be used for serial output anymore.
It also means that automatic sketch reset and download often didn’t work for me. It was quite normal to now have to use the BOOT and RESET buttons to get the ESP32 back into listening for a new sketch – not always, but also not uncommon. But this might be some serial port remapping weirdness that often occurs when the USB stack is running on the same microprocessor as the main code…
MIDI USB – RP2040
For the RP2040, the USB stack needs to be changed from the Pico SDK to TinyUSB, so in the Tools menu:
USB Stack -> Adafruit TinyUSB
There are some other RP2040 specific notes here, but I don’t believe they apply unless one is interested in rebuilding the core, default TinyUSB support directly.
USB MIDI – ESP32-C3
I don’t believe USB MIDI works on the ESP32-C3
Adafruit TinyUSB doesn’t seem to anyway and I haven’t looked into what the options might be yet.
Other Notes
I’ve left in all the conditional compilation from Duppa I2C MIDI Controller – Part 3 but for now am just working with potentiometer control.
Pretty much everything is configurable, but the most important config option is to specify the board at the top:
//#define WAVESHARE_ESP32S3
//#define WAVESHARE_ESP32C3
#define WAVESHARE_RP2040
I could probably auto detect from the build settings but for now, this will do.
Other options include GPIO pins, whether to include serial or USB MIDI (or both), and whether to enable MIDI THRU or not.
Closing Thoughts
This is the first go at getting my Duppa controller working on 3V3 Waveshare Zero format boards, and so far it looks pretty good.
For the ESP32-S3 and RP2040 being able to enable MIDI USB is particularly useful. I might see if I can support MIDI THRU across the interfaces, which might be handy for a built-in USB to serial MIDI converter, but for now MIDI THRU is on the same port only.
I’ve not tested this with encoders or the endless potentiometer, but in theory it ought to work. I’d have to add some conditional compilation for GPIO numbers if I want to keep the same physical pins again.
Kevin
#controlChange #duppa #endlessPotentiometer #esp32c3 #ESP32s3 #i2c #midi #potentiometer #rgbLed #rotaryEncoder #rp2040 #WaveshareZero