#SynthThing

Simple DIY Electronic Music Projectsdiyelectromusic.com@diyelectromusic.com
2024-10-07

I covered all the theory and main functions of the code for my Arduino Euclidean Gate Sequencer in my previous post. In this one I look a little more at some hardware that hopefully lets me use this to actually control something useful!

  • Part 1 covered all the theory and main functions of the code.
  • Part 2 included some hardware suggestions for connecting it to other devices.
  • Part 3 added a rotary encoder and I2C display and demonstrated by Arduino Clock Generator Shield PCB.
  • Part 4 reimplements HAGIWO’s original with a few tweaks and updates.

Warning! I strongly recommend using old or second hand equipment for your experiments.  I am not responsible for any damage to expensive instruments!

All of the key ideas along with a list of references for the main concepts used in this project were listed in my first post here: Arduino Euclidean Gate Sequencer.

If you are new to Arduino, see the Getting Started pages.

Experiment 1: Arduino to Arduino to MIDI

I could add MIDI functionality to my Euclidean clock generator, but instead opted to build a TRIGGER to MIDI converter using a second Arduino. This has several digital inputs setup to receive TRIGGER pulses and on reception will send out a preconfigured MIDI message.

The configuration is such that a NoteOn is sent for a specific drum on MIDI channel 10 which is typically used for percussion. Which drum corresponds to which input is configurable in the code.

Full details of this so far can be found here: Arduino Drum Trigger to MIDI. This is how I connected them up and it seems to work pretty well.

Arduino to GATE or TRIGGER Output

Here I’m setting up the board to be able to drive an external device.

As always, the standard warning applies – use second hand or disposable equipment for experiments. I am not responsible for damage to expensive instruments. Assess what I’m doing, decide for yourself how it will affect your equipment and then use at your own risk.

I’ve followed the design from HAGIWO’s GATE sequencer, which is detailed in full here: https://note.com/solder_state/n/n17c69afd484d

This recommends the following:

  • All outputs clamped to the Arduino’s 5V and GND using BAT43 Schotky diodes.
  • 470Ω resistor on the output to set an output impedance.

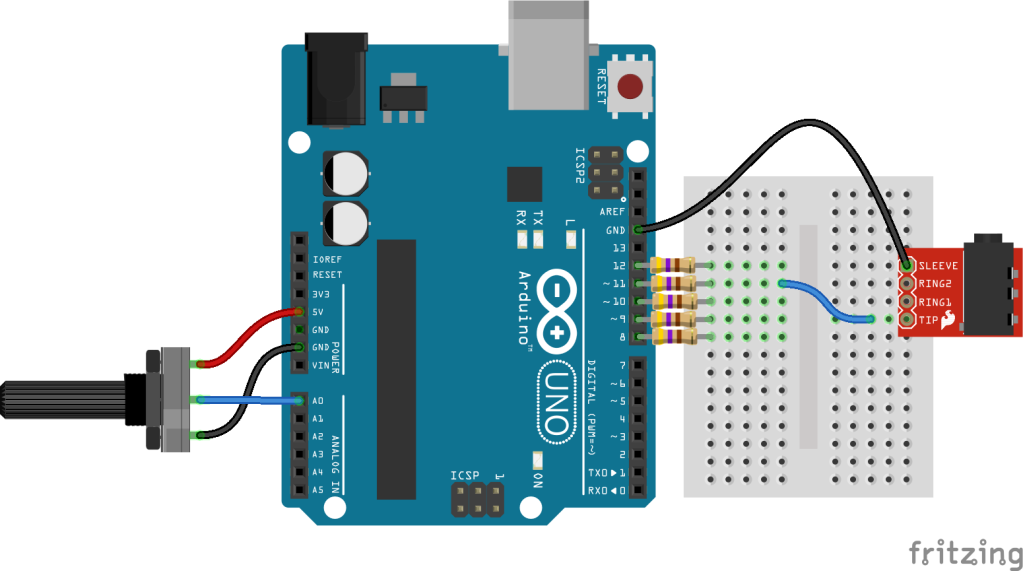
I’m wanting to plug this into my Korg Volca Sync In.

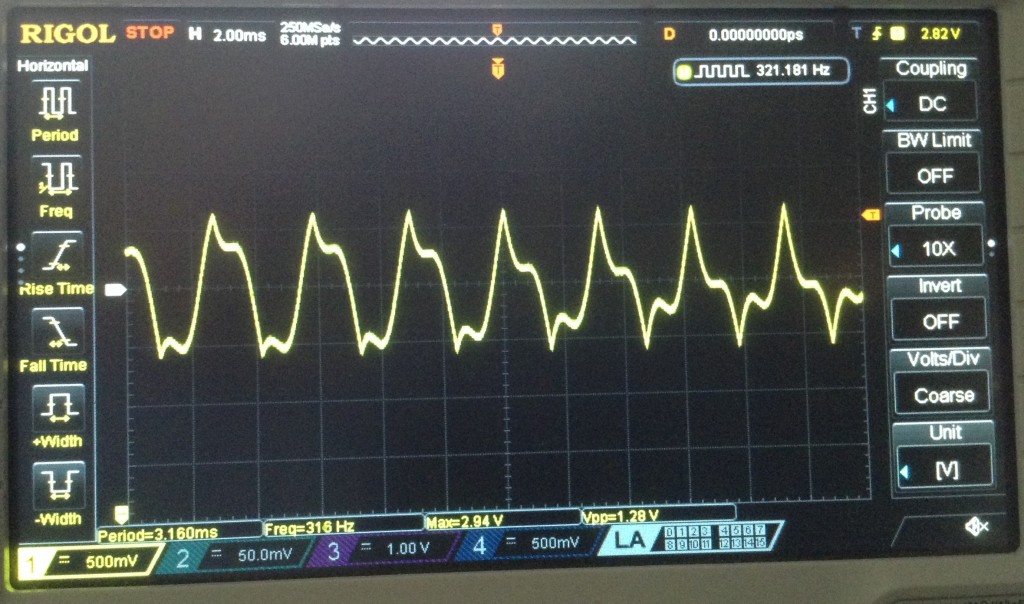
With an oscilloscope I examined the Sync Out signal and confirmed that it is a 5V pulse of 15mS. As I’m only plugging a 5V Arduino into the 5V accepting Korg, I’ve not bothered with the clamping diodes for my simple experiments, but if I build this up into a PCB then I’ll probably add them in to make it a little more universal.

The TRS jack is wired to be compatible with the Korg Volca Sync In port – i.e. using just the tip and shield. A stereo or mono 3.5mm jack to jack cable (as comes supplied with a Volca) can then be used to connect it up.

The blue jumper wire can be used to select which of the Euclidean clock outputs to use.

The code is built for TRIGGER mode, so each output is a single 10mS pulse. This is shorter than that produced by the Volcas but generally seems to work.

When first connected or when the tempo is changed I sometimes hear some spurious or irregular triggering, but once it has settled down it seems to work fine for my Volca Keys, Volca Modular, and Volca FM2.

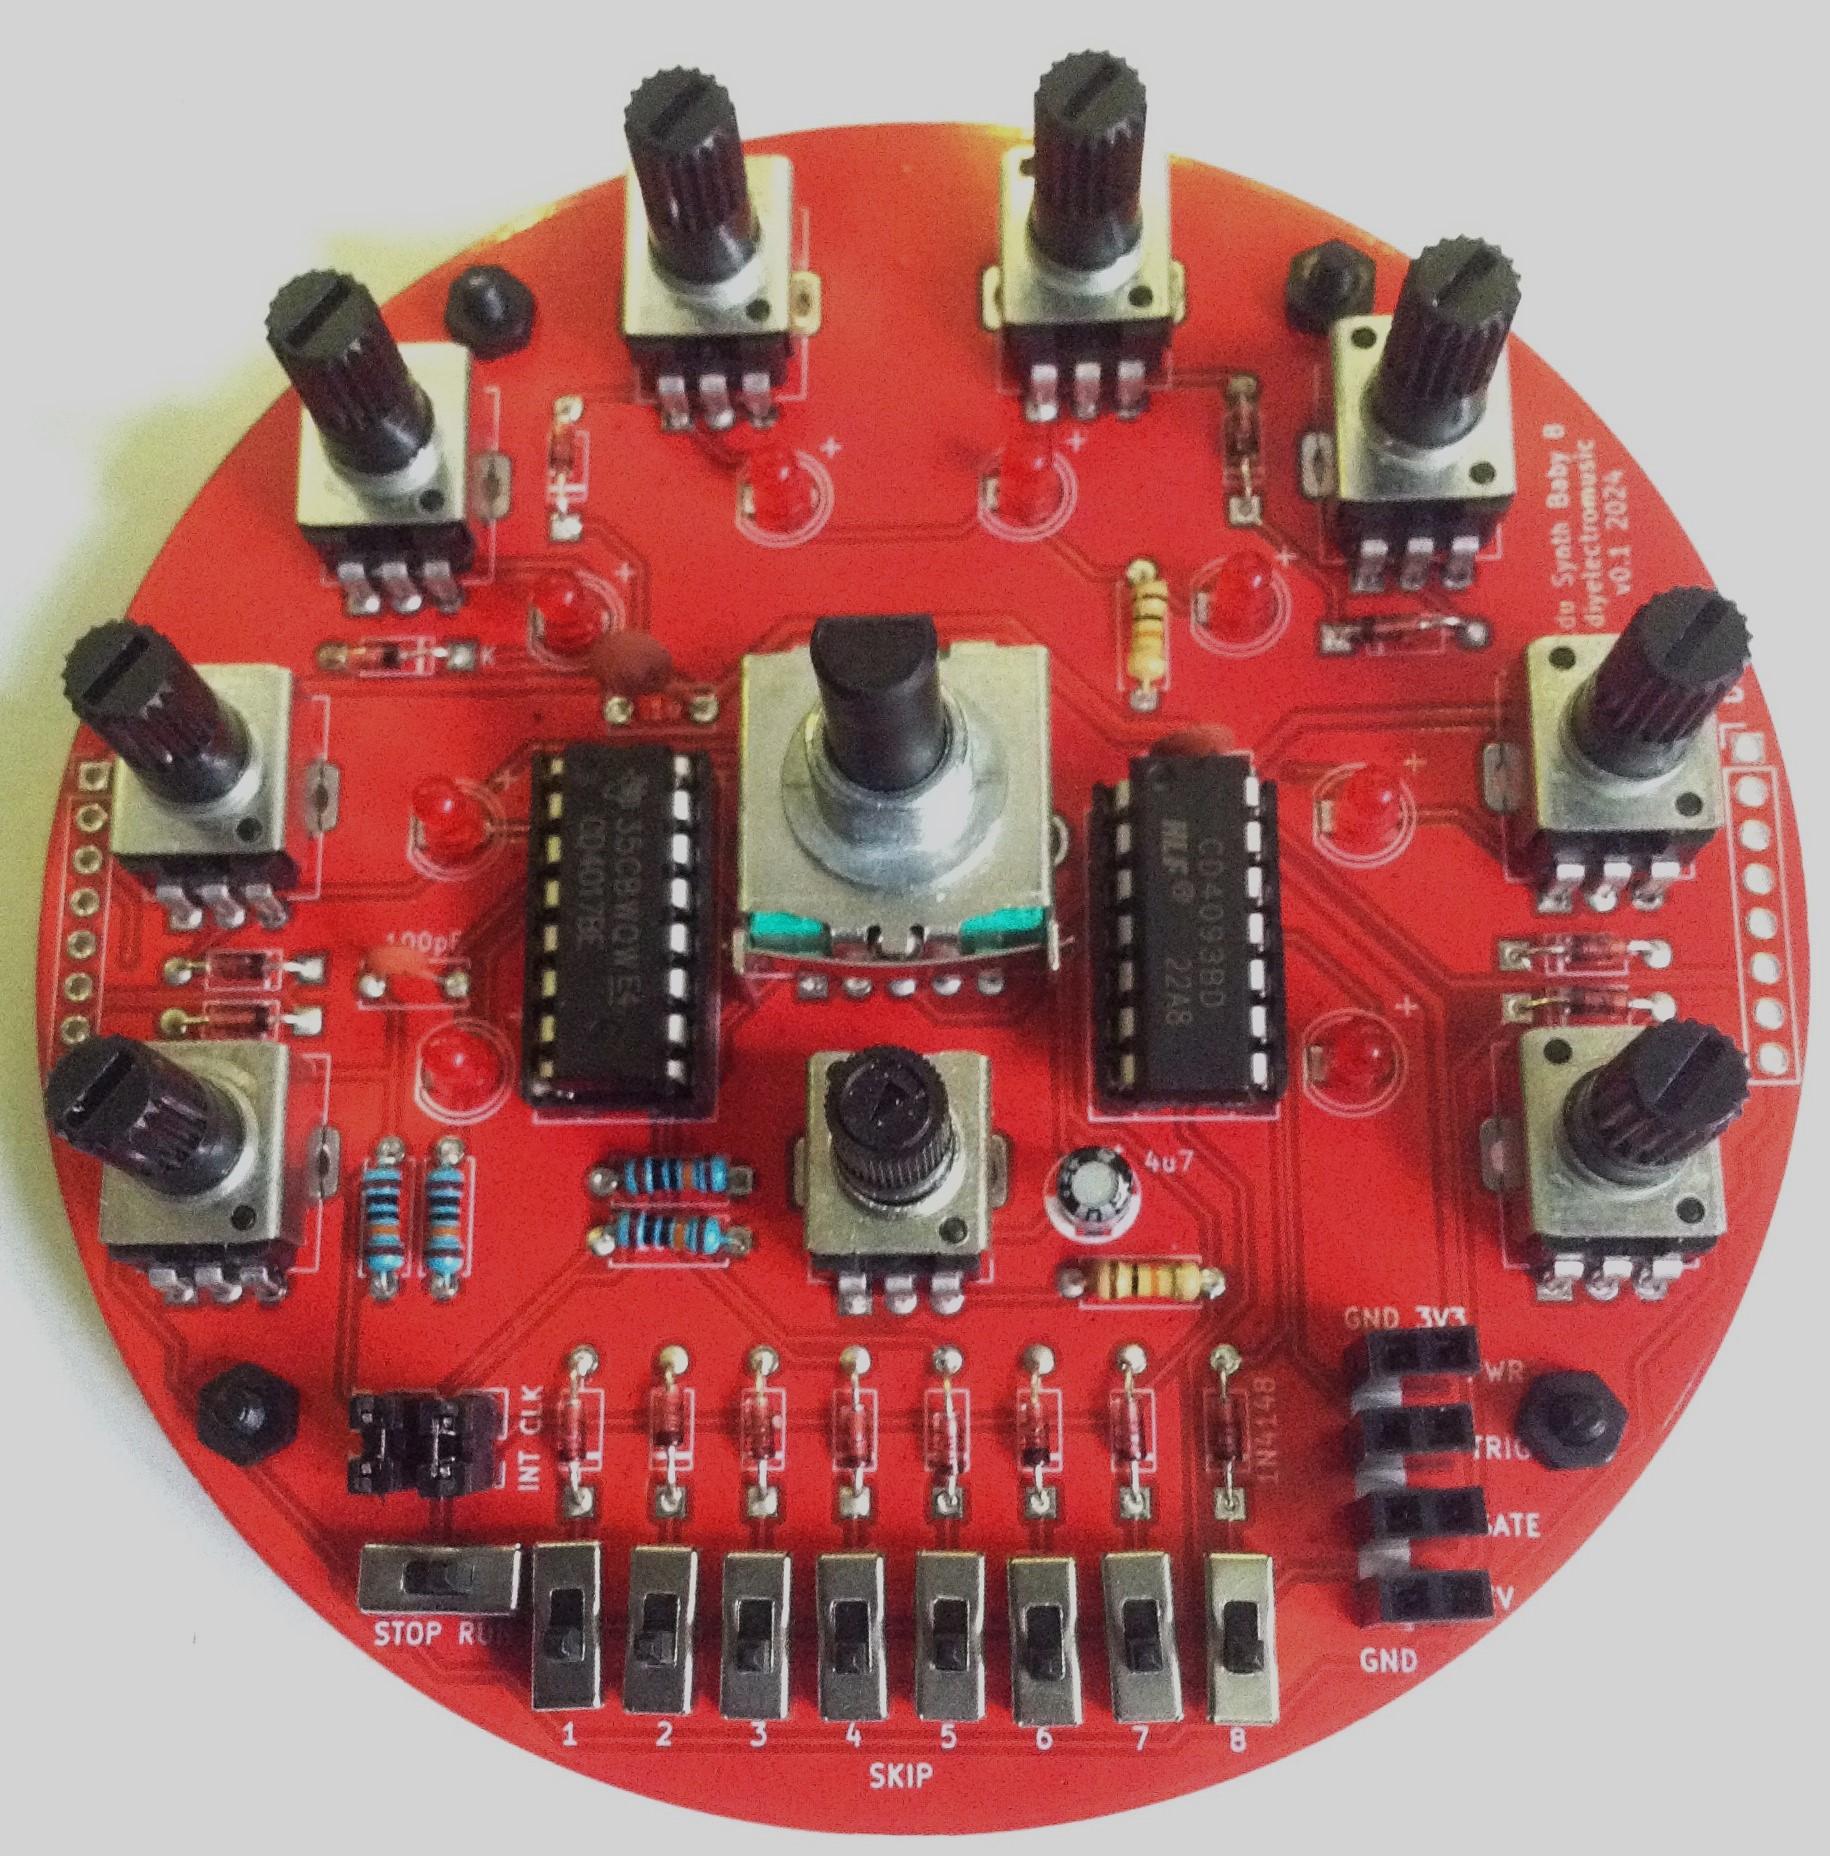
Arduino to ESP32 Synth Thing Baby8

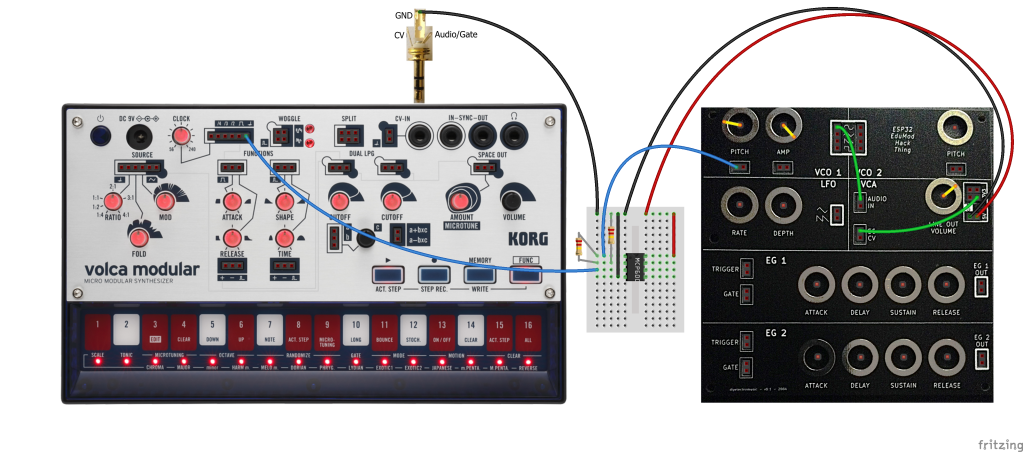
The “Baby8” CV Step Sequencer has an option to be driven by an external clock. If the INT_CLK jumper is removed then it will trigger off whatever is plugged into the CLK header pin (third down from the top of the header).

This means that, assuming the Baby8 is powered off 5V, then any of the Arduino GPIO clock outputs (D8-D13) can be directly connected as shown below.

This is directly connecting the Arduino’s GPIO OUTPUT pins (the clock) to the Baby 8’s 4017 timer CLK pin. As in general terms directly connecting an OUTPUT to an INPUT is deemed an ok thing to do (INPUTs are high impedance as I understand things), i.e. the output of a microcontroller, 555 timer, or NAND oscillator and so on are often set up to drive the CLK pin directly, then connecting it directly to an Arduino GPIO OUTPUT should be fine.

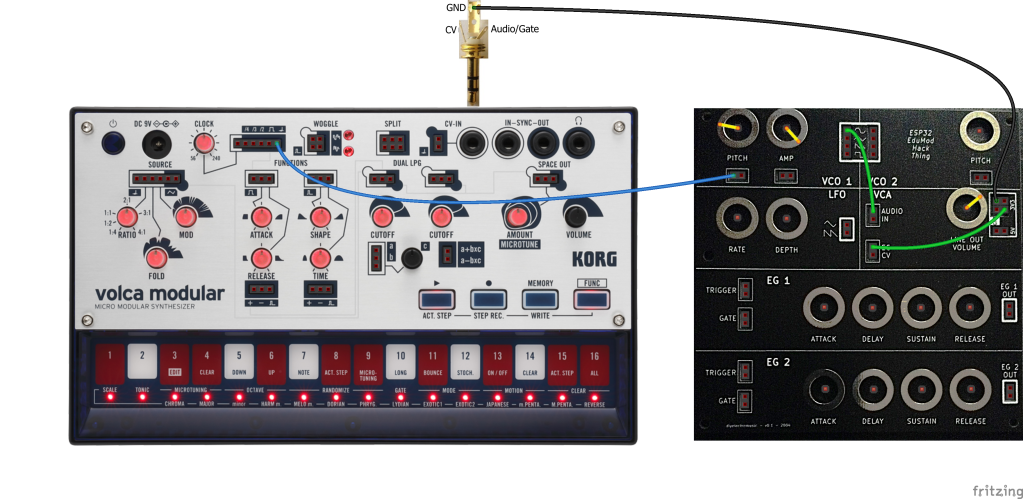
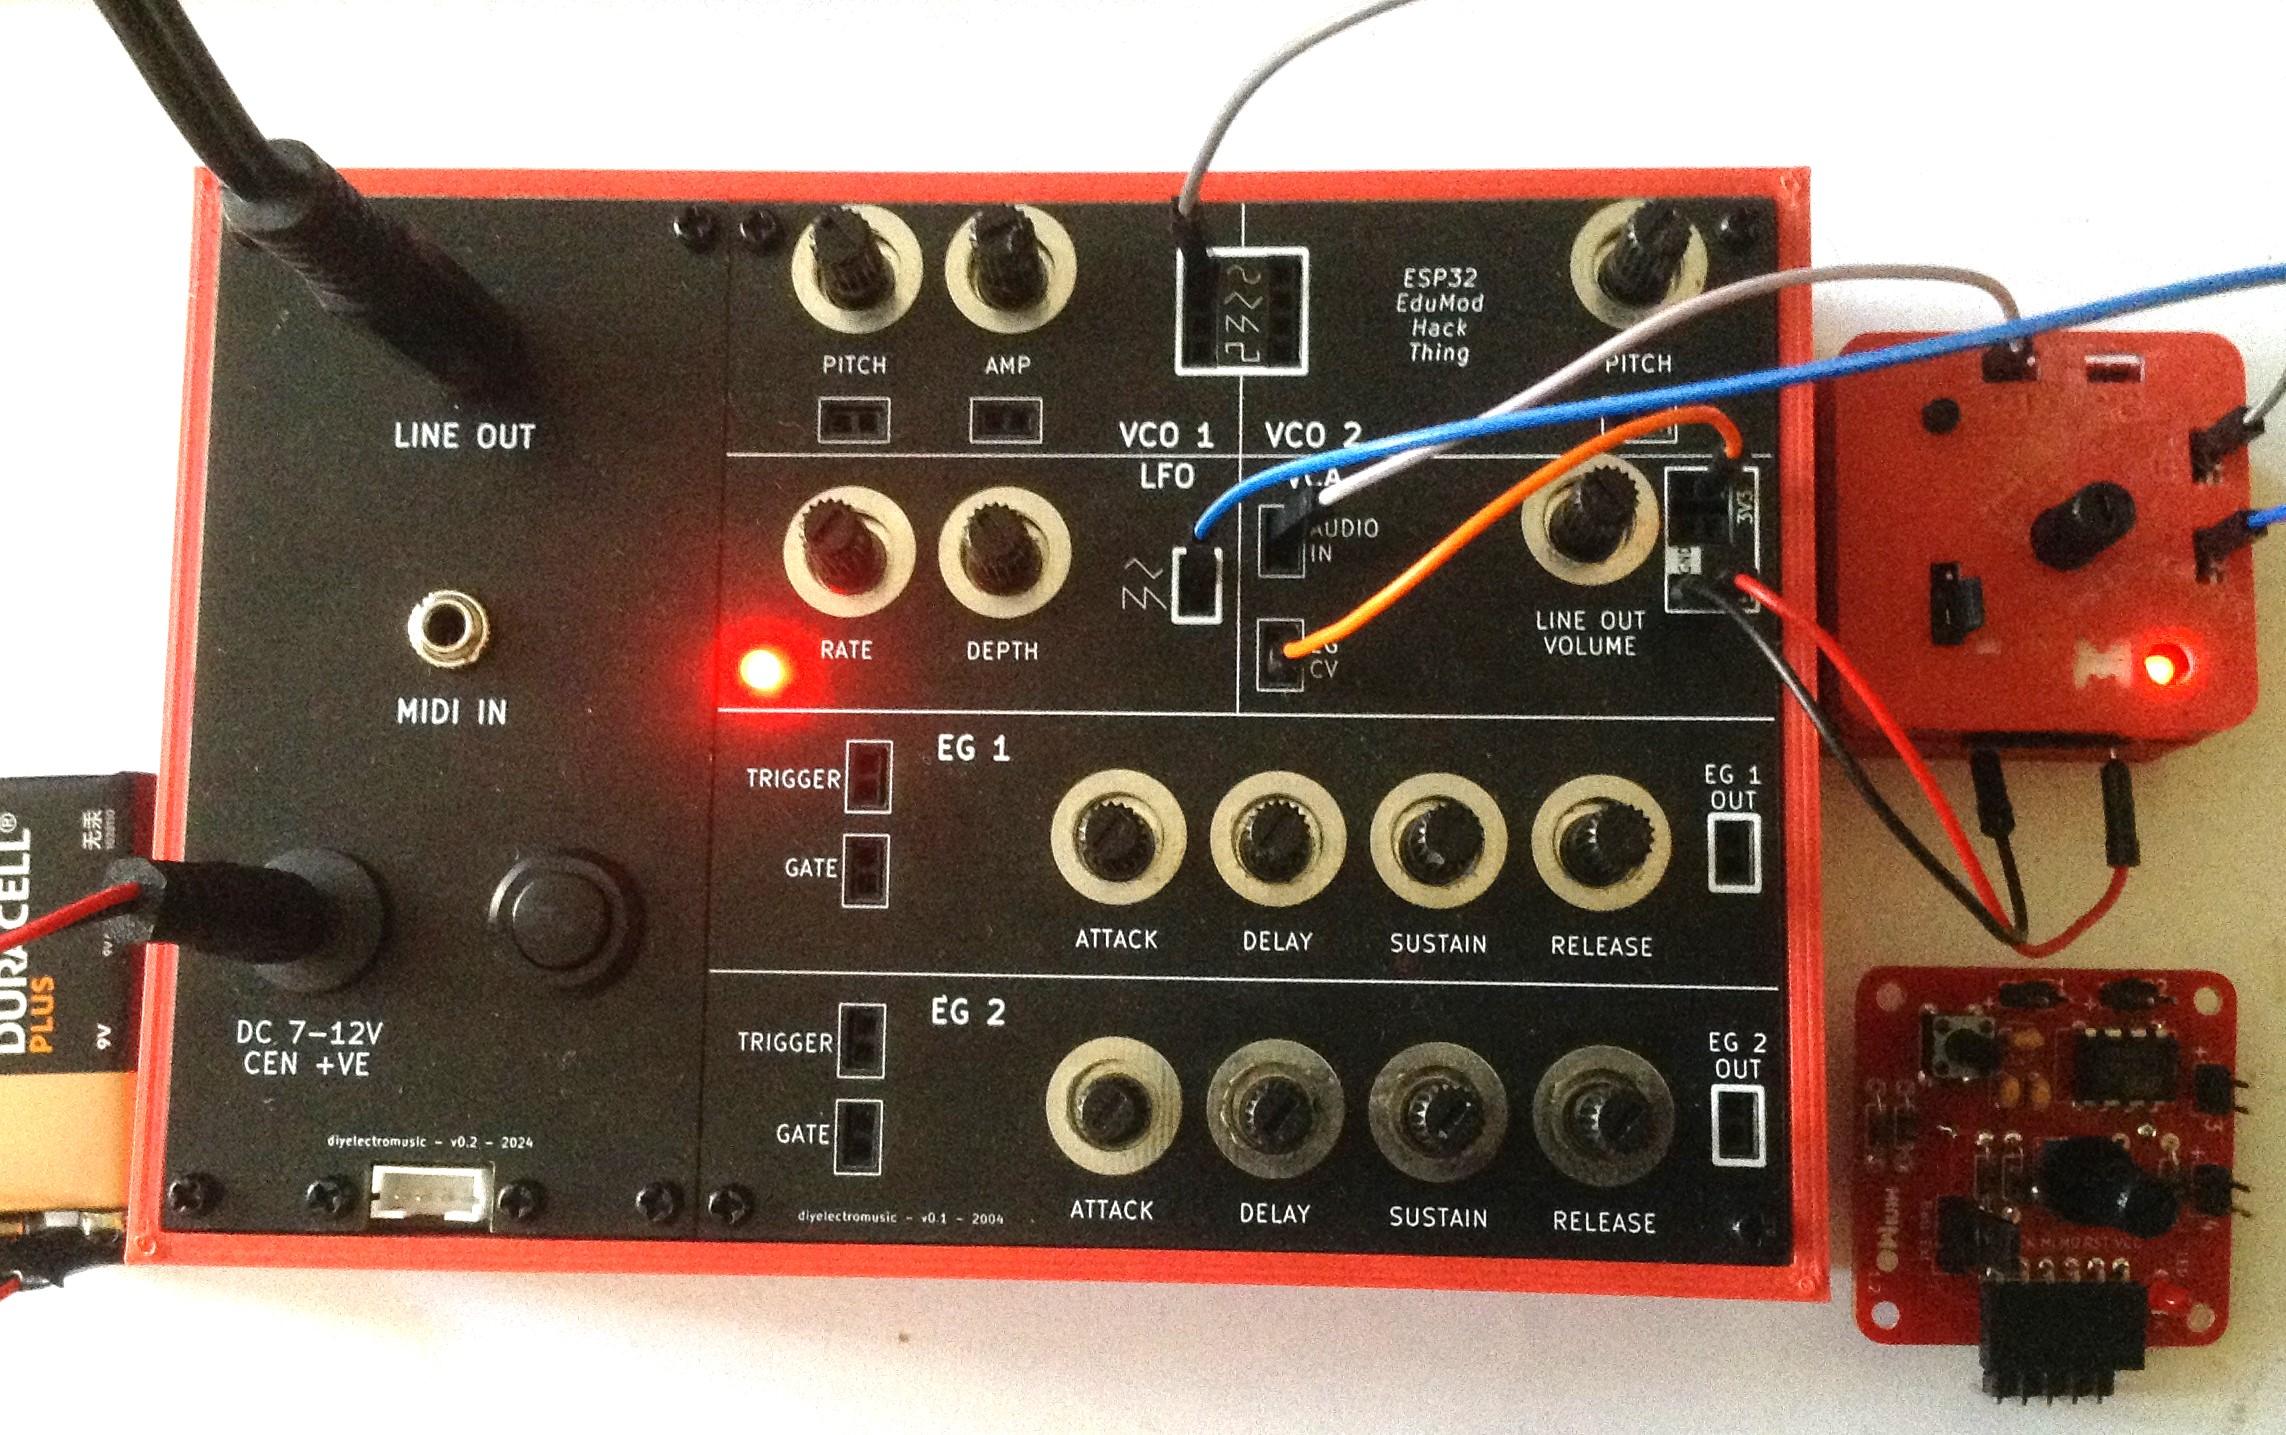
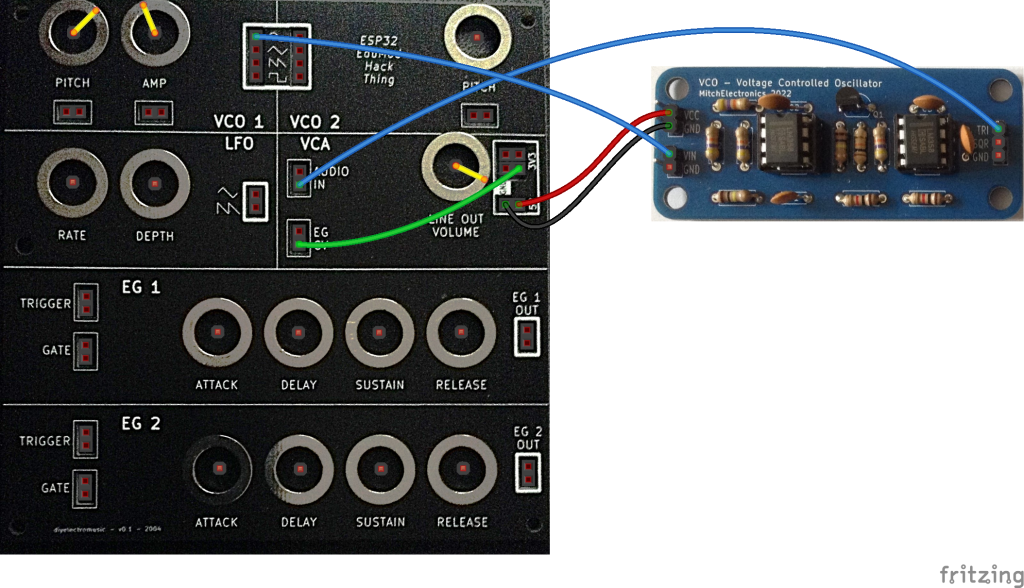
It is also possible to drive the actual Educational DIY Synth Thing itself as it includes 5V tolerant GATE and TRIGGER inputs, but having a regular clock pulse with no pitch CV information is somewhat limited.

But using the Baby8 as shown above with the Synth Thing too should work fine, although if the Baby 8 is powered off 5V then the top of the potentiometer’s range will be slightly too high for the Synth Thing which will top-out at around 3V3. It won’t damage the Synth Thing as the CV inputs are clamped to the 0 and 3V3 power rails.

Closing Thoughts

Naturally getting the logic signal doing the right thing on a GPIO port is only part of the equation. That is only useful if it is able to control something else.

This post looked at some options, from the hacky “quick and dirty” versions through to what ought to be done to do things properly.

I’m still chewing over the idea of some kind of trigger shield or similar PCB.

Kevin

https://diyelectromusic.com/2024/10/07/arduino-euclidean-gate-sequencer-part-2/

#arduinoUno #baby8 #euclidean #gate #midi #stepSequence #synthThing

diyelectromusicdiyelectromusic
2024-09-03

Well it isn't without its quirks, but in essence the cascade works :)

The video shows two of my Baby 8 style sequencers linked together to give a 16 step sequence.

makertube.net/w/iD2K8ett5KDeSS

Simple DIY Electronic Music Projectsdiyelectromusic.com@diyelectromusic.com
2024-09-01

When designing my Educational DIY Synth Thing I always had in mind that I might be able to hook it up to my Korg Volca Modular.

This post looks at the implications and possibilities.

Warning! I strongly recommend using old or second hand equipment for your experiments.  I am not responsible for any damage to expensive instruments!

CHECK YOUR LEVELS AND SIGNALS, DECIDE FOR YOURSELF, AND PLUG THINGS INTO YOUR KORG VOLCA AT YOUR OWN RISK!?

These are the key previous posts for the main concepts used in this project:

If you are new to electronics, see the Getting Started pages.

Korg Volca Modular Signals

According to the manual that comes with the synth, there are the following internal (i.e. patchable) signals:

  • Audio: -3.3V to 3.3V (so 6.6V peak to peak).
  • Unipolar CVs: 0 to 3.3V.
  • Bipolar CVs: -3.3V to 3.3V.
  • Gates and Triggers: 0 or 3.3V.

And of course, any of these signals as an output can be used as an input to another part of the synth.

One additional source of information comes from The Real Volca Modular Specs by Syntherjack where they have observed the following:

  • Some fully modulated audio signals can get to 9V peak to peak.
  • The carrier signal is a clean 4.5V peak to peak triangle wave.
  • The function generator outputs are close to 0 to 3.3V, although the rise-and-fall function (shape/time) trigger appears to get up to 4.5V at times.
  • The sequence gate outputs are 0 to 3.3V, but the pitch output gives a steady CV based on the currently playing note (from a sequence or the keyboard) across the range 0.5V up to around 2.2V. Apparently it follows a 0.5V/oct internal standard.
  • The highest signal observed by Syntherjack was 9.4V peak to peak which implies that all of the Volca’s inputs should be able to take up to that voltage quite happily (otherwise there would be combinations of jumper wires that could fry the Volca!).

The 0.5V/oct comment on the pitch sequencer is interesting. That implies that the internal standard used by the Volca is half of what you’d expect in (say) a Eurorack 1V/oct common setup.

My own Synth Thing uses 1V/oct internally but only has a range of 0 to 3.3V.

So what I have learned? That the triggers and gates should be fine and compatible. That audio may be clipped as the Volca uses +/- 3.3V and I use 0-3.3V. But the Volca’s pitch CV is half that of the Synth Thing.

Volca to Synth Thing Experiments

Volca pitch CV to Synth Thing

The first experiment is to investigate that 0.5V/oct vs 1V/oct thing to see what that sounds like.

This demonstrates the basic connection from the Volca to the Synth Thing. A key point to note is that the GND must be connected together, but the only way to access that from the Volca is from the CV-In socket, which isn’t ideal.

Once the GND are linked, the Sequencer’s pitch output can be connected to the Synth Thing’s VCO1 pitch input and the pitch pot turned until the pitch matches the note played on the Volca. I tuned it to the lowest note on the keyboard and then could easily hear as it went up an octave that the Synth Thing hadn’t matched the pitch again.

As this is the pitch output for both the sequencer and the Volca’s keyboard, this allows the Volca’s sequencer to drive the Synth Thing too.

Some interesting micro-tonal effects are possible, but if I want pitch parity then I’d need to use some kind of amplifier with a gain of 2 on the output of the Volca to get it to match 1V/oct.

Volca Amplified Pitch CV to Synth Thing

There are lots of circuits around for a simple amplifier with a 2x gain, but perhaps one of the best for this type of application might be a classic non-inverting amplifier op-amp circuit.

At its simplest it is as follows:

The gain is 1 + R1/R2 so when R1 = R2 that gives a gain of 2. A MCP6002 is a “rail to rail” opamp so it can work essentially up to the power supply. In this case I’ll power it via the 5V supply from the Synth Thing.

Now there are a number of other considerations with a practical, accurate amplifier but for my purposes I’m putting on my “little knowledge is dangerous” hat and just going for it.

I’ve used two 220K resistors, but the accuracy of the resistors isn’t very good. The principle largely works, but I find that if I tune the two synths to the lower note on the Volca, I can’t quite get an accurate octave above. It may be that using variable resistors it might be possible to tune an octave.

There could easily be issues with non-linear tracking of input and output voltage and voltage drops due to impedance issues, but this is where my (limited) knowledge of electronics reaches its limits.

To be honest, I’m not entirely convinced the pitch tracking in the Synth Thing is very accurate anyway! I really ought to do some calibration tests with constant voltages vs frequency.

This is an interesting experiment and something worth exploring a little more in the future, but for now I’m leaving it here.

Volca and Synth Thing ADSR

The final audio output of the Volca can be obtained from the “Space Out” output. Pairing this with the gate from the sequencer allows me to use the Synth Thing’s ADSR envelope generator.

The key thing to watch out for is having the Volca’s release time too short. If it instantly releases then the release phase of the ADSR will seem not to be working.

The other thing to note is that the Volca sequencers gate output always has a break between notes so it isn’t a continuous gate. But playing quickly could easily overtake the release time from the ADSR.

I’m not sure if it is possible to completely bypass the built-in connection between the Volca’s modules, but it might be possible to connect the Source carrier out signal directly into the LPGs and onwards to the output. But that is pretty much bypassing most of what makes the Volca a Korg Volca Modular so I’m not sure why I’d want to do that 🙂

Synth Thing to Volca Experiments

It is probably prudent at this point to repeat the warnings:

  • Check the voltage levels yourself before you attempt to plug anything into your Volca synth and then decide if you’re happy to do so.
  • Do this entirely at your own risk.

I’m daft enough to take the consequences of toasting my Volca but I am not responsible for damage to anyone else’s!

Using the CV/Gate Input

This is by far the easiest, safest, and probably most reliable way to link into a Korg Volca Modular. I covered this before in my Korg Volca Modular Notes, but to recap:

  • The TRS Left (Tip) is an audio or GATE signal input: “clipped to +/-5V and scaled down to +/- 3.3V”.
  • The TRS Right (Ring) is for CV: “1V/octave signal (0 – +6V)”.

This is how to wire up the Synth Thing LFO to the CV input of the Volca.

It uses a stereo 3.5mm TRS to 3.5mm TRS lead – essentially a headphone lead. I’m using my Sparkfun 3.5mm TRS breakout and a solderless breadboard.

The CV signal is available on the lower of the two breakout jumper headers on the Volca. In the patch above it is connected to the control input (middle) of the first LPG.

Other good candidates for patching the CV to are:

  • Source modulation control input.
  • Source fold control input.
  • Space out control input.

You can also get some curious effects by using the “a+bxc” utility module to combine the CV In with one of the internally generated control signals, e.g. the first LPG “+” output.

The CV In can be linked to the Source pitch input too, but there is no way that I’ve found so far of combining a pitch CV input with the keyboard, so the pitch becomes fixed by the CV input only at this point – i.e. it controls the carrier frequency, not the modulator (as far as I can see).

Synth Thing EG controlling the Volca

It is possible to trigger the Synth Thing envelope generator and use the resultant control signal back in the Volca via the CV in as shown below.

The key for this working is to use the Volca’s sequencer GATE output as the GATE and TRIGGER for the Synth Thing’s ADSR envelope generator and then feed the EG output into the Volca’s CV In. The Volca’s CV In is then connected to whatever is to be controlled by the EG – in the above case the first LPG.

Unlike the previous approach that fed the Volca’s output through the Synth Thing’s EG, this now replaces the built-in AHD attack and release EG of the Volca which leads to a much easier to understand set of controls.

Direct connections between Synth Thing and the Volca

Whilst it should be possible to connect the Synth Thing’s patch wires directly into various parts of the Volca, in the end, I decided there wasn’t anything at this point in time that couldn’t be achieved using the official CV In link.

So for the time being, I’ve not experimented further with any direct connections that bypass the official CV In.

Closing Thoughts

I’m intrigued by the 0.5V/oct thing and need to do some further testing of the Synth Thing’s response, but then I was never really happy with how the pitch and amplitude inputs for the VCOs were working. It is on my “todo” list to look into a more efficient way of sample the ESP32’s ADCs.

But I am quite impressed with the possibilities of the CV In on the Volca. Now I’ve explored and noted the basics I’ll have to see what the full “art of the possible” might be.

Kevin

https://diyelectromusic.com/2024/09/01/educational-diy-synth-thing-meets-korg-volca-modular/

#controlVoltage #cv #envelopeGenerator #korg #synthThing #vco #volca

diyelectromusicdiyelectromusic
2024-09-01

I've now published my design, build and usage notes for my "Baby 8" style CV step sequencer for use with my ESP32 Educational Synth Thing.

Full details can be found linked off the following, which includes a short video of it in use: diyelectromusic.com/2024/09/01

Kevin

Photo of a red, circular PCB with 8 pots and LEDs around the edge, a pot and rotary switch in the middle, and a set of slider switches at the bottom.  The PCB is fully populated and there are two ICs near the middle.
Simple DIY Electronic Music Projectsdiyelectromusic.com@diyelectromusic.com
2024-09-01

These are the usage notes for my “Baby 8” style sequencer based on the ideas presented in “Baby8” CV Step Sequencer – Part 1 and using the PCB I’ve described in part 2 and part 3.

  • Part 1 – This post with the introductory design information.
  • Part 2 – The design for a PCB based on the principles in the first post.
  • Part 3 – The build and test notes for the PCB.
  • Part 4 – Usage notes for the PCB and how to use it with the Educational Synth Thing.

The video shows it connected up to my Educational DIY Synth Thing.

https://makertube.net/w/vP4orcyfKqkRYG8qn5Z9p5

Warning! I strongly recommend using old or second hand equipment for your experiments.  I am not responsible for any damage to expensive instruments!

If you are new to electronics, see the Getting Started pages.

Basic Single Use

The jumpers must be set as follows for single-use:

The key controls and principles of operation are as follows:

  • Tempo is set by the central potentiometer.
  • The number of steps is set using the rotary switch to between 1 and 8.
  • The pitch of each step is set by each of the 8 potentiometers to between 0V (off) and almost the power level of the supply (3V3 or 5V).
  • Each step can be skipped, but this only skips generating the GATE and TRIGGER signals. The CVs are still updated.
  • The TRIGGER signal has a pulse width that matches the current clock, so will be longer for slower tempos.
  • If all steps are active then the GATE signal will be on constantly.
  • CVs are constantly generated for all steps regardless of the use of TRIGGER or GATE.
  • The “run” switch can be used to pause the clock.

The following trace shows the interactions between the TRIGGER (yellow), reset signal (blue), clock (magenta) and GATE (darker blue) for a switch pattern where steps 2, 5, and 6 are being skipped.

Note that pattern has just started to repeat with the next step 1 and the skipped step 2 just on the screen.

Cascading Units

There are two 8-way headers on the boards with pins as follows:

This means that it should be possible to plug the boards directly into each other, change the jumper settings and have the boards work in a cascade mode.

The final E_RST_OUT must be routed back to the first E_RST_IN. This can be done with a long jumper wire connecting the two “EXT” pins.

But there is also a “RTN” header pin which has no other purpose than to provide an internal return path back through each board, so one only has to jumper these two signals together at each end to make the return link, as shown below.

The “RST” jumper must be removed to enable cascade mode (note: this is labelled “INT RST” on V1 of the board, but “EXT RST INT” on V2).

Photo on the right shows the jumper set for external cascade operation. Photo on the left shows the jumper set for internal operation.

Reducing the Steps

The two step selection switches will still work, but note that pots for the resetting step will still be active when cascading. This means that if the pot is turned up higher than any of the other units steps then that voltage will dominate the CV output.

It is therefore important that the pots for any skipped steps are turned right down to zero.

Note: skipping steps works as before – i.e. it results in no GATE or TRIGGER signal but does not skip the CV output itself.

Cascading Clocks

When cascading the sequencers, all but one should have their clocks disabled. This means removing the “INT CLK” jumper. The board that retains its jumper will be the master clock for all the boards.

External Clocks

In principle it would be possible to disable the clock on all modules and have then driven by a completely external clock signal via the external IN CLK signal. Similarly in principle it would be possible to hook up the CLK signal of the external OUT header to another device.

Warning: This is not recommended as there is no protection circuitry for completely external signal inputs such as a clock or to drive completely external devices.

Cascading Two Units

https://makertube.net/w/iD2K8ett5KDeSSi6maHtox

Use with the EduModSynthThing

A key reason for building this was to be able to use it with my Educational DIY Synth Thing. The following diagram shows how to do that for a module in single mode.

The key connections are:

  • GND and 3V3 to the Baby 8 GND/3V3 power input.
  • Baby 8 CV OUT to one of the VCO pitch inputs.
  • Then there are some options:
    • Ignore TRIGGER and GATE on the Baby 8 and just connect 3V3 to the VCO CV.
    • Connect TRIGGER and GATE on the Baby 8 to one of the EGs.
    • Connect GATE on the Baby 8 to one of the EGs and then patch TRIGGER and GATE together.
    • Connect TRIGGER on the Baby 8 to one of the EGs and then patch TRIGGER and GATE together.

TRIGGER will determine when the envelope generator starts (or restarts) the envelope. GATE determines when the release phase will start – i.e. when the GATE is released.

Just using the GATE as both gate and trigger means that a new sound will only be triggered after a skipped step. Just using the TRIGGER as both gate and trigger will mean that each note lasts half as long as the clock as each.

A key consideration is that the Baby 8 GATE will never be off if no steps are skipped, so the envelope will never start a release phase.

Another consideration is that if the release takes longer than each step, then subsequent steps, even if skipped, will still sound as the CVs are continually generated.

Closing Thoughts

It takes a bit of thinking about to realise how the GATE and TRIGGER signals interact with the envelope generator of the synth. But that is kind of the point – it is meant to allow simple experimentation to help understand what is going on.

In short, I’m really pleased with how this has come out and once I realised the CV issue with skipped steps, the cascading seems to work fine too.

Kevin

https://diyelectromusic.com/2024/09/01/baby8-cv-step-sequencer-part-4-in-use/

#baby8 #pcb #sequencer #synthThing

diyelectromusicdiyelectromusic
2024-08-09

I've added some notes for how to use a MiniMo "Mini Modular Synth" with my own Synth Thing.

There is a lot of potential here, especially using the processing modules such as the phaser, delay or resonant LPF.

diyelectromusic.com/2024/07/02

Photo of my Synth Thing (as per previous posts) hooked up via jumper wires to a MiniMo mini-synth.  The MiniMo is powered from the Synth Thing and takes its pitch input from the Synth Thing VCO and sends its audio output back to the Synth Thing's VCA.
Simple DIY Electronic Music Projectsdiyelectromusic.com@diyelectromusic.com
2024-07-14

Ok, so this is yet another final, “final” part, but having produced my Raspberry Pi Pico MIDI Touch Keyboard PCB I wanted to show how it could be hooked up to my Educational DIY Synth Thing.

This includes a variant of the accessories panel that supports a connector for the Pico touch keyboard.

Optional additional things to try:

Warning! I strongly recommend using old or second hand equipment for your experiments.  I am not responsible for any damage to expensive instruments!

If you are new to electronics, see the Getting Started pages.

Independent Connections

The first option is to power the Pico via its own USB connector and just use a 3.5mm stereo jack to jack cable for the MIDI connection between the Pico’s TRS MIDI OUT and the Synth Thing’s TRS MIDI IN.

This is probably the simplest way to connect the two devices and in this manner it is no different to attaching any other MIDI controller via TRS MIDI to the Synth Thing.

Synth Thing’s Power

The second option is to use the Synth Thing’s 5V output and the MIDI input as shown below.

Here the 5V output powers the Pico keyboard directly but the MIDI connection is still provided by the two TRS sockets.

Integrated Synth Thing Panel

The final option uses an updated Synth Thing accessories panel to provide a JST SH connector compatible with that on the Pico touch keyboard.

The idea is to include a JST SH connector accessible at the bottom of the panel to allow a single 4-way JST SH jumper cable to link the Synth Thing to the Pico keyboard.

The pinout of the JST SH socket will match that on the Pico Keyboard and includes power and MIDI. The pins are (from left to right, looking from the top):

  • MIDI Pin 4 – MIDI Pin 5 – 5V – GND

Note: MIDI cannot be used via the TRS and JST SH connectors at the same time!

I’ve also taken this opportunity to fix a few niggles with the original panel – the font sizes and I remember to change the hole for the power switch to a 12.5mm diameter hole.

A small breakout board is required for the JST SH connector to allow it to be mounted on the panel.

This PCB is actually two breakout boards supporting the mounting of the connector in either orientation. It needs to be cut into two and the JST SH soldered on.

To construct the panel is largely a repeat of the previous process, but now there are some additional connections required to the JST connector.

One of those is a 5V power link. The easiest way to access that from the Synth Thing main board is via the 5V-VCC jumper headers, so I’ve soldered up a simple cable with two jumper header socket on one end and a link to the JST SH breakout 5V at the other.

The breakout requires 4mm M2.5 spacers. It also requires a couple of small screws. I only had 6mm screws so ended up trimming the ends off. I didn’t have any nylon 4mm spaces so had to use brass, but I’d have used black nylon if I had them.

The breakout requires a tap into the MIDI connections, 5V (as mentioned previously) and GND.

Looking from the back, the order (from left to right) is: GND-5V-MIDI 5-MIDI 4.

The JST SH connectors are meant to interlock with each other, so they don’t come apart so easily. For the Synth Thing end of the connector wire, I’ve cut off the interlocking lugs to make it easier to pull off.

The files for the new panel and the JST SH breakout have been added to the GitHub repository.

Closing Thoughts

The updated panel makes for a really neat “all-in-one” connection to the keyboard.

I’ve added a simple 3D printable case, which is very in keeping with the design of the Synth Thing too.

Kevin

https://diyelectromusic.com/2024/07/14/educational-diy-synth-thing-part-7/

#esp32 #midi #raspberryPiPico #synthThing #touch

diyelectromusicdiyelectromusic
2024-07-12

Ian from Electromaker has included my DIY synth thing in his latest Electromaker Show! :)

youtube.com/watch?v=xI9qvM2XHB

Simple DIY Electronic Music Projectsdiyelectromusic.com@diyelectromusic.com
2024-07-02

My Educational DIY Synth Thing is meant to be a platform for experimenting and one easy way to get started on that is with the addition of some off-the-shelf audio and synthesizer-oriented electronics kits.

Optional additional things to try:

This post will collect together any kits I’ve bought that seem to work pretty well with my Synth Thing. I’ll come back and update it as I add more things I’ve found that work.

Important Note: In most cased I’ve just stumbled across these kits and bought them myself directly. I’ve not been asked to mention them or been sponsored in any way by the people who have made them. They are all just neat kits I’ve found that seem to work ok with my Synth Thing. No endorsement or fit for any purpose is implied. Other kits, I’m sure, are available! In fact feel free to drop me a note of any you know about in the comments. 🙂

Warning! I strongly recommend using old or second hand equipment for your experiments.  I am not responsible for any damage to expensive instruments!

If you are new to electronics, see the Getting Started pages.

Mitch Electronics Synth Kits

Mitch Electronics produce some pretty simple, inexpensive, soldering kits, several of which have audio or synthesizer related purposes. I picked up the following:

The build guides are very well done, schematics are published online and one feature I particularly liked is that each guide includes a link to an embedded version of what looks like Lush Projects Javascript based Circuit Simulator set up for the circuit for that kit. That is a really nice touch!

Each guide has a description of how the circuit works which again is really easy to follow. My only criticism is that it might have been useful to add the specs for each module to the guides too so that all the information you’d need for further integration can be found in one place. The specs are on the product page in the shop area at the time of writing, but not the guides themselves.

Notes about the kits:

  • As the oscillators are based on the LM358 they can probably be powered by quite a range of voltages. The spec suggests 5-16V.
  • The oscillators output a square wave at 0 to VCC-1.5V. The triangle is a lot less.
  • The oscillators have a frequency range of 0 to 36kHz (ish, depending on VCC and tolerances of components).

Voltage Controlled Oscillator

I’ve hooked this up to my Educational DIY Synth Thing as follows:

Note I’m using the 5V supply to power the board. This will give me a maximum voltage to feed back into the synth thing of ~3.5V.

In use I found that the triangle wave has a much lower amplitude, but also a DC offset, so the signal is around ~1.3V pp with a DC bias of around 1.8V or thereabouts. Note this is still fine to get fed back into the audio input of the VCA stage of the synth thing.

I’ve configured it so that the Synth Thing VCO1 is acting as the control voltage for the Mitch Electronics VCO. Having control over the frequency and amplitude gives all sorts of possibilities for frequency modulation, as can be seen in the following oscilloscope trace. This is a trace at the audio input to the VCA, hence the bias in the signal is evident. This is a trace of the Synth Thing VCO outputting a sine wave into the Mitch Electronics VCO outputting a triangle wave.

The VCO is excellent for use with my Synth Thing. The only downside is that the square wave output is so much louder than the triangle wave, but that can be compensated for if required.

Simple Function Generator

The Simple Function Generator (SFG) works fine, but its application “out of the box” with the Synth Thing is a little limited. Given how the Synth Thing isn’t very good at modulating its own oscillators at audio frequencies, the SFG could be used as an independent oscillator but not much else.

However, if C1 (100nF) is replaced with a 10uF non-polar capacitor then the frequencies generated are in the range 0.5Hz to around 1kHz which is much more use to me as an additional LFO. Note I believe it has to be a non-polar capacitor rather than an electrolytic as I think the voltage is oscillating across the capacitor. But I could be wrong.

Here is how to use it as an LFO for the VCO1 pitch CV input. Notice that C1 has been changed.

555 Synth Punk

The 555 Synth Punk is a fun thing. This is essentially an Atari Punk Console with one of the pots replaced by a series of button-activated tunable presets. This in theory allows for five “notes” to be tuned up. In practice this isn’t as easy as it sounds due to the nature of the APC and the stepping function.

One minor annoyance for me is that the buttons are ordered so that the lowest note corresponds to the button on the right hand side. I really wish it was the left as you’d expect with a keyboard. There is room for expansion to more buttons, but as far as I can see no option for integrated this into my Synth Thing other than taking the audio output itself. There is no access to the voltage control for example. But this is a neat kit none-the-less.

Summary

The Simple Function Generator and 555 Punk Synth are neat kits for stand-alone purposes and general messing around as they stand.

But the VCO and a tweaked SFG are perfect for adding to my Synth Thing as an extra oscillator and LFO.

Rakit Baby8

The Baby8 sequencer is a pretty common circuit around the Internet and there are a number of kits available in a variety of form factors.

I have a Rakit version, which can be found here: https://www.rakits.co.uk/product/baby8-sequencer/

This is a pretty nice kit and can be used to generate a 0-5V CV and 5V gate signal for driving an analog synth. I’ve hooked it up to my Synth Thing as follows.

The Rakit Baby8 has a 6-way header which can be used to tap off the power, CV and gate signals and is designed to match up with the Rakit APC kit (which I also have). The header has the following pinout:

  • 5V VCC
  • APC CV1
  • APC CV2
  • Gate
  • Normal CV
  • GND

In this case, I’m not using the APC compatible CVs (I believe they are scaled to drive the APC in a more useful manner) or the 5V VCC connection. I’ve just connected the two GNDs together and then hooked up the normal CV and gate signals to my Synth Thing as follows:

  • Baby8 CV -> VCO1 Pitch.
  • Baby8 Gate -> EG 1 Gate+Trigger.

Here is a short video of it in action. This is a great kit!

https://makertube.net/w/nB8uXAXsM3r5LXp5WT2Hqg

MiniMo

One of the existing synths that started me off down this page was the MiniMo synth, based on an ATtiny85 so naturally it is worth looking at how this can be used with the Synth Thing too.

This shows how to connect it up as an additional oscillator (in DCO mode).

Key points:

  • The MiniMo could be powered from its own batter, 5V or 3V3. I’ve used 5V which comes directly off the regulator in the Synth Thing rather than via the ESP32 module (which is the case for the 3V3 link).
    • The above shows how to connect GND and 5V to the MinoMo.
    • Note that the power jumper on the MiniMo (shown in orange) must be set to “Ext”.
    • In principle this means the MiniMo output could reach 5V too, but that is not an issue for the VCA’s audio input.
  • Either of the outputs (jumper 1 or 2) from the MiniMo can be sent to the Audio In of the VCA. Only the “+” link is required as the GNDs are already tied together via the power link.
  • The output from the Synth Thing oscillators (VCO or LFO) can be used to drive either the pitch (input 3) or amplitude (input 4) of the MiniMo. Again only the “+” link is required.

In the above, I’ve linked the LFO of the Synth Thing to the amplitude of the MiniMo; the VCO of the Synth Thing to the pitch; and used a constant input to the VCA (from 3V3 volts).

Some internal adjustments of levels on the MiniMo may be required as the Synth Thing is sending in 3V3 level control voltages, but in practice it seemed to work fine for me.

MiniMo as a Signal Processor

Several of the MiniMo programs perform signal processing:

In each of these cases, Input 3 is the modulation control and Input 4 is the audio signal in. These can be used by connecting Input 3 (modulator) to the Synth Thing for a control voltage – e.g. from the LFO; and connecting Input 4 (audio) to one of the Synth Thing’s audio signals – e.g. the output from the VCOs.

These will require the re-programming of the MiniMo. There are details of how to do that on the original MiniMo site here; and some details of how to get this working with a more recent Arduino environment here.

Closing Thoughts

I’m really pleased at how usable these integrations with other kits are. The Mitchelectronics VCO/LFO is a really useful addition. The Rakit Baby8 works great. The MiniMo has lots of possibilities for additional signal processing.

If you know of an interesting kit that might work well with the Synth Thing, be sure to let me know in the comments!

Kevin

https://diyelectromusic.com/2024/07/02/educational-diy-synth-thing-part-6/

#apc #baby8 #esp32 #mitchElectronics #oscillator #rakit #synthThing #vco

Client Info

Server: https://mastodon.social
Version: 2025.04
Repository: https://github.com/cyevgeniy/lmst