
@catsalad I realy need like a "Retro #FrontPanel" like that for the #tiny486…
#frontpanel

Ask Hackaday: How Do You Make Front Panels? https://hackaday.com/2024/06/20/ask-hackaday-how-do-you-make-front-panels/ #HackadayColumns #AskHackaday #frontpanel
Explosion-Scarred Scope Gets Plastic Surgery Hackerspace Style https://hackaday.com/2024/01/02/explosion-scarred-scope-gets-plastic-surgery-hackerspace-style/ #RepairHacks #frontpanel #hantek #repair
Your Home Mainframe https://hackaday.com/2023/12/28/your-home-mainframe/ #Retrocomputing #blinkenlights #frontpanel

May I present to you:
The most #cursed #FrontPanel Configuration I did to this day:
It has everything I could get my hands on to this day.
Not shown are the internal 3,5" 1440kB #FDD i had in it earlier, but swapped it for the #FloppyEmulator cuz it was annoying that #Linux constantly checked if a #Floppy was in the drive.


#modular #synthesizer in #Buchla style. #Frontpanel of a Quad Function #Generator 281 clone.
All made by me.


I found a forgotten #frontpanel for #Hagiwo FM and Chords #VCO in my drawer, so I built it.


For many of us, the bane of electronic projects is making a professional-looking enclosure. Sure, 3D printing has made it easier to make the actual enclosure, but there's still the problem of labeling it. [Richard Langner] has the answer with something he calls easy front panels. You can read about it or watch the tutorial video below.
The concept is easy enough. You create your beautiful artwork in your choice of graphics programs. The example uses Inkscape, but you could do it in anything, even PowerPoint. You print it out and cut it to size. You could, of course, print it in color or -- as the example does -- color it in by hand.
Even if you print in color, [Richard] suggests you print a black border around holes and then use a black marker to color it to hide any imperfections in cutting. For the next step, you place the artwork in a laminator pouch and laminate it. We wondered if any of the self-laminating pouches would work as well.
After lamination, you trim almost to the edge. The instructions say to leave 1 mm to avoid losing the laminate seal. It is best not to cut holes in the laminate (for example, for the display window) unless absolutely necessary. One thing missing was how the finished front panel attaches to the box. We presume some glue that sets thin would do the trick.
The box looks great and this seems easier than using, say, waterslide paper to create labels. You could also get fancy by using laser printer foil or other printing tricks as long as they will survive the lamination step.
A laminator can have many uses around the shop. You can even use it in your PCB fabrication.

Reverse Engineering a Topfield VFD Front Panel
Hackers love the warm glow of a vacuum fluorescent display (VFD), and there's no shortage of dead consumer electronics from which they can be pulled to keep our collective parts bins nicely stocked. Unfortunately, figuring out how to actually drive these salvaged modules can be tricky. But thanks to the efforts of [Lauri Pirttiaho], we now have a wealth of information about a VFD-equipped front panel used in several models of Topfield personal video recorders.
The board in question is powered by a Hynix HMS99C52S microcontroller and includes five buttons, a small four character 14-segment display, a larger eight character field, and an array of media-playback related icons. There's also a real-time clock module onboard, as well as an IR receiver. [Lauri] tells us this same board is used in at least a half-dozen Topfield models, which should make it relatively easy to track one down.
After determining what goes where in the 6-pin connector that links the module with the recorder, a bit of poking with a logic analyzer revealed that they communicate over UART. With the commands decoded, [Lauri] was able to write a simple Python tool that lets you drive the front panel with nothing more exotic than a USB-to-serial adapter. Though keep in mind, you'll need to provide 17 VDC on the appropriate pin of the connector to fire up the VFD.
What's that? You don't need the whole front panel, and just want to pull the VFD itself off the board? Not a problem. Our man [Lauri] was kind enough to document how data is passed from the Hynix microcontroller to the display itself; critical information should you want to liberate the screen from its PVR trappings.
If you manage to get your hands on one of these modules, it would be an ideal addition to a custom media streamer. Though we suppose simply turning it into a network-controlled clock would be a suitable alternative if you're looking for something a bit easier.
#parts #consumerelectronics #frontpanel #hynix #python #reverseengineering #salvage #topfield #uart #vfd

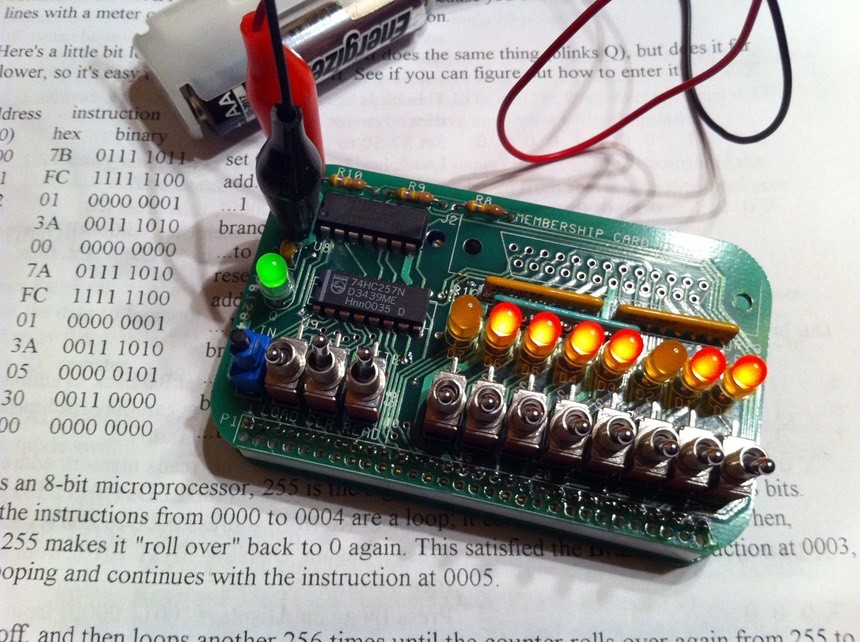
Multithreading? Virtual memory? Supervisor mode? Floating point? Multiply and divide? All unnecessary! The 1802 doesn't even have a subroutine call. Or a dedicated PC register.
https://en.wikipedia.org/wiki/RCA_1802
As for computers, well, they certainly don't need sound. Or video. Or keyboards. See Lee Hart's membership card:
http://www.cosmacelf.com/gallery/membership-cards/
You *do* need blinking lights though.
Client Info
Server: https://mastodon.social
Version: 2025.07
Repository: https://github.com/cyevgeniy/lmst