#scienceExperiments

2025-10-07

Amusing Experiments (after Martin Gardner) by Martin Gardner; M. Stoliar ; L. Fomin


SCIENCE READER FOR THE EIGHTH FORM OF SECONDARY SCHOOL

In this book you will find descriptions of amusing experiments which are based upon well-known scientific facts. You can easily carry out these experiments yourselves, and you will not need any special equipment. But if you wish to show the experiments to your friends, we advise you to practise them a few times before you demonstrate.
The experiments are not only amusing: after you have carried out each experiment and read the explanation, you will learn something interesting and important in such fields of science as mathematics, physics, chemistry, biology, astronomy and psychology.

The book will help you to learn a number of new English words which are connected with science. When you have learned them, it will be much easier for you to read scientific literature in English in the senior forms. At the end of the book you will find the vocabulary of the words which you may not know. Some of the terms are given in the footnotes. We hope that you will find the book interesting and easy to read, and that it will help you to become science-minded people.

You can get the book here and here.

Twitter: @MirTitles
Mastodon: @mirtitles@mastodon.world
Mastodon: @mirtitles@mastodon.social
Bluesky: mirtitles.bsky.social

CONTENTS

ASTRONOMY

Prove That the Sum of All the Angles of a Triangle Is 180°
You Can Push a Coin Through a Smaller Hole
How Long Is the Diagonal of a Square?
Short Bridges
The Pythagorean Theorem
How Many Matches Are There in Your Hand?
A Trick with Dice
The Wonderful Window
Quick Addition
An Interesting Way to Multiply Numbers
Strange Mathematics
Magic in Mathematics
PSYCHOLOGY

Hot or Cold?
“Moscow in the Spring”
It Is Easy to Remember Some Facts
PHYSICS

Watermarks
Spectrum on the Ceiling
A Device to Copy Pictures
An Experiment with a Box of Matches
The Forks Will Not Fall Down
How to Break a Strong Rope
A Lemonade-straw Can Go Through a Potato
Egg in the Bottle
A Three-kopek Coin Can Dance
The Magdeburg Glasses
Bernoulli’s Principle
Two Interesting Ways to Blow Out a Candle
An Experiment with a Table-tennis Ball
Cold Water Can Boil
The Button Which Does What You Tell It
An Automatic Siphon
You Can Get the Water out of the Glass
The Water Is in the Lower Glass
Pascal’s Law
Put the Cork in the Centre
An Experiment with a Cardboard Arrow
How You Can Demonstrate Inertia
The Egg and Friction
There Is No Magic
OPTICAL ILLUSIONS

A Funny Finger
Circles on the Card
A Missing Piece of Cake
An Optical Illusion with a Match
Moon Illusion
An Illusion with a Three-kopek Coin
You Can See Through Your Hand
The Third Coin
A Strange Spiral
Paper Films
A Turning Device
An Illusion with a Pencil
A Pendulum Which Moves in a Circle
The Stamp Which Disappears
The Two Sides of Your Face Are Different
You Haven’t Seen the Real Image of Your Face in the Mirror
Colour That Isn’t There
You Can Read a Secret Letter from Your Friend
You Can Make a Stroboscope
EXPERIMENTS WITH SOUND

A Musical Fork
Music from a Coat-hanger
A Musical Glass of Water
VOCABULARY

#childrenSScience #handsOnScience #popularScience #scienceExperiments #sovietLiterature

TechGeeksApparelTechGeeksApparel
2025-03-27

Stand Back. I’m Going to Try Science.
Risk level: HIGH.
Coolness level: HIGHER.
Chance of explosions? Classified.

🔗 techgeeksapparel.com/stand-bac

2024-12-31

Most people (I guess?): Finds a recipe, then follows the recipe.

Me: Finds a recipe, finds a couple more similar recipes, mentally compares the recipes, breaks down all the common elements (basically deconstructing the recipe), looks around to see what ingredients I have on hand, then re-constructs the recipe based on ingredients on hand (unless I happen to be going to the store), jots down rough notes, creates a new recipe (tweaking as needed).

Does anyone else do this? I know some folks who can just throw together ingredients (and I can do that too) -- but I prefer having a "formula" and notes so I can replicate it in the future (if it comes out well), or tweak as needed.

#Recipes #Cooking #FoodPreparation #ScienceExperiments #CookingWhileAutistic?

Sriharsha Kodurusri@geekysteth.com
2024-09-21

Have you ever seen a “snake” emerge from a sugar and baking soda? Welcome to the wild world of the giant carbon snake experiment! This jaw-dropping demonstration has been wowing students and science lovers for decades. A 2023 survey found that 87% of science teachers consider it one of the most engaging classroom experiments. But what’s going on beneath the surface of this chemical reaction?

  1. What is the Giant Carbon Snake Experiment?
  2. The Chemistry Behind the Magic
  3. Step-by-Step Guide to Conducting the Experiment
  4. The Science of Carbon Snakes: From Micro to Macro
  5. Educational Value and Applications
  6. Safety Considerations and Best Practices
  7. Beyond the Basic Experiment: Advanced Variations
  8. Conclusion

What is the Giant Carbon Snake Experiment?

The giant carbon snake experiment, also known as the “black snake” or “sugar snake” experiment, is a captivating chemical demonstration showcasing sugar’s dehydration. This reaction, catalyzed by baking soda, produces a growing, snake-like carbon foam structure.

The experiment has its roots in 19th-century chemistry demonstrations, originally using more dangerous compounds like mercury thiocyanate. Today’s version is much safer and perfect for classrooms and home science projects!

The Chemistry Behind the Magic

At its core, the giant carbon snake experiment is all about the dehydration of sugar (sucrose). Here’s what’s happening:

  • Sugar (C12H22O11) is heated and begins to break down.
  • Baking soda (NaHCO3) acts as a catalyst, lowering the temperature needed for the reaction.
  • As the sugar decomposes, it loses water molecules (dehydration).
  • The remaining carbon atoms link together, forming a black, porous structure.
  • Carbon dioxide gas is produced, causing the “snake” to grow and move.

It’s like watching chemistry come alive right before your eyes!

Step-by-Step Guide to Conducting the Experiment

Ready to try it yourself? Here’s what you’ll need:

  • 4 tablespoons of white sugar
  • 1 tablespoon of baking soda
  • A heat-resistant container (e.g., a ceramic plate)
  • A lighter or matches
  • Sand or dirt (for safety)

Safety first! Always conduct this experiment in a well-ventilated area and under adult supervision.

  1. Mix the sugar and baking soda in your heat-resistant container.
  2. Form the mixture into a small mound.
  3. Surround the mound with a ring of sand or dirt for safety.
  4. Use the lighter to ignite the top of the mound.
  5. Step back and watch the magic happen!

Pro tip: Try powdered sugar instead of granulated for an even more impressive show. The finer particles react more quickly, creating a faster-growing snake!

The Science of Carbon Snakes: From Micro to Macro

Let’s zoom in on what’s happening at the microscopic level:

  1. As the sugar heats up, its molecular structure begins to break down.
  2. Carbon atoms, freed from their sugary bonds, start linking together in long chains.
  3. These chains form a porous, foam-like structure full of tiny air pockets.
  4. The heat causes the baking soda to decompose, releasing carbon dioxide gas.
  5. This gas inflates the carbon foam, causing it to grow and twist like a snake.

Under a microscope, the carbon snake looks a bit like a sponge made of charcoal. It’s similar in structure to activated carbon, used in water filters and air purifiers. Cool, right?

Educational Value and Applications

The giant carbon snake experiment is more than just a fun show – it’s a powerhouse of scientific concepts:

  • Exothermic reactions (it produces heat)
  • Catalysis (how baking soda speeds up the reaction)
  • Gas formation and expansion
  • Carbon chemistry and allotropes

Teachers love this experiment because it brings these abstract concepts to life. It’s a great way to spark interest in chemistry, especially for visual learners.

But the applications go beyond the classroom. Similar processes are used in the production of activated carbon and some types of insulation materials.

Safety Considerations and Best Practices

While this experiment is generally safe, it’s important to take some precautions:

  • Always perform the experiment in a well-ventilated area.
  • Wear safety goggles to protect your eyes.
  • Keep a fire extinguisher or bucket of water nearby, just in case.
  • Never touch the snake while it’s forming – it’s extremely hot!
  • Consider using a hot plate instead of an open flame for younger students.

After the experiment, let everything cool completely before cleaning up. The carbon snake can be safely disposed of in the regular trash.

Beyond the Basic Experiment: Advanced Variations

For the budding scientists out there, here are some ways to take your carbon snake to the next level:

  1. Try different sugar types (brown sugar, corn syrup, etc.) and compare the results.
  2. Experiment with different catalysts, like sand or powdered iron.
  3. Measure the temperature of the reaction using an infrared thermometer.
  4. Calculate the volume of carbon dioxide produced by measuring the snake’s size.

You could even use this experiment as a jumping-off point for exploring topics like carbon capture or materials engineering. The possibilities are endless!

Conclusion

The giant carbon snake experiment is more than just a cool party trick – it’s a window into the fascinating world of chemical reactions! From the sizzling dehydration of sugar to the formation of intricate carbon structures, this demonstration never fails to captivate. Whether you’re a seasoned chemist or a curious beginner, there’s always something new to discover in the twists and turns of these carbonaceous serpents.

So why not give it a try? Who knows – you might just ignite a lifelong passion for science! Remember, in chemistry, sometimes the most eye-catching experiments reveal the deepest truths about our world. Happy experimenting!

https://geekysteth.com/the-mesmerizing-giant-carbon-snake-experiment-unraveling-chemical-reactions-in-2024/

#activitiesForKids #kids #science #ScienceExperiments #scineceActivities

balloon experiments image
Sriharsha Kodurusri@geekysteth.com
2024-09-16

Did you know that the average potato sitting in your pantry has the potential to light up your world? It’s true! In fact, a single potato can generate about 0.5 volts of electricity. Imagine harnessing that power for your next science fair project or as an emergency light source. Sounds a-peeling, doesn’t it? (Sorry, couldn’t resist!)

  1. The Science Behind Potato Batteries
  2. What Can a Potato Battery Actually Power?
  3. Materials Needed for Your Potato Battery
  4. Step-by-Step Guide to Building Your Potato Battery
  5. Boosting Your Potato Battery’s Power
  6. Cool Projects Powered by Potato Batteries
  7. Real-World Applications of Bio-Batteries
  8. Environmental Impact and Sustainability
  9. Conclusion

The Science Behind Potato Batteries

Before we start building, let’s understand why potatoes can generate electricity. It’s all thanks to a branch of science called electrochemistry.

  1. Electrochemistry Basics: Electrochemistry deals with the relationship between electricity and chemical reactions. In a potato battery, we’re creating a simple electrochemical cell.
  2. Potatoes as Electrolytes: The potato acts as an electrolyte, a solution that can conduct electricity. The slightly acidic juice of the potato helps facilitate the flow of ions.
  3. Metal Electrodes: We use two different metal electrodes, typically zinc and copper. These metals have different electron affinities, which is key to generating electricity.
  4. The Chemical Reaction: When we insert these metals into the potato, a chemical reaction occurs. The zinc electrode loses electrons (oxidation), while the copper electrode gains electrons (reduction). This flow of electrons creates an electric current.

What Can a Potato Battery Actually Power?

Now, let’s get practical. What can you realistically power with a potato battery?

  • A single potato typically generates about 0.5 volts and 0.2 milliamperes of current. This is enough to power a small LED light or a basic digital clock.
  • By connecting multiple potatoes in series, you can increase the voltage. For example, four potatoes could generate around 2 volts, enough to power a small buzzer or a more powerful LED.
  • With about 20 potatoes, you could theoretically charge a smartphone for a short period, though this isn’t very practical for everyday use.

Remember, potato batteries aren’t meant to replace your household batteries or power grid. They’re great for educational purposes and understanding basic electrical concepts.

Materials Needed for Your Potato Battery

Ready to build? Here’s what you’ll need:

  • 2-4 medium-sized potatoes
  • 2-4 zinc-galvanized nails or zinc strips
  • 2-4 copper nails or copper strips
  • Copper wire
  • Alligator clips (optional, but helpful)
  • An LED light, small clock, or voltmeter
  • Safety glasses and gloves

Most of these items can be found at your local hardware store. For the best results, choose firm potatoes without any soft spots.

Step-by-Step Guide to Building Your Potato Battery

Let’s get our hands dirty (or starchy)!

  1. Prepare the Potatoes:
  • Wash and dry your potatoes.
  • Cut a small slit in each potato for the electrodes.
  1. Insert the Electrodes:
  • Push a zinc nail into one side of the potato.
  • Insert a copper nail into the other side, about 2 inches apart from the zinc nail.
  • Repeat for each potato.
  1. Connect the Circuit:
  • Use a copper wire to connect the zinc electrode of one potato to the copper electrode of another.
  • Continue until all potatoes are connected in series.
  1. Test Your Battery:
  • Connect the free zinc electrode to the negative terminal of your LED or clock.
  • Connect the free copper electrode to the positive terminal.
  • If everything is connected correctly, your device should power on!
  1. Measure the Voltage (Optional):
  • If you have a voltmeter, use it to measure the voltage across your potato battery.
  • Each potato should generate about 0.5 volts, so four potatoes in series should produce around 2 volts.

Boosting Your Potato Battery’s Power

Want more juice? Try these tips:

  1. Use More Potatoes: Connect more potatoes in series to increase voltage.
  2. Try Different Potatoes: Some varieties, like Russet potatoes, tend to work better due to their higher starch content.
  3. Boil the Potatoes: Boiling potatoes before use can break down the starch into simpler sugars, potentially increasing power output.
  4. Experiment with Electrodes: Try different metals or increase the surface area of your electrodes.

Cool Projects Powered by Potato Batteries

Now that you’ve got your potato power plant running, here are some fun projects to try:

  1. Potato-Powered LED Light: Create a simple emergency light using an LED and your potato battery.
  2. Potato Clock: Power a small digital clock with your spuds.
  3. Potato Battery Car: Use your potato power to drive a small motor attached to a toy car.
  4. Potato Battery Experiment: Compare different types of potatoes or vegetables to see which produces the most power.

Real-World Applications of Bio-Batteries

While potato batteries are primarily used for educational purposes, the concept of bio-batteries has some exciting real-world potential:

  1. Emergency Power: In disaster zones, bio-batteries could provide small amounts of power for essential communication devices.
  2. Sustainable Energy: Researchers are exploring scaled-up versions of bio-batteries for sustainable energy production in developing countries.
  3. Medical Devices: Future bio-batteries might power small medical implants, using the body’s own chemistry.
  4. Environmental Sensors: Low-power environmental sensors in remote areas could be powered by bio-batteries.

Environmental Impact and Sustainability

Potato batteries are generally eco-friendly:

  • Biodegradable: Unlike traditional batteries, potato batteries can be composted after use.
  • Low Environmental Impact: They use renewable resources and non-toxic materials.
  • Educational Value: They teach important concepts about renewable energy and sustainability.

However, it’s important to use potatoes responsibly. Don’t waste edible food for long-term power needs!

Conclusion

Well, folks, we’ve just peeled back the layers on the amazing world of potato batteries! From lighting up LEDs to powering clocks, these starchy powerhouses are proving that science can be both fun and functional.

As we’ve discovered, the humble potato is not just a side dish anymore – it’s a glimpse into a more sustainable future of energy production. While a potato battery won’t power your house, it can illuminate young minds and spark interest in renewable energy.

More fun science experiments on geekysteth.com

https://geekysteth.com/how-to-make-a-potato-battery-powering-science-projects-in-2024/

#science #ScienceExperiments

potato battery
Sriharsha Kodurusriharsha@geekysteth.com
2024-09-06

Did you know that the humble balloon can be a powerful tool for scientific discovery? It’s true! In fact, a study by the National Science Foundation found that hands-on experiments increase student understanding of scientific concepts by up to 40%. That’s why we’ve put together this list of amazing science experiments using balloons. Get ready to blow your mind (and maybe a few balloons) as we explore the wonders of physics, chemistry, and more. Let’s dive in and turn your home into a balloon-powered laboratory!

Table of Contents

  • 1. The Static Electricity Dance
  • 2. Balloon Rocket Races
  • 3. The Expanding Universe Balloon Model
  • 4. Balloon-Powered Car Challenge
  • 5. The Mysterious Shrinking Balloon

1. The Static Electricity Dance

Who says science can’t be hair-raising? This classic experiment is a great way to introduce kids to the concept of static electricity.

What you’ll need:

  • A balloon
  • Your hair (or a willing volunteer’s)

How to do it:

  1. Blow up the balloon and tie it off.
  2. Rub the balloon vigorously against your hair for about 30 seconds.
  3. Slowly pull the balloon away and watch as your hair stands up and “dances”!

The science behind it: When you rub the balloon against your hair, electrons (which have a negative charge) move from your hair to the balloon. This leaves your hair with a positive charge. Since opposite charges attract, your positively charged hair is drawn to the negatively charged balloon. Cool, right?

Safety tip: Make sure to do this experiment in a dry environment for the best results. And maybe avoid it if you’ve just applied hair gel!

2. Balloon Rocket Races

Ready to launch into some serious fun? This experiment is a blast (pun intended) and teaches kids about Newton’s Third Law of Motion.

What you’ll need:

  • Long balloons
  • String
  • Straws
  • Tape
  • Two chairs

How to do it:

  1. Tie a long piece of string between two chairs.
  2. Thread a straw onto the string.
  3. Blow up a balloon but don’t tie it. Instead, hold the end closed.
  4. Tape the balloon to the straw.
  5. Let go of the balloon and watch it zoom across the string!

The science behind it: As the air rushes out of the balloon, it creates a forward thrust, propelling the balloon in the opposite direction. This is Newton’s Third Law in action: for every action, there’s an equal and opposite reaction. It’s the same principle that powers real rockets!

Pro tip: Try different balloon shapes or sizes to see which travels fastest. Race your friends!

3. The Expanding Universe Balloon Model

Ever wondered how scientists explain the expanding universe? This simple experiment helps visualize this mind-bending concept.

What you’ll need:

  • A large round balloon
  • A permanent marker
  • A tape measure

How to do it:

  1. Blow up the balloon slightly and tie it off.
  2. Draw several dots on the balloon with the marker. These represent galaxies.
  3. Measure the distance between some of the dots.
  4. Now, blow up the balloon more.
  5. Measure the distances between the same dots again.

The science behind it: As you blow up the balloon more, you’ll notice the dots move further apart, just like galaxies in our expanding universe! This model helps kids grasp the concept that space itself is expanding, carrying galaxies along with it.

Fun fact: Edwin Hubble first observed this galactic “moving apart” in 1929, leading to the Big Bang theory. Mind-blowing, isn’t it?

4. Balloon-Powered Car Challenge

Who needs batteries when you’ve got balloon power? This experiment is a fun way to explore energy conversion and get creative with design.

What you’ll need:

  • A balloon
  • A small plastic bottle
  • Four bottle caps
  • Two straws
  • Tape
  • Scissors

How to do it:

  1. Cut the bottle in half lengthwise to create the car body.
  2. Attach the bottle caps to the body as wheels using tape.
  3. Thread the straws through the body to act as axles for the wheels.
  4. Attach the balloon to one end of the body, with the opening pointing back.
  5. Blow up the balloon through the car, hold the end, then let it go on a smooth surface!

The science behind it: The air escaping from the balloon provides thrust, converting the potential energy of the stretched balloon into kinetic energy of motion. It’s like a tiny jet engine!

Challenge idea: Have a distance contest or design competition. Who can make the car that goes the furthest or looks the coolest?

5. The Mysterious Shrinking Balloon

Get ready for a cool trick that seems like magic but is actually all about the relationship between temperature and gas volume.

What you’ll need:

  • A balloon
  • A glass bottle
  • A bowl of ice water
  • A bowl of hot water

How to do it:

  1. Stretch the balloon over the mouth of the bottle.
  2. Place the bottle in hot water and watch the balloon inflate slightly.
  3. Now place it in ice water and see the balloon deflate or even get sucked into the bottle!

The science behind it: This experiment demonstrates Charles’s Law. When air is heated, it expands, pushing into the balloon. When cooled, it contracts, pulling the balloon inward. It’s the same principle that makes hot air balloons rise!

Safety note: Be careful with hot water. Adult supervision is recommended for younger scientists.

Wow, what a journey through the world of balloon science! From creating static electricity to modeling the expanding universe, we’ve seen how these simple rubber orbs can unlock complex scientific principles. Remember, the key to great science is curiosity and a willingness to experiment. So grab those balloons, gather your young scientists, and start exploring! Who knows? Your kitchen table experiments today could inspire the world-changing discoveries of tomorrow. Now, go forth and let your scientific imagination soar – just like a helium-filled balloon!

Watch this youtube video for more info. Check out other fun science activities here.

https://geekysteth.com/fun-science-activities-using-balloons-for-kids/

#ScienceExperiments

Metharkmethark
2024-07-28

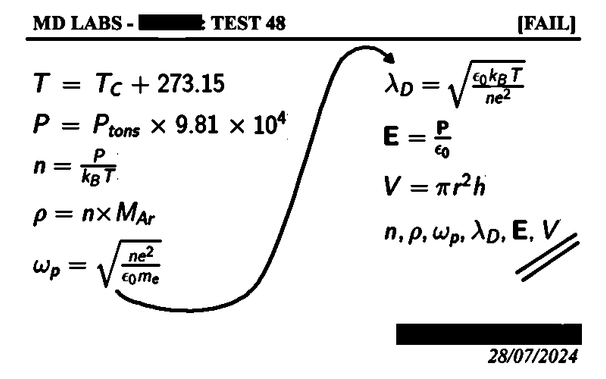
Never give up! Calculating properties given specific conditions and parameters. Seeking input on a cylindrical container, laser, heat, and Argon. Missing electromagnetics? Any help out there?

AVIATION SCHOOLSAviationschool
2024-04-17

Bernoulli's Tube Experiment Explained: Unveiling the Science of Lift. 🌬️✈️

Ever wondered how airplanes defy gravity and take flight? It's all about Bernoulli's principle! 🛩️

Here's a quick rundown of Bernoulli's Tube Experiment, which unveils the science behind lift:

1️⃣ Setup: A vertical tube with two different diameters connected by a horizontal section.

Science is truly magical! youtube.com/shorts/afKneKY6HAE

Client Info

Server: https://mastodon.social
Version: 2025.07
Repository: https://github.com/cyevgeniy/lmst