#EggsAndDarts continuation from https://pixelfed.social/p/Splines/796961505955555432
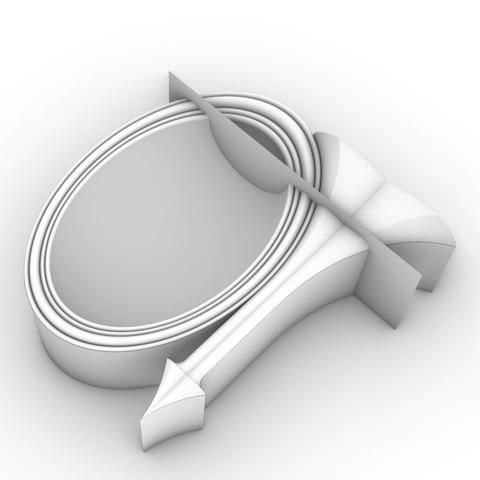
The slab height depends on the roundness of the egg and whether we have a concave design or not. If we are using a concave base, then top half of the egg is eliminated. For a fully round egg, that means the concave variant must scoop out up to 16 units deep. The dart slab will match the egg slab in depth.
To create the 3-dimensional shape of the dart, first #rotate the fin profile 90° in 3D space along the straight line at the bottom of the fin so that the rotated profile is perpendicular to the two #sweepRails for the dart.
Using the two sweep rails and the perpendicular fin profile, #sweepTwoRails to develop the surface of the dart. Remember to close the planar hole at the end of the fin to get a solid #airtight object. As always, check for #nakedEdges and #nonmanifoldEdges to stave off problems later.
#Extrude the bottom of the dart until it is flush with the bottom of the oval slab.
Two details worth noting in the dart design are:
1. The most exaggerated portions of the dart fin are sliced off when the eggs are sliced. After slicing, the size of the fin is roughly in proportion to the rims of the eggs on both sides.
2. There is a gap between the dart arrow and the oval slab. See the gap between points R and T in https://pixelfed.social/p/Splines/796961505955555432. This gap is necessary and will automatically close when we transfer the egg and dart to the #doublyCurved surface of the #ovolo on the #capital of the #IonicColumn. That is because the Ovolo is shaped like a bowl whose top has a bigger radius than the bottom. As a result, the motif will be warped, and its bottom will be condensed to fit the smaller radius at the bottom, closing the gap in the process.
If you plan to use the eggs and darts motif on a linear surface where there is no warping, experiment with the arrow and tip for a pleasing result.
Client Info
Server: https://mastodon.social
Version: 2025.04
Repository: https://github.com/cyevgeniy/lmst
