#EggsAndDarts
To transfer the egg and dart in https://pixelfed.social/p/Splines/797038670230603707 to the #doublyCurved surface of an #ovolo is a multistep process.
There are 24 eggs and darts around the entire Ovolo. So each egg and dart nominally occupies 360°/24 = 15°.
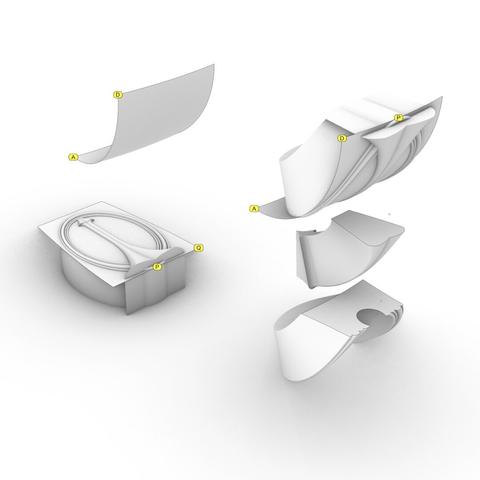
#Revolve arc AD in https://pixelfed.social/p/Splines/792124787573855518 about the #columnAxis to get the virtual surface. Points A and D are same in both figures. Then use cutting planes as described in https://pixelfed.social/p/Splines/790645054230337543 to get a wedge-shaped segment whose angle is 15° and one side of which is marked with A and D.
This is a doubly curved surface. Unlike a cylinder, where one side is straight while the other is curved, the surface of an Ovolo is curved in both horizontal and vertical directions.
To transfer the egg and dart to a doubly curved surface, we need a new operation called #UnrollSurface, which unrolls the wedge shape into a flat surface whose top-left corner is marked Q. Note the top is wider than the bottom.
Place the flattened wedge between the rim and the flat slab and align the top of the flat portion of the slab with the center of the top edge of the flattened wedge. Temporarily move the dart to align its center too, but only move it in the horizontal direction
If the flattened wedge were flexible and if the eggs and darts were flexible, we could flip all of these over, flex and squeeze the solid shapes, and line up Q with D so that the rim and dart appear "outside" the original wedge while the slab remains "inside" (or toward the center of the Ovolo).
Fortunately, in a #CAD tools, solids don't always have to be treated as rigid. Now we will use another new operation called #FlowOnSurface to flow the egg and dart on the wedge.
We then slice off the top of the egg and dart at the location PQ in https://pixelfed.social/p/Splines/796958366767133979.
Finally, we separate the dart, which we had aligned with the egg to minimize distortion
#doublyCurved
#EggsAndDarts continuation from https://pixelfed.social/p/Splines/796961505955555432
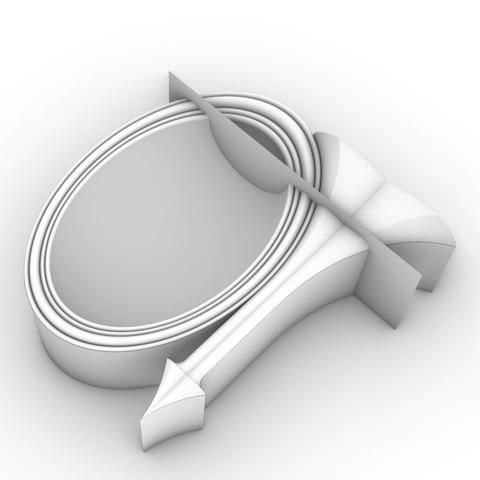
The slab height depends on the roundness of the egg and whether we have a concave design or not. If we are using a concave base, then top half of the egg is eliminated. For a fully round egg, that means the concave variant must scoop out up to 16 units deep. The dart slab will match the egg slab in depth.
To create the 3-dimensional shape of the dart, first #rotate the fin profile 90° in 3D space along the straight line at the bottom of the fin so that the rotated profile is perpendicular to the two #sweepRails for the dart.
Using the two sweep rails and the perpendicular fin profile, #sweepTwoRails to develop the surface of the dart. Remember to close the planar hole at the end of the fin to get a solid #airtight object. As always, check for #nakedEdges and #nonmanifoldEdges to stave off problems later.
#Extrude the bottom of the dart until it is flush with the bottom of the oval slab.
Two details worth noting in the dart design are:
1. The most exaggerated portions of the dart fin are sliced off when the eggs are sliced. After slicing, the size of the fin is roughly in proportion to the rims of the eggs on both sides.
2. There is a gap between the dart arrow and the oval slab. See the gap between points R and T in https://pixelfed.social/p/Splines/796961505955555432. This gap is necessary and will automatically close when we transfer the egg and dart to the #doublyCurved surface of the #ovolo on the #capital of the #IonicColumn. That is because the Ovolo is shaped like a bowl whose top has a bigger radius than the bottom. As a result, the motif will be warped, and its bottom will be condensed to fit the smaller radius at the bottom, closing the gap in the process.
If you plan to use the eggs and darts motif on a linear surface where there is no warping, experiment with the arrow and tip for a pleasing result.
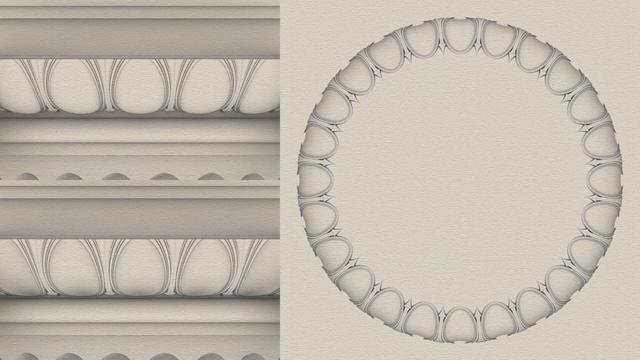
#EggsAndDarts is a common classical design motif with endless variations, two of which are shown here — the top-left variant has convex eggs and the bottom-left variant has concave eggs. The sketch on the right shows the bottom view of the concave variant.
This motif is neither specific to the #IonicOrder, nor limited to the #ovolo of the capital. It is common to find it laid on linear #moldings like #cymaRecta or #cymaReversa of a #cornice.
The egg shape, the dart shape, the degree of convexity or concavity, and so on, are infinitely variable from subtle to pronounced. Designers are not limited to convex or concave, and it is possible to combine both in a single design. Also, it is not necessary to use the eggs and dart motif at all. There are infinite possibilities. However, when the eggs and darts motif is used, it is almost invariably sliced off at the top, as the bottom view of concave variant on the right reveals.
The concave version here is quite subtle, but a more pronounced version can be really eye-popping. I will show how to construct one using just straight lines and circular/elliptical arcs exclusively as I originally promised in https://pixelfed.social/p/Splines/789956327130679640.
As usual, we start with a flat 2-dimensional plan with lines and ovals to use as #sweepingRails. Then, we add circles and arcs as #sweepingCurves to define the cross-sections. After sweeping the cross section curves on the rails, we create the eggs.
Simply #revolve an ellipse on its major axis to get the convex version of an egg. To get the concave version of an egg, simply create a flat slab and perform a #booleanDifference on that slab using a convex egg.
Once we have all of this preparatory work done, we have to transfer the 3-dimensional design from the flat surface it was originally created on to the #doublyCurved surface of the Ovolo. This requires some elementary calculations using circle geometry.
Previous— https://pixelfed.social/p/Splines/795361973789834465
Client Info
Server: https://mastodon.social
Version: 2025.04
Repository: https://github.com/cyevgeniy/lmst


