Continued from https://pixelfed.social/p/Splines/808187718454868394
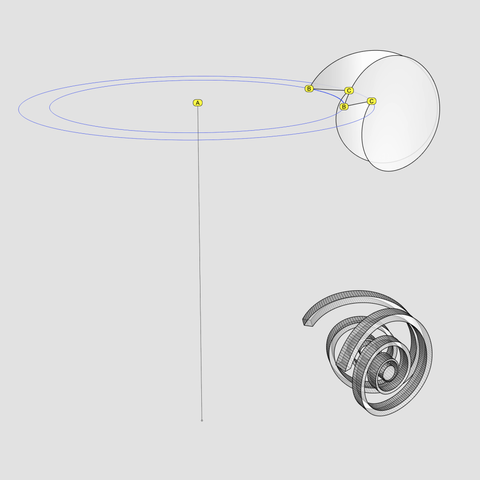
Explode the wedge on the top with curved faces and discard everything except the two faces.
Centered on the column axis marked with A, draw two concentric circles parallel to the XY plane — one with radius AB and another with radius AC. Split both circles with the two wedge faces.
Using the edges of the two wedge faces as #rails and using the two arcs BB and CC as #sweepingCurves, perform a #sweepTwoRails operation to generate a concave surface. Join this concave surface with the two faces.
The shape we just produced still has an open hole between the two arcs BB and CC. Cap this #planarHole to create an #airtight wedge shape with curved faces. As always, check for #nakedEdges and #nonManifoldEdges.
Align the wedge shape and the two 16 units thick spirals from the previous post. Then rotate both 45° about the column axis. Rotate and copy them again at 90° about the column axis until you have the curved volutes on all four corners.
#sweepTwoRails
#EggsAndDarts continuation from https://pixelfed.social/p/Splines/796961505955555432
The slab height depends on the roundness of the egg and whether we have a concave design or not. If we are using a concave base, then top half of the egg is eliminated. For a fully round egg, that means the concave variant must scoop out up to 16 units deep. The dart slab will match the egg slab in depth.
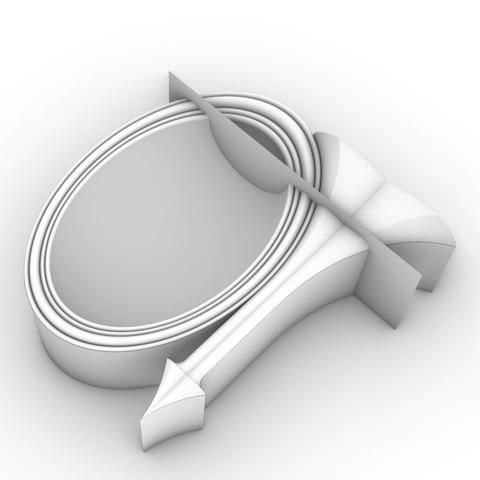
To create the 3-dimensional shape of the dart, first #rotate the fin profile 90° in 3D space along the straight line at the bottom of the fin so that the rotated profile is perpendicular to the two #sweepRails for the dart.
Using the two sweep rails and the perpendicular fin profile, #sweepTwoRails to develop the surface of the dart. Remember to close the planar hole at the end of the fin to get a solid #airtight object. As always, check for #nakedEdges and #nonmanifoldEdges to stave off problems later.
#Extrude the bottom of the dart until it is flush with the bottom of the oval slab.
Two details worth noting in the dart design are:
1. The most exaggerated portions of the dart fin are sliced off when the eggs are sliced. After slicing, the size of the fin is roughly in proportion to the rims of the eggs on both sides.
2. There is a gap between the dart arrow and the oval slab. See the gap between points R and T in https://pixelfed.social/p/Splines/796961505955555432. This gap is necessary and will automatically close when we transfer the egg and dart to the #doublyCurved surface of the #ovolo on the #capital of the #IonicColumn. That is because the Ovolo is shaped like a bowl whose top has a bigger radius than the bottom. As a result, the motif will be warped, and its bottom will be condensed to fit the smaller radius at the bottom, closing the gap in the process.
If you plan to use the eggs and darts motif on a linear surface where there is no warping, experiment with the arrow and tip for a pleasing result.
#EggsAndDarts continuation of https://pixelfed.social/p/Splines/796958366767133979
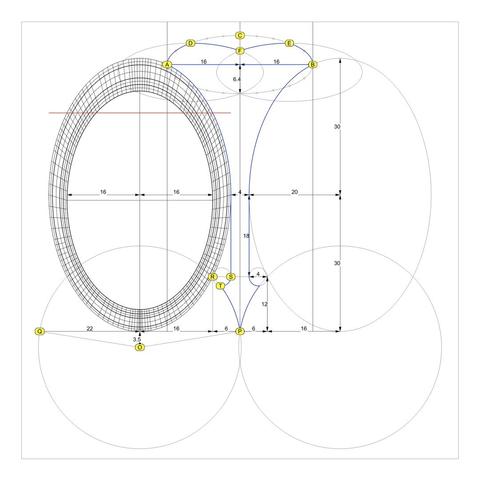
Successive egg slabs are 1/2 part or 4 units away from each other. So the thinnest part of the dart is 4 units. The tip of the dart is at point P, which is 22 units from the major axis for the egg slab.
The inside egg is 4 parts or 32 units wide, and we will start with the dart fin also at 32 units wide, even though a portion of the fin will be sliced off when the egg is sliced by the red cutting plane.
To find the start and end of the fin, draw a vertical line from P of length µ/2 or 72 units. Offset that line on both sides by 16 units. Mark the intersections of these lines with the outline of the largest ellipse with points A and B.
Draw an oval centered on AB with major radius 16 units and minor radius 2/5 of that, or 6.4 units. Divide each arc of the oval into 5 equal parts and mark AD and EF at 2/5 of that. Copy the oval from its top point C to D as well as E. Mark the intersection of the copies at F.
Trim the 3 ovals to get 4 arcs AD, DF, FE, and EB. Join them and close the curve with a straight line from A to B.
Draw a square 12 x 12 whose bottom edge is centered on P. From each of the top 2 corners, draw a circle with diameter 4 units, shown by RS.
#Reflect point P using the major egg axis as a #mirror to get point Q. Draw a #circleThrough3Points P, Q, and R. The origin of the circle, point O should be 3.5 units directly below the base of the large oval.
Draw a vertical line up from S to where it is tangent to the side of the large oval. Trim the straight line and arcs to get the left profile of the dart starting with A, passing through S and T, and ending at P. Join all 4 segments and reflect them using the line PC as the mirror.
These mirrored copies are the #rails along which we will sweep the fin of the dart with #sweepTwoRails operation to create the dart, but we must orient the fin to be perpendicular to the rails first
See https://pixelfed.social/p/Splines/796798349526747214 and https://pixelfed.social/p/Splines/796786779066451143 for detail.
Just like #ArcZero in the #spiral for the #IonicVolute, the plan for #EggsAndDarts starts out larger than what is eventually used.
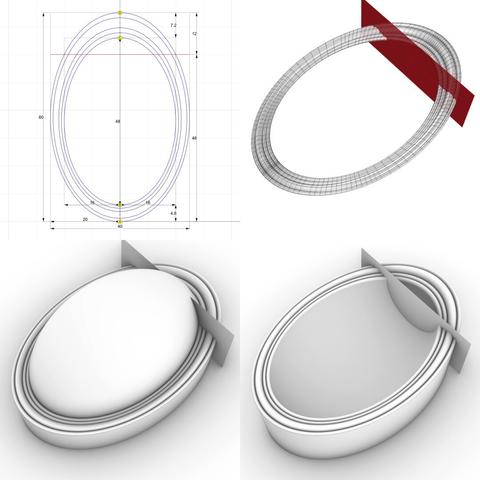
The outermost frame is 7.5 parts or 60 units tall (from A to D), and 5 parts or 40 units wide when µ = 144. The innermost frame is 6 parts or 48 units tall (from B to C), and 4 parts or 32 units wide.
The height and width for both inner and outer are in 3:2 ratio. The difference in height is also split in the ratio 3:2. So, the gap between A and B as 12*2/5 = 4.8, and the gap between C and D as 12*3/5 = 7.2. We then divide both of these gaps in 5 equal segments shown by the dots between them.
Create an ellipse to fill the outer frame, and another to fill in the inner frame. Then interpolate them to create 4 more through the dots, only to delete the 3rd ellipse. This gives us the 5 #rails for sweeping the rim of the egg.
Create circles perpendicular to and touching adjacent pairs of rails, and then #sweepTwoRails using the circles to get the rim shown in the top-right. The red cutting plane marks tentative slicing for eggs.
The bottom left image shows a convex egg created with an #ellipsoid that is 48 units tall, 32 units wide, and 32 units deep. This is equivalent to #revolving the innermost ellipse around its major axis. Only half of this egg is above the oval slab.
The bottom right image shows the concave variant which is created by performing a #booleanDifference between the oval slab and the round egg created above. The top portion of the egg is removed in the concave variant, but the convex variant must still account for the bulge of a fully round egg. As such, the slab heights of the convex and concave variant are different. I will show the measurements later.
To create the slabs for the convex and concave variants, #extrude the outermost ellipse according to their measurements and #cap #planarHoles.
Continuation of https://pixelfed.social/p/Splines/794199123072358090
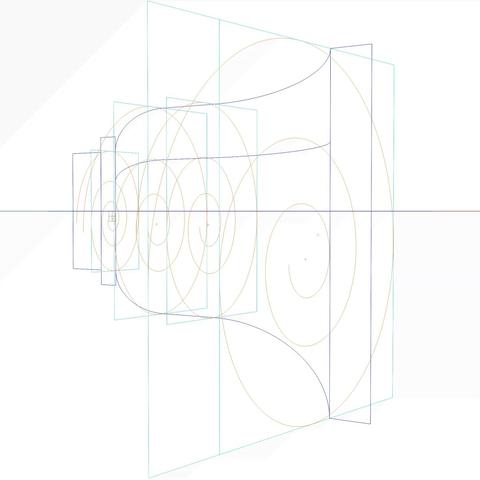
After you have rebuilt all the #spiral arcs as well as the projected #secondaryCurves into #tertiaryCurves, it is finally time to sweep the scroll surface, but remember to do it one section at a time.
Use one section of a spiral arc and the corresponding arc in the next interstitial as #railCurves. Then, #sweepTwoRails, using one section of the tertiary curves on each end of the rails.
This diagram shows 5 sections of the swept surfaces in front and 5 sections in the back.
The remaining ones will be built similarly but require further processing to make the whole surface smooth.
#IonicVolutes are the sinews of #IonicScrolls. Without #volutes, there would be scrolls, but not #Ionic Scrolls. Each scroll starts with a volute in front and is modulated by as many as six volutes of different shapes and sizes as it reaches the back, with the scroll surface tightly hugging the volutes at each contact point in ALL 3 dimensions. This is a key point to remember before we start #reverseEngineering the first #primaryProfileCurves from old image scans.
This diagram shows the #scaffolding we will construct using straight lines and rectangles, first in 2 dimensions, then place them front-to-back in 3 dimensions using precise markers, and finally scale and superimpose the volutes on this scaffolding.
All of this will be done before we derive the primary profile curves from the image scans.
How did I know about this scaffolding? I didn't. It is not documented anywhere that I'm aware of. I developed this after years of striving to derive the correct shape, and I hope that there are people who can still "see" things I might have missed and help improve the design.
So, the actual process went like this: I drew outlines from 2D image scans in the top view, getting close to #Vignola's detailed sketches. Then, I did the same thing with image scans in the side view, and I found that the designs didn't line up.
After several iterations, I got the designs to line up in both views, and it was obvious that the bell shape of the scroll would follow the large volute in the front.
So, I used the large volute as a "rail" and tried to sweep the primary profile curves on one rail. Big mistake! The undulating shapes of the primary profile curves wobbled wildly on the single rail — The middle, 3/4, and back of the scroll were twisted out of shape!
Instead of trying to #sweepOneRail, I decided to clamp down wobbling with another operation called #sweepTwoRails, using volutes at both front and back ends as rails with less wobbling.
You will need a #CAD tool to practice.
Client Info
Server: https://mastodon.social
Version: 2025.04
Repository: https://github.com/cyevgeniy/lmst
