
#ai #aiArt #aiArtWork #minimalist #illustration #whitebackground #boy #bigpen #ginkgoleaf #drippingwater #grass #clothes #32k #uhd #16k #ultrahd #hdr #ultrahighresolution #ultrahighdefinition #ai #aiArt #aiArtWork #minimalist #illustration #whitebackground #boy #bigpen #ginkgoleaf #drippingwater #grass #clothes #32k #uhd #16k #ultrahd #hdr #ultrahighresolution #ultrahighdefinition
#ultrahighresolution


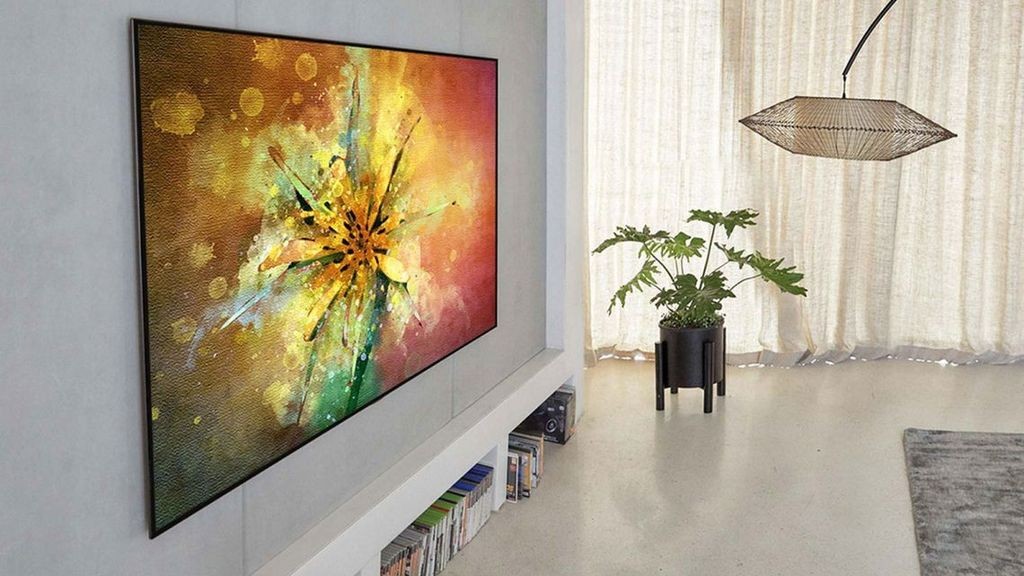
The Best 8K TVs of 2024 https://www.howtogeek.com/754591/best-8k-tv/
Discover the top-rated 8K TVs of 2024 that offer an unprecedented level of detail and immerse you in stunning visuals. One standout TV is renowned for its exceptional picture quality and clarity.
#8KTV #HomeEntertainment #CinematicExperience #UltraHighResolution #QuantumDotTechnology #HDRSupport #SmartTV #FutureProof #ImmersiveExperience #UpgradeYourSetup


These Bug Macros Required 8,000 151MP Photos and 86 Hours of Editing
Growing up in a communist country, we had no access to or real knowledge of the outside world. With the information that we now take for granted tightly controlled, we were living in a bubble. When communism ended, my entire concept of what the planet and all living things were all about changed quickly and dramatically.
I became a sponge for every type of available data as most was all new to me, with particular emphasis on the natural world of insects. The variety of their patterns, textures, and colors captivated me. For hours at a time, I would watch as many TV nature programs as possible and started collecting numerous National Geographic magazines that had an emphasis on insects.
Throughout my life, I’ve had the great fortune to have traveled to over 80 countries, and throughout those trips, I was always on the lookout for the unique and endemic species of those locations. I wanted to see for myself the species that I studied and knew so well and experience their native environments. It is then no wonder that I had always envisioned doing a photography project where I would capture that diversity in as high a resolution as possible. I just never imagined it would take me over a year and 10 months to complete.
Editor 's note: The photos included in this story should be considered at best previews, as the full-resolution files are available on Duman's website and allow for a fully dynamic viewing experience. Each finished photo is made up of 8,000 individual stacked frames taken with a 151-megapixel camera, which results in some of the most intricate detail of these specimens ever captured. It is highly recommended that readers enjoy the photos there.
Collecting the Specimins
The first order of business was to find the specimens. In order to be suitable for this project, they must have unique features, varying colors, and be in good condition. This sounds easier than one may think. To increase my chances, I partnered up with the entomology department at the University of California, Riverside as well as the Natural History Museum of San Diego. They were both generous enough to give me full access to their collections, and the University alone had 4.5 million specimens. As one of the largest faculty collections in the U.S., it took hours and multiple trips to have my first set of insects.
Photographing the Insects
With the samples chosen, my attention turned to how to actually shoot them. Researching online, everyone had their recommendations on the setup, lighting, composition, and gear. I was in a rather unique position because I was shooting on the world’s largest sensor and on a prototype medium format camera. There was no write-up on how to use this gear for this project because as I quickly found out, it had not really been done before. The gear I used was the Phase One IQ3 (101-megapixel back) and the IQ4 (151-megapixel back), ALPA 12PFS on a mechanical rail, and the Rodenstock f/5.6 105mm lens. The rail has a repeatable step of one micron (a human hair is 75 microns for reference). Multiple Broncolor Lights and softboxes were used to specifically highlight every section of each insect.
The Process To Make One Photo
Hours and hours of testing spanning over a few weeks led to more of what not to do, countless failed attempts, and many, many lessons learned. It quickly became apparent the magnitude of the project and how many independent factors had to be perfectly in sync for the mere slight chance that I would even get a single image. In the simplest way to express what it took to capture one image:
- Clean the specimen with surgical loupes and camel brush. Try to remove as much of the microscopic debris that is close to invisible to the human eye. The high resolution of the camera will pick up the tiniest of particles. Average time: 30-45mins
- Set up the lighting and composition to highlight unique features of specimen. Average time: 30mins
- Set up camera and rail and calculate 3 separate equations to find out the distance from the lens to the specimen, lens to the front of the sensor, and magnification factor. Average time: 45mins
- Depending on depth of specimen, calculate the numbers of focus stack. The incredibly shallow depth of field, as a result of the lens only being a few inches away from the specimens that were a few mm in size, meant that I needed to do very deep focus stacks. The larger the depth of the insect, the more stacks were needed. Automate the rail to shoot every 3 seconds and sync with the Broncolor Sirros pack and lights. Average time: 4 hours
- Once all images are taken, they have to be converted from the Phase One IIQ format to TIFF as the stacking software does not handle native Phase One files. Average time: 14 hours, average number of images: 4,500
- Once I had all TIFF files, I could import them into the stacking software (Zerene) and start the process of flattening them. Custom code was written by the creator of Zerene to accommodate the large number of files. The flattening involved a 25 step process. Only when the software has produced one flat image, you can tell if there was any issue with what you shot (see below). If any issues, I had to start all over with the above steps. Average time: 12 hours
- At this point, the file is ready to be sent to the retoucher. All the microscopic debris that I was not able to clean during the prep stage had to be removed. Adjustments are needed to fix any tiny damage to wings, antennas, etc. Average time: 45 hours, with the longest taking 86 hours
What Could Go Wrong?
With regards to what could possibly go wrong, well it was a lot. Because of the long shooting duration, it massively increases the chance of complications that will render all the work you have done up to that point useless. Anything from the specimen slightly moving due to the pin not being properly secured to batteries dying before a stack was complete, to the flashes not firing happened to me.
Vibration was a huge issue and I had multiple shots ruined because the AC turned on and caused vibrations in the floor, my wife opened the garage door, an earthquake hit, and even just walking close by would show up as soft spots when you do all the steps and see the final file. This is not fixable in post-production and I had to restart in every case.
The rail, being a prototype at the time, had some issues skipping some stack steps and I had to consult with the ALPA team in Switzerland who were instrumental and incredibly helpful. They had to send me new gear and test it before resuming.
Running out of hard drive space was also a constant issue. The IIQ files are 195-megabytes each and with the deepest stack being just around 7,000 images, it was a massive scramble to stay ahead of the storage needs. G-Technology (now SanDisk Professional) were kind enough to provide me with a slew of fast, dependable, and high-capacity drives that allowed me to keep shooting.
Overall, I shot over 75 specimens successfully and probably 30 that failed, with only 24 fully processed in post and available for viewing on the site.
Designed for a Dynamic Viewing Experience
From the very outset, I knew that once I had the final files from the retoucher, they had to be seen in a more dynamic way than just exporting to jpeg and uploading to the site. I wanted the viewer to have the flexibility to zoom in and navigate on the full high-resolution TIFF file to truly see the incredible detail. Finding the software that allowed me to do that was incredibly challenging.
Months were spent investigating and researching and ultimately had to rely on a few contacts that helped custom build code for a software that did not quite do what I envisioned. Now, when someone visits ExoSkeleton, the controls at the bottom of the image will allow them to see every section of the specimens in the highest resolution and navigate around the entire frame.
An Incredibly Challenging Project
Without question, this was the most complex and time-consuming photography project I have ever done. There were many times when I wanted to quit because it felt like I was trying to achieve the impossible. It felt like I was hitting dead ends at every turn and when I would find a solution to one issue, it would uncover three more. However, I am glad I stuck through with it. I love the way the images came out and with the custom-built website for the project, I feel I was able to achieve a vision that I had been yearning to do for many years.
_About the author: Andrei Duman is an award-winning commercial, conceptual, travel, and aerial photographer based in Los Angeles, California. His work is disciplined and driven by his passion to push boundaries with regards to what is possible with photography. His shoot concepts are usually complex with incredible attention to detail, all the while staying authentic to his ultimate vision. His photos are clean, technical, powerful, and evocative. They encourage the viewer to look beyond what is right in front of them to the scale and breadth of what surrounds us. More from Duman can be found on his Instagram.
#features #spotlight #bugs #detail #extreme #focusstacked #highresolution #insects #macro #macrophotography #mediumformat #onemicron #phaseone #precision #stacked #ultrahighresolution
DIY Ultra-High-Res Digital Photos with a Large Format Camera
In 2014, I started my project Applied Metaphysics – Ground Truth on exemplary still life. The goal was to produce very large prints (2 to 9 square meters and more) at a high resolution so that people could look at them very closely.
The idea was that the sheer amount of detail in each image and the immersive way of looking at them was fundamental for conveying the inner essence of things at a hyper-realistic level that transcended normal vision.
The image size you need for such large print sizes is easily computed. A 300dpi (dot per inch) print resolution is a 118dpc (dot per centimeter) resolution. So, ideally, for a 2×2 meter print, you need (200cm * 118dpc) 2 pixels = 558MP. You can still get a good print at 200dpi: in this case, you only need 248MP.
The problem was that no digital camera existing then (or now) offered such a high resolution. To solve this problem, I needed to tinker and I went on an uncommon road. By the way, tinkering with contraptions is something most painters, including Dürer, Vermeer, etc., did by perfecting the camera obscura concept and other drawing devices. So, I felt I was in good company.
A 2×2 meter print A detail with my ugly mug for size reference. The entire image scaled for video: it is a 278 MP image, 1.1 GB TIFF file. A 26x26cm portion of the same image at 300 dpi.
The Solution at a Glance
Those familiar with panoramic images know that one can obtain very large images, even gigapixel images, by using a panoramic head that allows you to shoot a large number of small images that are later recombined by software into a single large image. Each of the small images behaves like a mosaic tile.
While pano heads are great for far subjects like landscapes, they do not work quite well for closeups, like the still life I wanted to photograph. The main reason is the parallax error, caused by the motion and rotation of the camera.
Discarding the convenience of a robotic pano head I had used rather extensively for other projects, the solution I devised was to use a digital camera (namely a 16MP APS-C Sony NEX-6 camera) mounted on the back of a Sinar 4×5 monorail.
The coupling of a digital camera to a large format camera has been recently discussed in other articles. The methods proposed basically use the large format camera as a lens system placed in front of the digital camera to shoot a single image. While this strategy can yield interesting results, it really falls short of the potentialities and it is not a solution for the problem at hand.
Instead of taking a single picture, I used the movements offered by the back of the monorail, namely rise and shift (more on this later), to produce a mosaic panorama that can consist of more than 60 images. Once I captured the mosaic images, I produced the final image by composing them through panorama software, such as the one provided by Photoshop, or PtGui or GIMP. The composition of these images can yield final images larger than 400MP with rather inexpensive equipment.
A 500+MP image (3.5+ GB TIFF file). A 1:1 portion of the above image. 27x16cm 300 dpi.
A Primer on Large Format Monorails
For those not familiar with view cameras, and monorails specifically, some explanation might be in order. This is a Sinar P1 monorail:
A Sinar P1 monorail
It is a very simple camera composed of:
1. Two Standards. The front standard holds a lens, and the back or rear one usually holds the film and/or the ground glass for focusing and composing the image. In this case, a digital camera is connected to the back instead.
2. Bellows. This links the two standards, that can be extended or compressed, according to the distance between the two standards that varies to allow focusing.
3. The Rail (in this case a single rail, i.e. a monorail). This allows the movement to and from in both standards for focusing.
What makes this apparently primitive camera interesting is the fact that these standards can move along three axes and they can tilt and swing.
Camera movements
The above photo shows the rear standard movements: horizontally (this is called a shift), vertically (this is called a rise or a fall), and finally inclined with respect to the vertical axis (tilt) and inclined with respect to the horizontal axis (swing).
I will defer the discussion on tilt and swing, and concentrate on the other movements offered by the rear standard. By moving the back (on which the camera is mounted) left to right and top to bottom, we are able to shoot portions (mosaic images) of the large image produced by the camera lens. To wit, it is just as if we photographed portions of the image shown on the ground glass (but without the ground glass). We are not moving the lens and consequently there is no parallax error. That’s it.
Pros and Cons
Why should you waste your time with this approach, when there are high-resolution cameras out there? Admittedly, this method requires you to shoot tens of images and move the rear standard accordingly: a tedious, error-prone task, an exercise in patience even.
In addition, you can use this method for stationary subjects only with, ideally, controlled lighting. So, still life, product photography, interior photography. No portraits. As for landscapes, I think that a computerized pano head might be more convenient.
However, no current digital cameras reach the resolution we need, and the higher resolution cameras in the market (100+MP) will set you back $10,000 or more. I started with the following equipment:
1. A Sinar F1 monorail. 300 euro on eBay including shipping.
2. A 150mm Eskofot reprographic lens. 17 euro on eBay, including shipping.
3. A 3D-printed adapter for my Sony camera. 20 euro.
All this for the princely sum of 337 euro (less than $400, at the current exchange rate). This is less than an entry-level camera.
There is another advantage over high-resolution digital cameras and it is the control of the focus plane. With a camera with a normal lens, the focus plane is parallel to the sensor. If you want to increase the depth of field of your image (something you usually need to do in the present context because rarely you need high-resolution out-of-focus images), you can only close your diaphragm. But you can do that only to a point, after which diffraction kicks in and makes your image as blurred as a pinhole image.
A brilliant Austrian Army Captain, Theodor Scheimpflug, patented a method in 1904 to move the focus plane so that it doesn't need to be parallel to the sensor. This means that you can choose the plane of focus in such a way that objects, distant among themselves, can be in focus even with an open diaphragm. The Scheimpflug principle is rather involved (just as the name implies) but you can find excellent tutorials online. It basically works with tilts and swings, and it was used to shoot the image below, in which everything is in focus.
Scheimpflug principle applied: everything is in focus
If you are interested in shooting with large format film, you’ll find it rather intimidating: the learning curve is steep, film is expensive and, if you do not develop it yourself, you’ll see your blunders several days after. Not the best way to learn. My method makes learning much simpler and faster. I know, because that’s how I learned to shoot large format film.
A word of caution. In 2011, I bought my Sony NEX-5 because mirrorless seemed the obvious way to go, but also to save on lenses and use my old Canon FD lenses. I ended up having an arsenal of lenses from Leica to Zeiss, etc. I understand I’m not the only one and in fact, there is even an acronym for this: GAS, or gear acquisition syndrome.
The lenses you can mount on a large format camera go back to the 19th century, with an enormous variety and different drawing styles. Beware!
The photo shows a high-resolution image captured with the mythical Cooke triplet (1896), the first modern lens, here in its second version.
Shooting with a 19th century lens – Cooke triplet.
Tips and Tricks
Before you rush and buy the equipment, let me give you a few words of advice.
The large format camera. There is a number of variations on the theme. You need a camera with ample rear movements. This rules out field cameras (light cameras you can take around). I use Sinar monorails, as shown in the photo above. They are sturdy, highly modular and they are easy to find used at a reasonable price, as they were the standard in large format.
I would advise using the P series rather than the F series because the P (P1 or P2, P3 is for digital backs) series features geared movement that is very precise. The bellows you see in my camera is the standard bellows and it tends to be rather rigid. You might want to consider a bag bellow that allows easier movements. Finally, large format cameras come in various film sizes, from 4×5” to 8×10” and larger. I advise using a 4×5” camera: lighter, less expensive, and more than adequate for the task.
The lens. I normally use lenses from 150mm to 360mm. To have an idea of the field of view as compared to full frame, just divide the focal length by 3: a 150mm lens has roughly the same field of view as a 50mm lens in full frame, i.e. a normal lens. I found that reprographic lenses are excellent (they were used for demanding copy tasks like the production of maps) and inexpensive because they do not have a shutter (and you do not need one, because you are using the one in your digital camera).
The digital camera. Not all digital cameras are suitable. The sensor in your camera is not mounted, as it ideally should be, on the surface, but more or less deep in the camera. In front of the sensor, you have the bayonet that is used to mount interchangeable lenses.
Why is this relevant? If you are in the very center of the overall image, light rays focused by the taking lens are perpendicular to the sensor, and you have no problems. But, as soon as you move from the center and more markedly on the edges of the overall image, light rays become oblique and there is a large chance that mosaic images vignette (i.e. have a black portion) because the camera body or the bayonet intercept the rays. Obviously, the more recessed the sensor is, the sooner and more dramatic vignetting occurs. So, reflex cameras are not recommended.
The combination of bayonet size and adapter length can also produce vignetting. With the Sony equipment I am using, the small Sony bayonet makes using full frame cameras rather difficult. Conversely, Sony APS-C cameras do not vignette. The Nikon Z, with its 55mm bayonet diameter and a flange distance of 18mm, may have an edge over Sony (44.5mm and 20mm), but I have not tested it. Also, it might be a good idea to use Sony full frame cameras in APS-C mode, getting rid of vignetting but keeping the superior rendering of the sensor.
The adapter. One of the advantages of the Sinar monorail is that you can use a lens board (a metal square with a hole in the middle where lenses are mounted) in the back. Mounting a digital camera means building an adapter and glue it or (better) screw it to the board, as shown in the Sinar P1 monorail photo above. Adapters can be easily built by 3D printing. You can find an adapter for Sony cameras, that you have to modify slightly, at Thingiverse.
The tripod. Large format monorails are to be used with a sturdy tripod with a capable head. I use a Manfrotto 058B/Bogen 3251. Quite expensive new, but you can find great deals on used ones.
How to shoot. It goes without saying that you must shoot in manual. Bear in mind that, although you are shooting a number of mosaic images, you are really shooting a single, overall image. So, for best results, do not use daylight if it may abruptly change. You do not need expensive lights, however: the images you see were produced using a single 100w incandescent light bulb, mounted on an inexpensive IKEA pantograph.
First, set your white balance by using a white card. Then, set exposure by metering an 18% gray card placed in front of your subject (these cards and white cards for white balance are available online). Use your camera mounted to the monorail to meter, because it is simpler than using an external light meter. If you do use an external meter, you will have to compensate for bellows draw. Let me skip over this,
Afterword
Finally, let me tell you how I progressed. After having produced more than 100 satisfactory (at least for me) hyperrealistic images, I have recently been more and more drawn to Pictorialism, a movement active during the later 19th and early 20th centuries. whose goal was to produce photographs that are "true art" (whatever that means) rather than a mere recording of reality. In extreme synthesis and not quite accurately, pictorialist images tend to look like paintings rather than like photographs. I acquired a few pictorial lenses, like Verito, Perscheid, Heliar, and the cheapest ones, the cheap dioptric lenses you can put in front of your lens to shoot macro. These are in fact menisci or achromats like the very first lenses used in photography. Now, high resolution does not really matter anymore, but my technique is able to produce a great tonal range, which I believe is one of the main features of pictorialism.
A high-resolution pictorial image. The taking lens is an achromat (Leitz Elpro closeup lens) combined with a meniscus (no name closeup diopter lens). A detail with my ugly mug for size reference.
And in the end? I am now shooting black-and-white 8×10” film.
A 8×10” film image – Sinar Norma with Boyer Apo-Saphir 450mm on Foma Retropan.
And shortly I will be shooting 40x40cm wet plate. Full circle.
About the author : Giovanni Maria Sacco (GM Sacco) is a retired associate professor in computer science at the University of Torino in Italy. He has been a passionate photographer since the age of 8. The opinions expressed in this article are solely those of the author. Sacco's major themes are metaphysics and the impermanence of all things: hyperrealistic images, abandoned places (mostly large factories), still life, and nudes. He has won 50 awards in major international photo contests I use Sony digital equipment and film cameras from 6x6cm to 8×10″. You can find more of Sacco's work on his website and Instagram.
#doityourself #educational #equipment #walkthroughs #diy #giovannimariasacco #gmsacco #highresolution #largeformat #superresolution #ultrahighres #ultrahighresolution
Client Info
Server: https://mastodon.social
Version: 2025.07
Repository: https://github.com/cyevgeniy/lmst