#HardLight

David Divornedavid_divorne
2025-06-25
Black and white picture of formes and shadows of a gateway
2025-05-25

and Red Dwarf?!

#HardLight

2025-04-15

DAVID MALLETT
"VITAL SIGNS"
Mastodon Post

Evidently "Vital Signs" is the David Mallett fan favorite. It starts strongly with "Midnight Madness" and ends with "Highways," which, according to an apparently knowing Amazon customer comment, was often a very big number in concerts. Side One's "April" and the title track are spoken of favorably by Mallett's followers. The first side ends with one of Mallett's best known songs, "Red Red Rose," which was covered to perfection by Emmylou Harris. It is surprising how many covers and interpretations of David Mallett songs closely follow the original arrangements. This may be seen as a testimonial to the production.

"Vital Signs" is notable for the team effort - from piano to drums - of the players, with each contributing catchy riffs.

"Vital Signs" is something like David Mallett's forbidden fruit album. It has never been reissued; and, as far as I am aware, it does not stream. (Some re-recordings do.) A track that once was posted to YouTube has been removed. Evidently the label, Flying Fish Records, made a mistake on the cover which is mirrored on the LPs label, crediting all words and music to Mallett. Judging by the publisher credits, the first song on the second side, "(Coming Apart) At the Seams," appears to be an exception. Evidently pianist Chris Neville claims a co-writer credit. The album got locked up by a lawsuit. Vinyl LPs and at least one cassette can be had online and, one would imagine, in used record stores.

Following popular concert attractions "Good Times" and "These Times," the album ends with Mallett's re-recording of "Highways," which first came out on the live "Hard Light" album. Mallett's singing here on "Highways" is so different that it ought to be considered as a rearrangement.

Jim Rooney did his usual excellent job with this production. David Mallett's home, Sebec, Maine, shares a town line with my old hometown, Milo. For me, then, it is more than a little ironic that Jim Rooney got his start performing on Boston's WCOP Hayloft Jamboree for Nelson Bragg, "The Merry Mayor of Milo, Maine."

A clean burn of the vinyl LP keeps me happily listening. Anyone who has read this far may want to hunt up a copy of the vinyl album. If you are a devoted singer-songwriter fan, chances are good that you have a friend who has burned it. A reissue would have been ideal but ways still exist to enjoy what may very well have been David Mallett's most popular record release, "Vital Signs."

Here are two of the best covers of David Mallett songs:

Summer Of My Dreams
Kathy Mattea - Topic

youtube.com/watch?v=kzFUG4zQWG

Red Red Rose
EmmyLouharris

youtube.com/watch?v=fmL0QSPJhT

And one by David Mallett:

David Mallet - Summer Of My Dreams
from Live At The Iron Horse Vol. 1 by Signature Sounds Recording Inc.

signaturesounds.bandcamp.com/t

Music Museum of New England (MMone) Jim Rooney article

mmone.org/jim-rooney/

:

#april #bostonmusic #chrisneville #comingapartattheseams #davemallett #davidmallett #emmylouharris #flyingfish #flyingfishrecords #goodtimes #hardlight #hayloftjamboree #highways #jimrooney #kathymattea #mainemusic #merrymayorofmilomaine #midnightmadness #mmone #music #musicfeed #musicmuseumofnewengland #musicnews #nelsonbragg #nemsbk #newenglandmusic #redredrose #sebec #sebecmaine #singersongwriter #summerofmydreams #thesetimes #vitalsigns #wcop #wcophayloftjamboree

:::

2025-04-13

DAVID MALLETT
"VITAL SIGNS"
Mastodon Post

Evidently "Vital Signs" is the David Mallett fan favorite. It starts strongly with "Midnight Madness" and ends with "Highways," which, according to an apparently knowing Amazon customer comment, was often a very big number in concerts. Side One's "April" and the title track are spoken of favorably by Mallett's followers. The first side ends with one of Mallett's best known songs, "Red Red Rose," which was covered to perfection by Emmylou Harris. It is surprising how many covers and interpretations of David Mallett songs closely follow the original arrangements. This may be seen as a testimonial to the production.

"Vital Signs" is notable for the team effort - from piano to drums - of the players, with each contributing catchy riffs.

"Vital Signs" is something like David Mallett's forbidden fruit album. It has never been reissued; and, as far as I am aware, it does not stream. (Some re-recordings do.) A track that once was posted to YouTube has been removed. Evidently the label, Flying Fish Records, made a mistake on the cover which is mirrored on the LPs label, crediting all words and music to Mallett. Judging by the publisher credits, the first song on the second side, "(Coming Apart) At the Seams," appears to be an exception. Evidently pianist Chris Neville claims a co-writer credit. The album got locked up by a lawsuit. Vinyl LPs and at least one cassette can be had online and, one would imagine, in used record stores.

Following popular concert attractions "Good Times" and "These Times," the album ends with Mallett's re-recording of "Highways," which first came out on the live "Hard Light" album. Mallett's singing here on "Highways" is so different that it ought to be considered as a rearrangement.

Jim Rooney did his usual excellent job with this production. David Mallett's home, Sebec, Maine, shares a town line with my old hometown, Milo. For me, then, it is more than a little ironic that Jim Rooney got his start performing on Boston's WCOP Hayloft Jamboree for Nelson Bragg, "The Merry Mayor of Milo, Maine."

A clean burn of the vinyl LP keeps me happily listening. Anyone who has read this far may want to hunt up a copy of the vinyl album. If you are a devoted singer-songwriter fan, chances are good that you have a friend who has burned it. A reissue would have been ideal but ways still exist to enjoy what may very well have been David Mallett's most popular record release, "Vital Signs."

Here are two of the best covers of David Mallett songs:

Summer Of My Dreams
Kathy Mattea - Topic

youtube.com/watch?v=kzFUG4zQWG

Red Red Rose
EmmyLouharris

youtube.com/watch?v=fmL0QSPJhT

And one by David Mallett:

David Mallet - Summer Of My Dreams
from Live At The Iron Horse Vol. 1 by Signature Sounds Recording Inc.

signaturesounds.bandcamp.com/t

Music Museum of New England (MMone) Jim Rooney article

mmone.org/jim-rooney/

:

#april #bostonmusic #chrisneville #comingapartattheseams #davemallett #davidmallett #emmylouharris #flyingfish #flyingfishrecords #goodtimes #hardlight #hayloftjamboree #highways #jimrooney #kathymattea #mainemusic #merrymayorofmilomaine #midnightmadness #mmone #music #musicmuseumofnewengland #musicnews #nelsonbragg #nemsbk #newenglandmusic #redredrose #sebec #sebecmaine #singersongwriter #summerofmydreams #thesetimes #vitalsigns #wcop #wcophayloftjamboree

:::

petapixel (unofficial)petapixel@ծմակուտ.հայ
2021-10-14

Is Diffused Light the Same as Soft Light?

Diffused and soft light are often used interchangeably among photographers. Indeed, to an untrained eye, the two can sometimes appear to be the same. Furthermore, modifiers such as softboxes that give both soft and diffused light make it hard to spot the difference. Nonetheless, diffused light is not necessarily soft, and soft light is not necessarily diffused.

As a photographer, I previously used diffused and soft interchangeably without ever giving it much thought. Of course, it is a lot easier to tell a difference between soft and hard light. But diffused and specular not so much.

Everyone has their own definition of this light type, so before I start, let’s all agree on what these different types of light are.

Hard Light

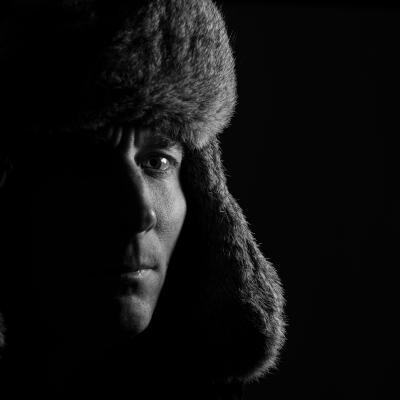
Hard light is light produced by a small light source relative to the subject, and the shadow to highlight transition will be very sudden. Shadow edges are defined.

Photo: Illya Ovchar // @illyaovcharphoto @wonderfulmachine
Hair&Makeup: Alice Högberg // @som_alice
Styling: Alina Ellstrom // @Alinaellstrom
Model: Sanna Bjelm // @sannabjelm
Agency: Sweden Models Agency // @swedenmodelsagency
Post-Production: Zahar // @justlike_magic

Soft Light

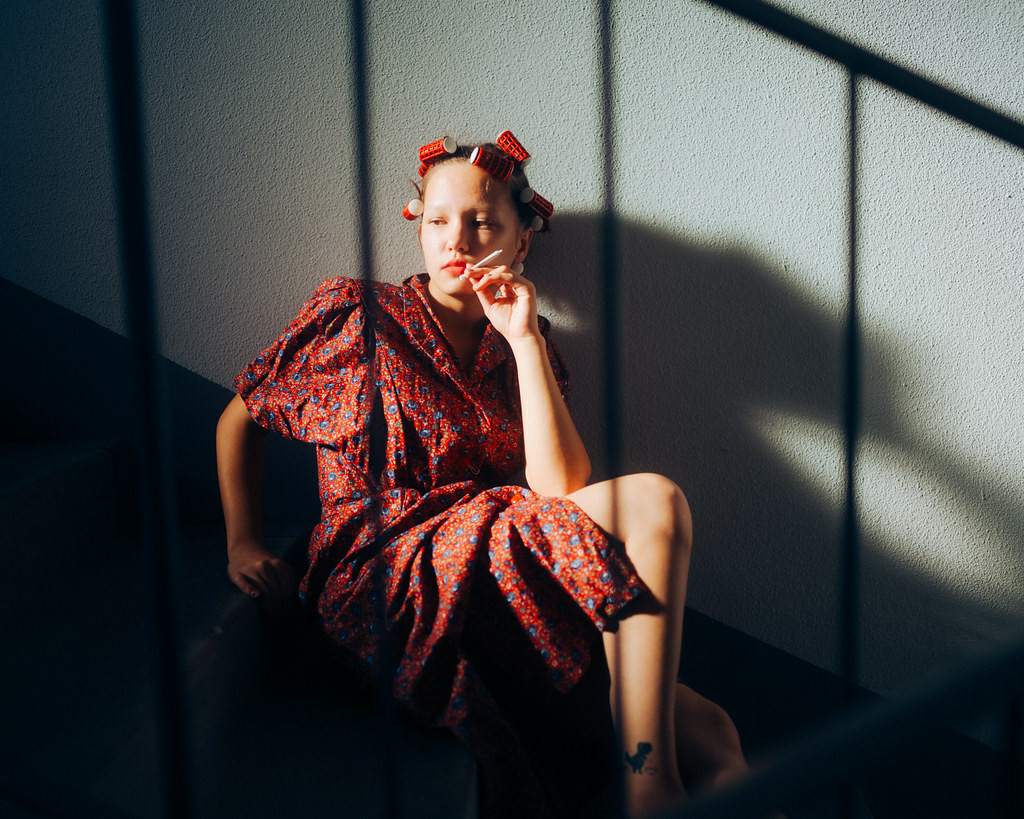
Soft light is light produced by a large light source relative to the subject, the shadow to highlight transition will be gradual. The shadow edges are wider and fuzzier.

Photo: Illya Ovchar @illyaovcharphoto
Hair&Make-up: Fruzsina Hollósi @makeup_by_fruzsinahollosi
Stylist: Richard Demeter @richarddemeter
Stylist assistant : Berta Bagi @bertabagi
Model: Viktoria Lomnasan @victorialomnasan @facemodelmanagementhungary
Location: Le Til Kúria @letilkuria
First Assistant : Seloua Benkaid Kasbah @seloua_benkaid_kasbah
Post-Production: Zahar @justlike_magic

So, the only way to tell if the light is soft or hard is by looking at the dark shadow edges. If you think about it, it makes sense. Hard light denotes hard shadow-highlight transitions, while soft denotes soft shadow-highlight transitions. It has nothing to do with contrast or any other property of light.

A Word on Diffusion

Adding diffusion will change the size of your light source and make it even. This is because the light transmitted through the fabric will strike the surface from a wider family of angles, decreasing contrast. Moreover, diffusion will negate the hundreds of hotspots on a reflector, which will technically make the light source larger. This is best seen in small rooms with white walls where the light can bounce.

A Word on Specularity

Photographers tend to confuse specular light and call it a bunch of things it isn't. In fact, there is no such thing as specular light -- there are only specular reflections.

Specular reflections are simply known as direct reflections. They are extremely bright and can only be seen from a particular angle. Therefore, a specular light will be essentially the flash tube reflecting off a metal surface. It will generally be rather uneven with hotspots in the middle.

An important thing to note is that you can't get a perfectly specular light, there is always some diffuse reflection.

A specular light will be very uneven in coverage. It is characterized by a bright highlight, often a small spot. More often than not, a specular reflector will produce abruptly graduated shadows (assuming it’s close enough to have some softness). The color will be a lot more saturated in this image.

It is important to understand that no light is perfectly diffused or specular. That depends on the surface you're photographing as well as the modifier interior. Specular and diffused co-exist together and it's a sliding scale from one to the other.

Let’s dive in and explore how we can make all of these qualities of light.
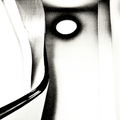
Hard Specular

In order to produce this light, I need a light source that is relatively small in comparison to my subject. I will use a magnum reflector that is specular and small in comparison with the subject.

You can see it’s hard by the shadow edges, and you can also tell it’s specular because of the highlight produced.

Hard Diffused

Now, I will not change anything except for adding a layer of baking paper on my reflector. It is still relatively the same size of the light source, although, technically it is bigger because the diffusion is the light source, not the individual points of reflection on the reflector.

Nonetheless, you can see that the light has become more even. It covers a larger area as well, and because my makeshift studio is very small, the contrast is also decreased.

Soft Specular-ish

Soft specular light is relatively hard to achieve. Let me detail why. As we established, a specular light is a light that is reflected in a small family of angles. Soft light on the other hand originates from a large light source. This implies that we would need to find a way to reflect a large light stamp in order to create soft but specular light.

A softbox may be the intuitive solution for this, but let me explain why it won't work. A softbox with diffusion removed is nothing more than a flash tube with a poorly-lit interior of the softbox. For all intents and purposes, removing diffusion from a softbox will render it useless as you've exposed the flash head.

Here is how this looks:

Therefore, producing soft but specular light is in most cases impractical and undesired. You can, however, use a modifier producing soft light for photographing metallic objects. They will give off specular reflection, while the light will also stay quite soft on other parts of the image. Nonetheless, that won't be a soft specular light per se.

Soft Diffused

Adding both diffusion layers to the 3-foot octabox will make the light a lot more even and result in light with gradated smooth shadow edges that are both soft and diffused. They are soft because the light source is large in comparison to the subject, while diffusion is defined by the light is a lot more even on the whole image.

Where Does the Diffusion Confusion Come From?

When we diffuse light, the diffusion material is relatively big. It is common to have big diffusion materials lying around. So often adding a 12×12 scrim to a hard light source will on one hand diffuse but also make it extremely big and hence soft.

It is important to know that when you’re diffusing the light source with a scrim as well as trying to make it soft you need to move the scrim away from the light source. As your light source has become the scrim itself, you need to control the scrim-to-subject distance in order to control softness.

Multiple Layers of Diffusion

Some photographers that confuse diffused and soft light tend to add more and more layers of diffusion to their light in order to achieve softness. It only makes sense to add no more than 1 stop of diffusion -- beyond that you will be losing power without any noticeable effect.

Here is are examples of what this looks like:

1 Layer 2 Layers 3 Layers

As you can see, there is no difference between 2 or 3 layers. The only difference is actually the power. Power is critical, especially if you’re working with battery-powered lights.

Grids and Diffusion

Incorrect placement

A grid will reduce the light spread, but diffusion will increase. So, how do photographers get diffused yet gridded light? The secret is in placing diffusion behind the grid. It is intuitive with softboxes, but with hard reflectors, many tend to put their diffusion after the grid. That defeats the purpose of the grid.

Here is how that looks:

Correct placement

Closing Thoughts

Light has two qualities: either soft or hard. Diffused or specular are a sliding scale and co-exist in 99% of all situations. You can combine soft with specular and hard with diffused, although a soft specular light will be hard to achieve (I couldn't within my small living room studio).

Although soft and diffused tend to co-exist in a lot of cases, it is still important to know the difference in order to have as many tools as possible to create your vision.

#educational #diffused #disambiguation #flash #hardlight #light #lighting #portrait #portraiture #softlight #specular #strobe #studio

image
petapixel (unofficial)petapixel@ծմակուտ.հայ
2021-08-16

How to Edit Food and Drink Photos Shot with Hard Light

As photographers, we generally aim to shoot perfectly to where our photos require minimal to no editing. But for some of us, the editing process can be just as creative of a process as the photography side. I am going to share exactly how I edited this hard light image to create something a little more dramatic than I can achieve in-camera.

I may not try and get the perfect photo at the time of capture, but I do like to make sure the exposure is right in-camera, as not having to worry about fixing exposure in the editing process makes it a lot more fun.

The first thing I do in Lightroom for every image is in the lens correction column: I tick the distortion box which will correct any distortion the lens you used created. It is a very clever tool that knows what lens you used and roughly how it has distorted the image.

If you look at the straight-out-of-camera image, I shot this old fashioned on a light blue background, but I really wanted the final image to have a more green or turquoise color. So in the HSL panel, I took the aqua and blue and brought the hue to the left to give it a lovely green tone. I think this helps really make this drink feel summery and makes the whisky pop. As I only used the color sliders of the aqua and blue, only the background was affected by this change. I also increased the luminance a little with these two to lighten it up, adding to the summery light and airy feel to the image.

Now I have the background at the color I was looking for, I next go up to the basic panel. My first step here is to lower the drag the highlight slider to the left, darkening them, and take the shadow slider to the right, lightening them.

This makes the image look a little undersaturated but I will fix that in the next step where I do the opposite with the whites and blacks. I lighten the whites and darken the blacks which add that contrast back but with more of a punch. I don't use the exposure or contrast panel to do this as it affects the image as a whole instead of the specific tones in the image. Also in the basics panel, I increase the clarity slider just slightly, to add some detail to the image.

The next step in my usual editing process is to sharpen the image. I first add a sharpen mask by selecting the option key and increasing the sharpen mask so the sharpening will only affect the drink and glass, and not the bottle of whisky. Now that the mask is on, I can increase the sharpening amount as much as needed. Not too much, but enough to make the image crisper.

For my next step, I go back down to the HSL panel and make some small tweaks to the orange color, increase the saturation a little and decrease the luminance to make that old fashioned and whisky look a bit more of a deeper orange. I didn't do this when I changed the background as I knew the other edits will have changed the color and tone slightly.

I find the orange swirl in the drink was looking a little dull and dark at this point, so using the brush tool I draw over the swirl so it is only affecting the area I want it to affect. With the mask on, I increase the exposure, the shadows and increase the saturation.

My final area to edit in Lightroom is the tone curve panel, I brighten the highlights and darken the shadows adding a last boost of contrast. This makes an S shape with the curve.

That is everything in Lightroom, but just to finish this image up I open the image in Photoshop and using the patch tool, I clean up the background and any marks on the glass because no matter how careful I am, there are always marks!

And that's it! Below you can see the image I started with on the left and the finished edit on the right:

For more videos all about food and drink photography, check out my YouTube channel.

_About the author: Amie Prescott is a professional photographer, and food photography combines two of her favorite things: food and photography. Prescott put a good spin on lockdown by using the bad situation to create YouTube videos in an effort to help people looking to learn food photography. _

#educational #tips #amieprescott #beverage #beveragephotography #drinks #editing #editingtips #food #foodphotography #foodphotographytips #hardlight

image
petapixel (unofficial)petapixel@ծմակուտ.հայ
2021-08-06

How to Leverage Hard Light in Summer-Themed Drink Photography

We all love soft light because it adds that dreaminess to food and drink photos that will always be great. However, recently I have been seeing more people use hard light in their food and drink photography.

If you want to jump on this hard light bandwagon I have put together a few tips for creating hard light, and examples to show you how the light can affect your images. I would definitely recommend giving hard light a try because it's always useful to have some diversity in your portfolio when it comes to lighting.

If you would like to have more of an idea when looking at other's work if they are using hard or soft light, look at the shadows they create. Hard light will create harsh, defined shadows and soft light will create softer shadows with more of a gradient.

The first thing we need to create hard light photography is, without sounding too obvious, some hard light. If you use artificial light, like flash strobes or continuous lights, you're going to want a hard reflector or the light's bare bulb.

Unlike our much-loved softboxes, these won't have any layer of diffusion over them. The diffusion in softboxes helps soften the light, so undiffused light will be harder and harsher. Hard reflectors are usually a lot smaller than softboxes and come in many sizes. The smaller the light source is, the harder the light will be. If you're using natural light, you will have to depend on the sun and weather. That's not great for me since I live in the United Kingdom. For hard light photography in natural light, you will need a cloudless sky, and a window with direct sunlight. On a cloudy day, the clouds act as a diffuser for the sun turning the sky into a giant softbox so you will have to wait until those clouds pass for the hard light.

The shadows in the hard light images can become really interesting and I think this is one of the reasons they are becoming more popular at the moment. This is especially true with drinks photography because the glasses can create some really interesting shadows and reflections with the light. Test out a few of your glasses to see how the patterns on them change the shadows and reflections.

Other things that can affect the shadows in hard light photography are the angle and height of the light. The angle your light is at is going to affect the direction of the shadow, this is the same with soft light photography but it may be more important to remember as the shadows with this style of photography tend to be darker and longer, which is going to be important to remember when thinking about composition in the image.

You are not going to want a long dark shadow going through your main subject, this would be quite distracting. To change this with natural light you're going to have to move yourself and your subject as you can't move the sun around.

The height of the light is going to affect the length of the shadows. The lower the light, the longer the shadow and the higher the light, the shorter your shadow.

By changing both the angle and height of your light you can manipulate these interesting shadows to fall over your image in the right position for your image and composition. There are no right or wrong combinations of these, it's just best to figure out what works best for the image you're creating.

Other small changes can also affect your image so it's always a good idea to experiment in different ways you can manipulate the light. For more information on hard light photography, check out this video. Or for more tips on food and drink photography, check out my YouTube Channel.

_About the author: Amie Prescott is a professional photographer, and food photography combines two of her favorite things: food and photography. Prescott put a good spin on lockdown by using the bad situation to create YouTube videos in an effort to help people looking to learn food photography. _

#educational #tips #tutorials #beverage #beveragephotography #foodphotography #foodphotographytips #hardlight #lighting #reflector #softbox #softlight

image

Diga di Beauregard, Valle d'aosta (Sep. 2019)

:ic_camera: Pentax K-50
:ic_lens: Pentax DA 18-55mm
:ic_camera_aperture: F/4.0
:ic_shutter: 1/10

#WeeklyPhotoChallenge #HardLight

A damn at night. The damn is lit and is surrounded by darkness.
maow :verified:maow@mamot.fr
2020-07-17

youhooooo c’est le week-end 🎉🎉🎉

pour le #WeeklyPhotoChallenge #HardLight / #LumièreCrue une excavatrice dans le Tarn

#tgif

une excavatrice dans le Tarn
maow :verified:maow@mamot.fr
2020-07-15

hop une photo pour le #WeeklyPhotoChallenge #HardLight / #LumièreCrue

Marrakech, septembre 2001

#NB #BW

maow :verified:maow@mamot.fr
2020-07-14

joyeux mardi tout le monde 🖐🏻
hop, une photo pour le #WeeklyPhotoChallenge #HardLight / #LumièreCrue

#NB #BW

écluse
maow :verified:maow@mamot.fr
2020-07-13

ah ben un nouveau #WeeklyPhotoChallenge #HardLight / #LumièreCrue

je n'ai pas assez profité de celle d'aujourd'hui, ni de la chaleur

là c'était l'an dernier, pendant la première vague de canicule de mémoire (29 juin, 39°C)
entre la cité de la mode et la BNF

#NB #BW

Client Info

Server: https://mastodon.social
Version: 2025.07
Repository: https://github.com/cyevgeniy/lmst