#gcode

2025-06-06
𝘋𝘪𝘳𝘬dirk@gts.0x7be.net
2025-05-19

Ages ago I installed a #BLtouch on my #Ender5pro and always do a leveling for each print, which never failed me.

Recently I messed with the physical leveling of the bed by changing the screw positions and eyeballed the leveling (screw all four screws hand-tight in,and then unscrew them by 3 revolutions each).

And I just checked ... a difference of shy over a millimeter. I think I did a pretty good job by just looking at the distance between the nozzle and the bed.

Visualization is done by the awesome OctoPrint-BedLevelVisualizer plugin for #OctoPrint. For my printer, this #gcode configuration properly creates the mesh visualization without manually modifying any of the printer's settings.

M190 S80            ; Set bed temperature
G28                 ; auto-home all axes
@BEDLEVELVISUALIZER ; monitor output for level data
G29                 ; probe for bed levels
G1 X0 Y0 F2000      ; return print head to home
M140 S0             ; turn off print bed
G91                 ; relative mode on
G1 Z60              ; lower print bed by 60mm
G90                 ; relative mode off

You might want to change the bed temperature to a value you usually use (M190 S80 where 80 is the temperature)

In the wiki they say use M420 V to store the created mesh, but this is what G29 with BLtouch already does.

The last three commands are purely aesthetic.

... and now I'm going to turn some screws 🙃

#3Dprinting

Niels Moseleytrcwm
2025-04-25

I have a working gcode interpreter in C++! No parameters or expressions (yet), so very much on par with Grbl. Good enough to create things with a 2.5D mill etc. It interprets per line and is therefore suitable for memory constrained systems

2025-04-12

#JournalEverything Just got the next #3DPrint in the series for the cannula puck holder going again. Looks like it is going to be one of those days. I started it off before I got breakfast, and did the sprouts, but I forgot to put the filament back in, so it was merrily running through with nothing coming out of the nozzle. So I had to cancel the print, feed the filament in, and start it off again. Watching it lay down the first few layers while I eat my porridge and drink my tea.

Sometimes I'm my own worst enemy: the filament was not mounted because a couple of years ago I added a bit of custom post-job #gcode to my slicer (I use UltiMaker Cura) to retract the filament all the way out of the Bowden tube because if it's left there for too long, it breaks up and is a pain to get out again - it's also wasteful of filament, and I have to disassemble the entire Bowden tube assembly. So I decided that the lesser evil was to add this ejection code, but if course I still occasionally forget to re-feed the filament at the start of the next job.

I guess what I OUGHT to do, it's measure exactly how much to reject to leave the filament just in the extruder drive, and add another bit of pre-job gcode to re-feed it again. But that would be too joined up thinking for me!

2025-02-15

Quote:
"Unlike G-Code, which executes tasks line-by-line, T-Code uses time to synchronize the 3D printer’s motion with key commands [...]. This eliminates common start-stop interruptions that slow production and create defects, enabling continuous, uninterrupted fabrication. As a result, 3D printing becomes faster without losing accuracy or detail, facilitating advanced capabilities like smooth gradients and in-situ material changes."

➡️ 3dprintingindustry.com/news/is

#3dprinting #gcode

Woutw0u7
2025-01-12

Day 10 of : “Impossible day - Try to do something that feels impossible for you to do. Maybe it is impossible. Maybe it’s too ambitious. Maybe it’s something you know nothing about how to accomplish.”

3D printing with clay is surprisingly idiosyncratic. Generating custom—and possibly non-planar— for it always seemed like the dream. It has become a reality, and now I can generate Gcode using the 2D drawing toolkit.

This is a stylized preview render with depth of field.

2025-01-08

Any recommendations for #Android apps to send #GCode and generally control a #CNC router via USB? I used to have my desktop plugged into it, but now they're in different rooms and I don't have a USB cable that long lol.

Google Play seems to be increasingly garbage at finding good apps... top search result is Genmitsu from Sain NeXT, which I presume may be something from Sain Smart. Might give it a go.

2025-01-06

Fast color change vase mode owl.

Printed with my fast color change filament gcode generator using lengths of 33mm and 50mm alternating.

It's not the best choice of colors but the idea is clearly working.

My code made progress faster than I expected!

The gcode does all of the first color, then one filament change, then all of the 2nd color. This means that your whole print head has to clear the approximately 1.75mm tall filament spiral it's printing. In this print of 1m of filament, one of the last 3 segments was knocked free during printing. If reliability can't be improved, this will limit the amount of fast color change filament that can feasibly be printed in one go.

The filament is a bit ratty and stringy but it didn't have any trouble in my (direct drive) Prusa. ymmv especially if you're on a bowden. A quick pass with sandpaper would probably do wonders.

I'll try to get the Python code online in the coming week.

#3dPrinting #python #gcode

A view of the owl in my hand. It has large clear red bands and short muddy blue bands. The highlights catch the owl's eyes & beak.

I'm also holding a piece of the filament, but it can't be seen quickly.A loop of fast color change filament I just printed. It alternates between shorter sections of blue and longer sections of red.A detail of the join between two sections. The join is at about a 30 degree angle from horizontal in the printing orientation. I believe that the horizontal overlap between adjacent materials where they join is the source of the strength of the join.
2025-01-05

writing a Python program to generate gcode that 3D prints filament. Step 1: can I print a single color 1 meter piece and then print with it?

Step 2 is adding a pause-at-layer directive to make bi-color filament.

Step 3 is breaking up the single coil into segments and using different colors per segment. I think this would only be useful for a "faster rainbow filament" not for multicolor prints where the color is supposed to end up in a specific spot.

It looks like I could fit up to about 14 meters / 42g of filament on my build plate (Prusa mk3s), depending how close it can spiral to the middle while remaining printable, so this is only useful for smallish projects unless you want to keep loading short lengths every so often.

I did this a long time ago in openscad but it was nearly unusably slow due to the CSG operations. This program isn't dealing in any 3d solid models, it directly generates gcode.

I've been learning things like the inverse arc length calculation for the Archimedean spiral & remembering how to make gcode, so it's been fun and educational even if I fall off the project before completing step 3.

#gCode #3dPrinting #python

A preview of some 3d printing gcde. The extruded plastic is in some weird (fleshy??) pink color. There are about 3 1/2 spirals, and the view is oriented so that you can see the bundle of individual tracks that create an approximately octagonal cross section.
2024-11-27

what the fuck. my G-code can do MATH?

SET_PRINT_STATS_INFO CURRENT_LAYER={layer_num +1} and it actually fucking works in the exported file

G92 E0
SET_PRINT_STATS_INFO CURRENT_LAYER=2
M141 S0 ; set chamber temperature

I. My god.

#3DPrinting #QidiQ1Pro #gcode

JonnyJestJonnyJest
2024-10-04

I was bad at metallic spray painting the light bar for my game shelf, so I learned to edit and put pauses in so I could switch out filament and sandwich in a white backing 😆

2024-08-03

With #Lightburn giving-up on #Linux I’m going to have to find something else to use with the #xtool laser.

If it works with Lightburn in addition to the proprietary xtool software, it must use some kind of #gcode right? So maybe I can use some of the stuff I used when I built my first CNC laser out of cdrom drives?

Dawn Tåke 🌙 :sparkletrans:Tourma@tech.lgbt
2024-07-23

Hello all,

At work we got a Carvey by Inventables CNC machine from our IT department. We thought this was really cool and we'd get good use out of it. Until we saw what the annual subscription to Easel Pro is. That's....not an insignificant portion of our annual program budget. IT was like "lolno" at paying for a sub.

So I'm looking for free/near free alternatives.

Is the base #STL files? If so, #Inkscape is the best for those? What about for making the #gCode? I saw #CNCJs, but I don't know. This is beyond my limited expertise with with 3D printing.

Thanks for any help.

#Carvey #inventables #CNC #CAM

2024-07-21

Today, I think I managed to mostly dial in the various settings for my plotter. Up until now, although the carriage moved fairly cleanly, there was a discrepancy in the dimensions that it was moving when I tried to send it any instructions.

Once I’d figured out the X and Y movement, the next issue was getting the Z axis (an RC servo that moves the pen up and down at the end of the plotter arm) to behave as intended. Initially I was seeing that the pen remained down during moves around the image I was trying to draw, but I realised that I had the Z motion in the wrong place in the GCode file (I’m using vpype-gcode to convert from SVG to GCode for my custom machine, here). I wrote my own template machine definition to help do that conversion.

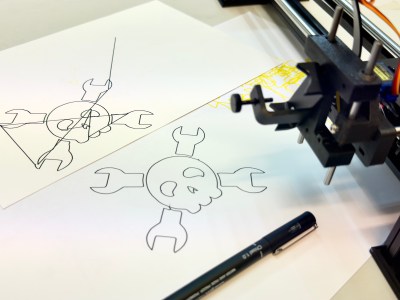
Here’s the before and after image where I had the pen up/down in the wrong spot in the GCode template. I love to use Hackaday’s Jolly Wrencher logo as a test bed for these kinds of things! It’s a nice clean and simple set of shapes.

You probably do not understand exactly how happy this has made me right now… just some final #fluidnc tuning and a more accurate vpype-gcode config to create… #penplotter #diy #hackaday #maker #plotter

— Andy Piper (@andypiper@macaw.social) 2024-07-21T13:18:13.782Z

Getting a clean plot completed was a huge step forward! I used OpenBuildsCONTROL as the GCode sender, as it seems to be one of the only apps I can find that works well communicating with FluidNC over the network. I’ve previously used UGS and CNCjs with my hanging polar plotter, but that currently talks something that resembles GRBL, and runs over USB serial only (another project I want to get around to updating, some time).

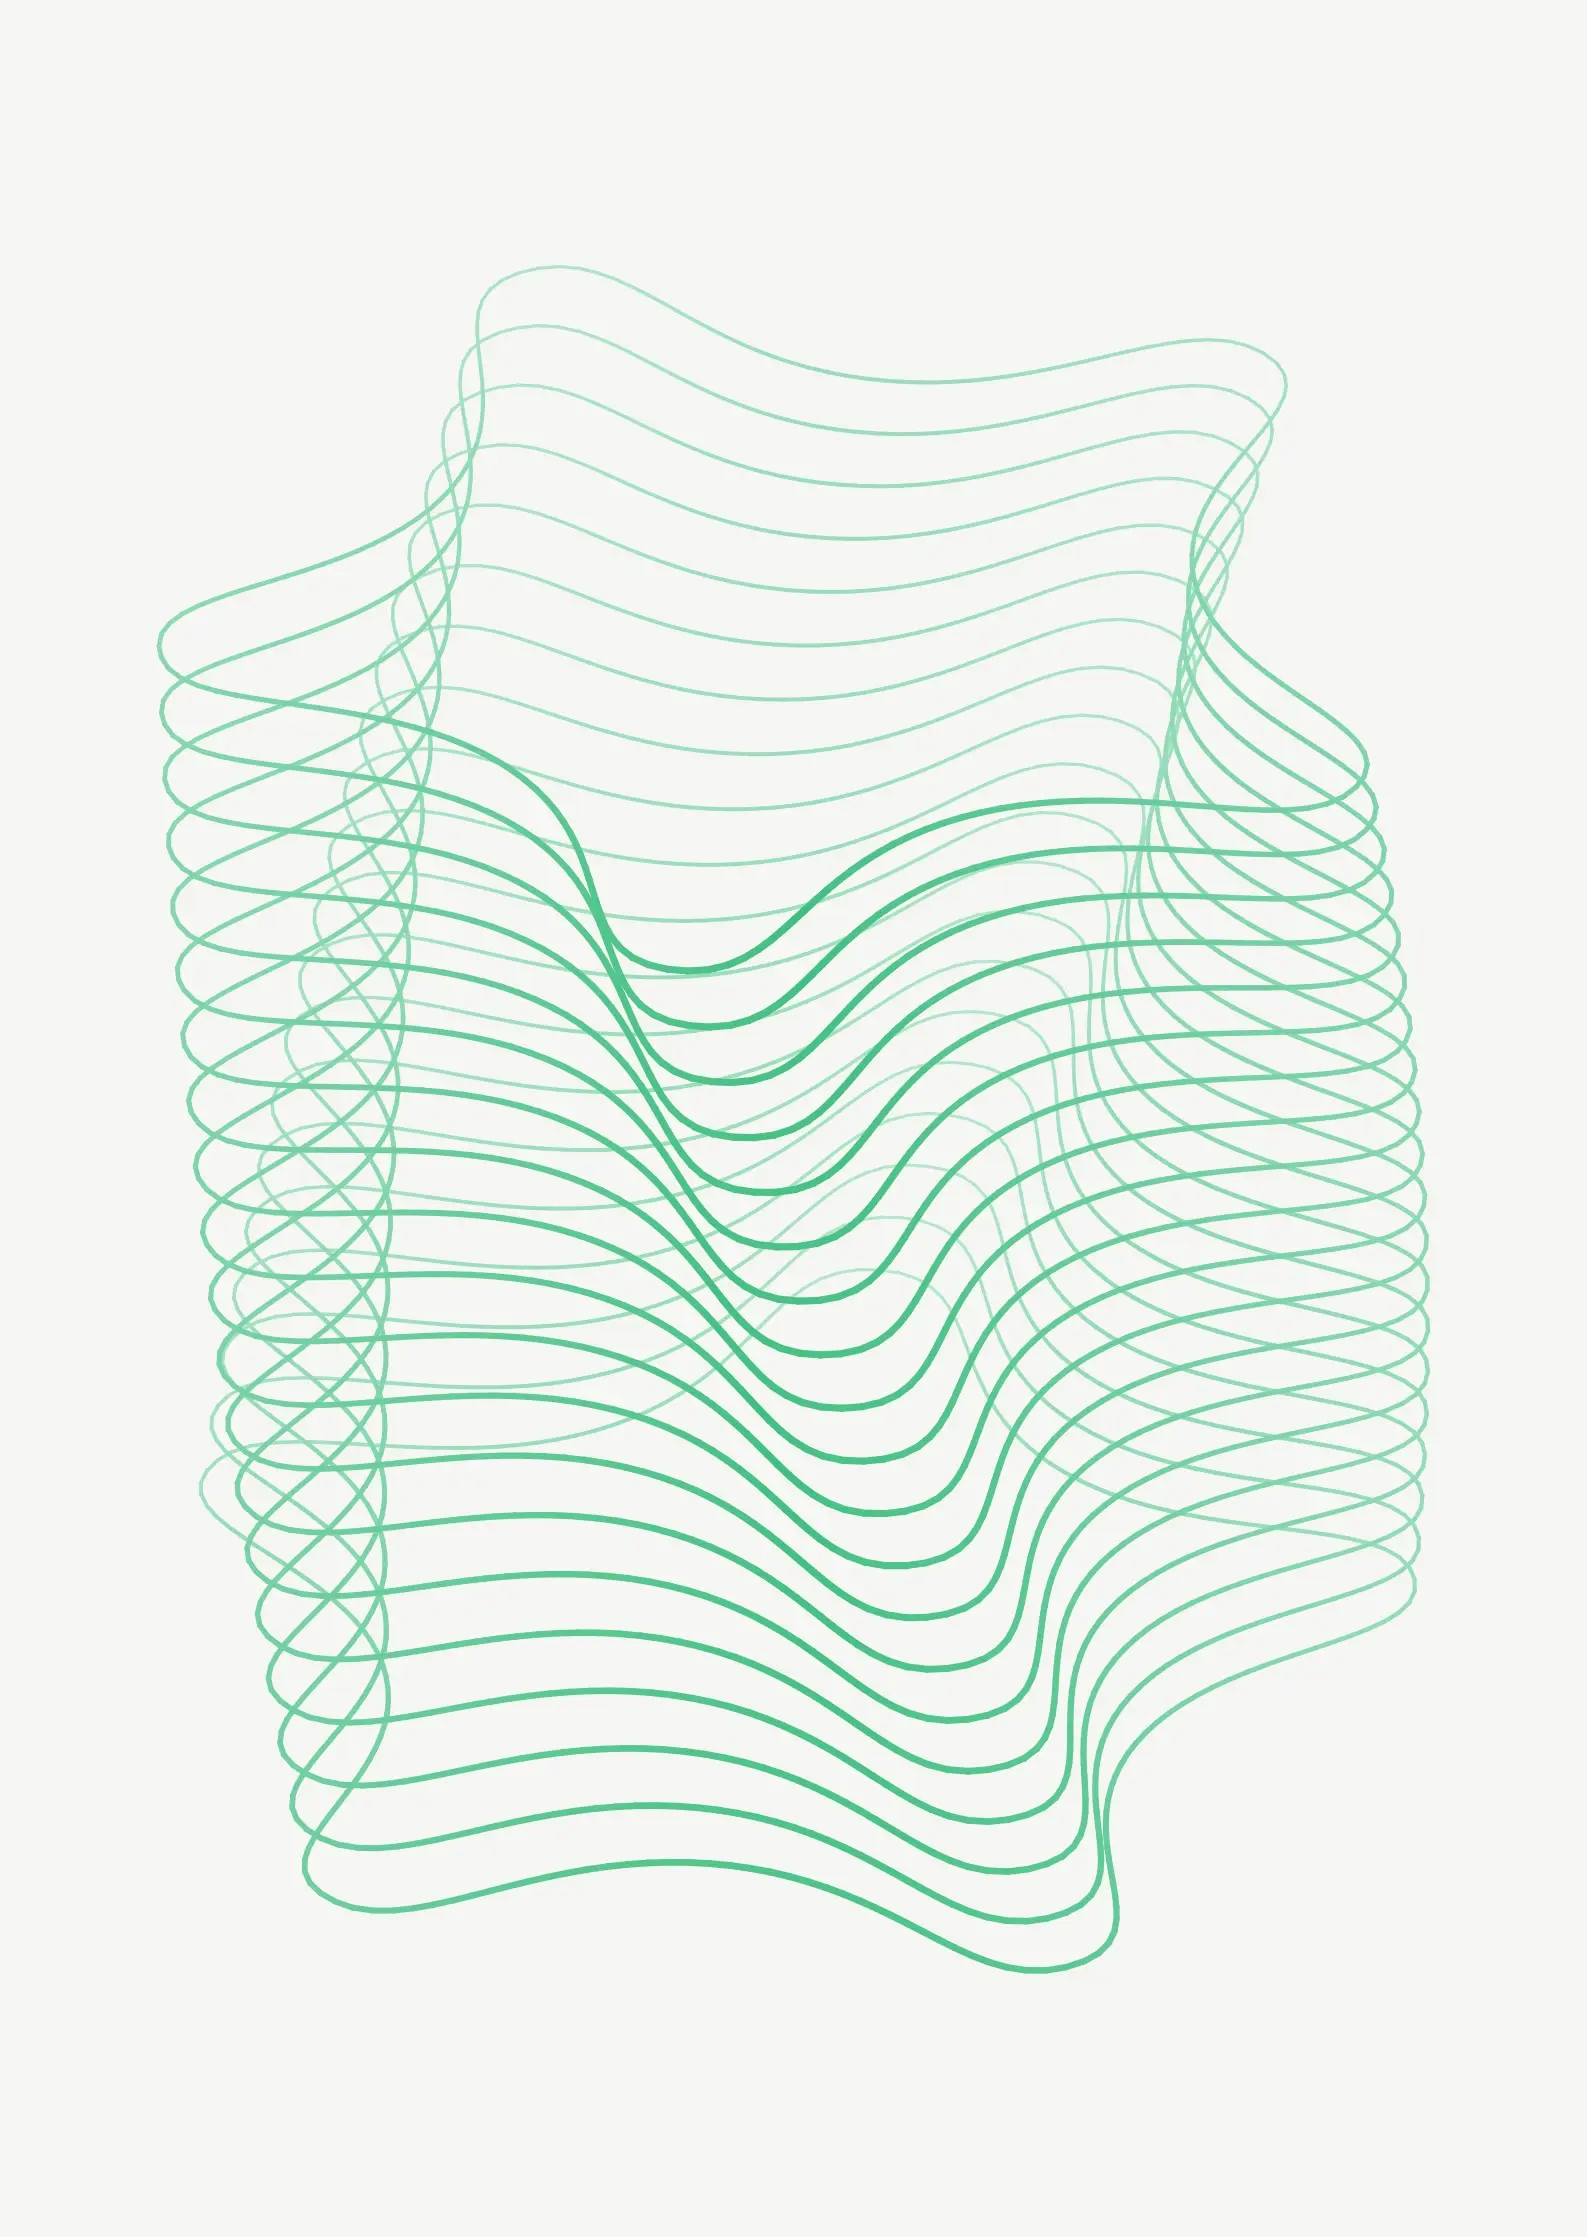
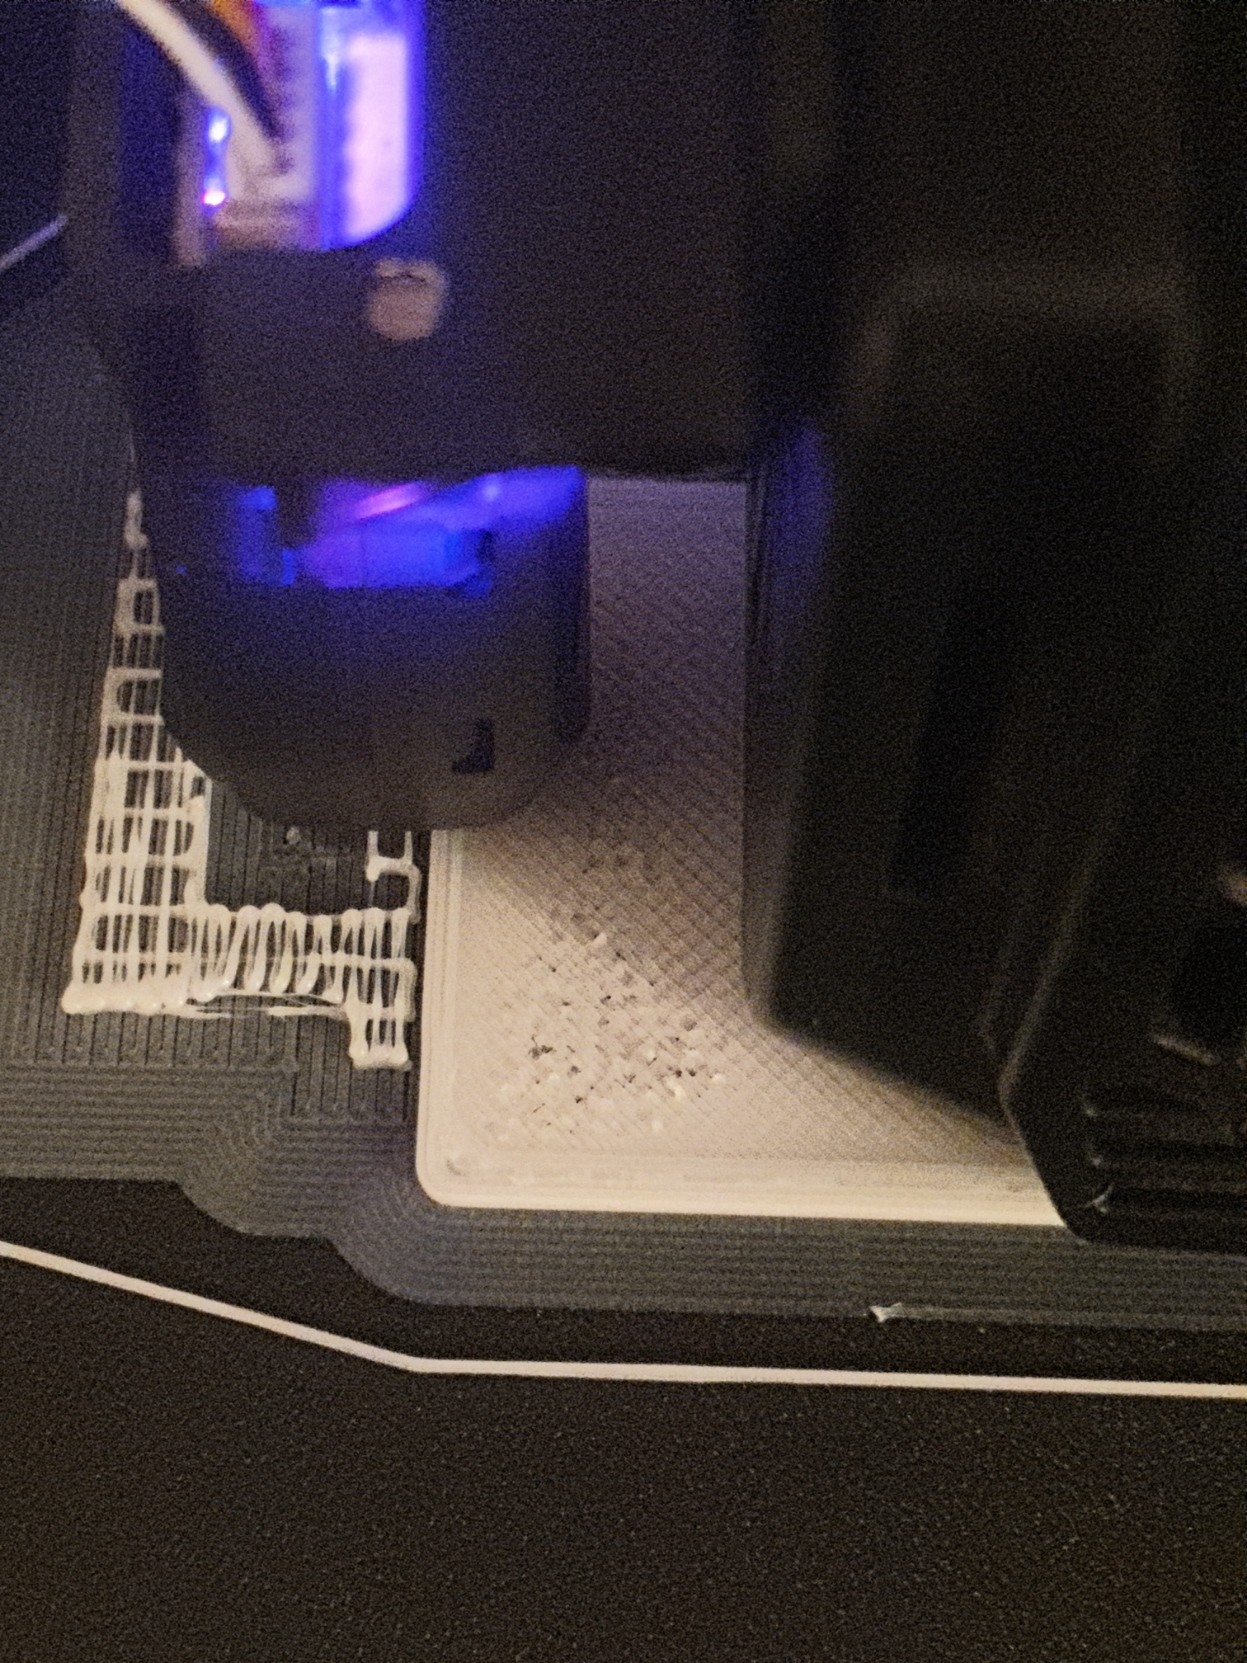
After that… I got cocky. I decided to try to draw a grid of these at 10% size (tip: Inkscape can easily generate this kind of thing, using Path Effects – super useful). However, 10% size was waaaay too small (not pictured or recorded, unrecognisable squiggles), so, I went for something a bit larger – although, not much.

https://www.youtube.com/watch?v=muXezKabU64

This all took around 20 minutes to plot out – not super fast, but having done some reading, I think pushing the stepper motors too much will have a negative effect.

Given that this is supposed to be a grid of 25 identical Jolly Wrenchers… I can see that some more tuning is needed! It is a cheap(ish) self-assembly machine… and I felt pretty good about how I put it together, but I also noticed that the belt probably needs adjusting and I’m sure I can do a better job on the mechanical side of things.

TODO: adjustments as above; build a mounting box for the FluidNC controller; look into improving the vpype-gcode template; put it all on Hackday and GitHub or Codeberg; considering replacing the SG90 with a nicer servo (extra credit idea, unnecessary).

Results!

[side note: I also put the video above onto my Peertube account, but I don’t think I can embed that here at the moment. WordPress / Automattic are moving in the direction of the Fediverse, but apparently I can’t embed from PeerTube yet…]

Like it? Share it -

https://andypiper.co.uk/2024/07/21/its-alive/

#100DaysToOffload #fluidnc #gcode #hardware #penplotter #plotter

Two pen plotted versions of the Hackaday wrench and skull crossbones logo in black pen on white paper and card. One of them has pen plotted travel lines across it and the other one is complete. There is the black head of a pen plotter and a fineliner pen on the right of the image.
𝘋𝘪𝘳𝘬dirk@gts.0x7be.net
2024-06-08

#PSA: Never ever select the “auto home” option from the control unit menu on an #Ender5Pro where you installed a #BLTouch on and walk away because “it will take a moment, I can use this to go to the kitchen and grab some food”.

For some reason the auto home feature from the menu seems to be reversed and instead of going up to the BLTouch probe the bed goes down until the cantilever screws are jammed into the lead screw connector till you turn of the power supply.

I don’t know what #GCode is sent, but it’s clearly not G28,G29 as it should be when there is a BLTouch installed.

Fortunately everything seems to work, though.

I wonder if I somehow can repurpose the unused Z endstop switch and place it at the bottom to trigger an “emergency stop” without modifying the firmware.

#3Dprinting #Creality

Hi everyone. Has someone ever saw such an issue with 3D Printing? I have invested hours in troubleshooting and still no progress. It is most of the time the 3rd layer and the first layer is perfect.

I use PETG+ from ACTIVEME at 230/70C° with 6mm retraction and the Ender 3 V2 Neo 0.15mm layer height at 100mm/s printing speed

The fillament is fresh newly opend so it is not humidity.
In the past i printed perfectly fine with the same fillament.

#3dprint #3dprinter #Ender3V2 #gcode #PETG

3D Print, layer crumbling
2024-05-18

Гроубокс с числовым программным управлением (ЧПУ)

Возникла необходимость сделать настройку гроубокса максимально комфортной -- удалённо, без программирования. Все исходные коды доступны по ссылкам в конце статьи . В статье будет упор на программную часть: прошивка гроубокса, графический интерфейс (GUI) для компьютера.

habr.com/ru/articles/815271/

#гроубокс #растениеводство #ситиферма #pyqt6 #python3 #arduino #gcode #саженцы

Bose-Einstein-KondensatMWNautilus@mstdn.social
2024-02-20

DDYNAMEX 3D: #OpenSource dual feed progressive cavity #pump #extrusion system for functionally graded direct #ink write (#DIW) #3Dprinting:

-#Prusa-based
-costly due to ViscoTec ecoDUOMIX 450 #extruder

doi.org/10.1016/j.ohx.2024.e00
#DIYbio #lab #instruments #GCODE #Arduino

concretedogconcretedog
2024-02-19

So.. I think I've given up trying to find an opensource toolchain for setting up lathe operations in . I'm seeing this as an opportunity to learn more gcode and hand write some of the simple operations I want to perform. Here I am exploring arc interpolation G02 and G03 in lathe mode (XZ plane G18).

Screenshot of the NC Viewer website, a handy site that allows you to write and test GCODE. The left hand side of the screen is an editor with some typed gcodes and the righ hand side shows some arc toolpaths the gcodes have plotted.
Bose-Einstein-KondensatMWNautilus@mstdn.social
2024-02-17

Office Chromatography: Miniaturized all-in-one #OpenSource system for planar #chromatography:

-article unfortunately #NOpenAccess
-#3Dprinted
-254 nm #UV #LED illumation
-#Arduino-/#RaspberryPi-/#PiCam-controlled

doi.org/10.1021/acs.analchem.8
#DIYbio #lab #instruments #TLC #GCODE

Client Info

Server: https://mastodon.social
Version: 2025.04
Repository: https://github.com/cyevgeniy/lmst