Another glamour shot of the 5×2 #handwired #dactyl #keyboard. The middle key in the left column now works as Shift_R (working on modifier keys).
#dactyl


Status af my #Teensy2 powered #dactyl keyboard: breadboarding is ongoing, I have a functional 4-button keyboard (aoeu on Dvorak, asdf on qwerty).
The I²C connection to the MCP23018 IO expander works, but not yet fully through the TRRS jack cable (I think it's bad connection/soldering on one of the pins, that's on me). Six months ago I wouldn't have known what any part of than previous sentence meant 😅 it's a wonderful learning journey.


I recently (a few weeks ago) finished putting the latest version of my Dactyl Lynx #keyboard together, using my Snowshoe MX single-switch PCBs, and I'm incredibly happy with the results!
https://hackaday.io/project/176016-dactyl-lynx/log/241332-finally-finished-the-new-build
#ergonomic #ergokeyboard #dactyl #mechanicalkeyboard #splitkeyboard #3dprinting #rp2040 #rmk


Pics, in terrible light of the new keyboard.
Alt text explains the second pic.

Handwired keyboard question:
As I was using my keyboard, suddenly a during a keypress (in the "row" of two keys in the middle) the entire column is being triggered (and flickering). I checked the connections on the keys but I could not find any shorts.
What could this be? Should I resolder everything just to be sure?

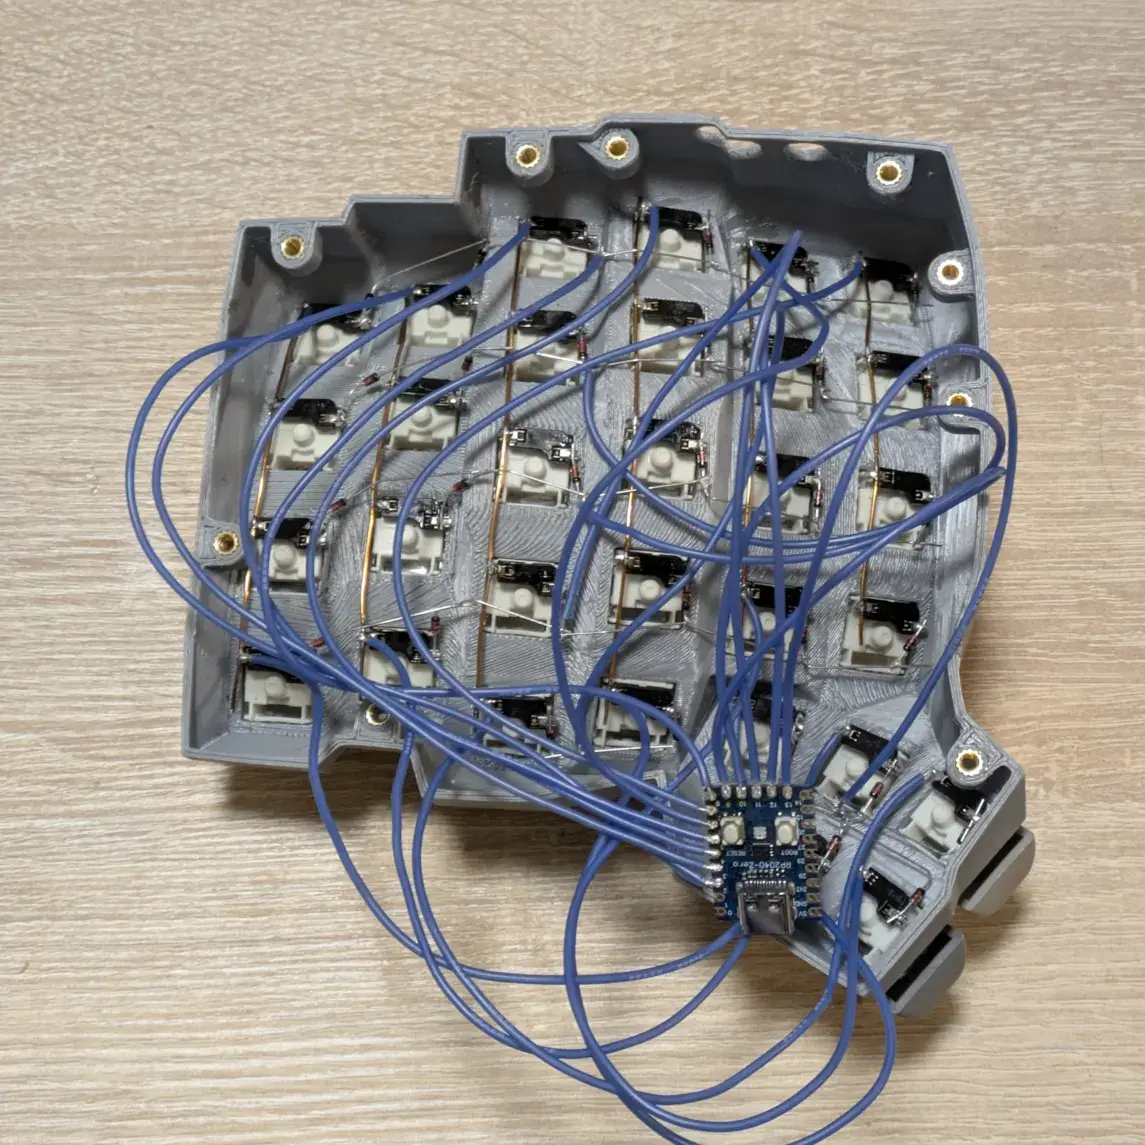
After a few hours of scratching my head about the diode wiring, my #diy #dactyl #manuform #splitkeyboard is wired up and working!
Now I need to do the other half 😭
The thick enamel wire is horrible to solder to (at least I'm sure there won't be any shorts!) and the config is really confusing to reason about.
But it's all set up with #Vial #QMK so at least I can change the keymap without recompiling/flashing!
Finally starting to build the latest version of my Dactyl Lynx keyboard! Many thanks to my coworker Baran for printing me some new keyboard parts while my 3D printer is in storage. Now to start soldering...


😢 😢 I started working on my walking desk after a few months of knees rehabilitation and my (last) #diy #dactyl keyboard starts emitting random noise characters. I'll need to dedicate an afternoon for debugging and fixing it. (Also if anyone in Ljubljana would like to join for some keyboard hacking, let me know).
Anyway, here's my setup (I'll write a blogpost about it when I'll find some time).

Second half looks a fair bit better. Not perfect, but I'm not sure I can do better.
Now to add the controller.
#mechanicalKeyboard #kicad #3Dprinting #handwiredKeyboard #dactyl

Don't zoom in.
Regardless I'm reasonably proud, and learned a lot.
#mechanicalKeyboard #kicad #3Dprinting #handwiredKeyboard #dactyl #rp2040


Update. Now I'm in the process of resculpting the whole keyboard by hand, to "smoothify it" a bit.
Was quite a fun experience, gonna do that to the whole piece + remake sure it prints out without any supports.
I AM going to publish the desing once it's done.
As promised, next prototype, besides the thumb part which I need to model.
It came out much better than the other one, and it was fast, 3 hoursh ish.
After a bit of processing which, I admit, it was a bit hasly, so it's not the pretties, it's a great result I think.
Gonna itterate a bit more, I still have to do wire hole stuff, the cable holes, all those.
But it's nice!
Supportless as in, no slicer supports, just some breakways parts.

Keebin’ with Kristina: the One with the Folding Typewriter https://hackaday.com/2024/08/26/keebin-with-kristina-the-one-with-the-folding-typewriter/ #Corona3typewriter #foldingtypewriter #PeripheralsHacks #HackadayColumns #tinykeyboard #microclick #macropad #macropad #wedgetyl #RGBLEDs #dactyl

Finished printing one side of my dactyl manuform and had to try the keycaps on for size 😻
Too bad I didn't order more in light blue. Well, maybe next time.
Now I gotta clean the print, apply the switches and start soldering - and find one and a half free days to print the other side ...
#3dprinter #3dprint #3dprinting #prusa #keyboard #keyboards #dactyl #dactylmanuform #ErgonomicKeyboards

Keebin’ with Kristina: the One With the Duplex Typewriter https://hackaday.com/2023/11/21/keebin-with-kristina-the-one-with-the-duplex-typewriter/ #PeripheralsHacks #duplextypewriter #HackadayColumns #dactylkeyboard #colecoadam #macropad #macropad #Coleco #dactyl #ADHD

I've been lurking on Mastodon for a while and figured it's time to actually post an #introduction and start sharing my projects. I like writing software and to generally just #make stuff, like:
- my star projector that uses star catalog data to accurately project points of light.
- my #dactyl keyboard re-designed in #OpenSCAD and built from laser cut acrylic
And for the past couple of years my main side project has been creating a visual keymap editor for #zmk #mechanicalkeyboards


Client Info
Server: https://mastodon.social
Version: 2025.07
Repository: https://github.com/cyevgeniy/lmst