https://www.walknews.com/910806/ リボルブ、苦境にあるオーストラリアの高級ブランド「ディオン・リー」を買収 – FashionNetwork 日本 #Australia #Clot #DionLee #fashionnetwork、ファッション #Revolve #アパレル #オーストラリア #ショー #テキスタイル #トレンド #ニュース #ビジネス #フランス #ブランド #マーケット #ランウェイ #化粧品 #小売 #業界 #海外 #繊維
#Revolve

https://www.wacoca.com/news/2532241/ リボルブ、苦境にあるオーストラリアの高級ブランド「ディオン・リー」を買収 – FashionNetwork 日本 ##ショー #Australia #Clot #DionLee #fashionnetwork、ファッション #REVOLVE #アパレル #オーストラリア #テキスタイル #トレンド #ニュース #ビジネス #フランス #ブランド #マーケット #ランウェイ #化粧品 #小売 #業界 #海外 #繊維

Cardi B Partners With Revolve To Launch Her 1st Clothing & Beauty Lines https://shinemycrown.com/cardi-b-partners-with-revolve-to-launch-her-1st-clothing-beauty-lines/?utm_source=dlvr.it&utm_medium=mastodon #CardiB #Revolve #Fashion #Beauty #CelebrityStyle

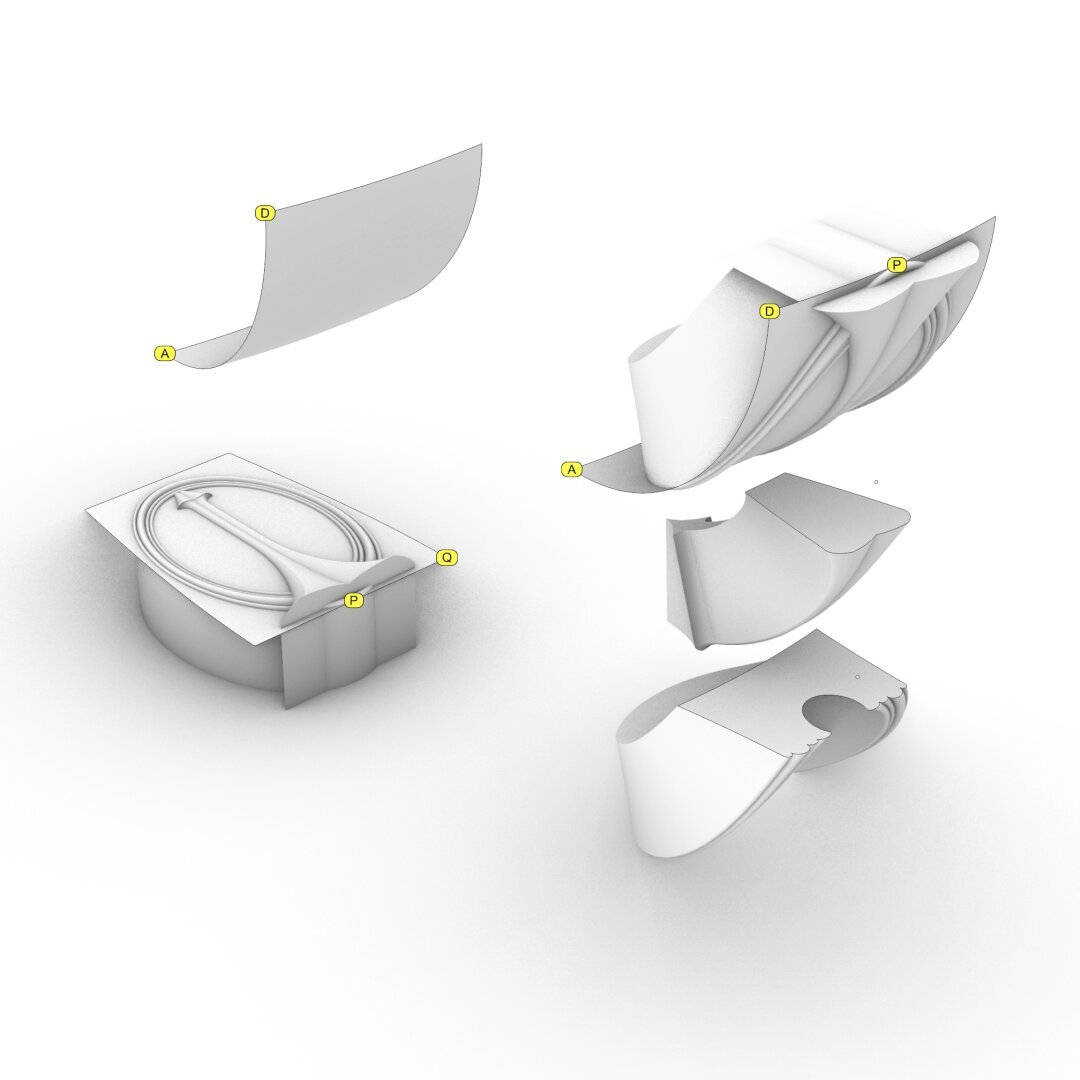
Left side of this diagram shows the #profileCurves for the cap of #ModernIonicCapital from the front. The right side shows a perspective view of the cap surfaces obtained by revolving the profile curves about their respective axes and after some of those have been trimmed away
The measurements for the floor plan of the modern ionic capital are given in https://pixelfed.social/p/Splines/807782440025967685 with further links to relevant pages in #Scarlata's book at the bottom.
I won't bore you with the bottom portion of the modern #capital because it is very similar to that of the classic capital shown in https://pixelfed.social/p/Splines/792124787573855518. A significant difference is that the bottom #ovolo is shorter, with a total height of 32 units instead of 40
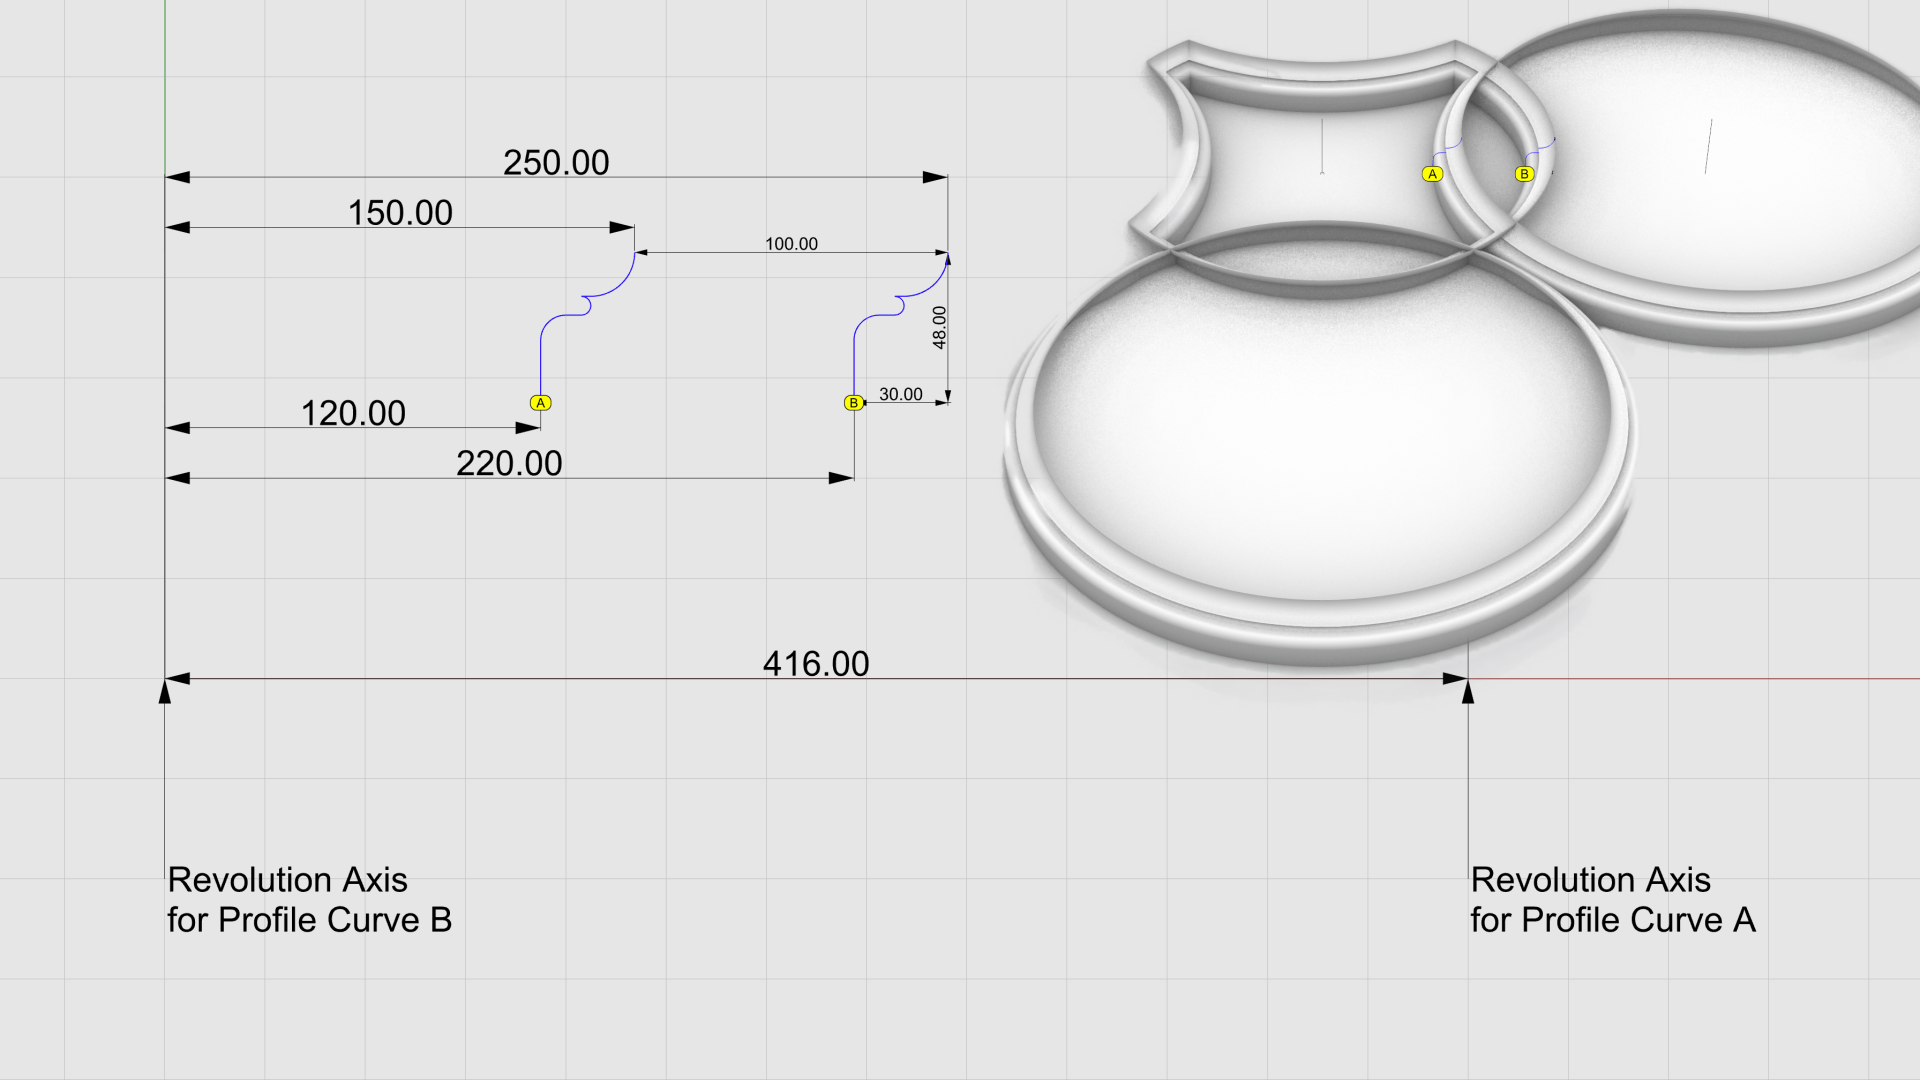
For the cap, we need two identical copies of a single profile curve that is 30 units wide and 48 units tall. The curves marked by A and B in the diagram are oriented in the same direction and are spaced 100 units from each other.
The bottom of profile curve A lines up with the neck of the #columnShaft at 120 units from the column axis. The revolution axis for this curve is located at 416 units from the column axis at the center of the largest circle in the floor plan.
We #revolve profile curve A full circle about its revolution axis. Then, we #rotate the resulting surface about the column axis to get 4 identical copies.
We revolve profile curve B full circle about the column axis. Then, we trim the resulting surface along with the 4 others at each intersection to get the side and corner surfaces for the cap of the capital.
We #join the trimmed surfaces, cap #planarHoles to convert them into a closed solid, and verify that the resulting solid is #airtight with no #nakedEdges and no #nonManifoldEdges.
The cap is in the correct final orientation. The volutes will be at 45° angles, but when we construct them, it will be easier to rotate the whole plan 45° so that the #volute #spiral is on the XZ plane.
The measurements for the floor plan of the modern ionic capital are given in https://pixelfed.social/p/Splines/807782440025967685 with further links to relevant pages in #Scarlata's book at the bottom.
I won't bore you with the bottom portion of the modern #capital because it is very similar to that of the classic capital shown in https://pixelfed.social/p/Splines/792124787573855518. A significant difference is that the bottom #ovolo is shorter, with a total height of 32 units instead of 40
For the cap, we need two identical copies of a single profile curve that is 30 units wide and 48 units tall. The curves marked by A and B in the diagram are oriented in the same direction and are spaced 100 units from each other.
The bottom of profile curve A lines up with the neck of the #columnShaft at 120 units from the column axis. The revolution axis for this curve is located at 416 units from the column axis at the center of the largest circle in the floor plan.
We #revolve profile curve A full circle about its revolution axis. Then, we #rotate the resulting surface about the column axis to get 4 identical copies.
We revolve profile curve B full circle about the column axis. Then, we trim the resulting surface along with the 4 others at each intersection to get the side and corner surfaces for the cap of the capital.
We #join the trimmed surfaces, cap #planarHoles to convert them into a closed solid, and verify that the resulting solid is #airtight with no #nakedEdges and no #nonManifoldEdges.
The cap is in the correct final orientation. The volutes will be at 45° angles, but when we construct them, it will be easier to rotate the whole plan 45° so that the #volute #spiral is on the XZ plane.
#EggsAndDarts
To transfer the egg and dart in https://pixelfed.social/p/Splines/797038670230603707 to the #doublyCurved surface of an #ovolo is a multistep process.
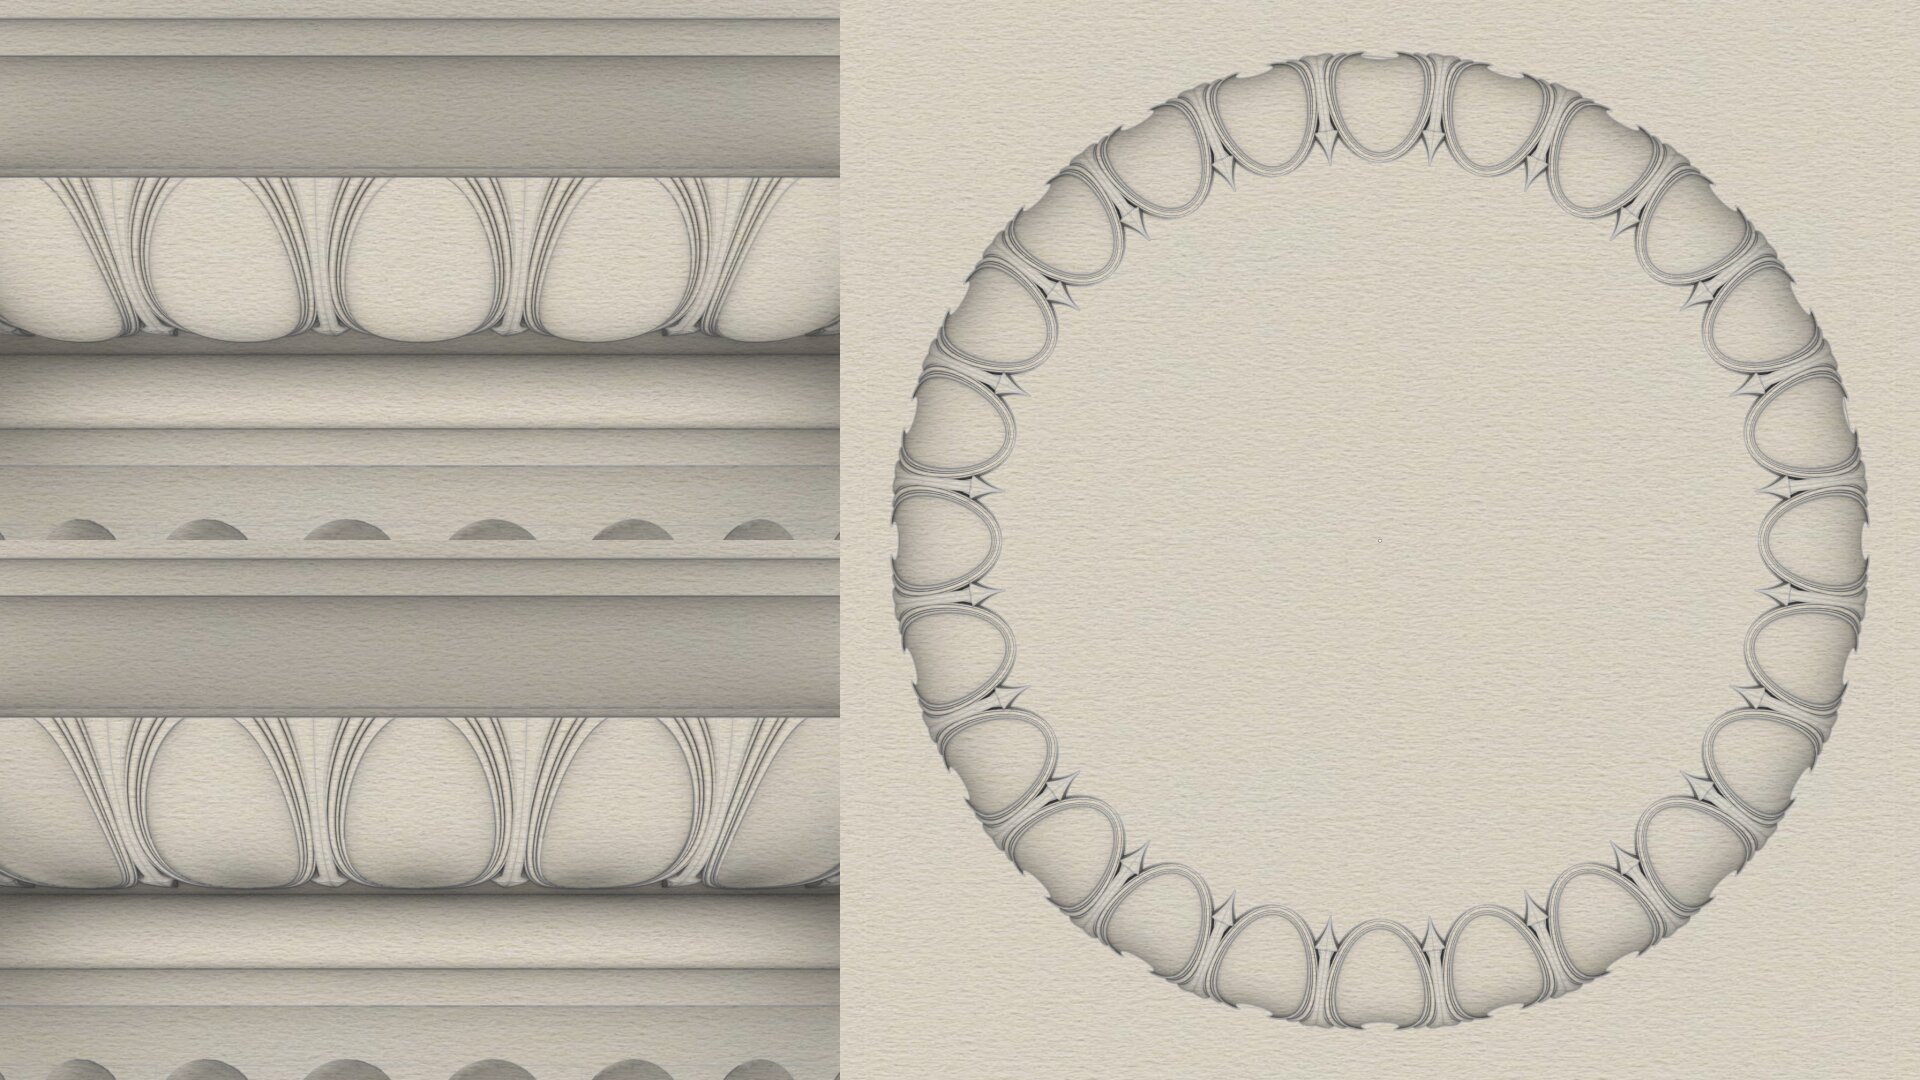
There are 24 eggs and darts around the entire Ovolo. So each egg and dart nominally occupies 360°/24 = 15°.
#Revolve arc AD in https://pixelfed.social/p/Splines/792124787573855518 about the #columnAxis to get the virtual surface. Points A and D are same in both figures. Then use cutting planes as described in https://pixelfed.social/p/Splines/790645054230337543 to get a wedge-shaped segment whose angle is 15° and one side of which is marked with A and D.
This is a doubly curved surface. Unlike a cylinder, where one side is straight while the other is curved, the surface of an Ovolo is curved in both horizontal and vertical directions.
To transfer the egg and dart to a doubly curved surface, we need a new operation called #UnrollSurface, which unrolls the wedge shape into a flat surface whose top-left corner is marked Q. Note the top is wider than the bottom.
Place the flattened wedge between the rim and the flat slab and align the top of the flat portion of the slab with the center of the top edge of the flattened wedge. Temporarily move the dart to align its center too, but only move it in the horizontal direction
If the flattened wedge were flexible and if the eggs and darts were flexible, we could flip all of these over, flex and squeeze the solid shapes, and line up Q with D so that the rim and dart appear "outside" the original wedge while the slab remains "inside" (or toward the center of the Ovolo).
Fortunately, in a #CAD tools, solids don't always have to be treated as rigid. Now we will use another new operation called #FlowOnSurface to flow the egg and dart on the wedge.
We then slice off the top of the egg and dart at the location PQ in https://pixelfed.social/p/Splines/796958366767133979.
Finally, we separate the dart, which we had aligned with the egg to minimize distortion
To transfer the egg and dart in https://pixelfed.social/p/Splines/797038670230603707 to the #doublyCurved surface of an #ovolo is a multistep process.
There are 24 eggs and darts around the entire Ovolo. So each egg and dart nominally occupies 360°/24 = 15°.
#Revolve arc AD in https://pixelfed.social/p/Splines/792124787573855518 about the #columnAxis to get the virtual surface. Points A and D are same in both figures. Then use cutting planes as described in https://pixelfed.social/p/Splines/790645054230337543 to get a wedge-shaped segment whose angle is 15° and one side of which is marked with A and D.
This is a doubly curved surface. Unlike a cylinder, where one side is straight while the other is curved, the surface of an Ovolo is curved in both horizontal and vertical directions.
To transfer the egg and dart to a doubly curved surface, we need a new operation called #UnrollSurface, which unrolls the wedge shape into a flat surface whose top-left corner is marked Q. Note the top is wider than the bottom.
Place the flattened wedge between the rim and the flat slab and align the top of the flat portion of the slab with the center of the top edge of the flattened wedge. Temporarily move the dart to align its center too, but only move it in the horizontal direction
If the flattened wedge were flexible and if the eggs and darts were flexible, we could flip all of these over, flex and squeeze the solid shapes, and line up Q with D so that the rim and dart appear "outside" the original wedge while the slab remains "inside" (or toward the center of the Ovolo).
Fortunately, in a #CAD tools, solids don't always have to be treated as rigid. Now we will use another new operation called #FlowOnSurface to flow the egg and dart on the wedge.
We then slice off the top of the egg and dart at the location PQ in https://pixelfed.social/p/Splines/796958366767133979.
Finally, we separate the dart, which we had aligned with the egg to minimize distortion
#EggsAndDarts is a common classical design motif with endless variations, two of which are shown here — the top-left variant has convex eggs and the bottom-left variant has concave eggs. The sketch on the right shows the bottom view of the concave variant.
This motif is neither specific to the #IonicOrder, nor limited to the #ovolo of the capital. It is common to find it laid on linear #moldings like #cymaRecta or #cymaReversa of a #cornice.
The egg shape, the dart shape, the degree of convexity or concavity, and so on, are infinitely variable from subtle to pronounced. Designers are not limited to convex or concave, and it is possible to combine both in a single design. Also, it is not necessary to use the eggs and dart motif at all. There are infinite possibilities. However, when the eggs and darts motif is used, it is almost invariably sliced off at the top, as the bottom view of concave variant on the right reveals.
The concave version here is quite subtle, but a more pronounced version can be really eye-popping. I will show how to construct one using just straight lines and circular/elliptical arcs exclusively as I originally promised in https://pixelfed.social/p/Splines/789956327130679640.
As usual, we start with a flat 2-dimensional plan with lines and ovals to use as #sweepingRails. Then, we add circles and arcs as #sweepingCurves to define the cross-sections. After sweeping the cross section curves on the rails, we create the eggs.
Simply #revolve an ellipse on its major axis to get the convex version of an egg. To get the concave version of an egg, simply create a flat slab and perform a #booleanDifference on that slab using a convex egg.
Once we have all of this preparatory work done, we have to transfer the 3-dimensional design from the flat surface it was originally created on to the #doublyCurved surface of the Ovolo. This requires some elementary calculations using circle geometry.
Previous— https://pixelfed.social/p/Splines/795361973789834465
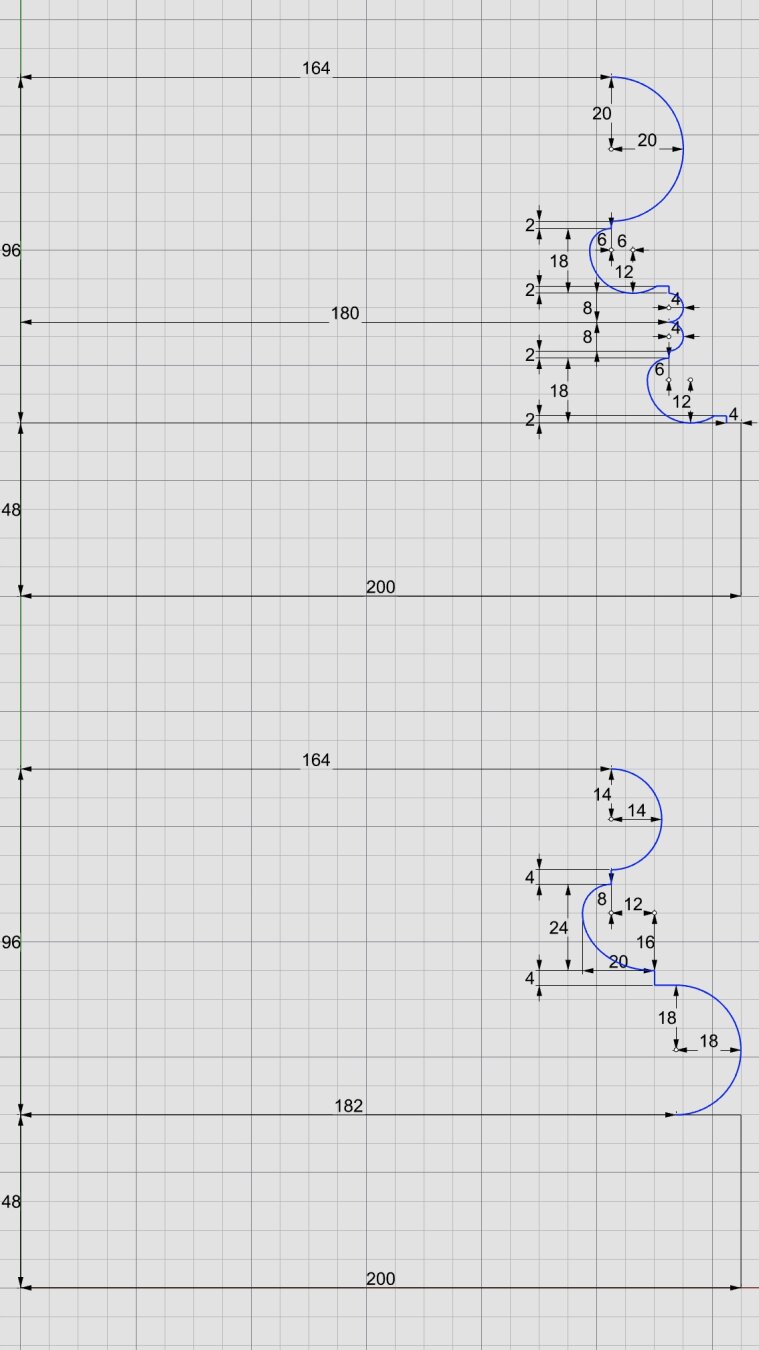
Classic #IonicCapital #Tectonic Surfaces Plan
We already made the 8 unit tall #fillet at the bottom of the #capital a part of the #shaft in https://pixelfed.social/p/Splines/791794072490907090. So, excluding that, the remainder of the capital is 14 parts or 112 units tall, for the bottom half of which we use the #revolve operation (like the #columnBase and #columnShaft), and for the top half we use the #extrude operation (like the #pedestal, #entablature, and #plinth).
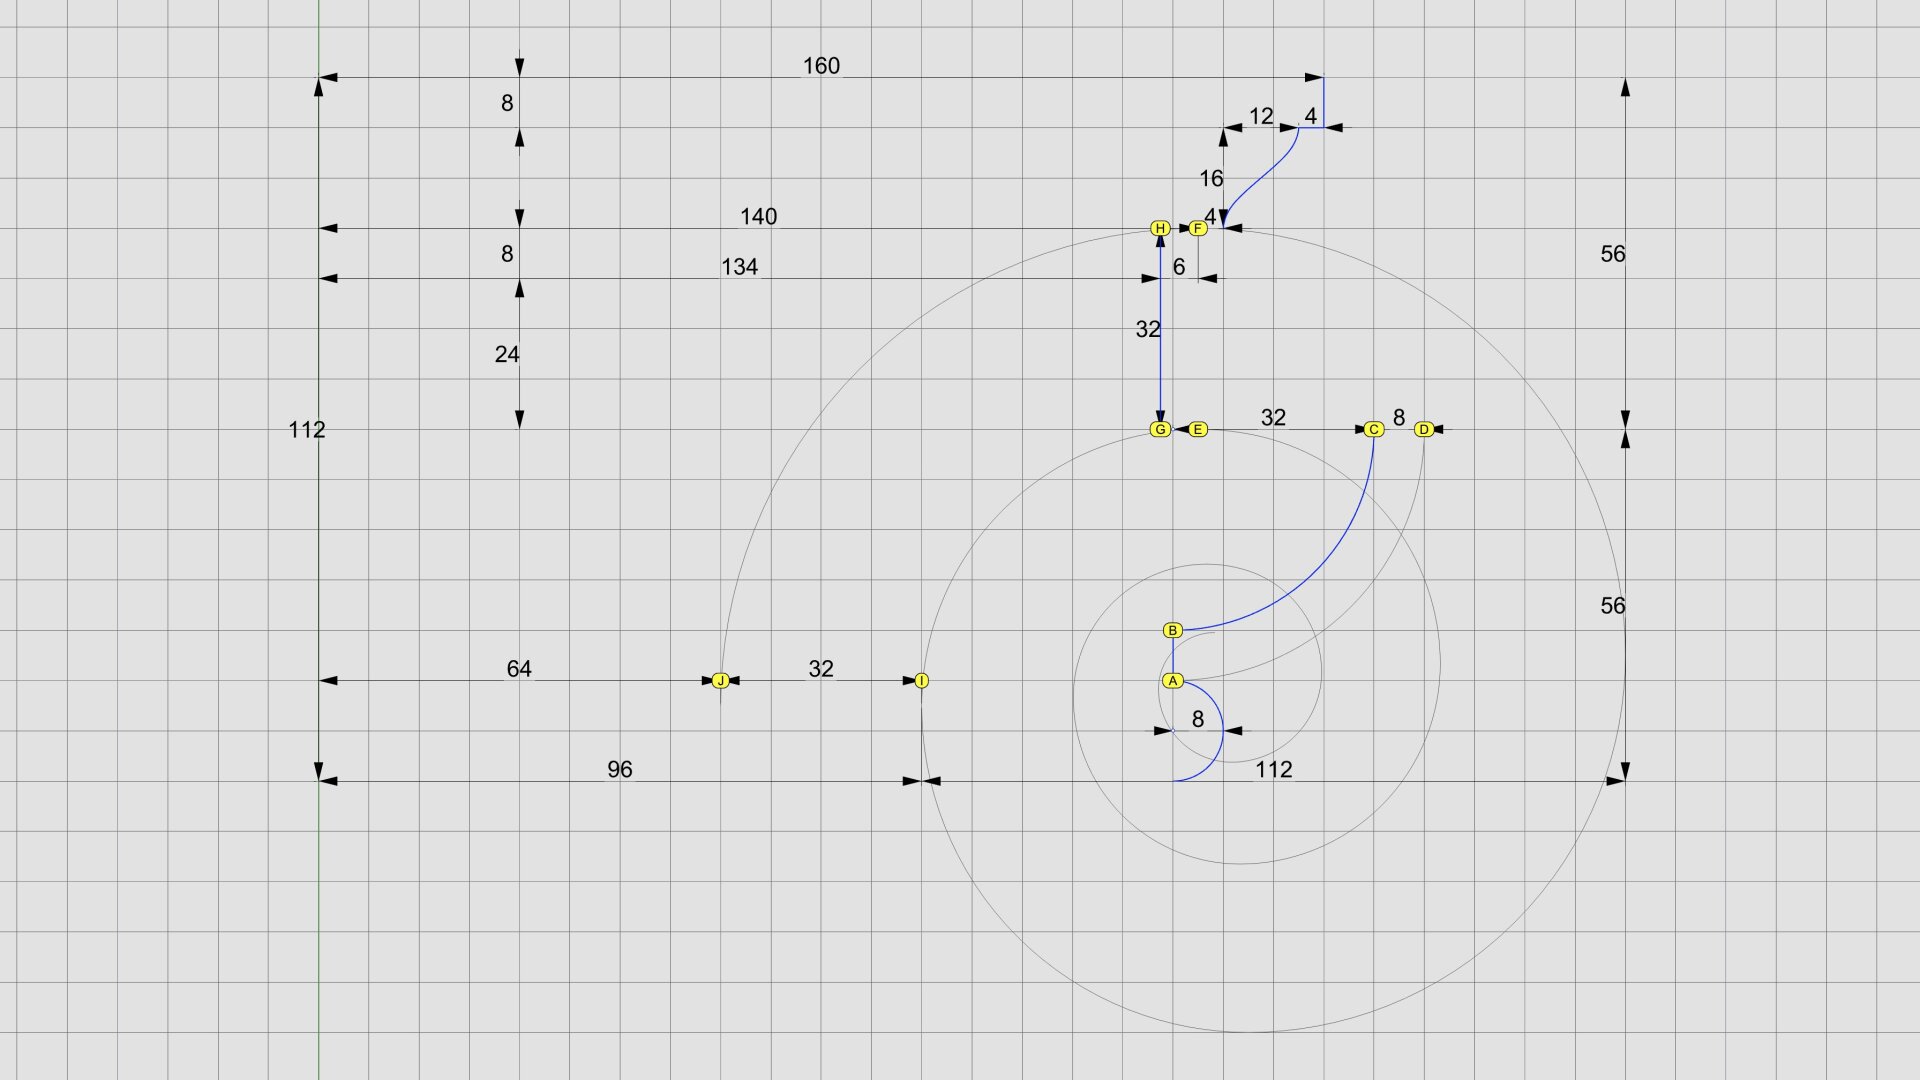
Starting at the bottom, we have an #astragal that is 2 parts or 16 units tall and has the same profile as a #reed and #torus, falling in between the two in terms of size. The arc AD is shown in gray because it is an invisible #virtualSurface that envelops the decorations like #eggsAndDarts on the #ovolo. This is the measurement that is given in #Scarlata's #PracticalArchitecture, but it makes no mention of the #decorative and #tectonic surfaces. Arc BC with a radius of 4 parts or 32 units is the tectonic surface on which the Ovolo decorations rest. Such decorations have a variable or uneven surface which may not exceed 1 part or 8 units.
Points E and F mark the horizontal tangent or maxima of the second spiral and the first (outermost) spiral, respectively. The gap between them is exactly 4 parts or 32 units. GH is the profile for the vertical side surface on which part of the #ribbon and #braid lie flat, protruding exactly 6 units to coincide with the invisible virtual flat surface through EF.
The #cymaReversa is 2 parts or 16 units tall and 1.5 parts or 12 units wide. It starts 4 units to the right of F and stops 4 units short of the top fillet, which is one part or 8 units tall and 20 parts or 160 units from the #columnAxis.
Of the 4 parts or 32 units between G and H, the lower 3 parts or 24 units are part of the #voluteChannel groove and the top 1 part or 8 units is a fillet that follows the curve of the #volute and progressively gets narrower until it converges with the #eye of the volute.
We already made the 8 unit tall #fillet at the bottom of the #capital a part of the #shaft in https://pixelfed.social/p/Splines/791794072490907090. So, excluding that, the remainder of the capital is 14 parts or 112 units tall, for the bottom half of which we use the #revolve operation (like the #columnBase and #columnShaft), and for the top half we use the #extrude operation (like the #pedestal, #entablature, and #plinth).
Starting at the bottom, we have an #astragal that is 2 parts or 16 units tall and has the same profile as a #reed and #torus, falling in between the two in terms of size. The arc AD is shown in gray because it is an invisible #virtualSurface that envelops the decorations like #eggsAndDarts on the #ovolo. This is the measurement that is given in #Scarlata's #PracticalArchitecture, but it makes no mention of the #decorative and #tectonic surfaces. Arc BC with a radius of 4 parts or 32 units is the tectonic surface on which the Ovolo decorations rest. Such decorations have a variable or uneven surface which may not exceed 1 part or 8 units.
Points E and F mark the horizontal tangent or maxima of the second spiral and the first (outermost) spiral, respectively. The gap between them is exactly 4 parts or 32 units. GH is the profile for the vertical side surface on which part of the #ribbon and #braid lie flat, protruding exactly 6 units to coincide with the invisible virtual flat surface through EF.
The #cymaReversa is 2 parts or 16 units tall and 1.5 parts or 12 units wide. It starts 4 units to the right of F and stops 4 units short of the top fillet, which is one part or 8 units tall and 20 parts or 160 units from the #columnAxis.
Of the 4 parts or 32 units between G and H, the lower 3 parts or 24 units are part of the #voluteChannel groove and the top 1 part or 8 units is a fillet that follows the curve of the #volute and progressively gets narrower until it converges with the #eye of the volute.
#IonicColumn #VignolaBase and #AtticBase #CAD Plans
Both #Vignola base and #Attic base have the same square footprint of 400 units x 400 units. The #plinth for both is 48 units (6 parts, or µ/3) tall, and the total height for both is 144 units (18 parts, or exactly µ). As such, they are easily interchangeable.
In the Vignola variant, we start at the plinth with a #fillet 2 units tall and a classic #scotia 18 units tall gouging out part of the fillet.
Then there is another fillet 2 units tall, followed by two #reeds, each 8 units tall, followed by another classic scotia as described above.
This is followed by yet another fillet 2 units tall and topped off with a #torus 40 units tall. A Torus is the same as a reed, except larger. When we reach the neck of the shaft, we will see another molding called #Astragal which has the same profile as reed and torus, but sits in the middle in size. Think of reed, astragal, and torus as small, medium, and large of the same profile.
The modern Attic variant is more elegant with fewer moldings. It also gives the impression of more heft for more stately columns. It starts at the plinth with a torus 36 units tall, followed by a fillet 4 units tall, followed by a modern scotia 24 units tall, followed by another fillet 4 units tall, and topped off with another torus 28 units tall.
As in the construction of #IonicEntablature [https://pixelfed.social/p/Splines/791013152244518907], split the construction of the #columnBase into two steps.
Just as we extruded #dentils separately, we extrude the plinth separately. First draw a square 400x400 in the top view. Then extrude the square 48 units in the front view.
For the rest of the base, we need a new 3D operation — #revolve around an axis. Instead of extruding the #primaryProfileCurve, we revolve it around the #columnAxis, and cap the #planarHoles on both ends before performing a #booleanUnion with the plinth. Finally check edges of the solid for #nakedEdges and #nonManifoldEdges.
37 #Funny And #Relatable #Comics About #Life’s #Quirks #Illustrated By 5ish.art on #Instagram
Most of the #comics #revolve around her #life as an #artist, a #mom, and a #wife, topics to which a lot of #people can #relate.
#Women #Transgender #LGBTQ #LGBTQIA #Entertainment #TheArts #Comics #Family #Relationships #Representation #Culture
Watch Pulse on Pluto TV Horror. #plutotv
https://pluto.tv/live-tv/pluto-tv-horror?utm_source=plutotv&utm_medium=share&utm_campaign=1000201&utm_content=1000735
Drop In. Watch Free via @plutotv #newscast #revolve #screencapture #genocides
Gorgeous✨🔥 @Jlo wore a Luxe Metallic Gown with a pair of silver platform heels.
#Revolve #JLOFootwear #JLO #JenniferLopez #Fashion #USRetailCorp
New on Insta: Kassogtha - Columbia Theater, Berlin #kassogtha #rEvolve #columbiatheater #berlin #musicphotography #concertphotography #sonya7riv #canon6d https://instagr.am/p/Cp3GU51ssVJ/
Great initiate by Sydney-based bicycle recycler Pete Shmigel who is collecting hundreds of abandoned share #bikes from the city's streets to keep them from going into landfill.
#Revolve #Recycling #stopWaste https://www.abc.net.au/news/2023-02-09/abandoned-sydney-share-bikes-being-recycled-revolve/101945106
Look! We made the front page of the local newspaper. I'm the wee grumpy elf in case you're wondering. #Revolve #Creditation #LangTounCycles #FrontPageNews #FifeFreePress
Interested in the #revolvingdoor phenomenon and its regulation? Come join @lolaavril, Verena Rosic Fegus and I at #EUI on 15 November 2022 when we discuss our #AcademyOfFinland funded project #REVOLVE. https://www.eui.eu/events?id=554048
Bose #revolve : l'enceinte parfaite pour chiller cet été #obs http://o.nouvelobs.com/high-tech/20170629.OBS1381/bose-revolve-l-enceinte-parfaite-pour-chiller-cet-ete.html

Client Info
Server: https://mastodon.social
Version: 2025.04
Repository: https://github.com/cyevgeniy/lmst