#Milestone9 - #ArcadeIntercolumniation #Keystone and #Modillion
#Arch without Pedestal https://pixelfed.social/p/Splines/803615973439041638
#Arch with #Pedestal and Keystone https://pixelfed.social/p/Splines/804537414363507454
#Keystone and #Dentil Details https://pixelfed.social/p/Splines/804548474524642209
#Modillion Details https://pixelfed.social/p/Splines/805587292338863257
#ModernEntablature with Detail https://pixelfed.social/p/Splines/805607059171193759
#Milestone8 - #SimpleIntercolumniation https://pixelfed.social/p/Splines/803106316515798367
#Milestone7 - Complete #IonicOrder https://pixelfed.social/p/Splines/800050647761776920
#Milestone6 — #Braids #3StrandBraids https://pixelfed.social/p/Splines/799602946527813102
#Milestone5 — #EggsAndDarts https://pixelfed.social/p/Splines/797069447808333887
#Milestone4 — #IonicScroll https://pixelfed.social/p/Splines/795361973789834465
#Milestone3 — #IonicColumn https://pixelfed.social/p/Splines/792803978865652429
#Milestone2 — Classic #IonicEntablature https://pixelfed.social/p/Splines/791021871062069787
#Milestone1 — #IonicPedestal https://pixelfed.social/p/Splines/790752092700055739
#IonicOrder
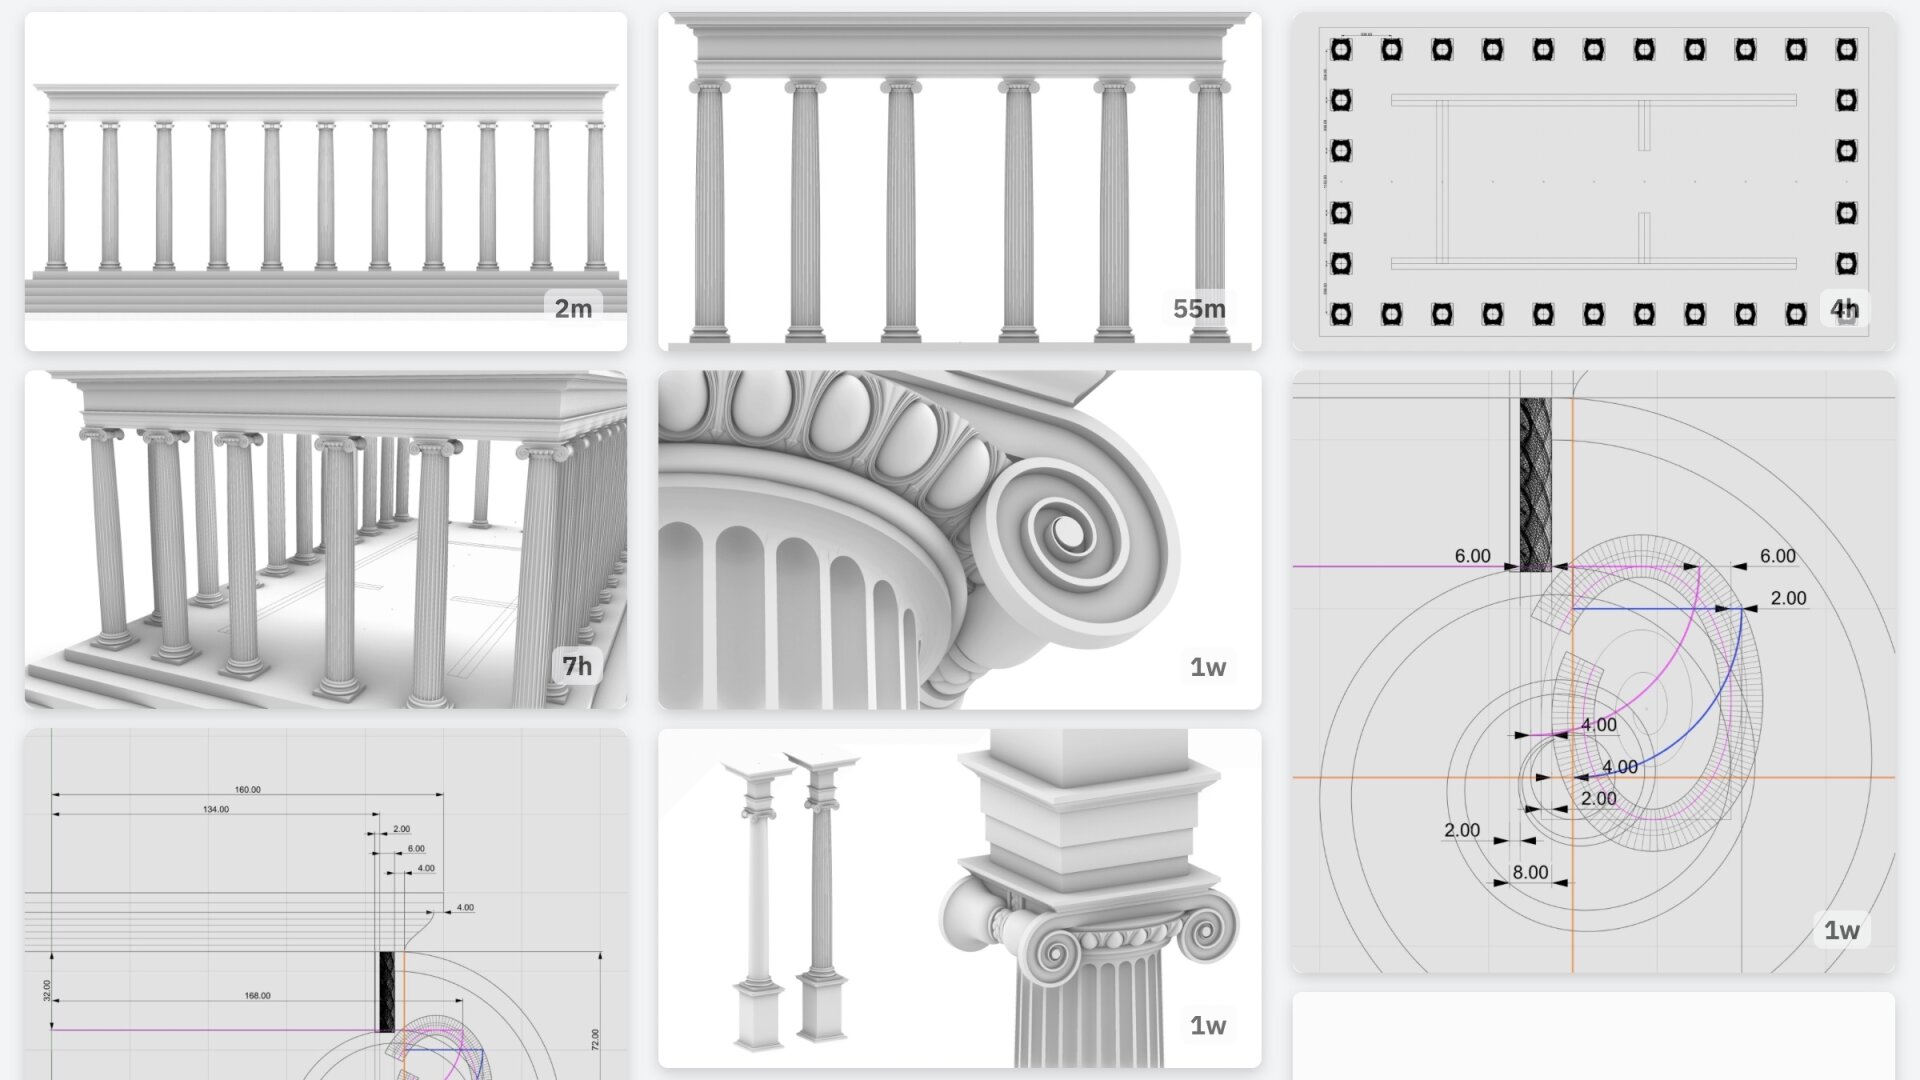
#ModernIonicEntablature with #modillions and #dentils adapted for #arcadeIntercolumnation.
This image shows modillions across the top of the entablature, including modillions visible on the side wall. The dentils are below the modillions and are a bit shorter than in the classic variant.
As with dentils, a #modillion must be centered on a column axis. In the front, there are two modillions directly above the two columns and eight other modillions equally spaced between them. The number is always 10. So the spacing is different for an #arch with no #pedestals.
This image also shows a skinnier #keystone. Its thickness is half that of the one shown in https://pixelfed.social/p/Splines/804548474524642209 but all other measurements remain the same. There is never a modillion directly above the keystone.
The #cymaReversa and #fillet above the keystone have #profileCurves identical to those in the #capital but the top is a square that is only µ x µ units. The top slab is centered front to back on the face of the arch.
In this image, the modern entablature is shown with the classic capital, but it goes really well with the #modernIonicCapital. As I mentioned in https://pixelfed.social/p/Splines/791065657488081419, the classic variant of the column capital has parallel flat #volute slabs only visible from the front and back, but not from the sides. Because of its lack of radial symmetry, the capital does not look as satisfying when viewed from the side, especially in a #colonnade, as seen in https://pixelfed.social/p/Splines/803089629244302486.
The modern variant has curved volute faces on all four sides with pointed ends at all corners and optimized for use in a corner column, but not limited to that. The modern #IonicCapital is the last remaining piece in our systematic look at the complete #IonicOrder.
This concludes our look at the entablature, both classic and modern, and both for #simpleIntercolumniation, or #Architravato, and #arcadeIntercolumniation.
#Milestone8 - #SimpleIntercolumniation
Floor Plan of archetypal Greek Temple https://pixelfed.social/p/Splines/803021258359555093
Front and back #intercolumniation https://pixelfed.social/p/Splines/803076419096100108
Side intercolumniation https://pixelfed.social/p/Splines/803089629244302486
#Milestone7 - Complete #IonicOrder https://pixelfed.social/p/Splines/800050647761776920
#Milestone6 — #Braids #3StrandBraids https://pixelfed.social/p/Splines/799602946527813102
#Milestone5 — #EggsAndDarts https://pixelfed.social/p/Splines/797069447808333887
#Milestone4 — #IonicScroll https://pixelfed.social/p/Splines/795361973789834465
#Milestone3 — #IonicColumn https://pixelfed.social/p/Splines/792803978865652429
#Milestone2 — Classic #IonicEntablature https://pixelfed.social/p/Splines/791021871062069787
#Milestone1 — #IonicPedestal https://pixelfed.social/p/Splines/790752092700055739
We have now looked at every nook and cranny of the complete #IonicOrder in microscopic detail.
Here is one more look at the underside of the #ovolo to revel in the splendor before we move on to the macro level, the first step of which is arranging columns in a row to create a #colonnade according to spacing rules known as #intercolumniation.
Colonnades need not be straight and can follow arcs or other (preferably loose) sweeping curves.
As mentioned in https://pixelfed.social/p/Splines/790357912719769731, a #pedestal is always optional.
Greek designers designed the Ionic Order with full columns. The Romans introduced half columns on surfaces of walls, with or without arches. Multiple columns with arches, whether in series or in parallel, are called #arcades.
The rules for #arcade intercolumniation are different from those for simple intercolumniation, varying even by whether pedestals are present or not.
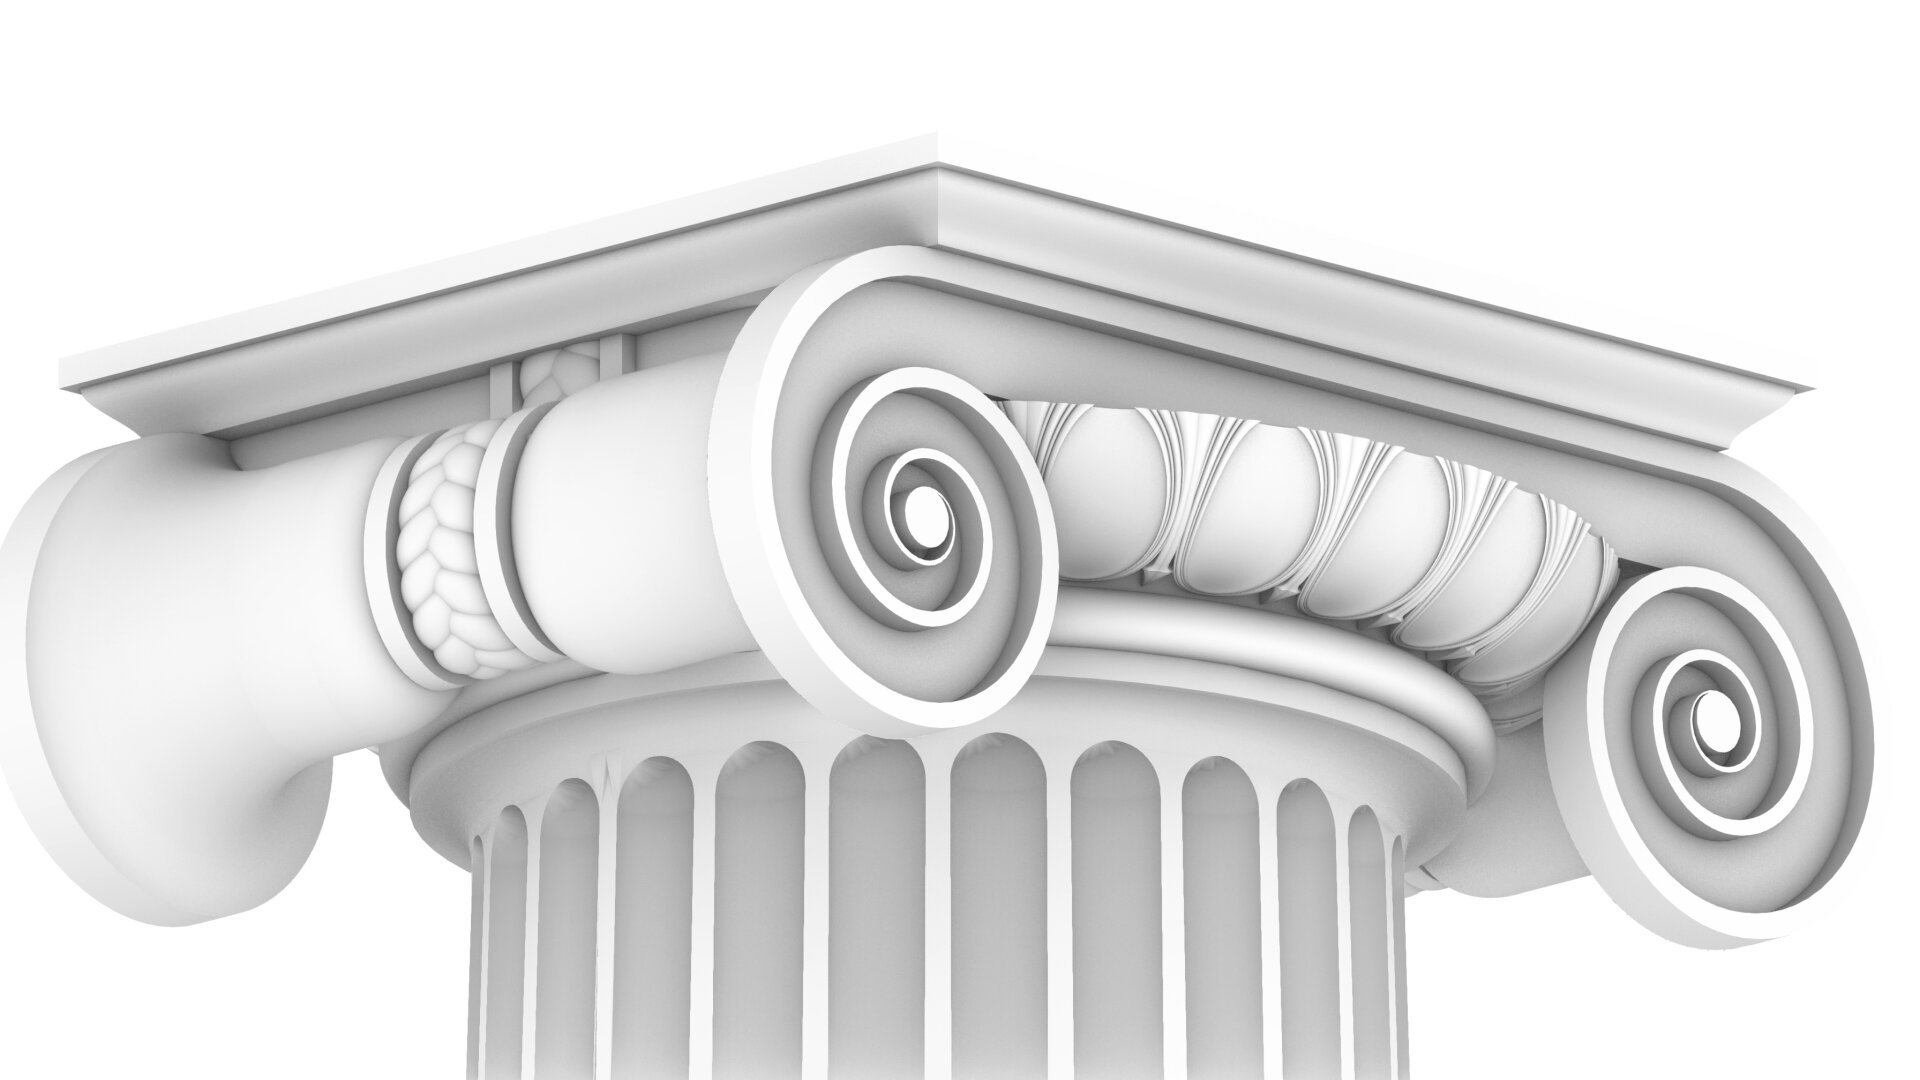
#Milestone7 - Complete #IonicOrder with fluted and unadorned #IonicColumn with details of #decorativeElements
#Milestone6 — #Braids #3StrandBraids https://pixelfed.social/p/Splines/799602946527813102
#Milestone5 — #EggsAndDarts https://pixelfed.social/p/Splines/797069447808333887
#Milestone4 — #IonicScroll https://pixelfed.social/p/Splines/795361973789834465
#Milestone3 — #IonicColumn https://pixelfed.social/p/Splines/792803978865652429
#Milestone2 — Classic #IonicEntablature https://pixelfed.social/p/Splines/791021871062069787
#Milestone1 — #IonicPedestal https://pixelfed.social/p/Splines/790752092700055739
#IonicColumn #Flutes
In https://pixelfed.social/p/Splines/799864068250003272 I mentioned rounding off the radius of the bottom circle, but you don't have to. #CAD tools are perfectly happy working with 15.0728 or even higher precision as they are with 15.
After placing the two circles as described in that post, use the full #primaryProfileCurve of the shaft from https://pixelfed.social/p/Splines/791794072490907090 as a #sweepingRail and the two circles for the flutes as the #sweepingCurves, and #sweepOneRail for the body of a single flute. Close #planarHoles on both ends to get an #airtight solid.
Then draw a sphere at the center of the top circle using the same radius as the circle, and perform a #booleanUnion between the sphere and the flute body.
If you want a round bottom for the flute, repeat the sphere at the center of the larger circle using the same radius (15.0 or 15.0728) and perform another boolean union to get one flute.
Switch to the top view and make 24 copies of the flute (including the original) centered at the column axis and #group the 24 flutes.
Finally, perform a #booleanDifference with the flutes group on a copy of the solid #unadornedShaft to get a fluted variant.
The result is a column shaft with flutes carved out. Save the flutes separately for future reuse.
This concludes the entire #IonicOrder, including all #decorativeElements.
Now we pause and reflect: The whole exercise seemed like one of #art and #sculpture. Where is the #architecture in all of this?
Without a ceiling or a roof, there is no building. Without additional columns or walls, there is no ceiling. So, while we have completed the Ionic Order itself, we only have the first #buildingBlock — a single column.
Next step is to repeat the columns to create a #colonnade, which together with supporting walls or additional colonnades can support a ceiling.
Just like with everything else in design, there are rules of proportion for #intercolumniation, or space between columns.
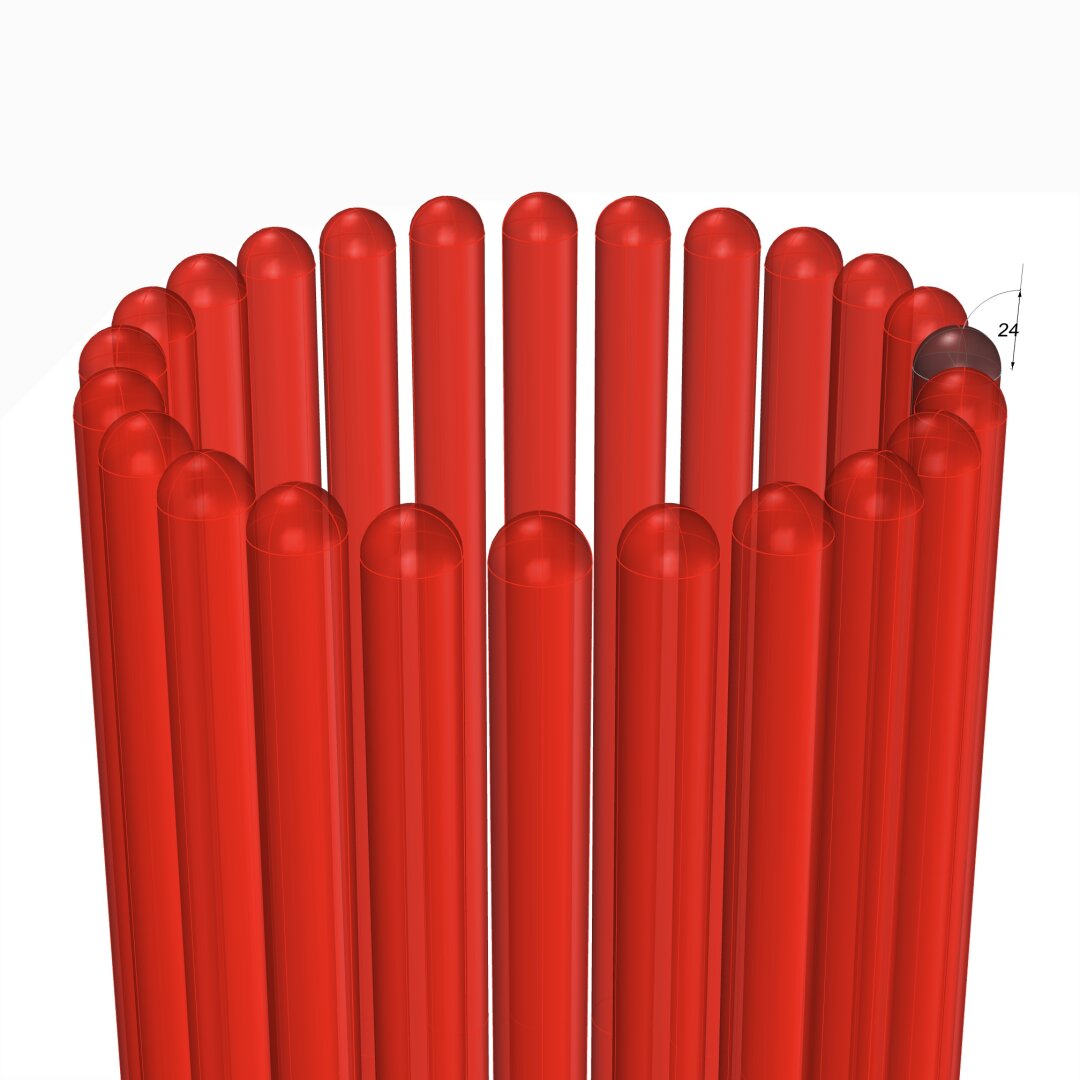
#IonicColumn
#Flutes have a different configuration in the #IonicOrder than they do in the #DoricOrder. In #Doric, the flutes run right next to each other, dividing the circumference of the column into 24 equal sectors, or 15° each.
In #Ionic, there is a small gap between the flutes. This gap used to vary, but over time, Ionic designers seemed to have settled and standardized the measurements by splitting 15° in 4:1 ratio, giving 12° to a flute and 3° to the gap between flutes.
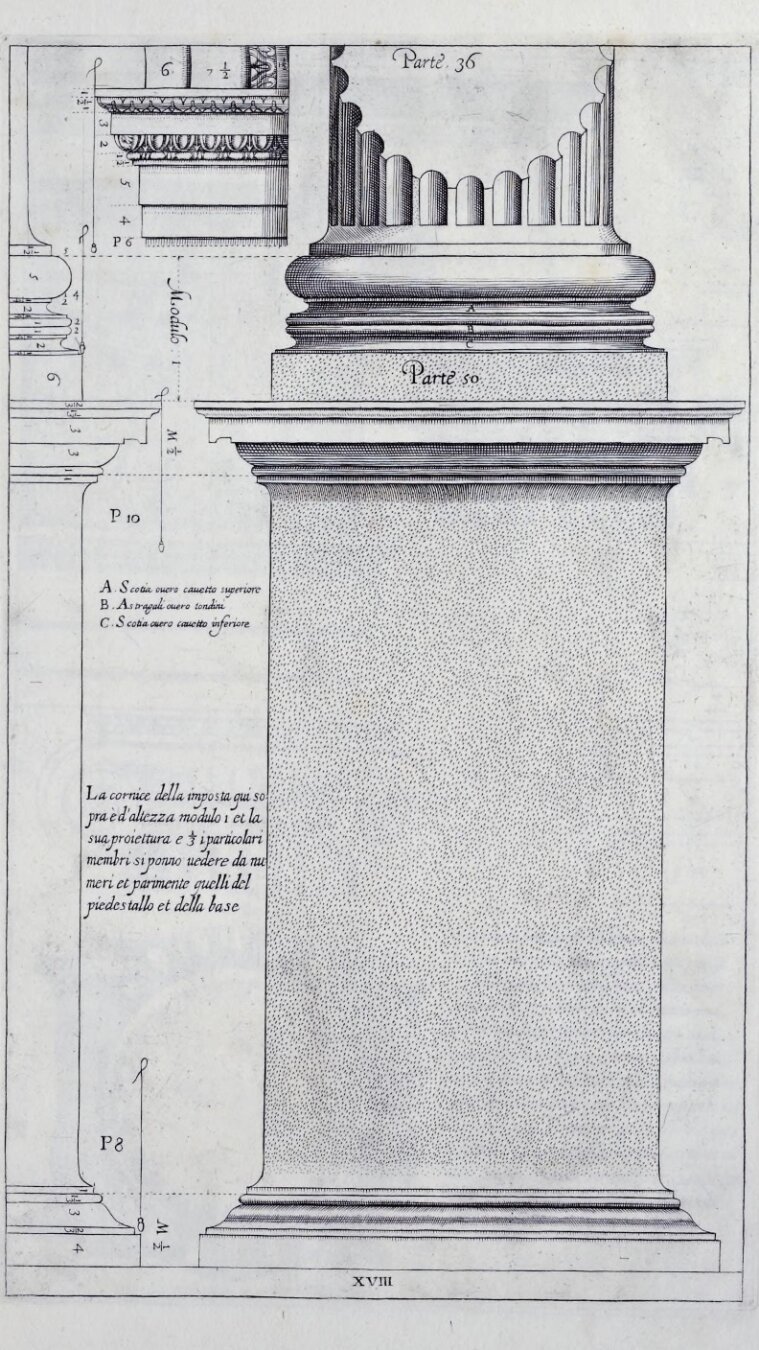
Because of this standardization, there would seem to be little room for variants, but there is. In his #RegolaArchitettura [see https://archive.org/details/gri_33125008229458/page/n37/mode/2up], #Vignola documented flutes with hemispherical tops but flat bottoms, as shown in the image here.
However, it is acceptable to have hemispheres at both top and bottom as long as they are consistently used within a #colonnade or #arcade.
Flute geometry is interesting. Just like the #IonicColumn #shaft, a flute also gradually tapers as it rises from bottom to top. Additionally, it bends along the shaft surface due to #entasis [see https://pixelfed.social/p/Splines/791794072490907090]. In other words, flutes hug the column shaft.
Unlike other decorative elements like #eggsAndDarts and #3StrandBraids, flutes are #subtractive, not #additive to the rest of the design. In other words, we have to carve the flutes out instead of adding them to the design.
#Flutes have a different configuration in the #IonicOrder than they do in the #DoricOrder. In #Doric, the flutes run right next to each other, dividing the circumference of the column into 24 equal sectors, or 15° each.
In #Ionic, there is a small gap between the flutes. This gap used to vary, but over time, Ionic designers seemed to have settled and standardized the measurements by splitting 15° in 4:1 ratio, giving 12° to a flute and 3° to the gap between flutes.
Because of this standardization, there would seem to be little room for variants, but there is. In his #RegolaArchitettura [see https://archive.org/details/gri_33125008229458/page/n37/mode/2up], #Vignola documented flutes with hemispherical tops but flat bottoms, as shown in the image here.
However, it is acceptable to have hemispheres at both top and bottom as long as they are consistently used within a #colonnade or #arcade.
Flute geometry is interesting. Just like the #IonicColumn #shaft, a flute also gradually tapers as it rises from bottom to top. Additionally, it bends along the shaft surface due to #entasis [see https://pixelfed.social/p/Splines/791794072490907090]. In other words, flutes hug the column shaft.
Unlike other decorative elements like #eggsAndDarts and #3StrandBraids, flutes are #subtractive, not #additive to the rest of the design. In other words, we have to carve the flutes out instead of adding them to the design.
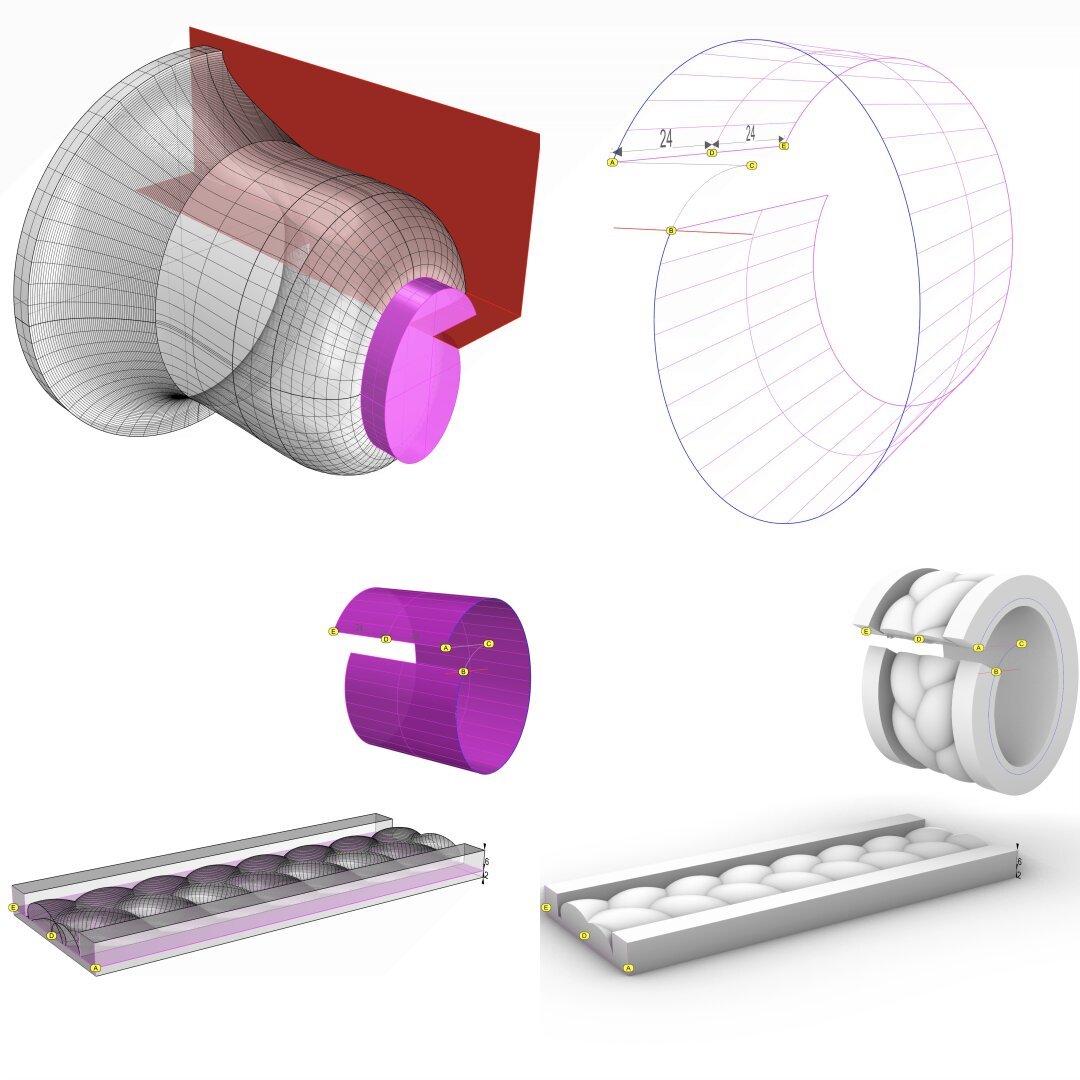
#3StrandBraids #FlowOnSurface
In the top-left, the highlighted magenta portion shows the interface between the #braids assembly and the #IonicScroll from https://pixelfed.social/p/Splines/795276076797088402.
Extract the #profileCurve shown as ABC in the top-right where the interface meets the scroll.
In https://pixelfed.social/p/Splines/794199123072358090, we rebuilt curves from 2nd-degree arcs to 3rd-degree NURBS for smoothness and swept the scroll surface one set of arcs at a time.
Now we have to flow braids on a single surface in one operation. So we need to combine the separate segments into a single NURBS curve. To do that, #explode the profile curve into individual segments, discard the straight portion, and join the curved portions.
Curves and surfaces have a #direction that you can change in the #CAD tool. Check that the direction of the joined curve is A to C, not C to A, and flip it if necessary. Then divide the curve at 120 units starting at A. This is marked by point B. Split the curve AC at B so that AB is 120 units long.
At this point AB is still made up of 5 segments, and exploding it would again decompose the curve into separate segments. So #rebuild AB as a single NURBS curve with 32 sections.
#Extrude AB to get a 48 units wide surface shown in magenta in the top-right. Point D is at the midpoint of AE and lies on the XZ plane.
Slice the channel assembly so that it is 8 units tall, 6 of which will be above the #tectonicSurface for the braid and 2 below. The tectonic surface is shown in the bottom-left as the flat magenta surface on the channel and the curved magenta surface for the scroll neck.
Flow the entire braid and channel assembly along the curved surface lining up points A, D, and E. For the vertical part on the side of the capital, just use the 33 unit tall block from https://pixelfed.social/p/Splines/799340150182400358 and bury 1 unit inside the #ovolo.
This concludes 3-strand braids. Only the non-essential #column #flutes remain.
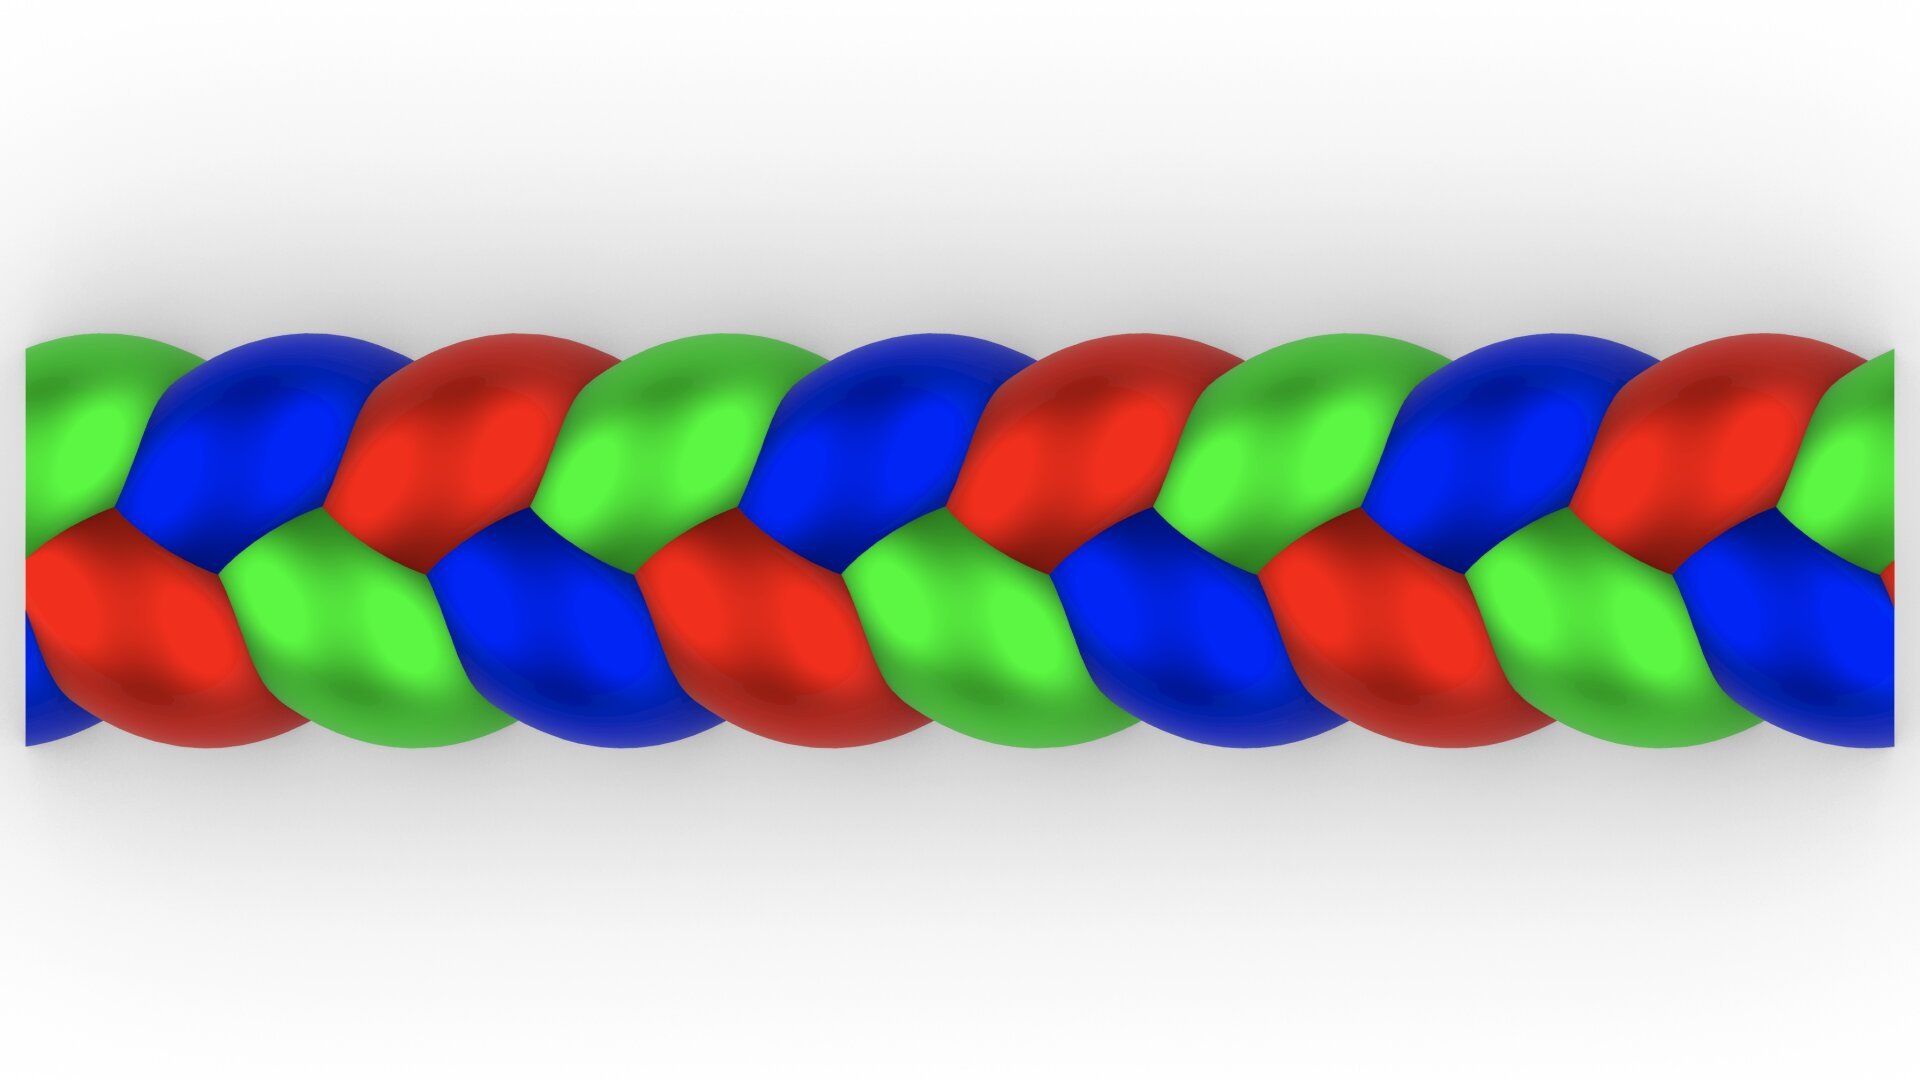
#3StrandBraids
#Braids are the last of the #decorative elements on the #IonicScroll, but like #EggsAndDarts, they are not specific to the #IonicOrder.
Braids are a popular design motif that find wide currency in modern #hairstyle, #fashion, and fashion accessories like #belts and #bracelets.
Braids come in infinite varieties with varying number of strands, thickness of strands, roundness or flatness of strands, and how tightly or loosely they are wound together. Here, I focus on the 3-strand variant mentioned in #Vignola's book and previewed in https://pixelfed.social/p/Splines/792015485979791089. The image here is brightly colored to draw attention to the 3 strands.
The geometry of braid strands is not at all obvious despite how familiar they look. Also, a braid strand is the only feature in the entire iconic order whose geometry cannot be captured with straight lines and circular arcs. Instead, a strand geometry must be defined in a series of steps starting with a basic #sinusoidal curve.
A sinusoidal curve or #sinusoid is a wave form whose function belongs to a family of functions known as #transcendentalFunctions that also include #logarithmic and #exponential functions. I mentioned #logarithmicSpirals in https://pixelfed.social/p/Splines/792499765146596723, and in a future post I will show how to construct one and compare it with the #spiral used in our implementation of #IonicVolute.
They are called transcendental functions because they transcend the math of finite algebraic polynomials and go beyond geometry into trigonometry. Fortunately, we don't have to go there.
Few #CAD tools have a direct primitive for a sinusoid, but almost all have a primitive for a 3-dimensional round coil shape called a #helix which we can use to create the sinusoids we need for a braid strand. To create a sinusoid, all we need to do is #project a helix on a flat surface to convert it into a 2D waveform.
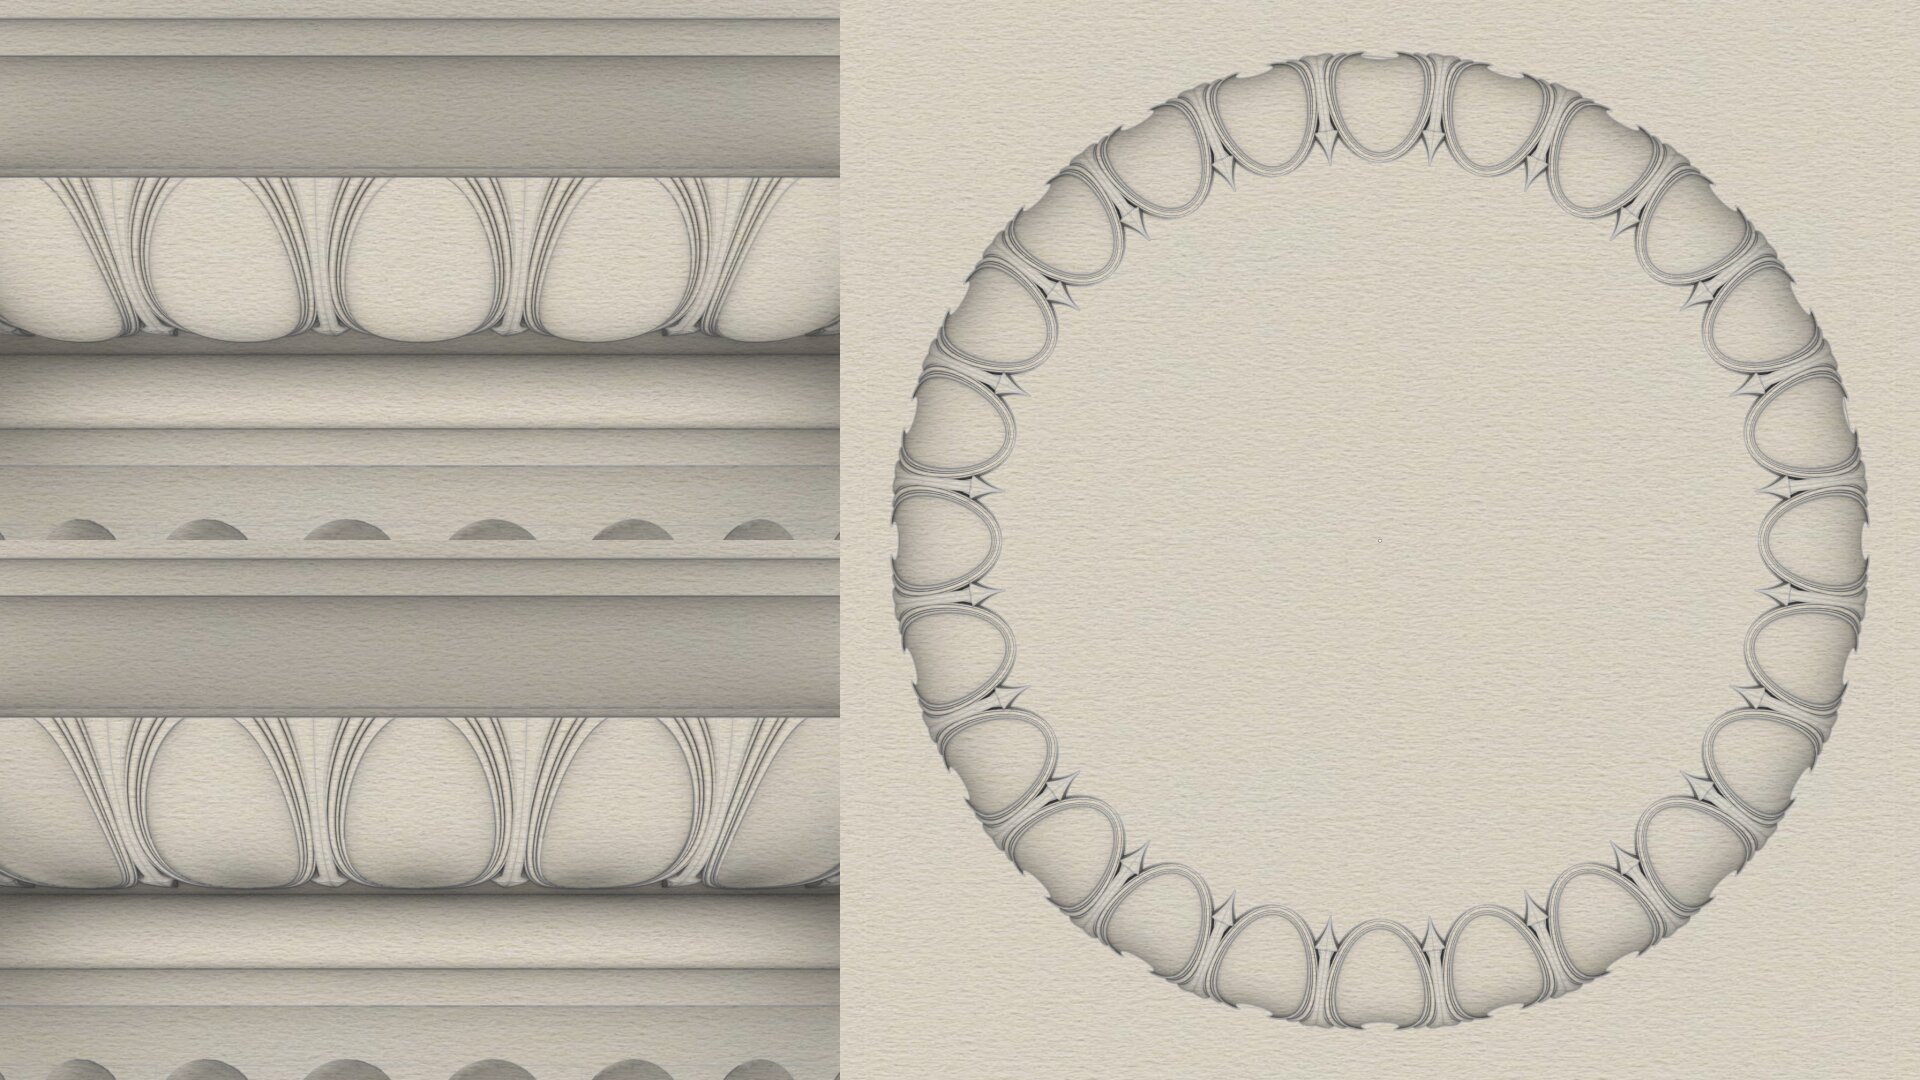
#EggsAndDarts is a common classical design motif with endless variations, two of which are shown here — the top-left variant has convex eggs and the bottom-left variant has concave eggs. The sketch on the right shows the bottom view of the concave variant.
This motif is neither specific to the #IonicOrder, nor limited to the #ovolo of the capital. It is common to find it laid on linear #moldings like #cymaRecta or #cymaReversa of a #cornice.
The egg shape, the dart shape, the degree of convexity or concavity, and so on, are infinitely variable from subtle to pronounced. Designers are not limited to convex or concave, and it is possible to combine both in a single design. Also, it is not necessary to use the eggs and dart motif at all. There are infinite possibilities. However, when the eggs and darts motif is used, it is almost invariably sliced off at the top, as the bottom view of concave variant on the right reveals.
The concave version here is quite subtle, but a more pronounced version can be really eye-popping. I will show how to construct one using just straight lines and circular/elliptical arcs exclusively as I originally promised in https://pixelfed.social/p/Splines/789956327130679640.
As usual, we start with a flat 2-dimensional plan with lines and ovals to use as #sweepingRails. Then, we add circles and arcs as #sweepingCurves to define the cross-sections. After sweeping the cross section curves on the rails, we create the eggs.
Simply #revolve an ellipse on its major axis to get the convex version of an egg. To get the concave version of an egg, simply create a flat slab and perform a #booleanDifference on that slab using a convex egg.
Once we have all of this preparatory work done, we have to transfer the 3-dimensional design from the flat surface it was originally created on to the #doublyCurved surface of the Ovolo. This requires some elementary calculations using circle geometry.
Previous— https://pixelfed.social/p/Splines/795361973789834465
After ensuring that the object in https://pixelfed.social/p/Splines/795271266191779399 is #airtight, extrude the front and rear planar surfaces by 1 part (8 units) on each end.
At the end of this step, you should have a solid #scroll object with a smooth surface except for the flat parts that will butt against the head of the unadorned #capital.
We have now concluded the #tectonic portions of the entire #IonicOrder. All that remains are decorative #eggsAndDarts that go on the #ovolo of the capital and the #3StrandBraid that goes on the scroll.

The classic #IonicScroll is the most complex of all components in the #IonicOrder mainly because it is poorly documented, if at all, and even poorly understood. It is as if the classical architects deliberately concealed its enigmatic design secrets within the confines of a smooth elegant shell that could only be revealed after intense study and analysis.
I got this impression because I spent years searching for credible and actionable documentation on how to recreate this beautiful design in a #CAD tool. In the Age of Internet and Social Media, my web searches always disappointed me because the results lacked something vital in one respect or another. Over the years, I created hundreds of versions of the scroll that looked so perfect and pleasing that I thought I had cracked it, only to find some flaw or another in my work.
So, it is with caution that I present my work on the scroll in the hopes that someone will build upon this knowledge and either validate the design, or correct it and share it with me and the rest of the world.
Looking back at my progress, I'm now surprised at how remarkably simple and elegant the design is that defied familiar geometrical construction techniques I had been using until now.
As I mentioned in my introductory post, this design can be recreated by drawing simple 2-dimensional lines and circular arcs, but instead of just #primaryProfileCurves, we will use up to three additional sets of curves — #secondaryCurves, #tertiaryCurves, and #quaternaryCurves — each derived from the previous set.
I extracted the #primaryCurves after a lengthy trial-and-error process that involved #curveFitting image scans from #Vignola’s book, #RegolaArchitettura. I had to #reverseEngineer the details because the measurements have either been lost, or are locked away in some library.
Even though we start with lines and arcs, the end results are always #NURBS curves and surfaces, but everything is done by the CAD tool, and no additional math is needed.

The #volute is the most striking element of the #IonicOrder, even more than the #scrolls, for there would be no scrolls without volutes.
The #IonicVolute is constructed as a spiral, of which there's a bewildering array of types that have fascinated artists, philosophers, and mathematicians alike for millennia. Most #CAD tools have a built-in primitive for spirals, but you will only waste your time with them because they strive for #continuous curvature changes, when only a #discrete spiral made from circular arcs will work in this design. I spent years trying different kinds and learned a lot in the process.
Even within the family of discrete spirals, there's only one that fits. Dürer's approximation of #logarithmicSpirals with 90° arcs comes close, but still doesn't fit. The only one that works is contrived to fit the measurements of the #IonicCapital, and it's not a general spiral. It's specifically designed for 3 turns, and you can only proceed in one direction — toward the eye. You cannot start at the eye and diverge outward.
The process is not complicated. I purposely left out the measurements in the sketch because they cluttered the area near the eye, but I describe them here.
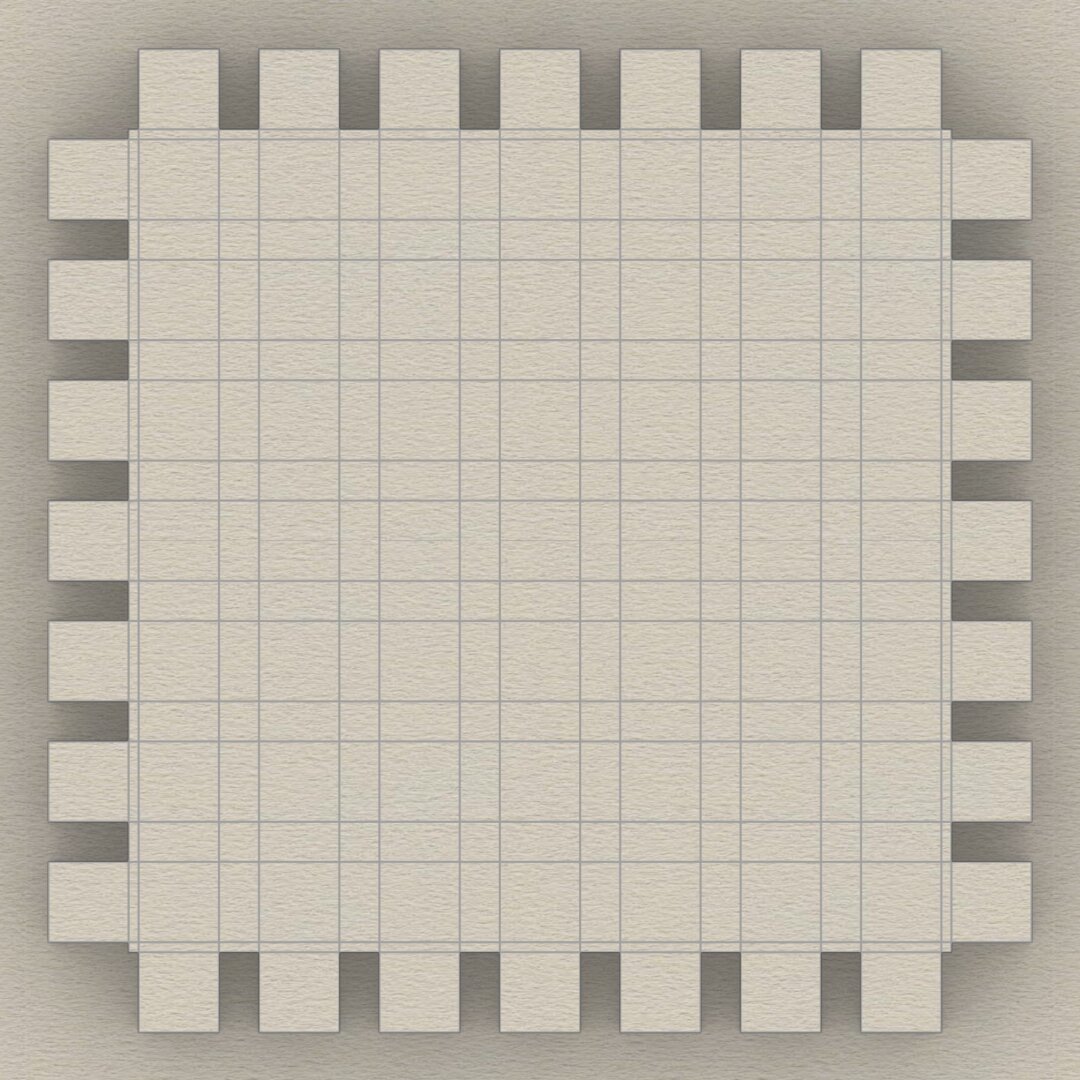
When µ = 144, you will need to start with a square that is exactly 1 part (8 units) wide and divide it into smaller portions — initially 6, but eventually 24. This is the first time you might regret choosing µ = 144. If you had chosen a value 3x larger, then one part would be 24 units instead of 8. That would certainly have made understanding the volute a little easier but the other measurements would also be 3x and too unwieldy to work with.
There is a happy compromise: Temporarily scale everything up by 3x just for the volute, and once it has been constructed, scale it down to 1/3 to fit with the rest of the design.
So, the first step is to divide the square into a 24x24 grid. Then make 3 concentric squares 4 units apart and mark their ends with points 1 through 12 as shown here.
The #IonicVolute is constructed as a spiral, of which there's a bewildering array of types that have fascinated artists, philosophers, and mathematicians alike for millennia. Most #CAD tools have a built-in primitive for spirals, but you will only waste your time with them because they strive for #continuous curvature changes, when only a #discrete spiral made from circular arcs will work in this design. I spent years trying different kinds and learned a lot in the process.
Even within the family of discrete spirals, there's only one that fits. Dürer's approximation of #logarithmicSpirals with 90° arcs comes close, but still doesn't fit. The only one that works is contrived to fit the measurements of the #IonicCapital, and it's not a general spiral. It's specifically designed for 3 turns, and you can only proceed in one direction — toward the eye. You cannot start at the eye and diverge outward.
The process is not complicated. I purposely left out the measurements in the sketch because they cluttered the area near the eye, but I describe them here.
When µ = 144, you will need to start with a square that is exactly 1 part (8 units) wide and divide it into smaller portions — initially 6, but eventually 24. This is the first time you might regret choosing µ = 144. If you had chosen a value 3x larger, then one part would be 24 units instead of 8. That would certainly have made understanding the volute a little easier but the other measurements would also be 3x and too unwieldy to work with.
There is a happy compromise: Temporarily scale everything up by 3x just for the volute, and once it has been constructed, scale it down to 1/3 to fit with the rest of the design.
So, the first step is to divide the square into a 24x24 grid. Then make 3 concentric squares 4 units apart and mark their ends with points 1 through 12 as shown here.
The #Capital is the last essential component of the complete #IonicOrder. The column #flutes remain, but they are #decorativeElements, and I will cover them later when I cover the decorative elements of the capital like the #EggsAndDarts motif on the #ovolo and the #3StrandBraid on the ribbon or belt around the middle of the smooth #scrolls.
The Ionic capital is complex, but not unapproachable. We will systematically construct everything in this draft rendering using just straight lines and arcs as promised in https://pixelfed.social/p/Splines/789956327130679640, with the exception of the #cymaReversa near the top and the 3-strand braid on the ribbon.
In this rendering, the cyma reversa near the top is made using a flattened half-turn of a #helix, but it can also be constructed using elliptical arcs as I described in earlier posts.
The braid is a #periodic shape with infinite variety and is also based on a helix. You can vary the number of strands, their thickness, pitch, and so on, none of which are essential to the Ionic Order itself. They're only a jumping point for further exploration.
The eggs in the 'eggs and darts' motif can have different shapes. They can be convex like real eggs or concave as shown here, but the top is almost always sliced off. The total depth of the convex or concave shapes can vary, but only within a range of 1 part, or 8 units.
The #volutes in the front and back of the capital are based on #spiral shapes, of which there are many different kinds. Some have #continuous curvature changes, while some do it in #discrete steps, like #fibonacci spirals that can approximate #logarithmic spirals seen in nature, e.g., nautilus. When curvature changes are discrete, the spiral arms can diverge in #arithmetic, #geometric, or some other sequence.
We will construct all of these, and most notably the smooth, sweeping surface of the scrolls using just straight lines and arcs, and let the #CAD software deal with delicate #NURBS curves and surfaces.
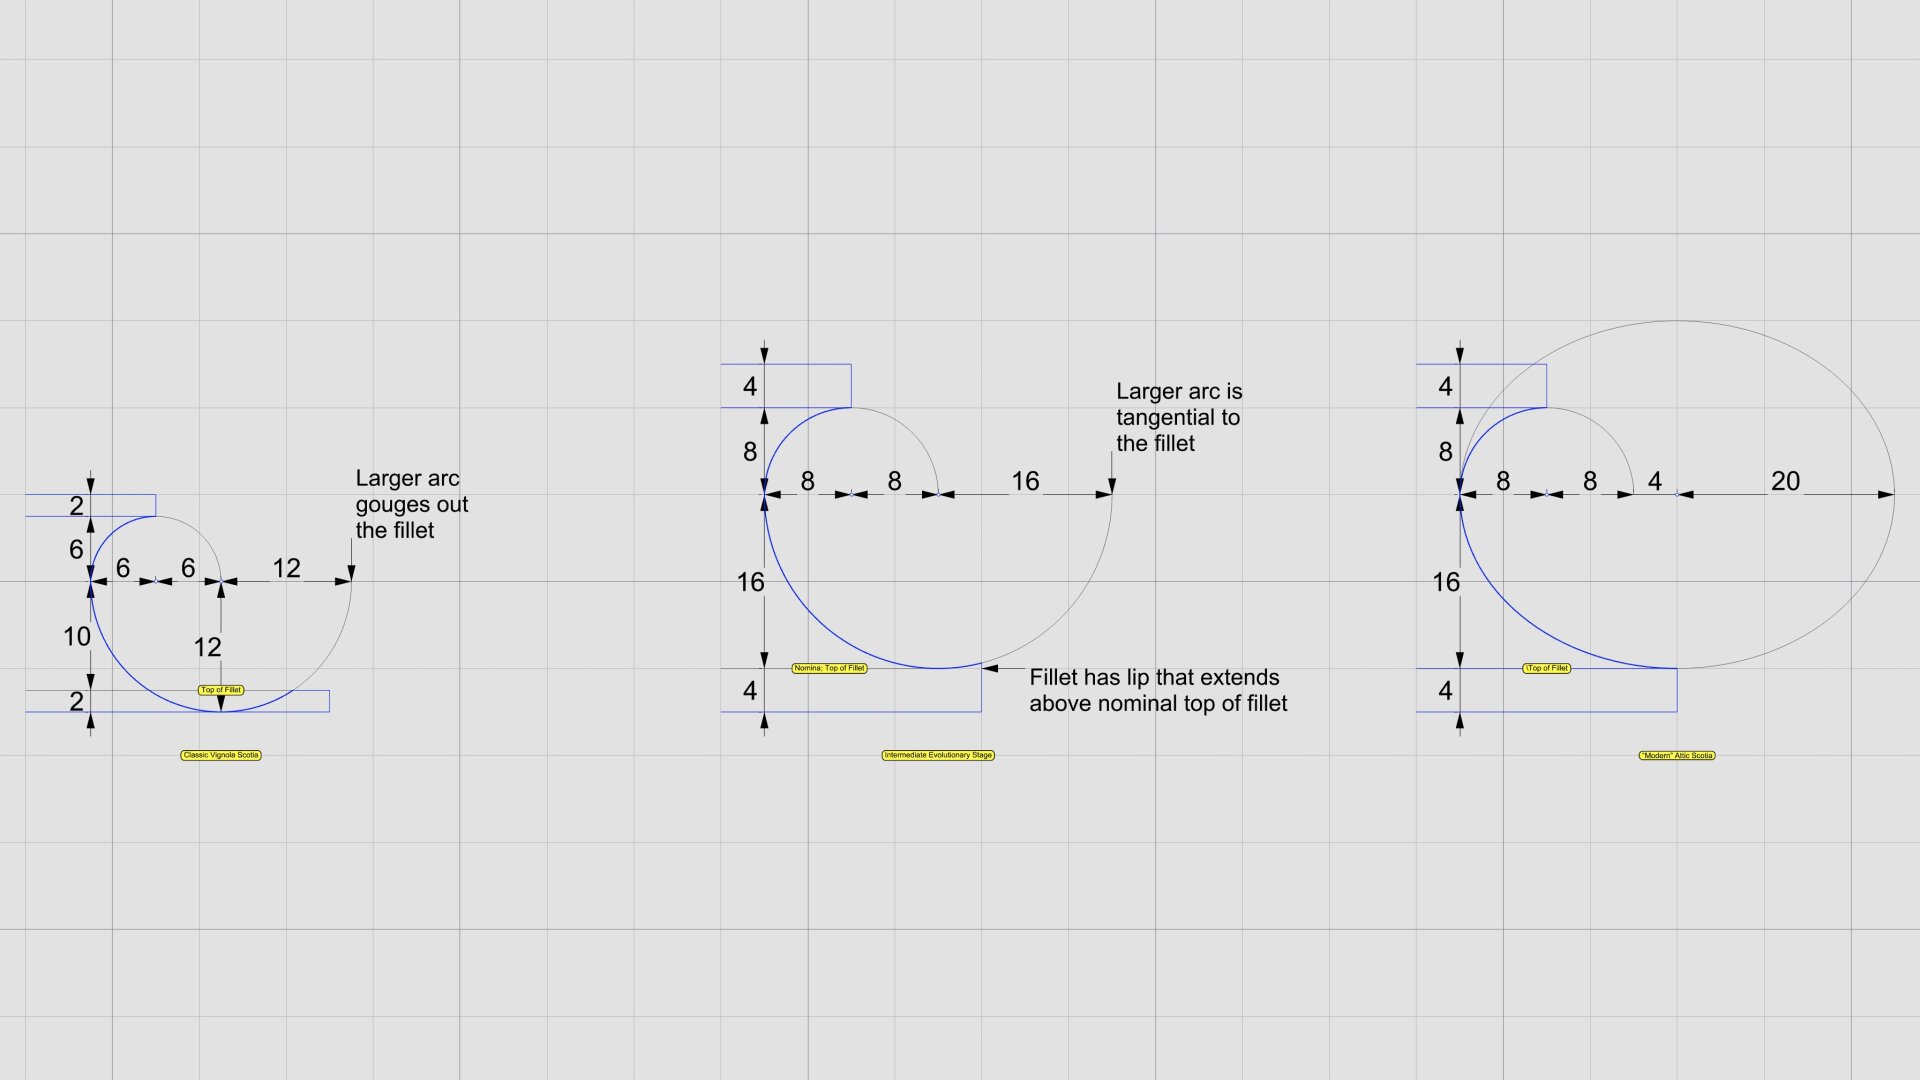
#EvolutionOfScotia
#Scotia is a new concave #molding that we are seeing for the first time in the #IonicOrder. Its #primaryProfileCurve is a compound curve that is always segmented 1/3 and 2/3 from top to bottom. The two segments have different radii, but they also have a common tangent where they meet.
The scotia molding went through some evolutionary stages as shown in the sketch.
In the classic #Vignola version, the scotia used in the column base is smaller and gouges out a portion of the bottom fillet. Vignola did that to accentuate the effect of incident light and bring out the shadows. He must have really liked the #lightAndShade effect because he had TWO of them in the classic column base for the #IonicColumn.
An intermediary variant then emerged in which the larger arc was tangential to the bottom fillet instead of gouging it out. It still allowed for the interplay of light and shade as it had a lip that extended above the nominal fillet. Also, it was 4/3 the size of the Vignola variant and the fillets were twice as tall, ostensibly to make the lip more conspicuous, and provide some utility or justification for the lip.
If you are into #font design or you are an avid calligrapher, you will never look at font #serifs the same way after looking at the intermediate evolutionary stage of the scotia. In particular, the #Optima font is classified as #sansSerif, but the stem in its repertoire of characters has an uncanny resemblance at the tip of the lip.
Unfortunately, the lip didn't seem durable as it was prone to chipping. While Optima still thrives, designers rejected the lip of the scotia as vestigial over time, and used an ellipse for the larger arc so that it was tangential to the fillet right where the fillet ended. This design has endured, and the variant of the column base that uses this molding is called either the "modern" base or the #AtticBase. The etymology is from Latin #Atticus which means ‘relating to #Athens or #Attica region of #Greece.'
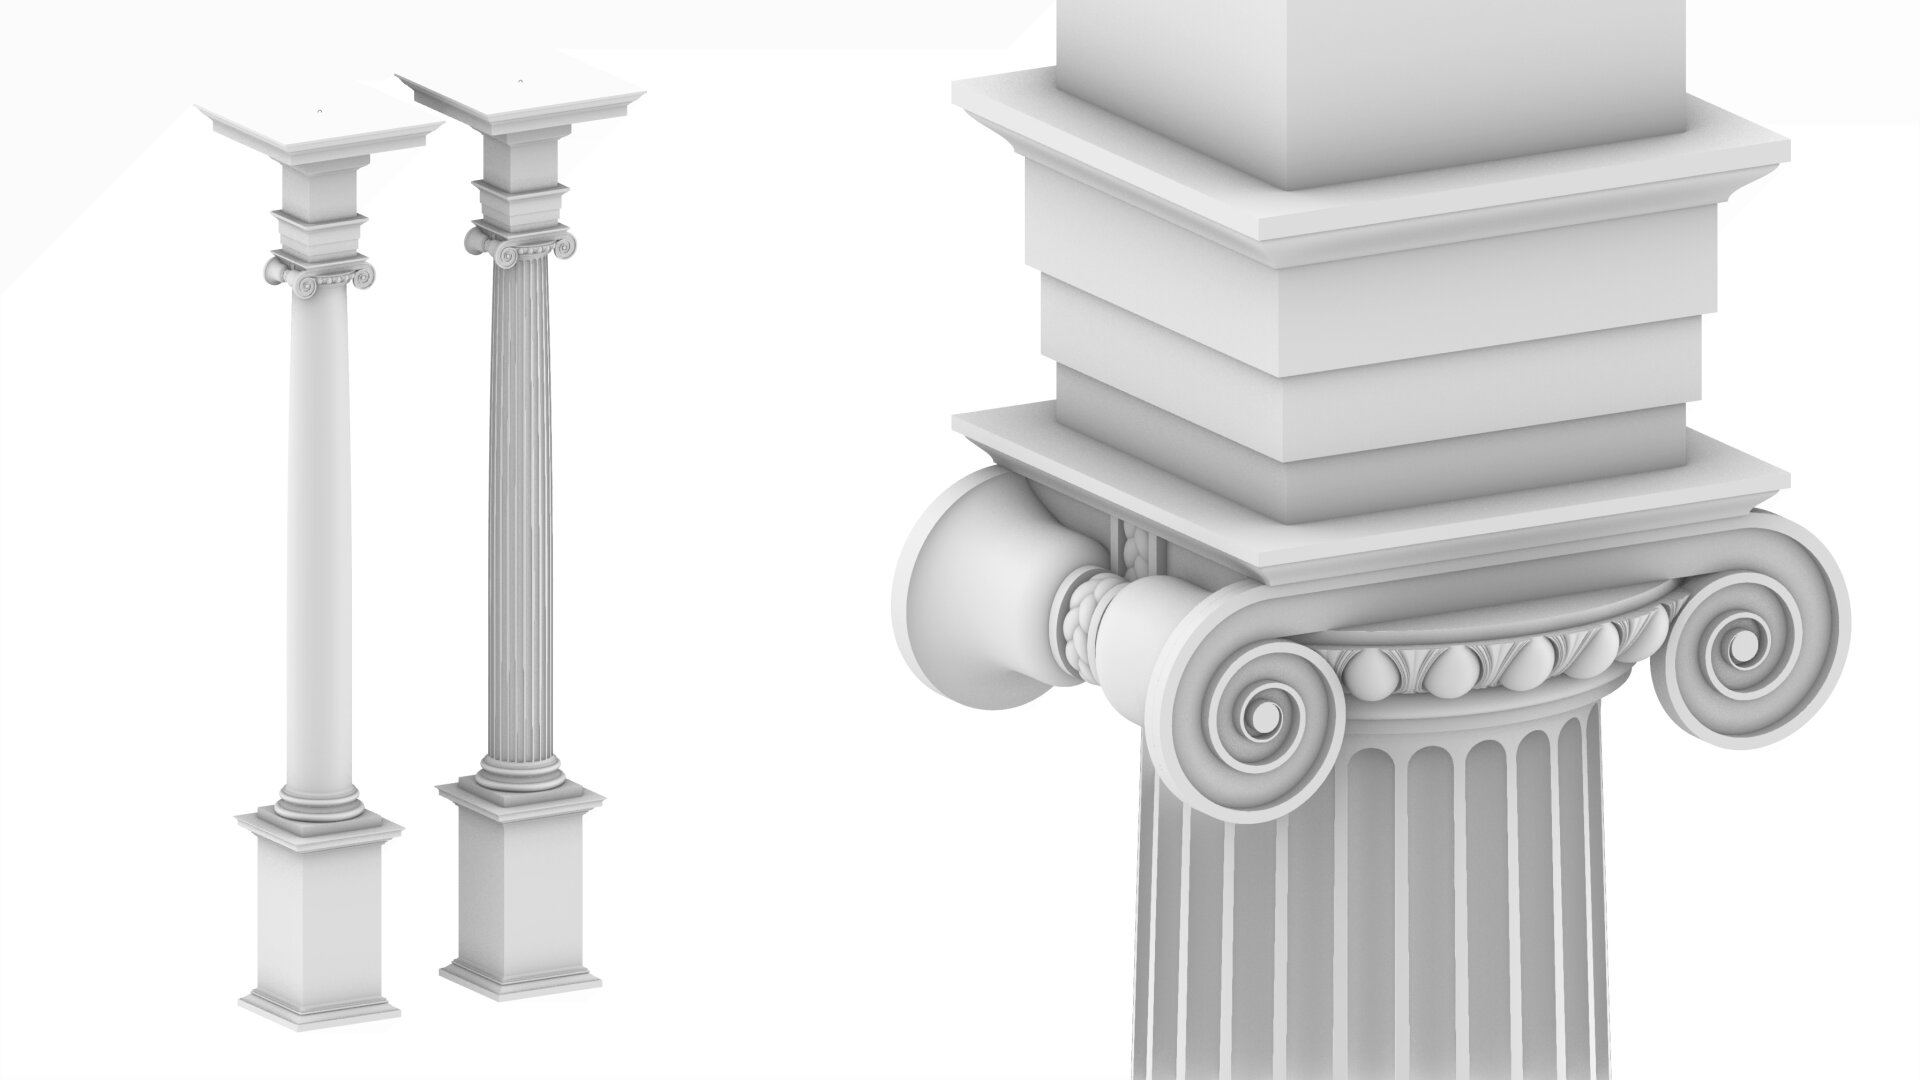
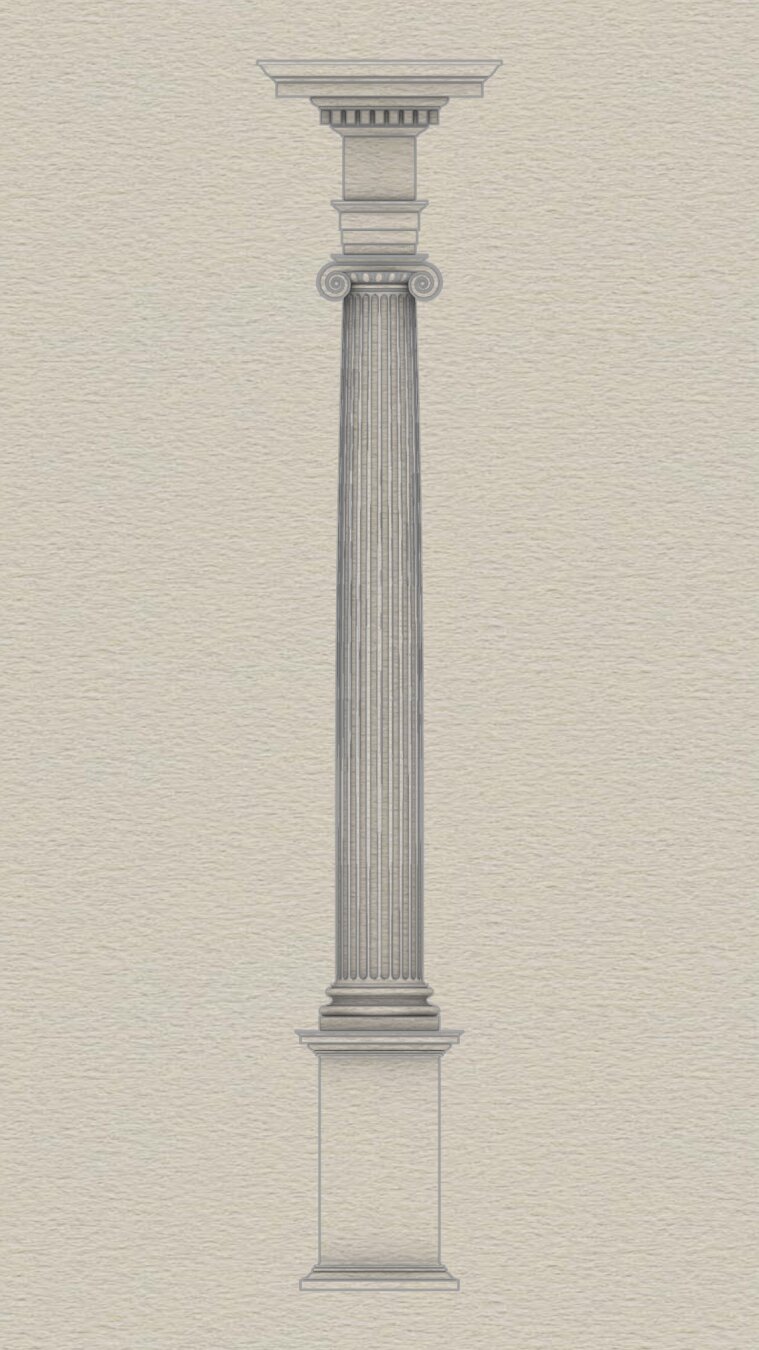
The #column is the most complex component — not least because of the beautiful #capital at the top. It also offers the most opportunities for creative expression, as long as designers differentiate in the #decorativeElements, not #tectonicElements.
There are 3 subcomponents of a column — the #columnBase, #columnShaft, and #columnCapital. In the #IonicOrder, there are variants for each of these components, not just in the tectonic portions, but also in the decorative portions, and it is equally acceptable to mix and match them.
Classic variant of the column #base bears #Vignola's signature in a new #molding called #scotia. There's a "modern" version that has a newer Scotia. I am trying hard to resist the urge to call it #NovaScotia.
The column #shaft is not perfectly cylindrical. It gradually tapers off in the upper 2/3, has a plain unadorned variant, and a #fluted variant.
Classic variant of the column #capital has parallel flat #volute slabs only visible from the front and back, but not from the sides. There's also a modern variant that has curved volute faces on all four sides with pointed ends at all corners and optimized for use in a corner column, but not limited to that.
These variants can be freely intermixed in any combination of base, shaft, and capital. The sketch shows an Ionic column with a modern base, fluted shaft, and classic capital, but any other combination would be equally acceptable as long as all are internally consistent in a single #colonnade or #arcade.
Beyond these tectonic elements, there are decorative elements like the #eggsAndDarts motif in the #ovolo of the capital. The eggs can be convex or concave, the eggs and arrows can look different, or the Ovolo could have a completely different motif, or none at all.
The bell-shaped #scrolls between volute slabs are separated by a ribbon or belt with a 3-strand braid not seen in this sketch. If you design fashion accessories, experiment with other designs while maintaining proportions.

This sketch shows the arrangement of #dentils in the classic variation of the #IonicEntablature. It shows the full layout, but most of the top is obscured by the top portion of the #cornice. Only the outside square shapes are actually visible.
Each #dentil has a square "footprint" that is 4 parts by 4 parts (32*32 units) and is 6 parts (48 units) tall. The spacing between each dentil is 2 parts (16 units).
Dentils project 4 parts (or 32 units) from the face of the #fascia on which they rest.
Each face of the fascia has 7 dentils with the middle dentil laterally centered and directly in front of the column axis. The 2 side dentils are on side faces, and that is apparent in the darker shading in the sketch at https://pixelfed.social/i/web/post/790782316675150160. Take the time to reconcile this with the numbers listed in #Scarlata's #PracticalArchitecture.
The 3D reconstruction from the #primaryProfileCurves is very similar to that of the #IonicPedestal, with #extrusion, #mitering, #joining, and #capping planar holes as described in https://pixelfed.social/i/web/post/790645054230337543 — just set the dentils aside, for now.
Once you have capped the #planarHoles to get a solid, analyze the edges of the solid in the #CAD program for #nakedEdges and #nonManifoldEdges.
Then, extrude the dentils outline (in the top view) to a height of 48 units (in the front view).
Now perform a #booleanUnion of the two solid shapes to get the complete #entablature.
Finally, check the edges of the solid in the #CAD program AGAIN for #nakedEdges and #nonManifoldEdges.
With this, we have finished two of the three main components of the #IonicOrder. There's a modern version of the Ionic entablature with #modillions, which I will describe later.
Next, we move on to the biggest, most conspicuous part of the order — the #IonicColumn.
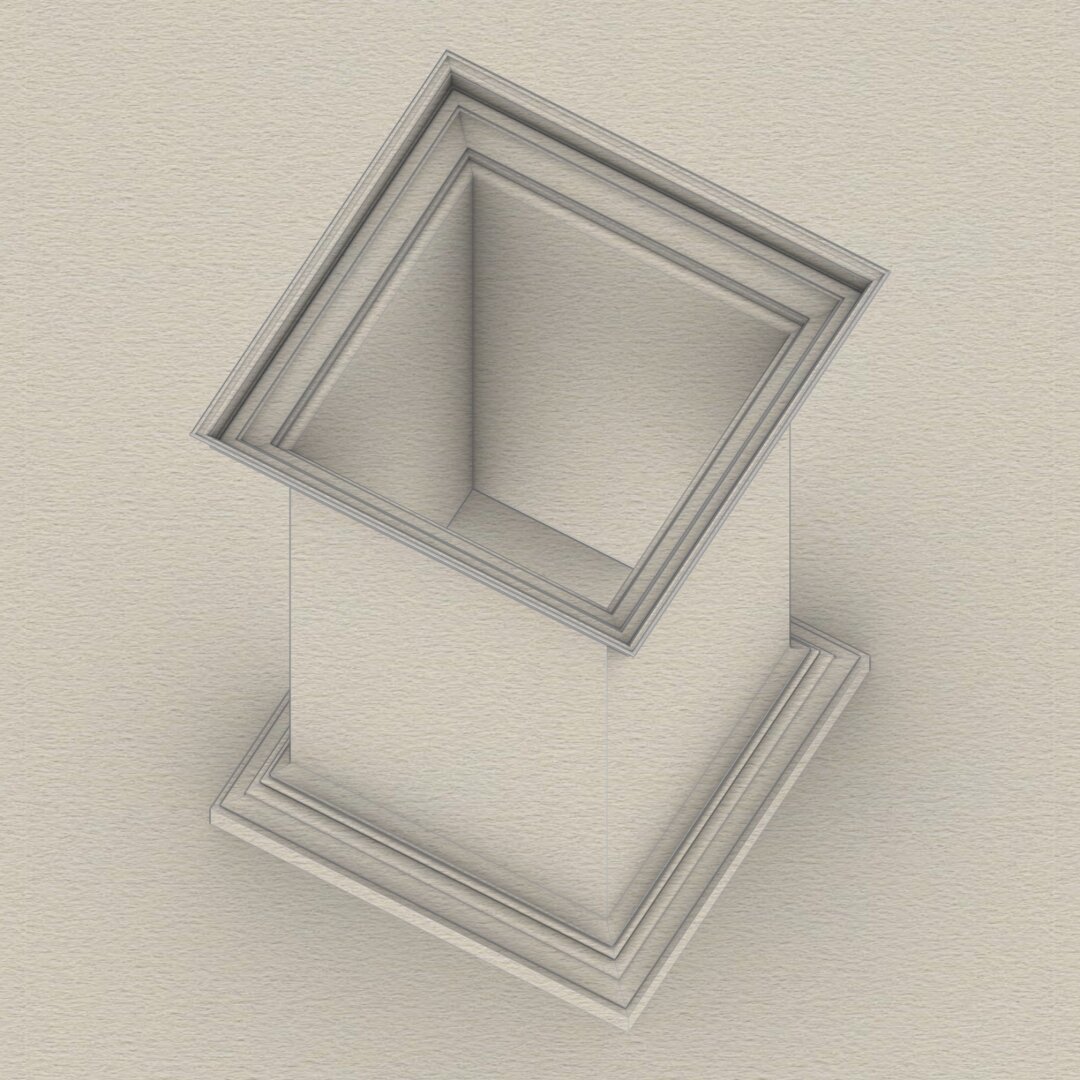
Here is a #textureMapped #IonicPedestal using a photo of a marble slab I took at #TheLouvre in Paris a few years ago.
Also, notice the refined bottom and top of the pedestal with #cymaRecta and #cymaReversa based on flattened half-#helix curves rather than two elliptical arcs.
I am going to focus on #modeling rather than #textureMapping or use of #shaders. I am just putting this up here to show how far we have come in just 10 posts.
Next up is the #entablature of the #IonicOrder
From https://pixelfed.social/p/Splines/790645054230337543, we now have an open surface for the #IonicPedestal. To finish this, close the #planarHoles at the top and bottom with flat caps and join everything. And just like that, we have finished 1/3 of the complete #IonicOrder with very little work.
To ensure that your finished object is amenable to #3DPrinting or #CNCMilling, always check the edges of your object after all surfaces have been joined. Do this EVERY time you join surfaces to create a closed object.
Most CAD programs will offer edge analysis tools that let you detect #nakedEdges or #nonManifoldEdges. If you have either of those, your object is not #airtight, and you will not be able to physically realize it.
This version of the pedestal uses the classic variation of #CymaRecta and #CymaReversa. If you want to remain faithful to the original, then you are done.
However, designs are rarely static and they continue to evolve. There is an opportunity for a slight refinement at the top and bottom of the pedestal without compromising the integrity of the order, but it requires the introduction of a new kind of curve — a #helix, which is a coil-shaped 3D curve.
I will discuss the #helixVariation later. For now, look closely at the #basement and notice how pronounced the turns of the cyma recta are. Instead of using elliptical arcs in the #primaryProfileCurves of the cyma recta and cyma reversa, it is possible to substitute a half-turn of a helix that has been flattened to a 2D shape. The result is a softer, more gradual profile curve that produces a very refined shape.
This is a sketch of the complete #IonicOrder, excluding #intercolumniation and #arches, which came later.
Different people have different abilities and different levels of mathematical knowledge. I make few assumptions about the minimum knowledge one must possess to follow my posts. At a minimum, one must understand ratio, proportion, similar, congruent triangles, Pythagoras, and basic properties of circles, including radius, diameter, circumference, tangents, secants, and chords.
No trigonometry or calculus is assumed, but people who have a knowledge of differentiable continuity, maxima, minima, and inflection points will have increased appreciation of the nuances of some designs featuring smooth curves and surfaces.
I start with first principles, even if it might be a little boring for people with advanced skills. The most basic requirement is that one must be able to mark points on a 3D grid, draw a straight line between two points, and draw a circle or arc from the center. The CAD tools should help with the rest, for example, to find a point of tangency, draw a circle through three arbitrary points, or tangential to three curves (if possible).
There are three components in the #Ionic order. Starting at the bottom is the #pedestal (which is optional), the #column, and the #entablature. Each of these three components has three subcomponents:
— Pedestal has #basement, #dado, and #cap.
— Column has #base, #shaft, and #capital.
— Entablature has #architrave, #frieze, and #cornice.
The pedestal, column, and entablature are always in 4:12:3 ratio. If all components are present, the total order height is divisible by 19. If there's no pedestal, the total height is divisible by 15.
The entire order is parameterized by a SINGLE parameter — the radius of the column at its base. #Vitruvius called the radius a "module" (µ) — an abstract unit of measure independent of physical units.
Components of Ionic column and entablature also have classic and modern variations.
Client Info
Server: https://mastodon.social
Version: 2025.04
Repository: https://github.com/cyevgeniy/lmst