#CustomPCB

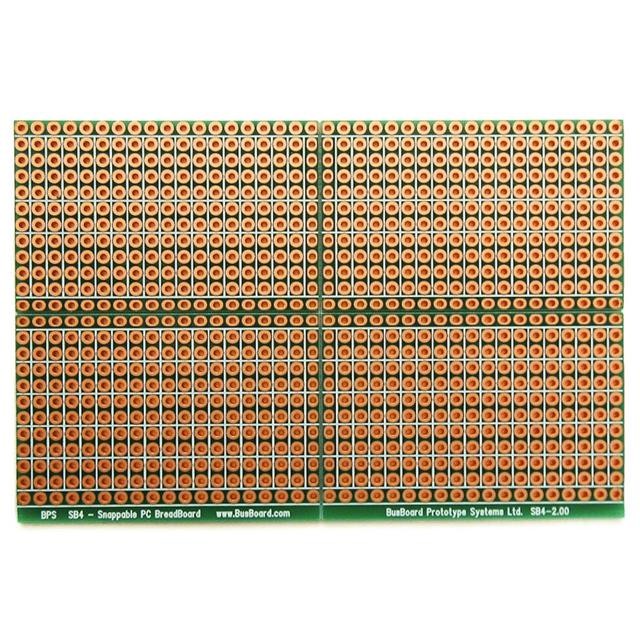
About that BusBoard Prototype Systems SB4 board -- they're expensive. They're more than $6 each (Canadian) plus shipping from DigiKey. They're $10 each plus shipping from Mouser.

That's a lot for a hobbyist when you're experimenting, especially if you're making mistakes.

I looked around again recently, and couldn't find anything I liked at a reasonable price point.

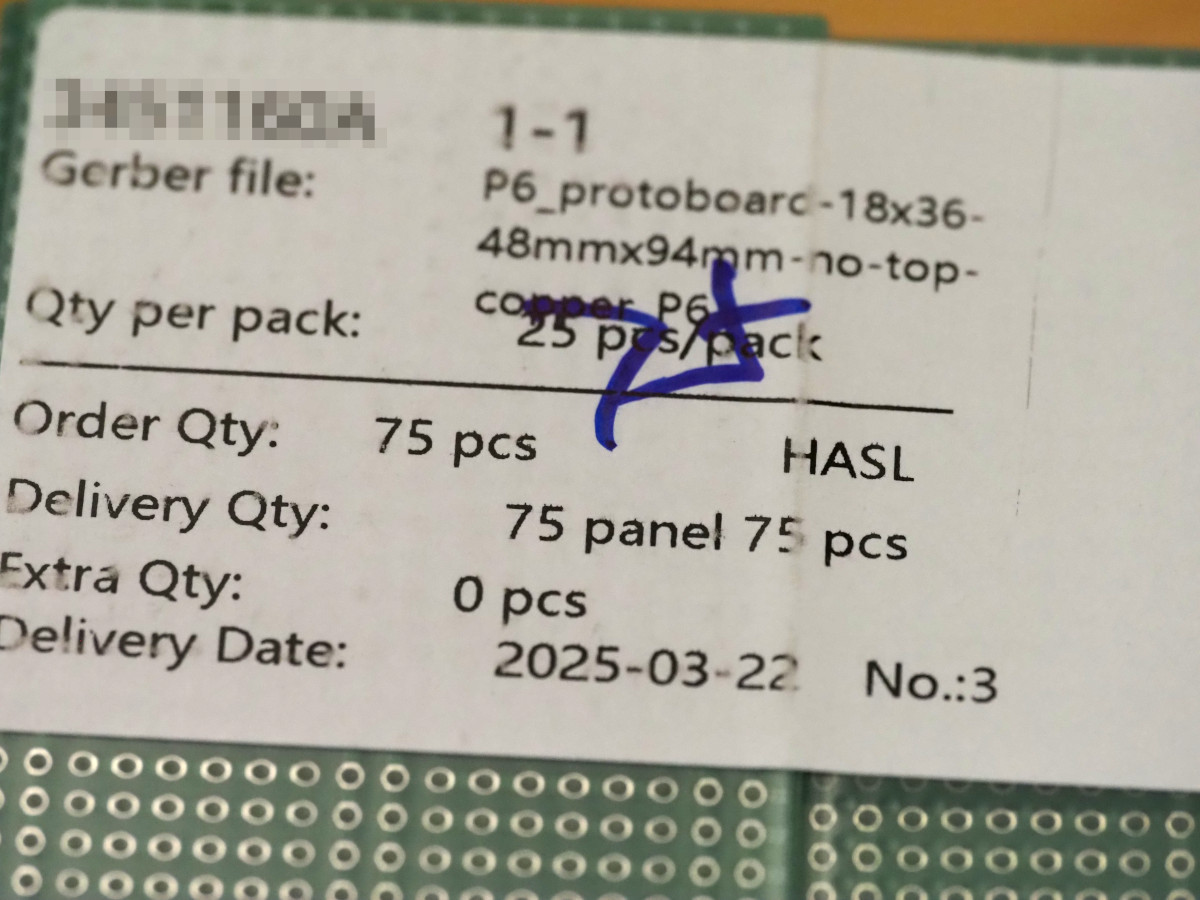
So what does one do in this situation? Well, if you go Overkill 9000, you design your own prototyping perfboard and have a bunch manufactured for you! When you design your own, you can give it any features you like. So this one has:

18 x 36 (648 holes total)

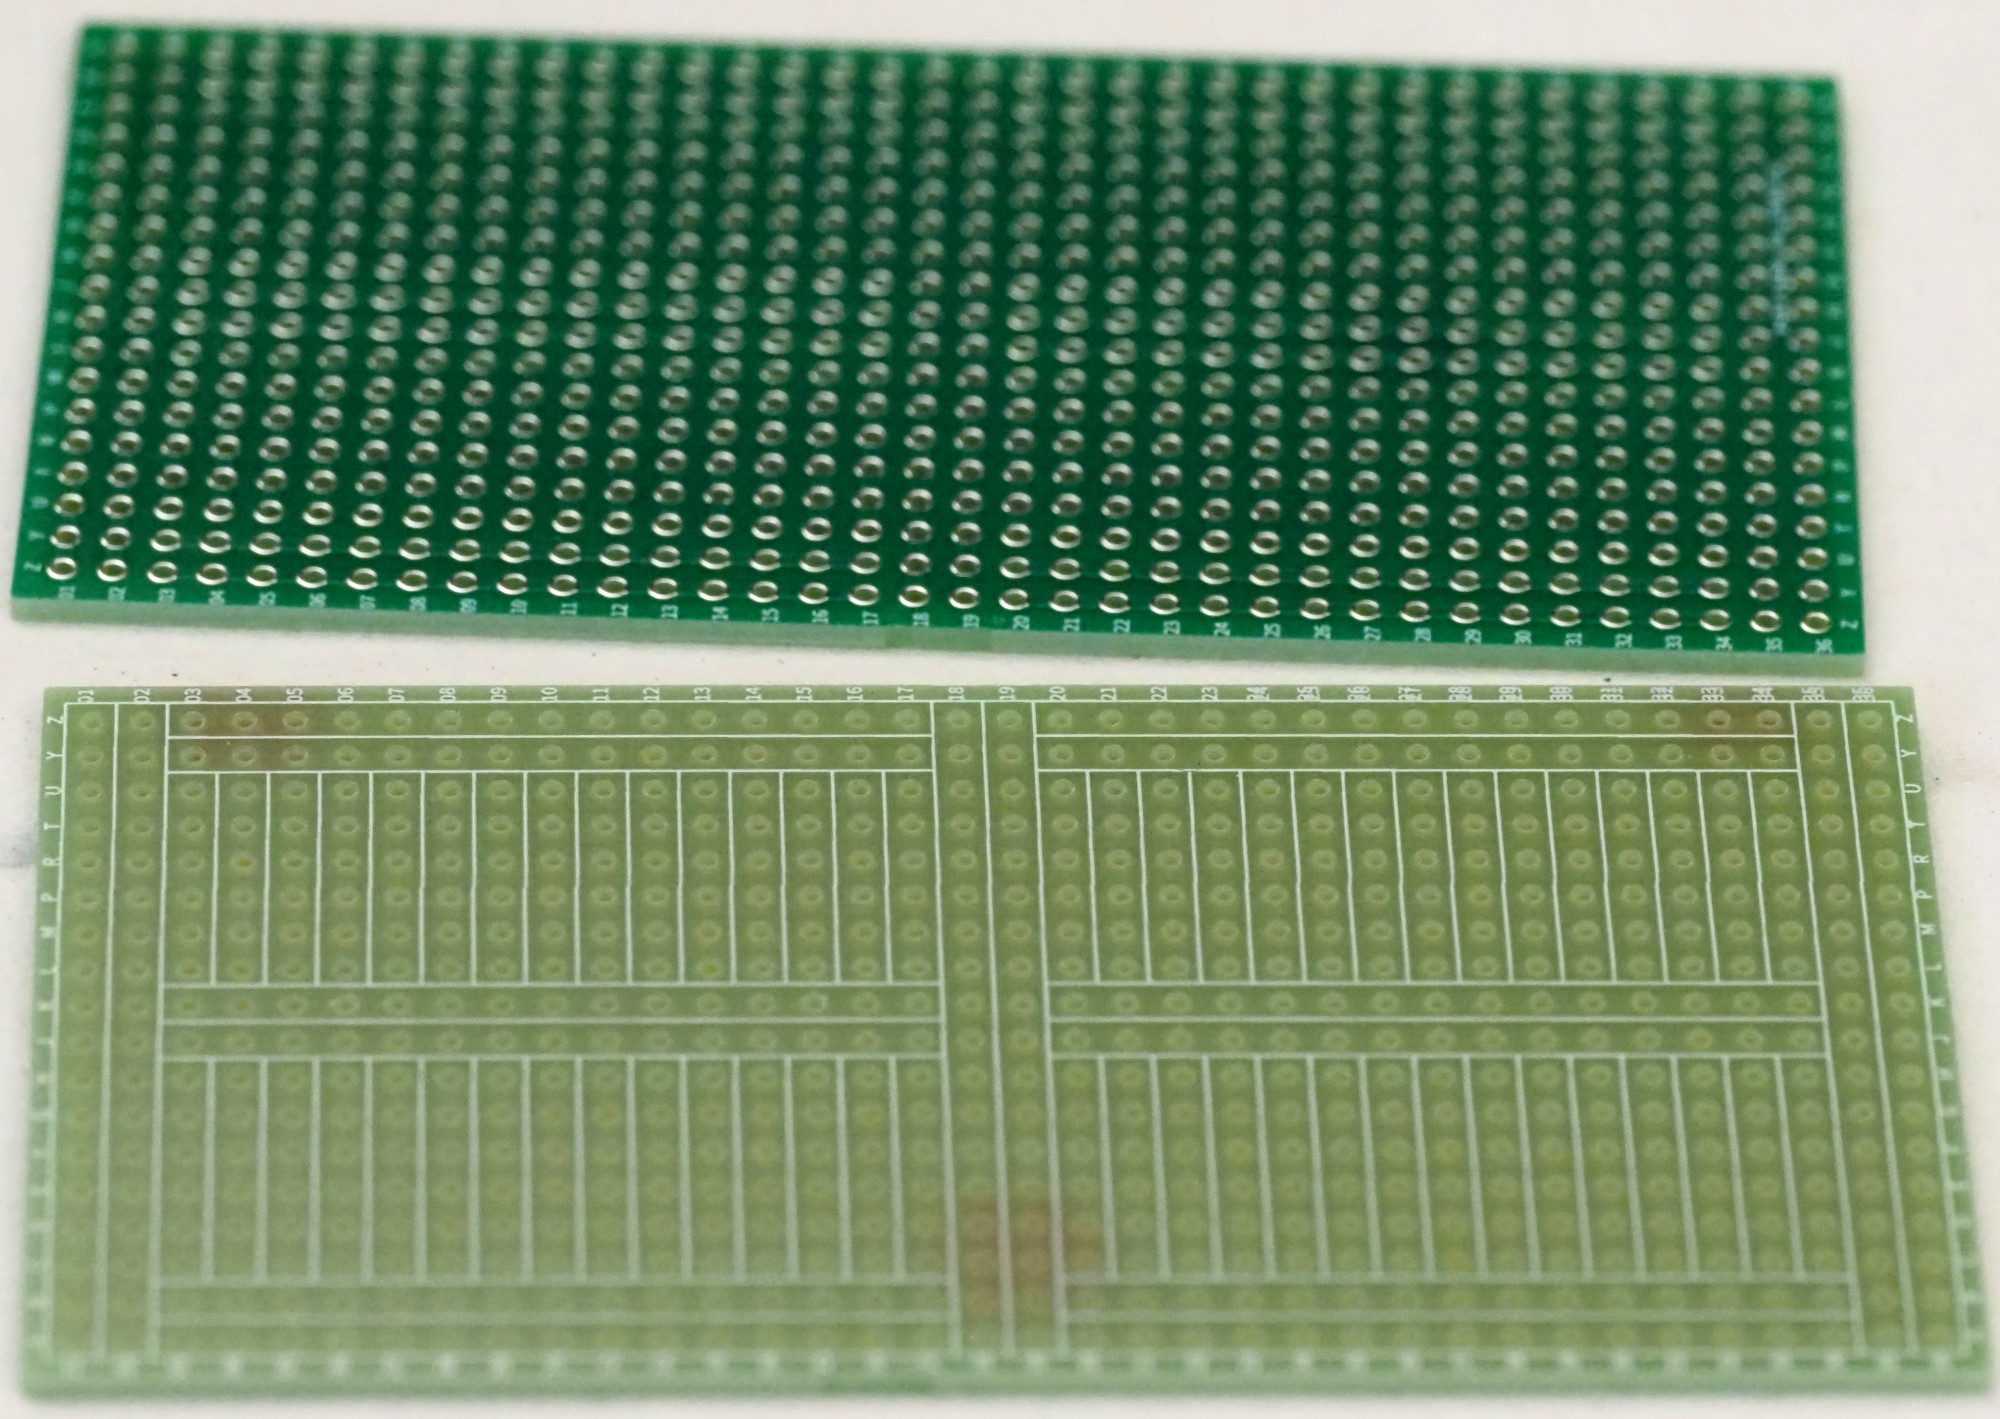
It's two 18 x 18 sections, though I didn't have them scored for snapping.

A total of 6 horizontal busses in groups of 2, at the top and bottom plus one in the middle.

3 sets of 2 vertical busses within that space between horizontal bus sets, similarly edge - center - edge.

Then each row has a 6-hole pad on each side of the center 2 busses, which are spaced for IC or other standard 0.4" component layout.

Made of proper FR4 fiberglass. Good copper, good soldermask.

Silkscreened row and column IDs on both the front and back, at both the start and end of each row/column (and they match up with the back...).

And silkscreened boxes on the front showing the pad/buss pattern - no more flipping!

They arrived today and ... they're beautiful.

2/x

#PCB #CustomPCB #silkscreen #overkill #Overkill9000 #buss #busses #pads #components #IC #DIP

Product photograph of the Busboard Prototype Systems SB4 snappable breadboard.  This shows the top of the board, which includes silkscreened lines to indicate what the connected pad pattern on the underside is, to assist in placing components.Close-up photograph of the order ID label on a package of manufactured printed circuit boards, dated 22 March 2025.A photograph of 2 perforated prototyping printed circuit boards, one showing the front and the other the back.

The boards are the typical green of fiberglass boards, with shiny exposed pads on the underside, and labels for rows and columns  silkscreened in white on both sides.  There are also silkscreened outlines on the front of the board to indicate the pattern of joined pads on the back.
2024-01-05

Soldered a mic preamp for dynamic mic in a old cable tv amp.

Nice shielded enclosure with efficient integrated isolated switching power supply.

Changed the voltage divider at TL431 regulator to get 2 volts more, and made floating ground for OPV electronics at half voltage.

OPV is a LM833 with lower noise than my old one.

This time i was to lazy to make a custom PCB.

#soldering #customPCB #diy #electronics

Handsoldered mic preamp PCBMic preamp in cable TV amp housing
Gunnarssongunnarsson
2023-10-31

Added some capacitors and resistors to make sure eveything is stable. The PCB is not as tidy any more, but it's satisfying to do things right.

A small PCB with some components, labeled Zap-o-matic high voltage programmer
Gunnarssongunnarsson
2023-10-30

Drew up this little PCB for a potential ATtiny high voltage programmer. Pretty neat if I may say so myself 🙂

A rendering of a circuit board with a few components saying "Zap-o-matic high voltage programmer"
ShrampyBot :shrimplove:shrampybot@gsg.live
2023-09-04

@dj_doughy is now streaming Art on Twitch: twitch.tv/dj_doughy

Doughy Does - dj_doughy - #Solder, prep for #KnobCon, #CustomPCB

#ArtStream #twitch #GSG #art

Preview of dj_doughy's stream on Twitch
ShrampyBot :shrimplove:shrampybot@gsg.live
2023-09-03

@dj_doughy is now streaming Art on Twitch: twitch.tv/dj_doughy

Doughy Does - dj_doughy - #Solder, prep for #KnobCon, #CustomPCB

#ArtStream #twitch #GSG #art

Preview of dj_doughy's stream on Twitch
ShrampyBot :shrimplove:shrampybot@gsg.live
2023-09-03

@dj_doughy is now streaming Art on Twitch: twitch.tv/dj_doughy

Doughy Does - dj_doughy - #Solder, prep for #KnobCon, #CustomPCB

#ArtStream #twitch #GSG #art

Preview of dj_doughy's stream on Twitch
ShrampyBot :shrimplove:shrampybot@gsg.live
2023-09-02

@dj_doughy is now streaming Art on Twitch: twitch.tv/dj_doughy

Doughy Does - dj_doughy - #Solder, prep for #KnobCon, #CustomPCB

#ArtStream #twitch #GSG #art

Preview of dj_doughy's stream on Twitch

Receive Virtual Postcards on This Beautiful E-Ink Photo Frame

Sending postcards to loved ones used to be standard procedure for travelers back when travel was glamorous and communications were slow. While some travelers still keep this tradition alive, many have replaced stamps and post offices with instant messaging and social media -- faster and more convenient, but a lot less special than receiving a postcard with a handwritten message from a faraway land.

[Cameron] designed a postcard picture frame that aims to bring back a bit of that magic. It's a wooden frame that holds an e-ink display, which shows pictures sent to it by your friends. All they need to do is open the unique link that you sent them beforehand and upload an interesting photo; the picture frame will cycle through the submissions based on an adjustable schedule. A web interface allows you to change settings and delete any inappropriate images.

The wooden frame is beautifully made, but the sleek black PCB inside is an true work of art. It holds a battery and a USB-C charging circuit, as well as an ESP32 that connects to WiFi, stores images and downscales them to the 800×480 monochrome format used by the display. [Cameron] has not accurately measured the current consumption, but estimates that it should work for about one year on a single charge thanks to the extremely low power requirements of e-ink displays.

Having your friends decide on the images shown in your house is an interesting idea, if you can trust them to keep it decent. If you like to have more control over your e-ink display, have a look at this solar-powered model or this wall-mounted newspaper display.

#homehacks #microcontrollers #custompcb #eink #epaper #esp32 #usbc

image

Liberating the ESP8266 from its Development Board

While the ESP32 is clearly a superior piece of hardware, we think you'll agree that the ESP8266 is just too useful not to have a dozen or so kicking around the parts bin at any given time. Cheap, easy to use, and just enough capabilities to bring your projects into the wonderful world of IoT. But if you really want to get the most out of it, you'll eventually have to skip the development board and start working with the bare module itself.

It can be a scary transition, but luckily, [Ray] has collected some notes that should prove helpful for anyone looking use modules like the ESP-12F in their own custom PCBs. From different tips on making sure the power-hungry modules get enough juice, to cost cutting measures that help reduce the ancillary parts needed in your circuit design, it's a worthwhile read for new and experienced ESP8266 wranglers alike.

An auto-reset circuit with the CH340C

For example, [Ray] talks a bit about using the infamous GPIO10 pin. This pin is on the rear of the ESP8266 module, and on many development boards, it isn't even connected. That's because its internally hooked up to the ESP8266's SPI flash chip, and using it can cause problems if you're not careful. But as explained in the blog post, as long as you make sure the flash mode is set to "dual IO" (DIO), then GPIO10 can be used just like any other free pin.

We also really liked the tip [Ray] shares at the end for making your boards more easily programmable. Sure you can leave an unpopulated header on the board, or fiddle with some pogo pin setup, but his edge connector approach is quite clever. Just slip the programmer on for the initial burn, and then after that you can update over the air.

There's no denying how easy it is to throw something together with an ESP8266 development board, but we've covered so many incredible projects that have made use of the bare module's diminutive dimensions that you'll ultimately be missing out if you don't cut out the middle-man.

#microcontrollers #parts #circuitdesign #custompcb #esp12f #esp8266

image

Binary Clock Lets the Nixies Glow

We're not here to talk about another clock. Okay, we are, but the focus isn't about whether or not it can tell time, it's about taking a simple idea to an elegant conclusion. In all those ways, [Marcin Saj] produced a beautiful project. Most of the nixie clocks we see are base-ten, but this uses base-two for lots of warm glow from more than a dozen replaceable units.

There are three rows for hours, minutes, and seconds. The top and bottom rows are labeled with an "H" and "S" respectively displayed on IN-15B tubes, while the middle row shows an "M" from an IN-15A tube. The pluses and minuses light up on IN-12 models so you'll need eighteen of them for the full light show, but you could skimp and use sixteen in twelve-hour mode since you don't need to count to twenty-four. We won't explain how to read time in binary, since you know, you're here and all. The laser-cut acrylic is gorgeous with clear plastic next to those shiny nixies, but you have to recreate the files or buy the cut parts as we couldn't find vector files amongst the code and schematics.

Silly rabbit, nixies aren't just for clocks. You can roll your own, but they're not child's play.

The HackadayPrize2021 is Sponsored by:

#clockhacks #thehackadayprize #2021hackadayprize #clock #custompcb #nixie #nixiedriver #nixietube #nixietubeclock #nixietubes #timepiece

image

Hacked IKEA Air Quality Sensor Gets Custom PCB

Last month we brought word of the IKEA VINDRIKTNING, a $12 USD air quality sensor that could easily be upgraded to log data over the network with the addition of an ESP8266. It only took a couple of wires soldered to the original PCB, and since there was so much free space inside the enclosure, you didn't even have to worry about fitting the parasitic microcontroller; just tape it to the inside of the case and button it back up.

Now we've got nothing against the quick and dirty method around these parts, but if you're looking for a slightly more tidy VINDRIKTNING modification, then check out this custom PCB designed by [lond]. This ESP-12F board features a AP2202 voltage regulator, Molex PicoBlade connectors, and a clever design that lets it slip right into a free area inside the sensor's case. The project description says the finished product looks like it was installed from the factory, and we're inclined to agree.

Nothing has changed on the software side, in fact, the ESP-12F gets flashed with the same firmware [Sören Beye] wrote for the Wemos D1 Mini used in his original modification. That said [lond] designed the circuit so the MCU can be easily reprogrammed with an FTDI cable, so just because you're leaving the development board behind doesn't mean you can't continue to experiment with different firmware builds.

It's always gratifying to see this kind of community development, whether or not it was intentionally organized. [lond] saw an interesting idea, found a way to improve its execution, and released the result out into the wild for others to benefit from. It wouldn't be much of a stretch to say that this is exactly the kind of thing Hackaday is here to promote and facilitate, so if you ever find yourself inspired to take on a project by something you saw on these pages, be sure to drop us a line.

#hardware #microcontrollers #airquality #custompcb #esp12f #esp8266 #ikea #retrofit #sensor

image

Custom Camera Flash Is Built for Stealth

As [Joshua Bird] began his foray into the world of film photography, he was taken back by the old technology's sheer hunger for light. Improvised lighting solutions yielded mixed results, and he soon realized he needed a true camera flash. However, all the options he found online were large and bulky; larger than the camera itself in some cases. To borrow his words, "[he] didn't exactly want to show up to parties looking like the paparazzi". So, he set about creating his own compact flash.

Impressed by the small size and simple operation of disposable camera flashes, [Joshua] lifted a module out of an old Fuji and based his design around it. An existing schematic allowed him to attach the firing circuitry to his Canon's hot shoe without the risk of putting the capacitor's 300 volts through the camera. With that done, he just had to model a 3D-printed case for the whole project and assemble it, using a few more parts from the donor disposable.

Of course, as it came from a camera that was supposed to be thrown in the trash, this flash was only designed for a specific shutter speed, aperture, and film. Bulkier off-the-shelf flashes have more settings available and are more capable in a variety of environments. But [Joshua] built exactly what he needed. He now has a sleek, low-profile external flash that works great in intimate settings. We're excited to see the photographic results.

This is not the first photography hacker we've seen breathe new life into disposable flashes. Some people see far more than a piece of camera equipment in old flashes, though, with aesthetically stunning results.

[via reddit]

#classichacks #cameraflash #camerahack #custompcb #disposablecamera #disposablecameraflash #filmphotography #photography

image

Client Info

Server: https://mastodon.social
Version: 2025.04
Repository: https://github.com/cyevgeniy/lmst