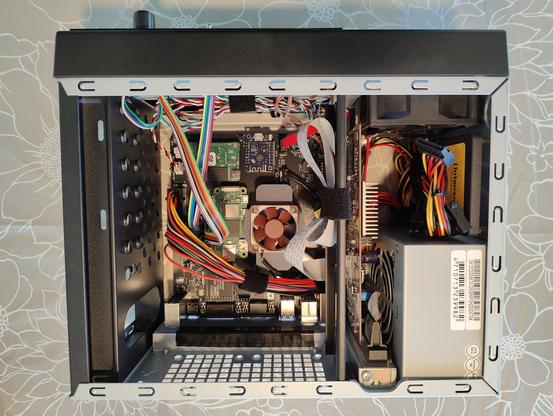
Finished my #ITXLlama builds today. Built around the #Chieftec BT-02 case, it features the ITX Llama motherboard, a #Radeon 9250 and a #3dprinted front control panel I designed with #OLED display, rotary encoder and buttons for the #MT32Pi. Also a much needed reset button, a switch to select either the MT32-pi or GS WaveTable audio and an SD slot. The software needs a bit of tweaking, but this could be an awesome and brand new box for playing #90s era #MSDOS and #Windows98 games. So far it plays #DukeNukem3D flawlessly with #GeneralMIDI sound.
#generalMidi
MT32-Pi on my EuroRack MiniDexed PCB
This is great. I was asked by Michel (mragutlich) if I knew how to build MT32-Pi to configure it for my MiniDexed EuroRack PCB but I don’t and there isn’t a lot of information apparently on how to build it from source.
So I offered my Rebuilding my Ability to Build MiniDexed post which talks about getting to the point of being able to build MiniDexed and as both synths run on circle, figured that would be a pretty good starting point.
And then Michel came back to me with a complete set of instructions for Ubuntu and I’ve just run through them – and they work great.
So massive thanks to Michel, this is how you could get MT32-Pi running on my MiniDexed EuroRack PCB.
https://makertube.net/w/2xzd8b4RPDPX1YJL3CpA57
Warning! I strongly recommend using old or second hand equipment for your experiments. I am not responsible for any damage to expensive instruments!
Previous posts on MT32-Pi:
If you are new to microcontrollers and single board computers, see the Getting Started pages.
Parts list
- Raspberry Pi Zero 2.
- Micro SD card.
- MiniDexed EuroRack PCB and panel.
- Power, leads, additional connectors and so on.
Building MT32-Pi on Ubuntu
Here are Michel’s instructions that worked for me.
Setup a Ubuntu 20.4 LTS system.

sudo apt-get update
sudo apt-get upgrade
sudo apt-get install build-essential
sudo apt-get install gcc-arm-none-eabi
sudo apt-get install git
sudo apt-get install curl
sudo apt-get install dialog
sudo apt-get install cmake
sudo apt-get install pkg-config
sudo apt-get install glib-2.0 Now clone the mt32-pi github repo

git clone –recursive https://github.com/dwhinham/mt32-pi.git

cd mt32-pi

nano src/control/simpleencoder.cpp In nano change the following lines

constexpr u8 GPIOPinButton1 = 5;
constexpr u8 GPIOPinButton2 = 6;

constexpr u8 GPIOPinEncoderButton = 11;
constexpr u8 GPIOPinEncoderCLK = 10;
constexpr u8 GPIOPinEncoderDAT = 9;

ctrl-X and say ‘Y’

make all

If everything goes well you will have a kernel8.img file in your directory.

Now hook up a microSD cardreader to your Linux environment and insert a blank microSD card

Goto the ~/scripts dir and start mt32pi_installer.sh , this will install all the needed bare metal files

sudo ./mt32pi_installer.sh

When ready copy the kernel8.img file to the SD card

Change in the mt32-pi.cfg file the line ‘encoder_reversed = off’ to 'on', now the volume knob will increase when turned clockwise

Copy the MT32 roms to to the rom dir

Copy some Sf2 soundfont files tot the soundfont dir

Thats it…unmount the sd card , put it in your Zero 2 W…and boot it.. the MT32pi logo should appear on the oled screen and the buttons and rotary encoder should work properly

The first button switches between m32 and soundfont mode.

The second button will switch to the next rom or soundfont file

The rotary encoder will change the master volume.

The encoder switch only displays a message that the button is pressed
There were a couple of tweaks I needed. First of, the mt32_inistaller.sh script has to be run as root. This will go through and ask you to choose the SD card to format and install and so on.
At some point you will need some MT32 ROMs. There are details of how to do that on the original MT32-Pi project here: https://github.com/dwhinham/mt32-pi?tab=readme-ov-file#-quick-start-guide
In addition to the aforementioned “encoder_reversed” setting in the mt32-pi.cfg file there are a couple of other options I find used (many of these were already set up by the installer):
[system]
default_synth = mt32 or soundfount


output_device = i2s

[control]
scheme = simple_encoder
encoder_reversed = on
mister = off

[mt32emu]
midi_channels = alternate

[lcd]
type = ssd1306_i2c
width = 128
height = 32
i2c_lcd_address = 3c
I think those were the major changes.
I installed a single “new” ROM and a PCM ROM. The default soundfont is already installed. And that was essentially that.
The first time I tried it, I’d forgotten to copy over the kernel8.img file, so that took a moment to figure out! But apart from that it was all pretty straight forward for me. Many of the packages to install at the start were already there and up to date, so that didn’t take too long and the build itself was again fairly straight forward.
Closing Thoughts
A big thanks to Michel for asking the question, then figuring out the answer, and most importantly sending me the instructions and permission to post them here.
This is a great additional option for my PCB 🙂
The video shows the MT32-Pi in Soundfont mode playing a MIDI file of Khachaturian’s Masquerade Waltz.
It is great to have a full General MIDI Soundfont device in EuroRack format.
Kevin
I see a number of recent Roland MT-32 clone projects out there, built using Raspberry Pi and the like. I don't see any that are being sold, pre-assembled.
The BulkyMIDI-32 looks great, but I don't think it's being sold, assembled.
If such things are on offer, can someone point me to a decent unit?
#MIDI #Roland #RolandMT32 #MT-32 #generalmidi #music #audio #vintagecomputing #retrocomputing #retrogaming #DOS #AtariST #Amiga #RaspberryPi #RPi #modernretro
Ca fait 20 ans que je galère à avoir du son #generalmidi basique avec un #séquenceurmidi sous #linux (actuellement #linuxmint)
Pas envie de lancer et paramétrer toute une config #jackaudio + #rosegarden + #qsynth à chaque fois que je veux juste écrire une idée, bordel !
Tu lances un vieux jazzware sous windows et tout se passe bien.
Sous Debian, Zenwalk, Ubuntu etc... jamais réussi à faire aussi simple.
J'y perds des heures et pas mal d'idées !
J'en suis réduit à composer en visuel pour lancer une commande timidity à chaque changement de note...
Today is a big day for DOS emulation, now we have 100% authentic Sound Canvas (Roland SC-55) emulation in Staging via Nuked SC-55 🥳 🎉 🍻 🎊
Grab the latest dev build from here:
https://www.dosbox-staging.org/releases/development-builds/
Then follow the installation instructions from the PR below:
Search "manual testing" and follow the steps under "usage" (this will be more streamlined in the final; the plugin (without the ROM files) will be included in the distribution package)
https://github.com/dosbox-staging/dosbox-staging/pull/4090
#DOSGaming #MS-DOS #Emulation #RetroGaming #LinuxGaming #MacGaming #FOSS #Roland #SoundCanvas #SC-55 #MIDI #GeneralMIDI
I implemented a fairly complete #GeneralMIDI table. It was quite a work! I am struggling though with the percussion sounds. This is an example of the drumkit while playing the bass drum (B0), the Closed Hi-Hat (F#1), and the Acoustic Snare (D1). Not impressive! I think I can get something better from the #SID.
@polpo I'm shure it's not a #CS4237B like @rasteri used for the #Wee86, so it's not acting like a Quad-Mode #AdLib / #SoundBlaster / #GeneralMidi / #Wavetable-Synth card...
Or does it?
https://www.youtube.com/watch?v=ZBsv-jRiIT8&t=244s
DOS Gaming MIDI: Roland MT-32 / SoundCanvas SC-55 / SC-88, mt32-pi & SoundBlaster Hanging Note Fix
https://makertube.net/videos/watch/e492c856-3acd-4c02-aa25-a21805d09cc6
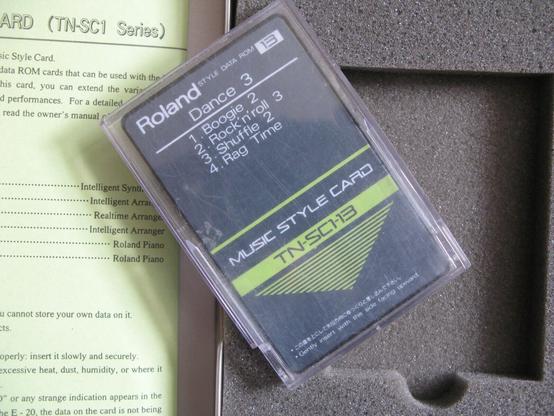
Here, as reference is a Roland TN-SC1, number 13, Dance 3. Also came in a big box (to justify the price), but card is small. Fits inside a PCMCIA case but a different technology altogether. The next series would be based on General Midi/GS instead of MT32 as a midi standard, and would include 8 styles.
#synth #midi #style #arranger #mt32 #ra50 #GM #gs #generalmidi #Roland #LASynthesis #keyboard #retromusic #stylecard #Rom
Question into my bubble: what is the minimal number and style of MIDI messages to produce a note via a MPU401 interface?
#generalmidi
I let Midjourney recreate the most important US General of all time:
General MIDI
It seems that I'm not in the mood to record serious things.
So, here is some general midi escalator music / library music, made on the crappy but cool yamaha QY-8 (i love this little thing.)
A small preview of today's work.
I'm quite happy with the whole thing, I'll make some minor tweaking tomorrow. It always feels special to finish the recording of a track.
#opl2 #adlib #ElektroPlankton #chipmusic #GeneralMidi #chiptune #KorgVolca #synth #musodon
You can probably guess what kind of tools I used to make this thing from the hashtags. :D
Retro spaceship shooty game music sketch from last year.
This was made with #Reaper and FluidSynth soundfont being an SC-55/SCC-1 clone.
Just realised that I have never spammed mammothsite with my old music.
Here's Work 0, a sort-of dungeon synth thing that I wrote in 1994/1995. There's a longer full band black metal version of the same track under a different name, but fuck knows where that tape is.
Composed on a Roland SCC-1 using Musicator Win, this copy recorded a couple of years ago from a Roland SC-55.
#music #DungeonSynth #electronicMusic #GeneralMIDI #MIDI #RolandSC55 #instrumental #GM #GS
Now thinking of using #Timidity software MIDI synthesizer to generate $(x,y)$ pairs: X could be a series of notes played with a piano and Y the same played with a guitar, hard-panned left and right so they are synchronized.
The #GeneralMIDI instrument list is at
https://www.midi.org/specifications-old/item/gm-level-1-sound-set
Anyone have any hateful #incel general midi tracks? #midi #generalmidi


