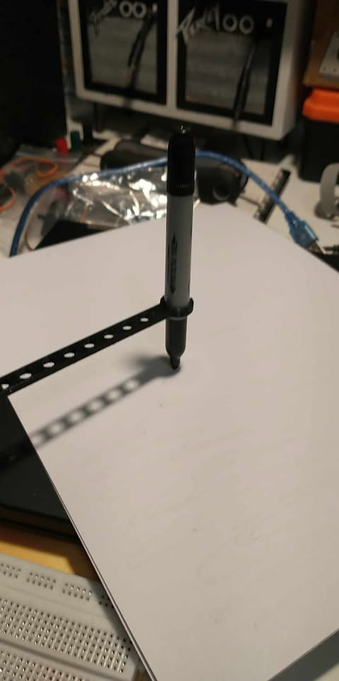
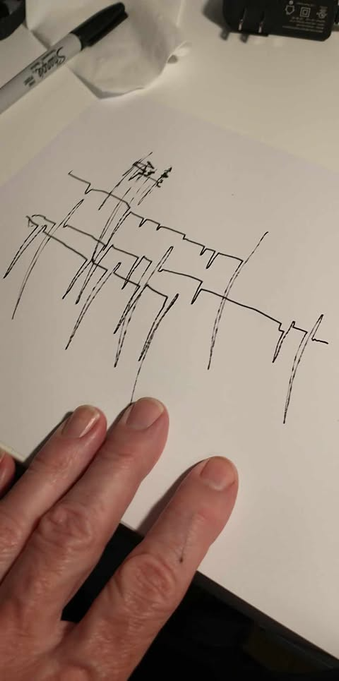
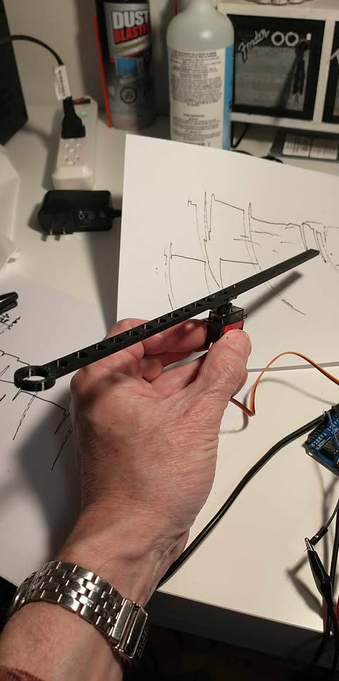
Part 3 of building the DIY seismograph. So continuing on the moving arm concept, I settled on using a servo motor as this could easily be driven by the Arduino. I had to make the arm very light so as not to put too much pressure on the small servo motor I was going to use. Here is the model of the arm. Although I went back and forth with different ends to hold the pen, ultimately I ended up going with this clip. Modeled in #freecad #maker #diy #earthquake #arduino #servomotor #seismograph
#ServoMotor
Part 2. After doing several tests with the read/write head of an old Hard Drive, which was my first idea for moving the pen back and forth, I ultimately abandoned this idea when I just couldn't figure out how to drive it with an Arduino Micro-controller, which I had chosen for this project, so I could learn how to program them. #maker #diy #earthquake #arduino #servomotor #seismograph
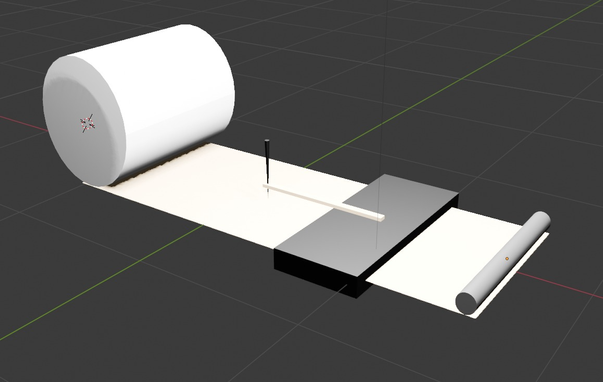
Part 1. I can reveal the project I had worked on last month. My nephew messaged me back in early February to ask if I had a dot-matrix printer for his girlfriend's art installation. Seems she wanted to build a DIY seismograph as part of an art exhibit. After getting more info on what she had in mind, in about 10 minutes I had to whole idea flushed out in my head and on a sketchpad. This is the first preliminary Blender render of my idea. #maker #diy #earthquake #arduino #servomotor #seismograph
Mifumo ambapo #steppermotor inatumika, hamna #sensors, mfano #IAC!
Kwa #ServoMotor lazima sensor, #throttlebody, nk!
www.5021.tips/ujanja/ec/
☝️👆
Hii #usefulapp ina #ujanja wa #controlsystems ata #wiringdiagrams, kupima sensors & actuators, nk! #HapaUjanjaTu #teachyourself #autoelectrical
#Autoelectricalrepair #autoelectronics #autorepair #enginecontrolmodule #enginecontrolunit #ecu #ecurepair #ecurepairs #repairtips #5021tips
Shahed-136 kamikaze drone servomotor [video]
https://www.youtube.com/watch?v=_jKbRdsi8fA
#ycombinator #teardown #drone #Shahed_136 #servomotor
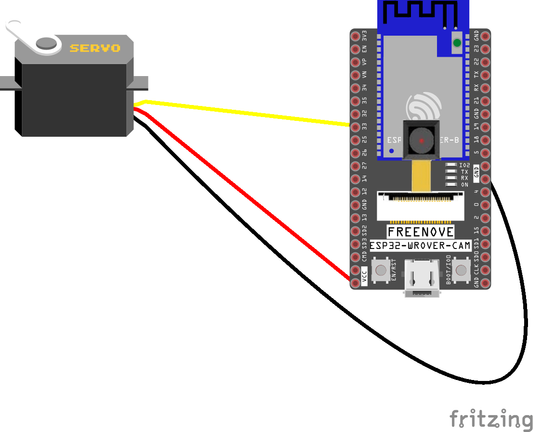
WiFi panoramic camera: remote monitoring and control via web
https://www.techrm.com/wifi-panoramic-camera-remote-monitoring-and-control-via-web/
#camera,#digital,#digitalelectronics,#Dupontcables,#esp32,#internetofthings,#iot,#library,#linux,#LittleFS,#NodeMCU,#platformio,#PWM,#sensor,#sensors,#servo,#servomotor,#SG90,#tutorial,#videosurveillance,#wifi,#wrover
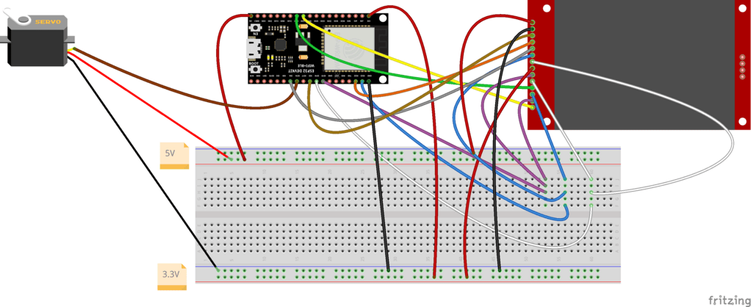
Control of an SG90 servomotor with ESP32 and touchscreen display
https://www.techrm.com/control-of-an-sg90-servomotor-with-esp32-and-touchscreen-display/
#breadboard,#digital,#digitalelectronics,#Dupontcables,#esp32,#internetofthings,#iot,#library,#NodeMCU,#platformio,#PWM,#servo,#servomotor,#SG90,#tftdisplay,#tutorial
Roll Your Own Servo https://hackaday.com/2023/10/04/roll-your-own-servo/ #Microcontrollers #servomotor #encoder #Parts
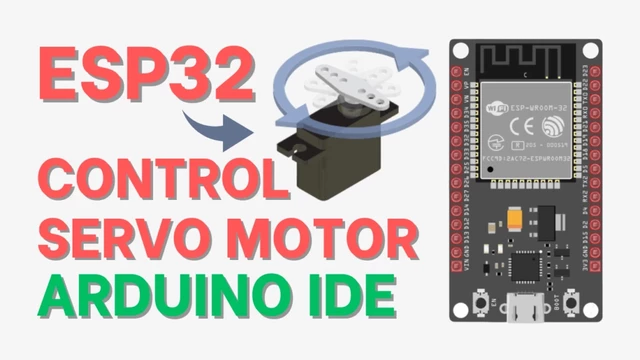
How to Control Servo Motor with ESP32 and Arduino IDE
https://lededitpro.com/control-servo-motor-with-esp32-and-arduino-ide
#ESP32 #ESP32Projects #ESP32tutorial #ESP32Board #Arduino #electronics #robotics #arduinoproject #MicroPython #uPyCraft #servomotor #arduinoide
Servo Surgery Teaches Us DIY Encoder Implants
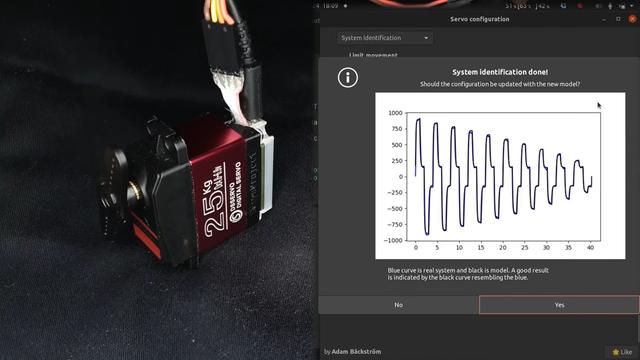
Today, we shall talk about how [Adam Bäckström] took a DS3225 servo and rebuilt it to improve its accuracy, then built a high-precision robot arm with those modified servos to show just how much of an improvement he's got - up to 36 times better positional accuracy. If this brings a déjà vu feeling, that's because we've covered his last demonstration video in an article a few weeks ago, but now, there's more. In a month's time since the last video came out, [Adam] has taken it to the next level, showing us how the modification is made, and how we ourselves can do it, in a newly released video embedded below.
After ordering replacement controller PCBs designed by [Adam] (assembled by your PCBA service of choice), you disassemble the servo, carefully setting the gearbox aside for now. Gutting the stock control board is the obvious next step, but from there, you don't just drop the new PCB in - there's more to getting a perfect servo than this, you have to add extra sensing, too. First, you have to print a spacer and a cover for the control board, as well as a new base for the motor. You also have to print (or perhaps, laser-cut) two flat encoder disks, one black and one white, the white one being eccentric. It only escalates from here!
Both of these disks go inside the motor. That is, you have to pry the servo's DC motor apart, take its base with brushes out, then insert the encoder disks. Then, you snip and file away at the base's plastic parts to free up as much space inside the motor's base as possible, and add the optical encoders in the space you freed. Once that's done, you solder the motor, the optocoupler and the potentiometer connections to the new controller PCB, and assemble the motor back together.
After you're finished with the surgery, you have to calibrate your servo, for which [Adam] shows how to properly set it up mechanically, provides the code you need to run, and even nice GUI tools with controls to tweak servo parameters - his firmware gives us way more power than we could ever expect from a servo like this. All the knobs and sliders available to control coefficients, limits and curves, show us that [Adam] really does understand what makes for proper servo movement. Enough care is put into the documentation, the explanations and the tools for this modification process, that we don't have to be anxious about being left behind if we are to follow these steps ourselves!
In a robot arm, small accuracy errors at the base scale into large errors at the arm's end. If what you crave is high accuracy on a budget, and you have a bit of time to devote to modifying stock servos, this approach might be just what you need, and [Adam] has basically laid all the groundwork for you. Last time we talked about these servo modifications, one of our commenters suggested that this could be a viable successor to the goals of the OpenServo project, and we definitely see where they're coming from. What if you wanted to go even less expensive than this? You could build a servo out of junk DC motors with a "3 cent" microcontroller, then.
We thank [sarinkhan], [Diede] and [BaldPower] for sharing this with us!
#robotshacks #closedloopservomotors #digitalservo #ds3225 #hobbyservo #opticalencoder #robotarm #roboticarm #servocontrol #servodriver #servomotor #servomotors #servos
Industrial Sewing Machine: Acquired
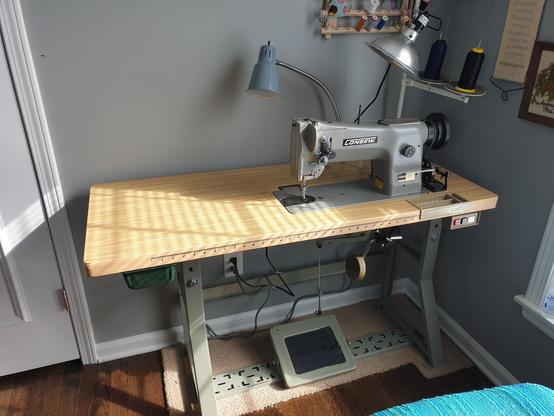
Well, it's done. After weeks of trawling Craigslist, an hour-long phone call with an intelligent stranger about a different machine that wasn't going suit my needs, and a two-week delay while the seller and I waited out their unintentional COVID exposure, I am the proud new owner of a vintage Consew 206RB-3 industrial sewing machine.
So far, it is exactly what I wanted -- at least a few decades old, in decent shape, built by a reputable maker, and it has a clutch motor that I can upgrade to a servo motor if I wish. I even like the color of the head, the table, and the little drawer hiding on the left side. Connie Consew is perfect!
Decidedly Not Portable
The internet was right -- these things are heavy. According to the manual, the machine head alone weighs 25.5 kg (56 lbs). The motor probably weighs another 50-60 lbs. There's a small wooden peg sticking up from the table that has the job of holding the head whenever it is tilted back for maintenance or bobbin changes. I'll admit I didn't trust the little peg at first, but it does a fine job of supporting all that weight on a single point of contact about an inch in diameter.
Even so, the nice lady I bought the machine from offered to deliver it to my house like it was nothing. One of the first things my husband and I did when we went to look at it was try to lift the table. It wasn't happening for us. But through the magic of a shoulder dolly and the physics of gravity, the seller and her husband floated this thing out to their trailer and drove it across town back to my house.
A Quart Low
So let's take a tour, shall we? You've probably seen a sewing machine before, but there are a few obvious differences with an industrial machine. The biggest one is lubrication. Whereas the instruction manual of the average domestic will tell you to put a single drop of lily white sewing machine oil in the bobbin area once every couple of months, even with heavy use, an industrial machine needs to be oiled frequently and in dozens of places. On top of that, there's a little tank in the underside that holds about an ounce of oil. This machine has an oil pan, but it isn't meant to be filled up with oil -- it's just where oil collects and drips through from the oiling points. However, some machines have a pump and a fill line in their oil pans.
Anecdotally, this machine did not go at first when I went to check it out. The motor came on just fine, but the hand wheel wouldn't budge at all, and the pedal did nothing. I suggested adding oil. After putting oil in all the ports, she started moving again. Apparently it had sat for a while. That's okay, because that means I get to become intimately familiar with it as I clean and re-oil it.
This Foot is Made for Walking
Image via Sailrite
This is a compound walking foot machine. Let's break that down. 'Walking foot' means that that the foot -- the many-varied and interchangeable part that holds the fabric down to the bed -- has a set of feed dogs that help push the fabric along the from top side at the same time that the regular feed dogs feed the fabric from underneath. The 'compound' part refers to the little middle bit, which moves up and down at the same time as the needle and also walks the fabric along.
Here's a great visual explanation of the differences between drop-feed, walking foot, and compound walking foot machines. Compound walking foot machines are great for my needs in that they give an even stitch through multiple thick layers of fabric, which is what I need to sew vinyl, canvas, and leather. Like I said in the first post, industrial machines are purpose-built. This one is for heavy duty use, and it spent many years doing upholstery work. It even made a motorcycle seat!
That Motor Though
The motor in a standard sewing machine for home use is pretty small -- about the size of a fist. Even the motor in my "heavy duty" Singer 4452, which is supposed to have 50% more power than a regular domestic's motor, is pretty darn small compared to Connie Consew's motor. This is a 1/2 horsepower clutch motor. The operating instructions I have are for a 206RB-4, and I'm really not sure what the differences are between the 206RB-3 and the -4, though I suspect they are slight. According to the manual, it will do 3300 stitches per minute! Look how fast it goes:
Because it's a clutch motor, it runs continuously when powered, even when not sewing. It's rather loud, too, although not as loud as I was expecting. Still, I will have fun replacing it with a servo motor that be much quieter and easier to dial in the speed. Gonna miss those cool controller buttons, though. Maybe I can re-use the motor for something else, like a go-kart. Just need an inverter.
For A Few Dollars More
Even though I really like this machine as-is, there are a few upgrades I'd like to do. Many of them are along the lines of what [Eric Strebel] did to his industrial Pfaff -- move the pedal more toward the right, swap out the clutch motor for a servo motor, and augment the built-in light with something containing many small LEDs.
I'm going to try to replace the pad on the knee lifter, which lifts the presser foot from its normally-down position. While there's nothing wrong with it, the outside is all crackled and flaky. I've already looked into it, and it seems that I'll have to buy the entire knee lifter assembly. Maybe I'll just make a little shower cap-style slipcover for it instead. I also think I'd like to get a link belt because they're cool looking, though that might not be a good idea. I'll have to check with my local sewing machine shop and see what they think.
Sew What?
Now that I have this baby, I can make better bags and backpacks with less hassle and at higher speeds. I could even start making stuff out of leather. I plan to start my sewing adventure with Connie Consew by working on a half-finished bag made from upholstery fabric that the Singer 4452 couldn't handle. But first, I'm going to go through and give her a tune-up, making sure she's got plenty of oil.
#hackadaycolumns #toolhacks #clutchmotor #industrialsewingmachine #servomotor #sewingmachine #walkingfoot
What You Should Know Before Buying An Industrial Sewing Machine
I've been sewing off and on since I was a kid, and I really started to get into it about ten years ago. Even though I technically outgrew my little 3/4 size domestic machine pretty quickly, I kept using it because it always did whatever I asked it to. I even made my first backpack on it before deciding it was time for something bigger. Don't ask me how I managed to not kill that machine, because I have no idea.
Left: a 3/4 size Janome 11706. Right: a full-size Singer Heavy Duty 4452.
Last year, I got a so-called heavy duty Singer that claims to have 50% more power than a standard domestic machine. This bad boy will make purses and backpacks with ease, I thought. And it does. Well, most of the time.
I found its limits when I tried to make a bag out of thick upholstery material. And honestly, when it comes down to finishing most bags -- sewing the thickest and most difficult seams -- the machine often lifts up from the table on the end opposite the needle.
What I really need is an industrial sewing machine. Not to replace the Singer at all, but to complement it. I can totally justify this purchase. Let me tell you why.
So, What's the Difference?
A domestic sewing machine is kind of like the family car in that it can do a variety of things pretty well. It hauls the kids, it's a good grocery getter, and the gas mileage is decent. You can probably get it in and out of the garage with no problem. Domestic machines, especially modern computerized ones, are all-purpose in this way. They come with anywhere from a handful to hundreds of different stitches, both functional and decorative.
A Juki industrial machine. Image via Juki
An industrial machine is more like a semi. It's big, it's heavy, and it has one major purpose: being heavy duty for whatever you need it to do. The comparison ends there, however, because industrial machines run terribly fast from a dead stop, unlike semis.
Domestic machines used to be built into cabinets or hard-sided carrying cases for the most part, but today they are generally more portable. On the other hand, industrial machines are flush-built into sturdy adjustable tables, and they always have been.
The biggest consideration for getting an industrial machine is their size. An industrial will definitely take up more space than the average domestic, and it is much heavier. I've seen some machines with tables on casters, and some that are meant to be bolted to the floor of a factory. Either way, I'll have to do some serious rearranging in my sewing room to make space for an industrial, including leaving myself some room to work.
Under the Hood vs. Under the Table
The motor in a domestic is about the size of my fist, and is located inside the machine. Industrials have a much larger motor that sits outside the machine and is bolted to the underside of the table. These machines are built for constant use, day in and day out. They are set up for a single purpose, which is often (and will be in my case) a single-needle, straight stitch with a walking foot. Others are set up to do a zig-zag stitch for stretchy seams, or a blind hem, or they might have a twin-needle and are set up to stitch the flat felled seams on hundreds of pairs of jeans a day.
Older industrial machines have clutch motors. They are fast, loud, and run continuously when powered on. The video below explains them rather nicely. Newer industrial machines have servo motors that offer much finer control, can sew either slowly or quickly, and are really quiet compared to clutch motors, or even the little fist-sized motors inside of domestics. However, I've been warned that they might not last as long as a clutch motor. To that I say meh, because a replacement is only about $100, and it should be easy to switch out old for new.
What Is It Good For?
One can do quite a bit with a domestic machine, especially if it's an older one. Like most things from 60-70 years ago, they're just built better. Want to make your own clothes? Unless we're talking about denim coveralls and leather coats, you're probably fine with a domestic.
We barely made it through this one on the Singer 4452.
Do you want to work with leather or canvas? Repair boat sails? Reupholster the seats in your Airstream? Don't bring a knife to a gun fight. You need an industrial sewing machine. While you might find a domestic that can go through thin leather or canvas, it will only become a point of frustration when your seams start to stack up. Like many other things in life, you should use the right tool for the job.
Here's the thing about industrials: they aren't all for heavy-duty fabrics, although that's the sort of industrial that I'm after. I want an industrial because of the muscle, and because of the seemingly endless list of materials I could sew with a heavy-duty model. I've made a lot of bags from old shower curtains and tablecloths with pretty good success, but I want to do more with upholstery material and leather, both of which are heavier and harder to sew through.
Advantages
- Durability. Industrial machines are built to run all the time for many years. Who wouldn't want that?
- Speed. Whether clutch or servo motor, these machines are fast. Some go as high as 5,000 RPM.
- Permanence. There's no putting the machine away when you're not using it. This is heavy equipment!
- Automatic features. Some industrials will cut the threads for you (yes, please!).
- Quiet , if it has a servo motor.
- Upgrade-able. Love the machine, but hate the table? Should be a one-for-one swap. Same with the motor -- it might even use the same mounting holes as the original.
Disadvantages
- Limited feature set. But this is what I want. I have my Singer domestics to do the fancy stitches.
- Heavy , hard to move, with a larger footprint. It'll be rough rearranging my room, but it's worth it.
- Noisy , if it has a clutch motor. I would love the chance to upgrade to a servo motor and hear the difference.
- Threading. Setting up the threads will be different from a domestic, and perhaps less straightforward.
- Energy-efficiency. Clutch motors are less energy-efficient than servo motors because they run all the time.
Old Machines: Maintenance and Upgrades
A Mitsubishi DU-105 industrial sewing machine. Image via Leather Worker
If you're like me (and I think you might be), you're attracted to older machines the same way you might be drawn to, say, a 60s car rather than a 90s car for your first project. You figure, I'll pay less than I would for a new one, it's almost guaranteed to be more rugged, and I won't freak out about every little scratch and ding like I would if I bought a new one.
On the other hand, a new one is new. It will come with all of its intended accessories and possibly a warranty of some kind. Its modernity will mean a better resale value if you decide that what you really want is a post-bed industrial machine so you can try your hand at making shoes.
If you can find an old mid-century industrial machine, you're more than likely going to get your money's worth. After cleaning, oiling, and greasing it, you'll probably want to upgrade a few things like the built-in light, the foot pedal's connection to the motor, and even the motor itself. And your machine might need something small but important, like a new belt.
No Soul In a New Machine?
I'm not saying that. But don't be shy about seeking out an older machine on Craiglist or something similar if you're not afraid of a little bit of upfront work. By older, I mean 1950s or 1960s. If you do want a new industrial, they're not hard to find. You can get a new Juki from the Bezos Barn for under a grand, or a Sailrite from their site for about twice that much. There's probably a sewing machine dealer in your town where you could go and try them out. And even if you can't do that, there are plenty of bag makers and leather workers out there who have made videos about their machines and why they got them, so watch a couple of those before you decide what's best for you. That's what I'm doing.
Banner Image: "Sewing Machine on Table" by dejankrsmanovic, CC BY 2.0
Thumbnail: "Industrial sewing machine" by David Hilowitz, CC BY 2.0
#hackadaycolumns #toolhacks #clutchmotor #industrialsewingmachine #servomotor #sewing #sewingmachine #upgrades
Simple Upgrades Make an Old Industrial Sewing Machine New Again
Well, this is a pleasant surprise: it seems that industrial designer [Eric Strebel] recently got a hold of an industrial sewing machine to tackle the softer side of prototyping. What doesn't surprise us is that he did some upgrades to make it more user-friendly. Check them out in the video embedded below.
So, what's the difference between a machine like this and what you might have around the house? Domestic sewing machines have a motor about the size of your fist, and it's inside the machine's body. Modern domestics can do light-duty work, but they can't handle making bags and upholstery or sewing a bunch of layers of any material together. Industrial machines have either clutch or servo motors that are easily five times the size of a domestic's motor, and are built into the table along with the machine.
[Eric] found this Pfaff 463 on Craigslist. It was built somewhere around 1950, and it only does one thing -- a single-needle, straight stitch, forward or reverse -- but it will do it through damn near anything you want (unlike those computerized hunks of plastic made for home use nowadays). Again, these machines are always built into a table, and they come with a lamp. While the machine itself may be a workhorse, the light is wimpy, so [Eric] replaced it with a goose-neck LED light that has a magnet for sticking it anywhere light is required around the machine.
No matter the size, electric sewing machines are driven with a foot pedal. On a domestic, the pedal is loose and you just put it on the floor wherever you want, but industrial foot pedals are built into the table frame. [Eric] drilled a bunch of new holes in the side of the pedal so he can move the connecting rod closer to the pivot point. This gives him better control with less footwork.
The biggest, baddest upgrade [Eric] did was to the motor. Although there was nothing wrong with the original clutch motor, it makes the machine go very fast so that garment workers can fulfill their quotas. Because of this, it's difficult to control. He upgraded to a brushless DC servo motor for greater precision and easier prototyping. He got really lucky, too, because it mounted directly into the old holes.
We agree wholeheartedly with [Eric]'s sentiment about old sewing machines, or any old machine for that matter. They tend to be overbuilt because planned obsolescence wasn't a thing yet. If you can't afford or find an industrial, an old Singer or something similar will likely serve your purpose, as long as you use the right needle.
If you already have an old domestic machine sitting around, you might be able to breathe new life into it with a 3D printer.
#toolhacks #brushlessdcmotor #clutchmotor #industrialsewingmachine #ledlight #servomotor #sewingmachine
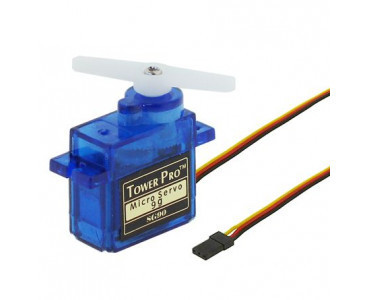
#SG09 is the #ServoMotor I used along a #Robotic demo, can you suggest others which are #OpenSource #OpenDesign #OSHW ?
#WebThingIotJs now supporting 2 more boards #STM32 #Nucleof767ZI and #IntelEdison with #PWM support useful control #ServoMotor or Buzzer

