After playing with #HomeAssistant for a couple of weeks, I have moved it to my permanent automation server. It will live along #NodeRED, #Grafana #Postres #InfluxDB nodes on #Super6C - a #ComputeModule4 cluster I dedicated to home automation:
https://notenoughtech.com/featured/24-cores-of-pure-power-deskpi-super6c/
#computemodule4
Quick video showing new features for the #eReaderHat and #eReaderCarrierBoard. This clip showcases the #raspberrypi #computemodule4 but there's another #PCB in the HAT form factor. The #hardware now supports a touchscreen, backlight, as well as a lipo battery. Pretty happy with this revision so will be working on #firmware in the near future.
Will post documentation in the thread below.
#CM4 #embedded #embeddedsystems #opensource #opensourcehardware #opensourcesoftware #eReader #eink #epaper
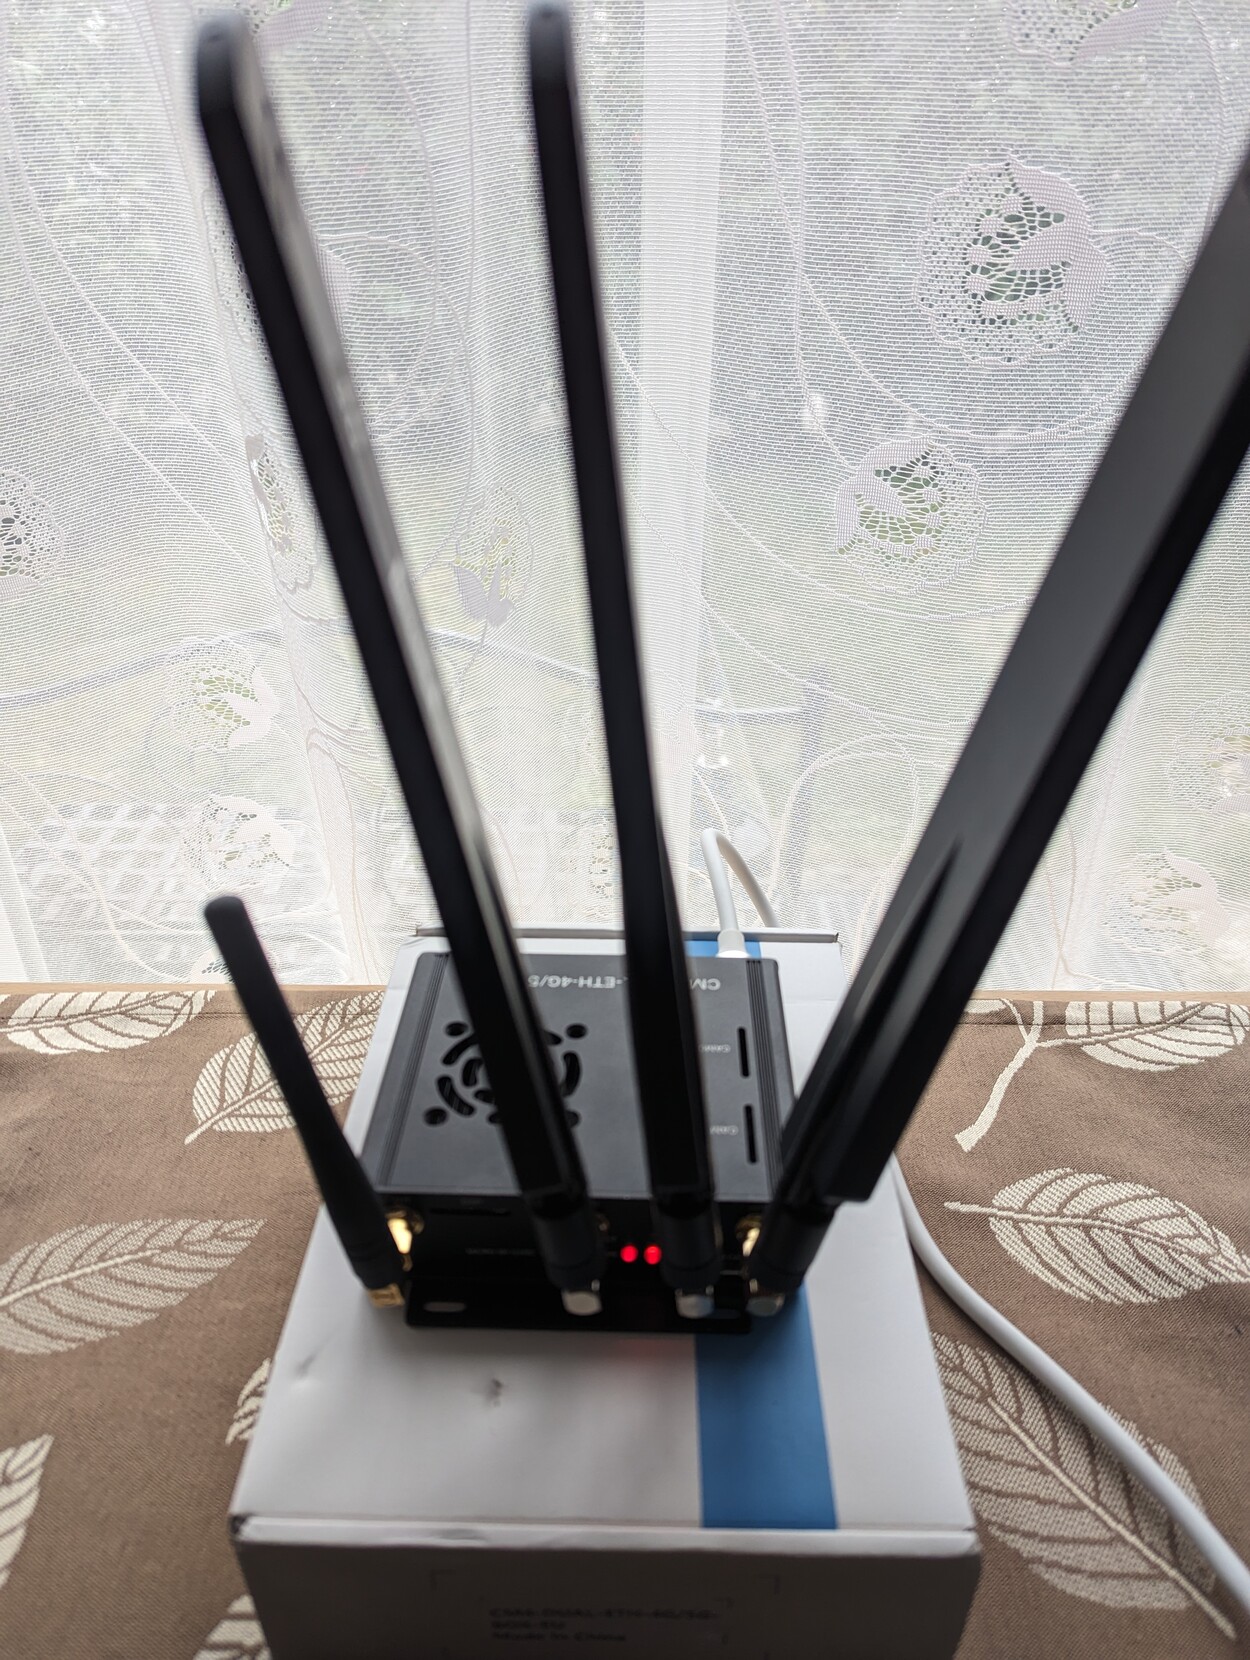
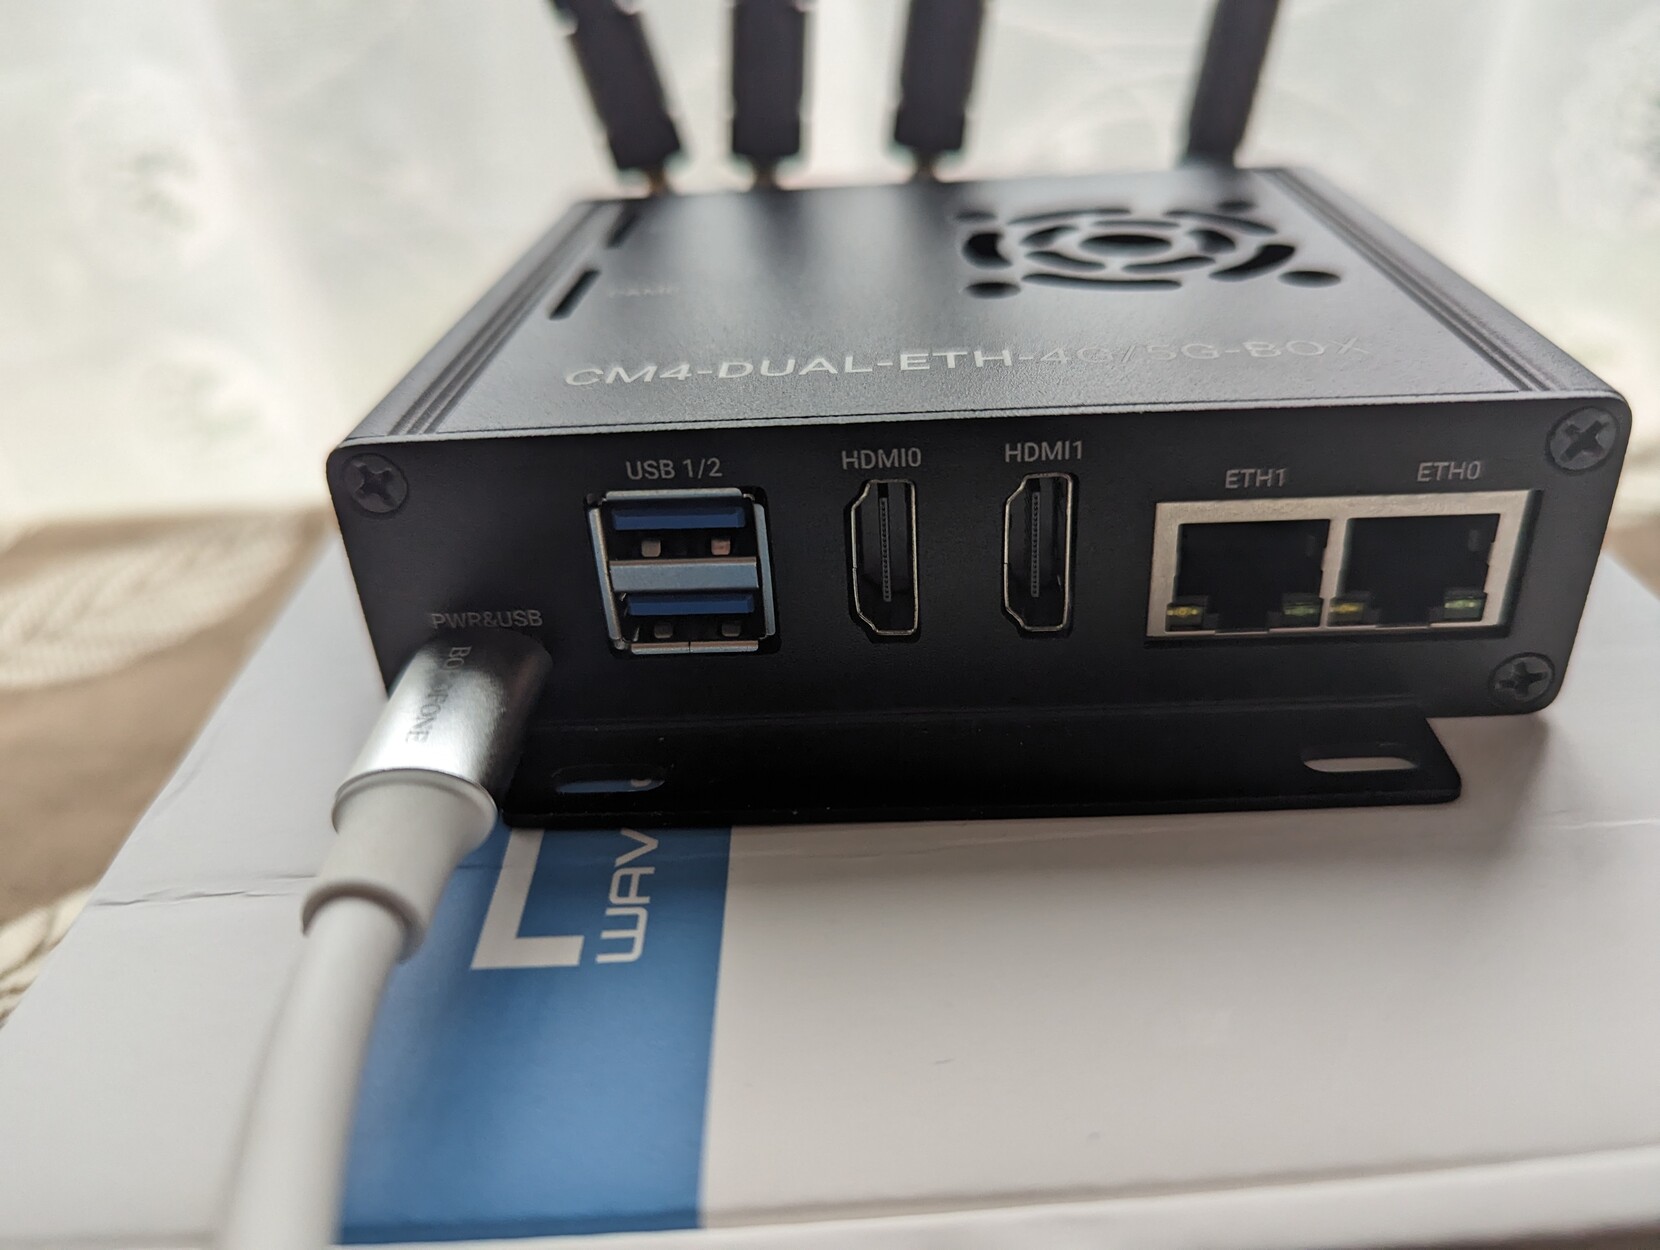
Eigentlich war ein anderer Einsatz dafür gedacht. Nun ist es ein Mobiler WLAN Access Point geworden. Werde diesen mit anderen Antennen für den Einsatz im Auto verwenden. RASPAP ist wirklich ein geniales Stück Software. Der Router verbindet sich automatisch mit dem HomeLab per Wireguard.
Preview of a Clockwork uConsole video I'm working on:
Hopefully one step closer to getting proper #PCIe support on #RaspberryPi #ComputeModule4 → https://lore.kernel.org/all/20230629015918.v4u7atl3ep3aetgj@mraw.org/
Oh ok then, it's now working.
My #raspberrypi #computemodule4 board is now fully working.
Blogpost coming soon....
Slightly mad things you can do with 24 core CPU! Find out more about #DeskPi Super6C - a very unique motherboard for #ComputeModule4
https://notenoughtech.com/raspberry-pi/24-cores-of-pure-power-deskpi-super6c/

What could you do with 24 cores and way more RAM than you probably need? I have a couple of ideas on how #DeskPi #Super6C can be used. Find out more about this pretty capable motherboard for clustering #ComputeModule4
https://notenoughtech.com/raspberry-pi/24-cores-of-pure-power-deskpi-super6c/

This little box has 24 cores and more RAM than your average PC.
Check out the #DeskPi #Super6C - a cluster bard for @raspberry_pi #ComputeModule4
https://notenoughtech.com/raspberry-pi/24-cores-of-pure-power-deskpi-super6c/
♲ @hackaday@social.gibberfish.org:
Meet the RouterPi, a Compute Module 4 Based GbE Router
#networkhacks #raspberrypi #softwaredevelopment #cm4 #computemodule4 #firewall #gbe #iptables #linux #nat #hackaday
posted by pod_feeder_v2
Meet the RouterPi, a Compute Module 4 Based GbE Router
[Zak Kemble] likes to build things, and for several years has been pining over various Raspberry Pi products with an eye on putting them into service as a router. Sadly, none of them so far provided what he was looking for with regard to the raw throughput of the Gigabit Ethernet ports. His hopes were renewed when the Compute Module 4 came on scene, and [Zak] set out to turn the CM4 module into a full Gigabit Ethernet router. The project is documented on his excellent website, and sources are provided via a link to GitHub.
A view underneath shows off the RTC, power supply, and more.
Of course the Compute Module 4 is just a module- it's designed to be built into another product, and this is one of the many things differentiating it from a traditional Raspberry Pi. [Zak] designed a simple two layer PCB that breaks out the CM4's main features. But a router with just one Ethernet port, even if it's GbE, isn't really a router. [Zak] added a Realtek RTL8111HS GbE controller to the PCIe bus, ensuring that he'd be able to get the full bandwidth of the device.
The list of fancy addons is fairly long, but it includes such neat hacks as the ability to power other network devices by passing through the 12 V power supply, having a poweroff button and a hard reset button, and even including an environmental sensor (although he doesn't go into why… but why not, right?).
Testing the RouterPi uncovered some performance bottlenecks that were solved with some clever tweaks to the software that assigned different ports an tasks to different CPU cores. Overall, it's a great looking device and has been successfully server [Zak] as a router, a DNS resolver, and more- what more can you ask for from an experimental project?
This CM4 based project is a wonderful contrast to Cisco's first network product, which in itself was innovative at the the time, but definitely didn't have Gigabit Ethernet. Thanks to [Adrian] for the tip!
#networkhacks #raspberrypi #softwaredevelopment #cm4 #computemodule4 #firewall #gbe #iptables #linux #nat
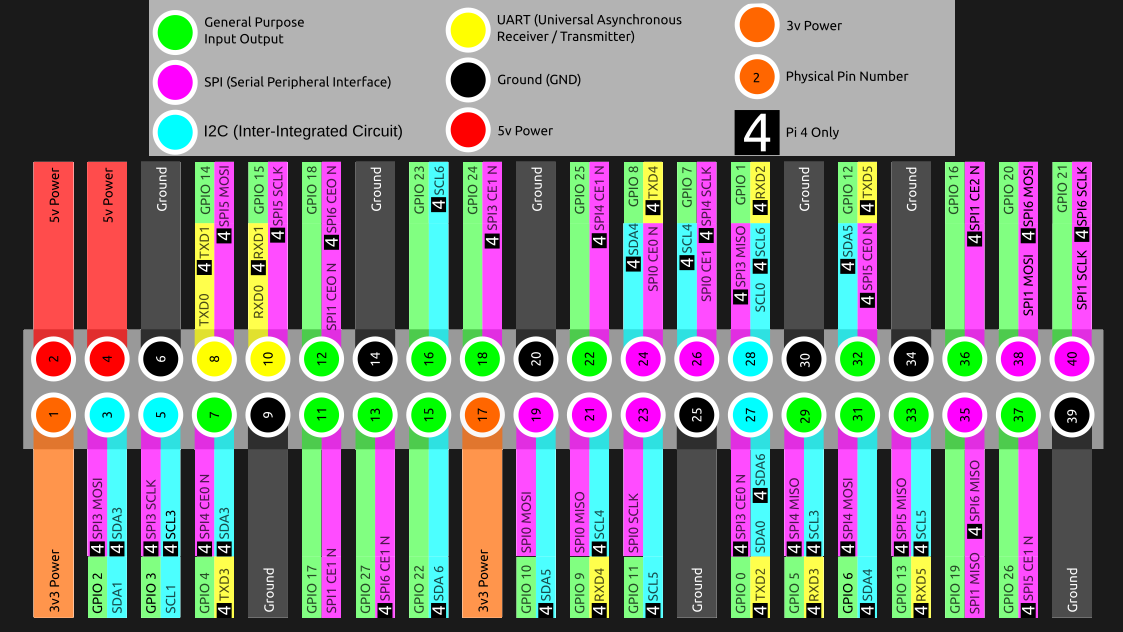
Did You Know That The Raspberry Pi 4 Has More SPI, I2C, UART Ports?
We've gotten used to the GPIO-available functions of Raspberry Pi computers remaining largely the same over the years, which is why it might have flown a little bit under the radar: the Raspberry Pi 4 has six SPI controllers, six I2C controllers, and six UARTs - all on its 40-pin header. You can't make use of all of these at once, but with up to four different connections wired to a single pin you can carve out a pretty powerful combination of peripherals for your next robotics, automation or cat herding project.
The datasheet for these peripherals is pleasant to go through, with all the register maps nicely laid out - even if you don't plan to work with the register mappings yourself, the maintainers of your preferred hardware enablement libraries will have an easier time! And, of course, these peripherals are present on the Compute Module 4, too. It might feel like such a deluge of interfaces is excessive, however, it lets you achieve some pretty cool stuff that wouldn't be possible otherwise.
Having multiple I2C interfaces helps deal with various I2C-specific problems, such as address conflicts, throughput issues, and mixing devices that support different maximum speeds, which means you no longer need fancy mux chips to run five low-resolution Melexis thermal camera sensors at once. (Oh, and the I2C clock stretching bug has been fixed!) SPI interfaces are used for devices with high bandwidth, and with a few separate SPI ports, you could run multiple relatively high-resolution displays at once, No-Nixie Nixie clock style.
As for UARTs, the Raspberry Pi's one-and-a-half UART interface has long been an issue in robotics and home automation applications. With a slew of devices like radio receivers/transmitters, LIDARs and resilient RS485 multi-drop interfaces available in UART form, it's nice that you no longer have to sacrifice Bluetooth or a debug console to get some fancy sensors wired up to your robot's brain. You can enable up to six UARTs.
How To Use These Interfaces?
Enabling these interfaces seems to be straightforward, and people on Raspberry Pi forums and other places have been test-driving them for their own endeavors. All three kinds of interfaces can be enabled using dtoverlay lines in config.txt. For SPI, the [MaSt] blog helpfully provides some examples:
# enabling SPI6 with two CS pins - one on GPIO16 and other on GPIO26 dtoverlay=spi6-2cs,cs0_pin=16,cs1_pin=26
For I2C and UART, Raspberry Pi forum threads provided a few examples. I2C example:
# Enabling I2C3, with SDA on GPIO4 and SCL on GPIO5 dtoverlay=i2c3,pins_4_5
# Enabling UART, with RTS and CTS pins (omit the 'ctsrts' part to disable them) dtoverlay=uart3,ctsrts
From here, these interfaces will appear as you'd expect them, as /dev/spi6, /dev/i2c-3 and /dev/ttyAMA* respectively. (The serial ports don't have aliases yet, so you'll get one more /dev/ttyAMA port added to existing ones.)
We were surprised to learn about these new peripherals, and maybe you were too? We can't wait to see what you'll do with them.
Main image remixed from Raspberry Pi 4 GPIO pinout diagram by [Les Pounder].
#hackadaycolumns #raspberrypi #computemodule #computemodule4 #i2c #raspberrypi4 #raspberrypicomputemodule #spi #uart
This Raspberry Pi Mini ITX Board Has Tons of IO
The Raspberry Pi now comes in a wide variety of versions. There are tiny little Zeros, and of course the mainstream-sized boards. Then, there's the latest greatest Compute Module 4, ready to slot on to a carrier board to break out all its IO. The Seaberry is one such design, as demonstrated by [Jeff Geerling], giving the CM4 a Mini ITX formfactor and a ton of IO. (Video embedded after the break.)
The Seaberry sports a full-sized x16 PCI-E port, with only 1x bandwidth but capable of holding full-sized cards. There's also four mini-PCI-E slots along the top, with four M.2 E-key slots hiding underneath. The board then has a M.2 slot in the middle for NVME drives, and x1 PCI-E slot hanging off the side.
Ports include a USB 2.0, a Cisco-style serial console port, two HDMI ports, and a Gigabit Ethernet jack. Two seperate 12V connectors are provided allowing for a redundant power supply setup, which can be made triple redundant with the addition of the right Power-over-Ethernet hardware. Naturally, the Seaberry also features the usual 40-pin GPIO header, the 14-pin CM4 IO header, as well as the usual DSI, CSI and RTC hookups.
The Mini ITX design is a particular boon. The Seaberry can easily be slapped into a mini PC case, and the power button and activity LEDs work just like you'd expect.
In testing the board, [Jeff Geerling] filled up almost every slot, trying to see how many cards will run on an Compute Module 4 with 8GB of RAM. Throwing in an NVME SSD drive, several Coral TPUs for machine learning, multiple network cards and a SATA interface caused no problems.
Not everything worked due to driver limitations, but everything enumerated on the bus just fine. [Jeff's] earlier work paid dividends here. His previous attempts trying to get GPUs working on the platform meant opening up an extended BAR space for PCI devices wasn't a problem.
Further attempts involved adding in a 12-card carrier loaded up with 7 more TPUs, 5 more WiFi cards, and 3 more NVME drives. Outside of some kernel panics from excess NVME drives, the Pi CM4 was still able to detect everything, showing it can address more than 20 PCI-E devices without major issues.
Throwing so many devices at the Pi CM4 may not have an obvious application in the mainstream, but it's sure to prove useful to someone. We're certainly enjoying watching [Jeff] push the limits of what's possible with the CM4, and we hope he gets GPUs working soon.
The Raspberry Pi CM4 Begets A Form Factor
It has become the norm for single-board computers to emerge bearing more than a passing resemblance to the Raspberry Pi, as the board from Cambridge sets the hardware standard for its many competitors. This trend has taken an interesting new turn, as a new board has emerged that doesn't sport the familiar 40-pin connector of the Pi Model B, but the more compact from factor of the Compute Module 4. The Radxa CM3 sports a Rockchip RK3566 quad core Cortex-A55 running at 2.0 GHz, and is to be made available in a variety of memory specifications topping out at 8 GB. It is hardware compatible with the Pi CM4, and should be usable with carrier boards made for that module.
We've looked at the CM4 as the exciting face of the Raspberry Pi because the traditional boards have largely settled into the same-but-faster progression of models since the original B+ in 2014. The compute module offers an accessible way to spin your own take on Raspberry Pi hardware, and it seems that this new board will only serve to broaden those opportunities. Radxa are the company behind the Rock Pi series of more conventional Raspberry Pi clones, so there seems every chance that it will reach the market as promised.
Will it make sense to buy one of these as opposed to the Pi CM4? On paper it may have some hardware features to tempt developers, but like all Pi clones it will have to bridge the software gap to be a real contender. The Raspberry Pi has never been the fastest board on the market at any given time, but it has gained its position because it comes with a well-supported and properly updated operating system. For this board and others like it that will be a tough standard to match.
Curious as to what the first Raspberry Pi form factor clone was? We think it's the SolidRun Carrier-one from 2013.
Via CNX Software.
The Compute Module Comes Of Age: Say Hello To The Real Cutting Edge Of Raspberry Pi
If we wanted to point to an epoch-making moment for our community, we'd take you back to February 29th, 2012. It was that day on which a small outfit in Cambridge put on the market the first batch of their new product. That outfit was what would become the Raspberry Pi Foundation, and the product was a run of 10,000 Chinese made versions of their very first single board computer, the Raspberry Pi Model B. With its BCM2835 SoC and 512 megabytes of memory it might not have been the first board that could run a Linux distribution from an SD card, but it was certainly the first that did so for pocket money prices. On that morning back in 2012 the unforseen demand for the new board brought down the websites of both the electronics distributors putting it on sale, and a now-legendary product was born. We're now on version 4 of the Model B with specs upgraded in almost every sense, and something closer to the original can still be bought in the form of its svelte stablemate, the Pi Zero.
How Do You Evolve Without Casualties?
The original Pi Model B+ from 2014. The form factor has had a few minor changes, but hardware-wise the Pi 4 follows this pretty closely. Lucasbosch, CC BY-SA 3.0.
The problem with having spawned such a successful product line is this: with so many competitors and copies snapping at your heels, how do you improve upon it? It's fair to say that sometimes its competitors have produced more capable hardware than the Pi of the moment, but they do so without the board from Cambridge's ace in the hole: its uniquely well-supported Linux distribution, Raspberry Pi OS. It's that combination of a powerful board and an operating system with the minimum of shocks and surprises that still makes the Pi the one to go for after all these years.
But for all that, the Pi is still a Pi with largely the same interfaces and the same PCB as it had when the original Model B received its first upgrade to a 40-pin header and 4 USB ports. How do you improve on that without breaking compatibility with nearly a decades-worth of projects? We don't have an inside line on the Pi folks' R&D thinking on a future Pi 5, but we'd like to advance the theory that they've already done so, and with a Raspberry Pi. Not the extremely cute Raspberry Pi 400 all-in-one, but the Pi 4's stripped down sibling, the Compute Module 4. Say hello to the new cutting edge of Raspberry Pi, it's where we think the most interesting hardware developments currently lie for the platform.
The original StereoPi board is a relatively rare project creating a custom board that's visibly a Raspberry Pi,using an earlier Compute Module.
There have been Raspberry Pi Compute Modules for sale since 2014 when the first one appeared as a BCM2835 on a SODIMM form factor. Since the we've seen a couple of versions with the Raspberry Pi 3's multicore BCM2837 still on a SODIMM, but it's fair to say that with a few very notable exceptions such as the StereoPi they've failed to set the world on fire for our community while the Compute Module 4 has in a short time spawned an interesting array of carrier boards.
We'd like to hazard a few guesses as to why this might be the case, among them that early Compute Module pricing wasn't tailored towards individuals, that the Zero offered a much more affordable way to find a Pi on a smaller PCB, and that while capable the Compute Module perhaps didn't offer enough extra that a regular Pi couldn't do. It made sense for the volume manufacturers it was originally aimed at, but not so much for a hardware hacker when the Pi itself was so easily available. The Compute Module 4 in its daughter board format by contrast offers easy availability and some significantly tasty extra interfaces such as the PCI Express bus that make it a far more tempting target for the experimenter than a regular Pi. When you can spin your own Pi to your specifications, why look back? Here are a few examples, should you fail to have been convinced.
A Plethora Of Ways To Spin Your Own Pi
[Timonsku]'s single-sided minimal CM4 carrier boardMaking a complex PCB can often be a daunting prospect for those of us who don't do it for a living every day, so our first CM4 board from [Timonsku] shows that a CM4 project needn't be complex at all. It's a CM4 carrier board with a full-size HDMI socket, USB-A and C ports, as well as a microSD slot. A modest specification to be sure, but what sets it apart is the PCB itself. It's a single-sided design milled with a PCB router, demonstrating that a CM4 carrier is simple enough to be created at home. Anyone really can spin up their own Pi! [Timonsku] hasn't rested on his laurels though, producing as well the Piunora, a CM4 carrier with an Arduino footprint.
This CM4 NAS carrier board brings out the PCIe interface to great effect.
In a similar vein though not quite so simple in its construction is [Arturo182]'s smallest CM4 carrier board. It's a truly minimalist design that sits on just one of the CM4's connectors and only exposes a UART, I2C, and SPI. It requires the CM4 version with on-board mass storage, but even with this limited array of interfaces it still has plenty of potential.
Staying with minimalism, the CM4's own form factor makes a handy template for [Kamil Lorenc]'s uCM4, a board the same size as the CM4 that's designed as a tiny network powerhouse. It has an Ethernet port of course, and beyond that just micro USB for power and USB2, and a microSD slot for a boot disk. With USB-OTG support we could see it becoming a mini network too accessible from a portable device, for example.
While we're on the subject of network peripherals it's worth turning to the CM4-based NAS from [mebs]. Simple NAS devices have long been a Raspberry Pi staple, and this one takes the idea to the next level with a PCIe slot holding a SATA card. This is something that finally turns Pi-based NAS boxes into something that can compete with more conventional devices, as while the USB3 on the Pi 3 offers the speed it doesn't so much offer the flexibility.
Finally in our quick round-up of CM4 projects is the StereoPi V2. We mentioned the original StereoPi earlier, and when we saw that first board we lauded it as a demonstration of how the earlier range of Compute Modules could be used to spin up a custom Raspberry Pi without the inconvenience of trying to source one of the Broadcom chips. Like the original it incorporates most of the interfaces that make a Pi a Pi, but it does so in its own compact form factor and sporting those two camera connectors that are it's raison d'etre.
We hope that having had a chance to see all these CM4 boards in one place will have convinced you that there's something in the idea of freeing yourself from the constraints of a mere Pi. We hope the Raspberry Pi folks will be watching the breadth of work done using their creation too, and will make future Compute Modules ever more accessible. Welcome to the new face of the Raspberry Pi!
Header image: SparkFun, CC BY 2.0.
Raspberry Pi With Some Serious Graphical Muscle
[Jeff Geerling] routinely tinkers around with Raspberry Pi compute module, which unlike the regular RPi 4, includes a PCI-e lane. With some luck, he was able to obtain an AMD Radeon RX 6700 XT GPU card and decided to try and plug it into the Raspberry Pi 4 Compute Module.
While you likely wouldn't be running games with such as setup, there are many kinds of unique and interesting compute-based workloads that can be offloaded onto a GPU. In a situation similar to putting a V8 on a lawnmower, the Raspberry Pi 4 pulls around 5-10 watts and the GPU can pull 230 watts. Unfortunately, the PCI-e slot on the IO board wasn't designed with a power-hungry chip in mind, so [Jeff] brought in a full-blown ATX power supply to power the GPU. To avoid problems with differing ground planes, an adapter was fashioned for the Raspberry Pi to be powered from the PSU as well. Plugging in the card yielded promising results initially. In particular, Linux detected the card and correctly mapped the BARs (Base Address Register), which had been a problem in the past for him with other devices. A BAR allows a PCI device to map its memory into the CPU's memory space and keep track of the base address of that mapped memory range.
AMD kindly provides Linux drivers for the kernel. [Jeff] walks through cross-compiling the kernel and has a nice docker container that quickly reproduces the built environment. There was a bug that prevented compilation with AMD drivers included, so he wasn't able to get a fully built kernel. Since the video, he has been slowly wading through the issue in a fascinating thread on GitHub. Everything from running out of memory space for the Pi to PSP memory training for the GPU itself has been encountered.
The ever-expanding capabilities of the plucky little compute module are a wonderful thing to us here at Hackaday, as we saw it get NVMe boot earlier this year. We're looking forward to the progress [Jeff] makes with GPUs. Video after the break.
How Do You Make a Raspberry Pi on a Stick?
We agree with [magic-blue-smoke] that one of the only things more fun than a standard Raspberry Pi 4 is the Compute Module form factor. If they are not destined to be embedded in a system, these need a breakout board to be useful. Each can be customized with a myriad board shapes and ports, and that's where the real fun starts. We've already seen projects that include custom carrier boards in everything from a 3D Printer to a NAS and one that shows we can build a single-sided board at home complete with high-speed ports.
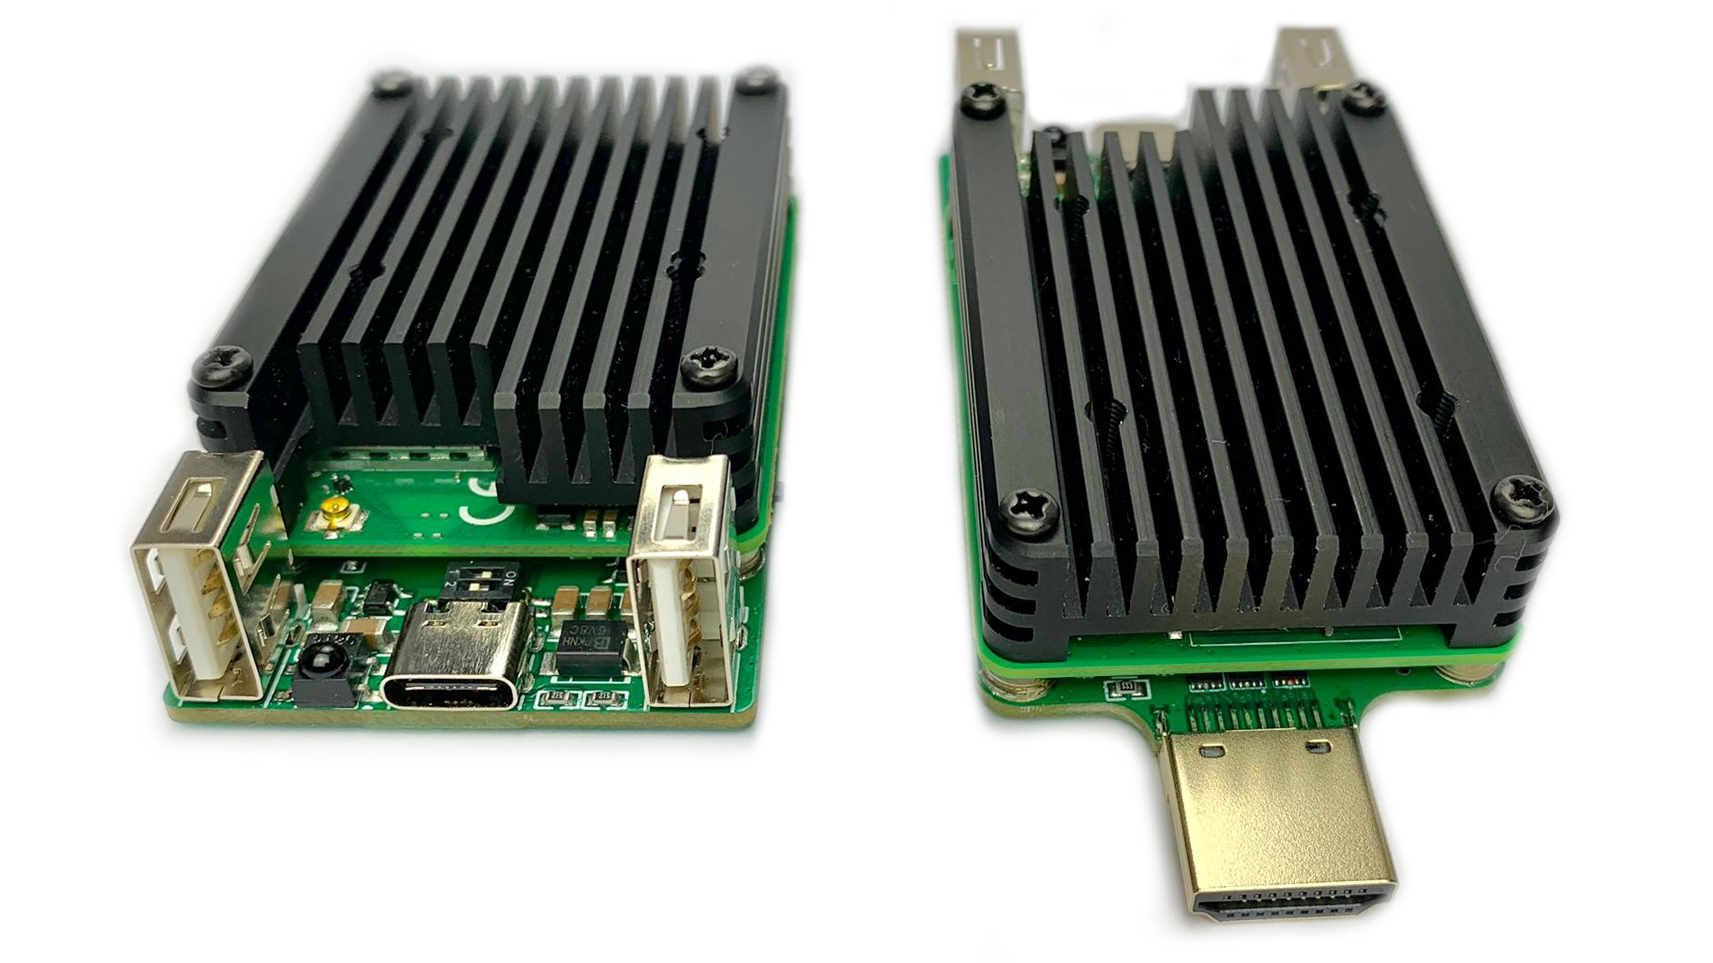
[magic blue smoke] used this ability to customize the breakout board as an opportunity to create a hackable media player "stick" with the Raspberry Pi built-in. We love that this Raspberry Pi CM4 TV Stick eliminates all the adapters and cables usually required to connect a Pi's fiddly micro HDMI ports to a display and has heat sinks and an IR receiver to boot. Like a consumer media player HDMI stick, all you need to add is power.
This seems like a super-clean way to get a media player or retro gaming on a TV or start developing your own custom smart TV without all the security concerns that come with an off-the-shelf device. But wait, there's more! [magic-blue-smoke] has already broken out 14 GPIO pins on the board for hardware hacks and plans to add connections for "Ambilight" LEDs in a future version. We'd like to see some IR LEDs to control older AV gear added too.
14 GPIO Pins, 3.3v and 5v solder pads broken out
#news #raspberrypi #ambilight #cm4 #computemodule4 #computestick #hdvideo #hdmi #mediaplayer #raspberrypicomputemodule #smarttv
Client Info
Server: https://mastodon.social
Version: 2025.04
Repository: https://github.com/cyevgeniy/lmst