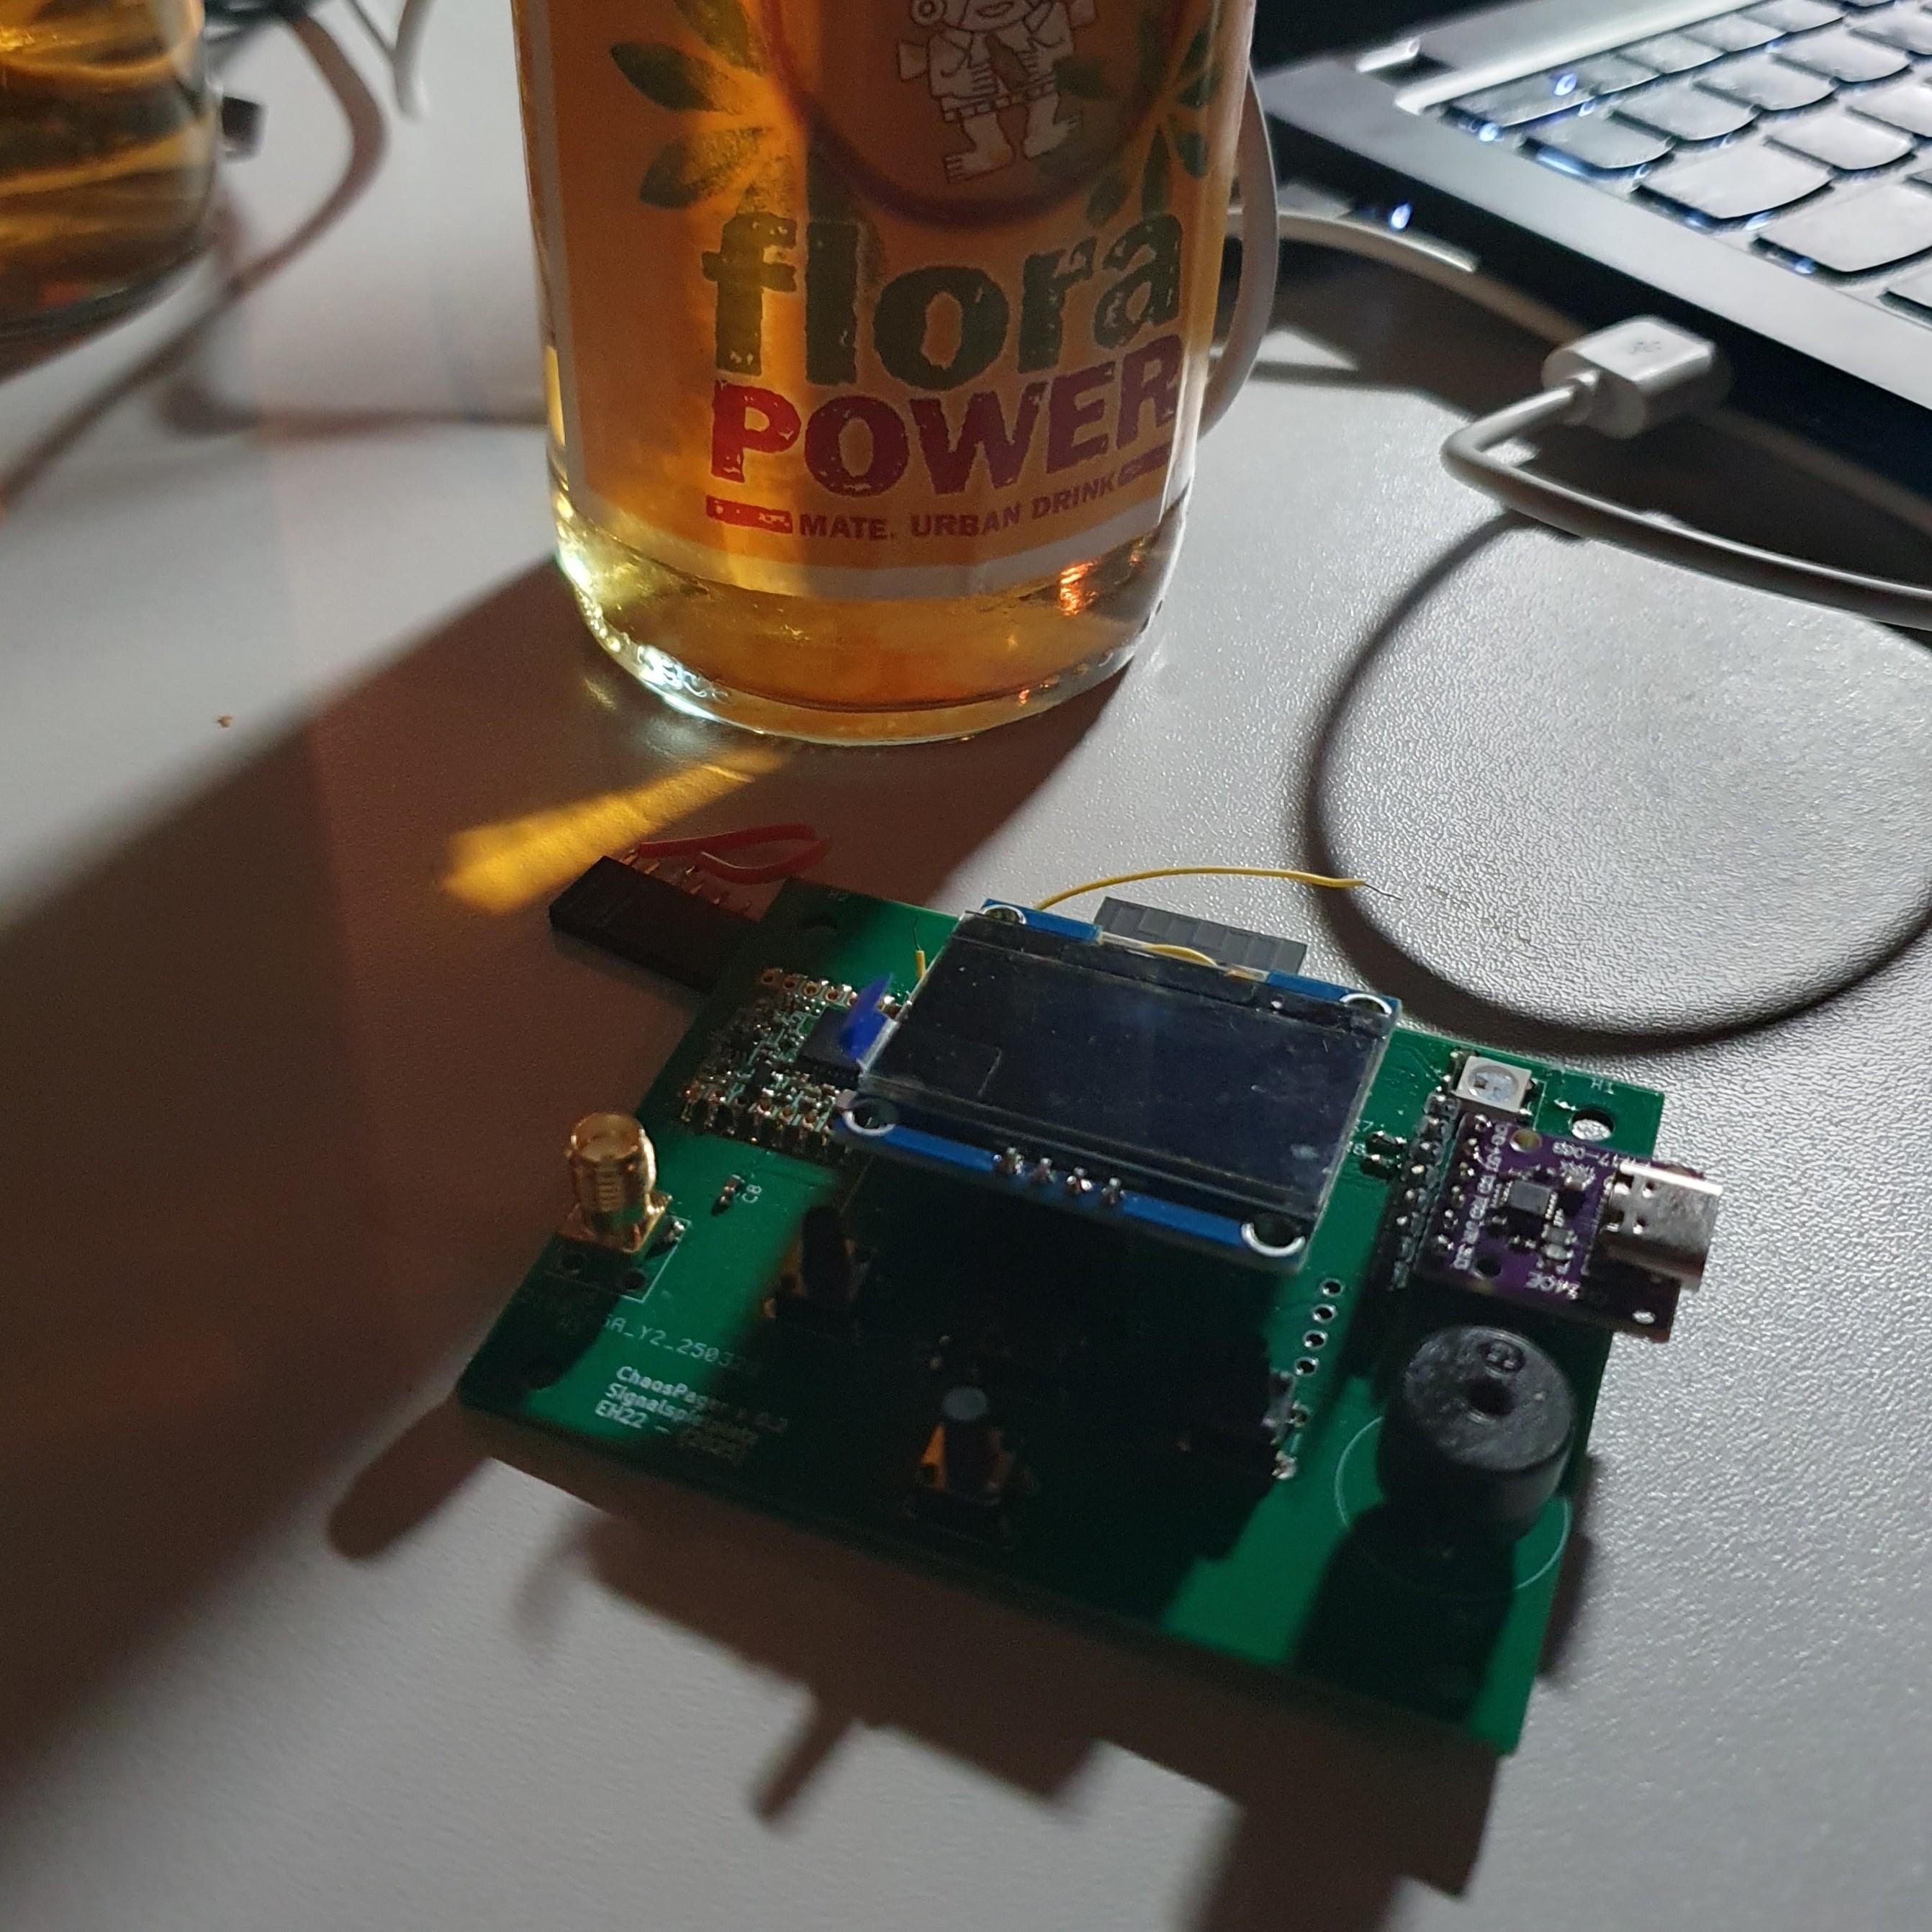
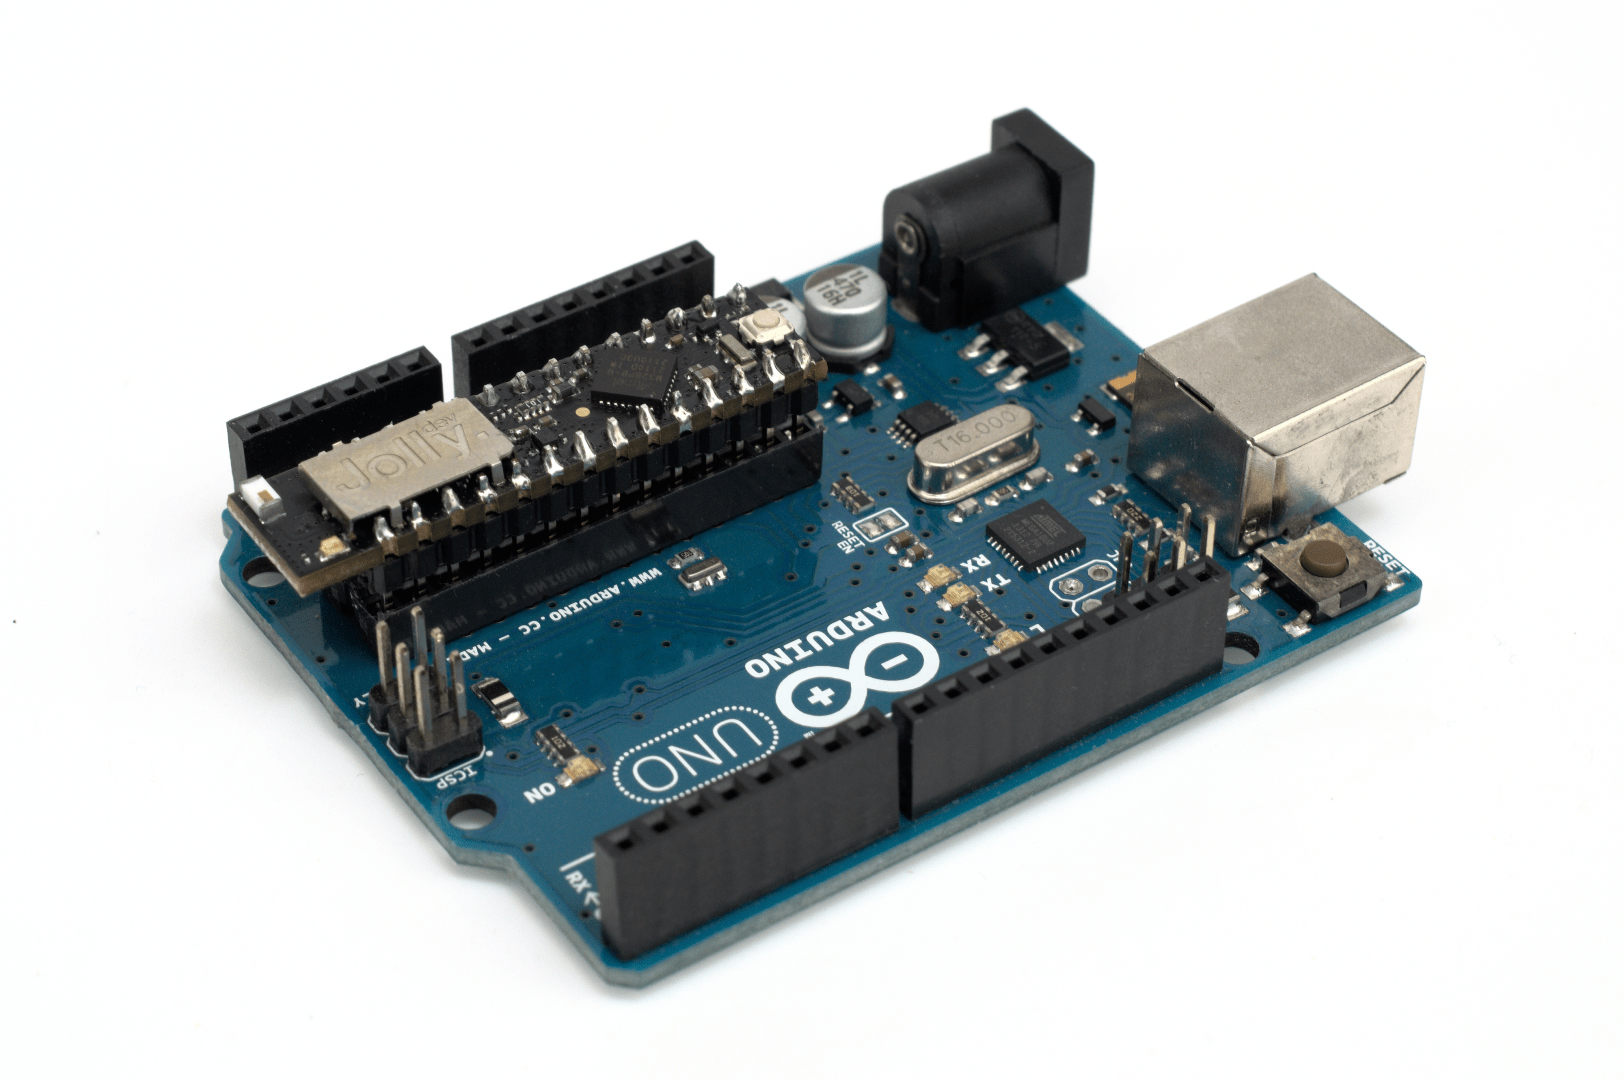
There are always more features to implement and bugs to fix ... no egg-ception even on a Sunday at #EH22
#EasterHegg #EasterHegg22 #EH22 #EasterHegg2025 #POCSAG #pager #radio #ChaosPager #firmware #coding #SoftwareDebugging #DevelopmentBoard
There are always more features to implement and bugs to fix ... no egg-ception even on a Sunday at #EH22
#EasterHegg #EasterHegg22 #EH22 #EasterHegg2025 #POCSAG #pager #radio #ChaosPager #firmware #coding #SoftwareDebugging #DevelopmentBoard
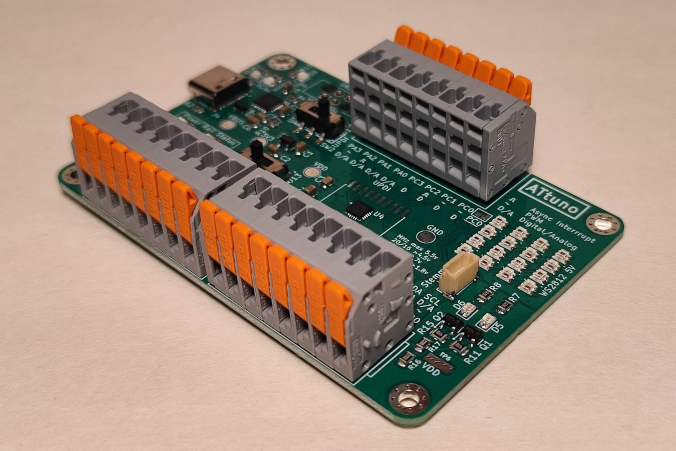
Explore the ATtiny 1 Series #TindieBlog #AVR #ATtiny #ATtuno #Wago #DevelopmentBoard
https://blog.tindie.com/2025/03/explore-the-attiny-1-series/
#HowTo use .NET on #OKMX6UL Series #DevelopmentBoard:
Our latest guide covers the necessary steps for setting up the .NET environment, compiling and running your first application, and exploring basic usage for #EmbeddedSystems development on #Linux 4.1.15. While .NET offers powerful cross-platform functionality, the guide also highlights some considerations and limitations when using .NET on lower-power devices like the OKMX6UL series.
https://www.forlinx.net/industrial-news/forlinx-okmx6ul-dotnet-usage-guide-639.html
#HowTo replace custom logo on TI 6254-C #DevelopmentBoard #LVDS Screen? 👇
This guide covers the steps for compiling the LVDS driver into the kernel, converting your logo to the proper format, and centering it on the display. Ideal for those looking to optimize the boot experience and personalize the display for their embedded systems.
🔗https://www.forlinx.net/article_view_631.html
Learn #HowTo achieve advanced routing functions on Forlinx #NXP iMX93 #DevelopmentBoard, including configuring network bridges, setting up 4G forwarding, and modifying kernel source code for efficient data communication. 👇
USB #Linux computer with 64MB RAM, 128MB flash, and a microSD card slot that supports USB gadget mode. #buildroot #arm #developmentboard
https://www.cnx-software.com/2023/06/29/popcorn-computer-popstick-29-usb-linux-computer-powered-by-an-allwinner-f1c200s-arm9-processor/
Original tweet: https://twitter.com/cnxsoft/status/1674352070672158720
.@Makerdiary nRF52840 Connect Kit is a small @NordicTweets nRF52840 board with #Bluetooth LE, #NFC, #Zigbee, and Thread connectivity. #wireless #developmentboard
https://www.cnx-software.com/2023/06/28/19-90-nrf52840-connect-kit-board-supports-bluetooth-le-nfc-zigbee-and-thread-connectivity/
Original tweet : https://twitter.com/cnxsoft/status/1673886857070014464
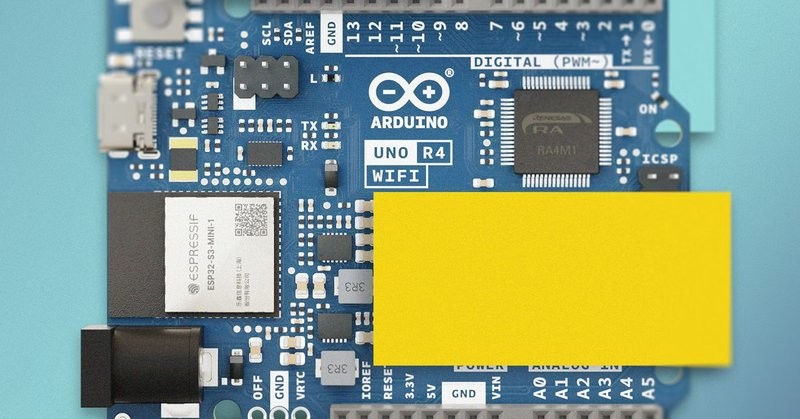
.@arduino is working on a beefier #Arduino UNO board with the UNO R4 equipped with a 48MHz @RenesasGlobal RA4M1 #Arm Cortex-M4F MCU, and an optional #ESP32-S3 #WiFi and #BLE module. #arduinoday #wireless #arduino #developmentboard
https://www.cnx-software.com/2023/03/26/arduino-uno-r4-renesas-ra4m1-32-bit-maker-board-esp32-s3-wifi-ble-module/
Original tweet : https://twitter.com/cnxsoft/status/1639926928634413057
Puya PY32 @arm Cortex-M0+ MCU should be the world's cheapest #Arm #microcontroller and also be the cheapest one with embedded flash storage. #lowcost #developmentboard #devkit
https://www.cnx-software.com/2023/02/09/8-cents-for-an-arm-cortex-m0-microcontroller-meet-puya-py32-series-mcus/
Original tweet : https://twitter.com/cnxsoft/status/1623685527529738241
.@96Boards #SBC based on a @SamsungSemiUS Exynos 850 Arm processor with 4GB RAM and 64GB storage, HDMI, WiFi, Ethernet, I/Os, and more. #android #linux #developmentboard
https://www.cnx-software.com/2023/02/01/winlink-e850-96board-sbc-samsung-exynos-850/
Original tweet : https://twitter.com/cnxsoft/status/1620641544587051009


.@MicrochipTech WBZ451 Curiosity board is based on the new PIC32CX-BZ2 #Arm Cortex-M4F MCU with a 2.4GHz radio supporting both #Bluetooth LE 5.2 and #Zigbee 3.0. #developmentboard #devkit
https://www.cnx-software.com/2022/10/27/wbz451-curiosity-board-features-microchip-pic32cx-bz2-ble-and-zigbee-3-0-microcontroller/
Original tweet : https://twitter.com/cnxsoft/status/1585489657747234816
.@dfrobotcn Beetle RP2040 is a small #RaspberryPi RP2040 board with largish soldering pads. #mcu #developmentboard
https://www.cnx-software.com/2022/09/16/beetle-rp2040-tiny-raspberry-pi-rp2040-board-easily-solderable-pads/
Original tweet : https://twitter.com/cnxsoft/status/1570670535679545344
RT from CNX Software (@cnxsoft)
.@WCH_TECH CH569 32-bit #RISCV MCU board with #USB 3.0, HSPI, and SerDes interfaces. #developmentboard
https://www.cnx-software.com/2022/08/04/hydrausb3-risc-v-mcu-board-combines-usb-3-0-with-hspi-and-serdes-high-speed-interfaces/
Original tweet : https://twitter.com/cnxsoft/status/1555198378136727553
.@MicrochipTech ATMega168PA board in #Arduino Nano form factor with CAN bus support. #developmentboard #devkit #automotive
https://www.cnx-software.com/2022/07/16/canduino-v3-a-microchip-atmega168pa-board-with-can-bus-arduino-nano-form-factor/
Original tweet : https://twitter.com/cnxsoft/status/1548234180105871360
Pine64 has unveiled the PineSound #developmentboard based on Bestechnic BES2300 Bluetooth audio MCU with the goal of eventually launching PineBuds TWS #earbuds and PinePod digital #audio player. #lowpower #sdk #wearables
https://www.cnx-software.com/2022/04/16/pinesound-development-board-for-earbuds-and-digital-audio-players/
Original tweet : https://twitter.com/cnxsoft/status/1515182981404819457
Using Fishing Wire To Hold In Pin Headers Is A Nifty Trick
Working on a breadboard, one can get used to the benefits of being able to readily plug and unplug jumper wires to reconfigure a project. One could only dream of doing so with PCBs, right? Wrong! [Stewart Russell] recently shared a tip on Twitter on how to do just that, with the help of a little fishing wire.
The wire can be neatly threaded through the board to enable quick hookups.
The trick is simple: on any old development board that uses 0.1″ pitch headers, simply weave some fishing line through the plated through-holes in the PCB. Then, regular jumper wires can be inserted just like on a breadboard. The fishing wire has just enough give to allow the jumper wires to be jammed in, holding them steady and in good contact, while still allowing them to be easily removed.
[Hackspace Magazine] has raved about the trick, noting great success using 0.38 mm fishing line. Alternative methods involve using toothpicks, though we suspect solution is likely messier and less reliable.
If you've got your own tricks for prototyping quickly using development and breakout boards, be sure to share them below in the comments. Alternatively, send your best stuff to us on the tipsline!
#toolhacks #developmentboard #header #headerpins #jumperwire #pcb #pinheader
While the price of electronic paper has dropped considerably over the last few years, it's still relatively expensive when compared to more traditional display technology. Accordingly, we've seen a lot of interest in recovering the e-paper displays used in electronic shelf labels and consumer e-readers from the likes of Amazon, Barnes & Noble, and Kobo. Unfortunately, while these devices can usually be purchased cheaply on the second hand market, liberating their displays is often too complex a task for the average tinkerer.
Enter the Inkplate. With their open hardware ESP32 development board that plugs into the e-paper displays salvaged from old e-readers, the team at e-radionica is able to turn what was essentially electronic waste into a WiFi-enabled multipurpose display that can be easily programmed using either the Arduino IDE or MicroPython. The $99 Inkplate 6 clearly struck a chord with the maker community, rocketing to 926% of its funding goal on Crowd Supply back in 2020. A year later e-radionica released the larger and more refined Inkplate 10, which managed to break 1,000% of its goal.
For 2021, the team is back with the Inkplate 6PLUS. This updated version of the original Inkplate incorporates the design additions from the Inkplate 10, such as the Real-Time-Clock, expanded GPIO, and USB-C port, and uses a display recycled from newer readers such as the Kindle Paperwhite. These e-paper panels are not only sharper and faster than their predecessors, but also feature touch support and LED front lighting; capabilities which e-radionica has taken full advantage of in the latest version of their software library.
With its Crowd Supply campaign recently crossing over the 100% mark, we got a chance to go hands-on with a prototype of the Inkplate 6PLUS to see how e-radionica's latest hacker friendly e-paper development platform holds up.
Room to Grow
The average Hackaday reader is well aware of the capabilities the ESP32 brings to the table: right out of the box you've got an impressively powerful processor, WiFi and Bluetooth connectivity, and some of the best power saving features available on a hobby microcontroller. It's a perfect candidate for the sort of tasks most folks would want to do with an electronic paper display, and e-radionica were smart to make it the centerpiece of their product. They even sprung for the ESP32-WROVER version, with an expanded 8 MB of RAM.
Of course, if all you wanted was an ESP32 plugged into an e-paper display, you could get a module from somebody like Waveshare and be done with it. Which is why e-radionica included so many extra features on the Inkplate 6PLUS. You don't need to wire in an external SD reader, because one's already there. Need an RTC? All you have to do is slot in a battery. They even included a lithium ion charge controller and a connector for a battery pack, should you want to roll your very own e-reader.
Hungry for more? As you'd expect, the ESP32's I2C interface can be used to connect up various sensors or even secondary displays should you need them for your project. But if you're worried about the notoriously limited GPIO on the ESP32, don't be. Since the Bill of Materials for the board already included a sixteen channel MCP23017 IO expander that the microcontroller needed to interface with the e-paper display, e-radionica decided to add another one in for good measure.
All of the pins for the secondary MCP23017 are broken out along the edge of the Inkplate 6PLUS, giving you plenty of breathing room for future expansions. The standard width pin header even includes ground and 3.3 V lines, which should make it easy to put together daughterboards which plug right into the back of the display.
Legendary Performance
Even though it's arguably the star of the show, I won't spend much time talking about the 1024 x 758 e-paper display on the Inkplate 6PLUS. That's because anyone who's used a first or second generation Kindle Paperwhite has already seen it. While it might be a couple revisions behind the screen used in the current generation Kindle, it's still a fantastic display. This isn't some hokey panel from a nameless eBay seller, it's literally the same screen that once graced the world's most popular e-reader.
<https://hackaday.com/wp-content/uploads/2021/06/inkplate6p_video.mp4>
Images and text are crisp, and the lightning-fast partial refreshes really complement its touch capabilities. While full screen refreshes still take a beat or two, the panel is more than up to the challenge of displaying dynamic data and interactive menus.
Hit the Ground Running
Between e-radionica's thoughtful board design and industry standard display technology, there's no denying that the hardware here is excellent. But in this community, that's only half the battle. If you want to succeed, you've got to have competent open source libraries, plenty of example code, and documentation that's clear enough for absolute beginners to understand but still deep enough to satisfy the hardcore hackers.
On all those fronts, I'm happy to say e-radionica has delivered. Getting the display running with the Arduino IDE is about as quick and easy as humanly possible: just add the URL for the board definitions, install the Inkplate library through the browser, and flash one of the examples. Depending on your operating system you might have to install drivers for the board's CH340 USB-to-serial converter, but that's it. At the time of this writing the MicroPython module for the 6PLUS was not available, but looking at the process for getting it up and running on the previous Inkplates, it looks like it won't be much more difficult to get going.
Browsing through the official documentation uncovers a wealth of resources, such as a complete API reference for the Arduino and MicroPython environments, and tools like the web-based GUI designer or image converter can really help jump start your project. Even if you've never worked with an e-paper display or touch screen before, the team has made sure you have everything you need to bring your idea to life.
A Worthy Investment
While overall I found the Inkplate 6PLUS hardware and software to be extremely impressive, I did notice a few odd quirks. The board would often fail to reboot itself after having new code flashed, and on several occasions went into a sort of rapid boot loop. The screen is also inverted in the current version of the library, requiring you to add display.setRotation(2) at the top of each program to get it into the proper orientation. But these are really very minor quibbles, and considering this is still prototype hardware, it's entirely possible these issues will be resolved before it starts shipping to backers.
If there's any real fault with the Inkplate 6PLUS for most people, it's going to be the price. At $159 it's a tough sell for those just looking to dip their toes in the water, but in truth, that's not necessarily a bad thing. If all you want to do is add a little e-paper weather display to your desk, this probably isn't the product for you. Just grab a cheap 2.13 module from eBay and plug it into the header on a Pi Zero, there's plenty of prior art to get you started.
But if you want a serious electronic paper development platform that's fully open source and scalable to whatever project you could come up with down the line, you'd be hard pressed to find a better option than the Inkplate 6PLUS at any price.
#featured #kindlehacks #microcontrollers #reviews #developmentboard #eink #epaper #ereader #ewasterecycling #electronicpaper #esp32 #kindle
An ESP32 Development Board For Sailors
[Matti Airas] wanted to have a better electronics platform for making his boat smarter, more connected, and safer. He found traditional marine electronics expensive and not suited for hacking and tinkering. There was also the issue of lack of interoperability between device generations from the same supplier and between different brands. This led him to design the Sailor Hat with ESP32 -- a marine specific, open source hardware development board.
Applications include all kinds of sensor and control interfaces for the boat, such as measurement of fuel or water level, engine RPM, anchoring chain length counter, or setting up smart lighting or smart refrigeration control. The board is designed to work with the traditional NMEA 2000 standard, as well as with Signal K. NMEA 2000 is standardized as IEC 61162-3, but isn't open source or free. Signal K, on the other hand, is free and open source, and can co-exist alongside NMEA 2000.
The marine environment can be pretty harsh with extremes of temperature, rain, humidity, condensation and vibration. Boats, just like automobiles, have a notoriously noisy electrical environment and [Matti] has paid special attention to noise and surge suppression throughout the board. The board can work with either 12 V or 24 V bus systems since the on board DC-DC converter is rated up to 32 V input. Connections between the board and the outside world need to be very robust, so it is designed to accept various types of connectors depending on how robust you want it to be.
The Sailor Hat is based around a standard ESP32-WROOM-32 module. Interfaces include a CAN bus transceiver, opto-coupled input and output, I2C, 1-wire and QWIIC interfaces, USB Micro-B programming conector, plus a couple of buttons and LEDs. All of the ESP32 GPIO pins are terminated on a GPIO header, with jumper options to disable terminations to the standard interfaces and instead route them to the GPIO header as needed. Additionally, there's a generous prototyping area to add additional hardware to the board. Hardware design files are hosted on the project repository on GitHub.
On the software side, there are several frameworks that can be used, with PlatformIO, SensESP, ESPHome and Visual Studio Code being the recommended choices. Or you could use any of the widely available SDK's for the ESP32 platform -- Espressif SDK, Arduino Core for ESP32, MicroPython, NodeMCU or Rust.
[Matti]'s NMEA 2000 USB gateway example is a good way to get a grip on hardware assembly and software installation required to build a practical project using the Sailor Hat. The board is designed to withstand a harsh electrical environment. But it's mechanical installation obviously requires greater care if it has to survive marine applications. The Sailor Hat can be installed in commonly available, 100x68x50 mm or larger plastic waterproof enclosures, rated for IP65 or higher. The bulkhead connectors and cable glands also need to be appropriately rated, and the enclosure may possibly need a IP68 rated ventilation plug to take care of environmental cycling within the enclosure.
#transportationhacks #boats #developmentboard #esp32 #esp32wroom32 #marineelectronics #nmea2000 #signalk