Who owns your virtualization stack?
https://virtualize.sh/blog/who-owns-your-virtualization-stack/
#xcpNG
@stefano@bsd.cafe reblog status of @gyptazy@gyptazy.com:
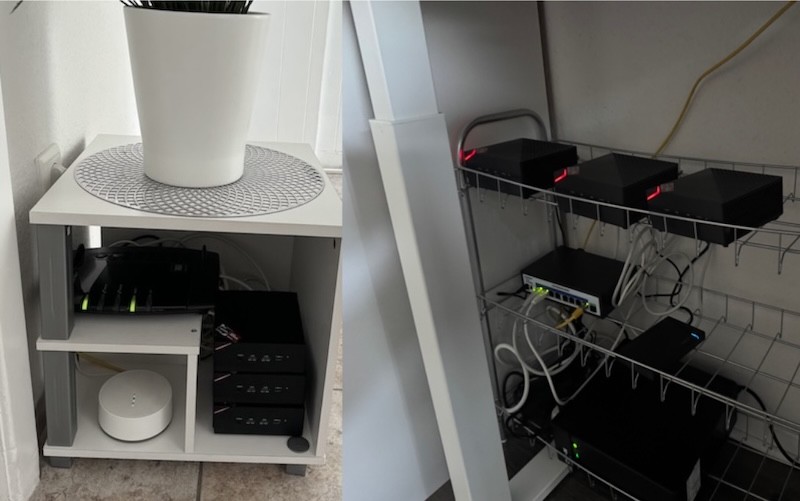
My wifey approved #homelab had to move...
The reason is easy - you can probably already guess that there might be some thermal problems raising on the left picture. It resulted into permanently spinning & annoying fans. Also the temperatures went a way too high. So, easy solution - everything moved into a metal shoe rack under my working desk. From ~80°C CPU temperature it dropped to ~65°C without spinning fans.
#Proxmox #ProxmoxVE #Labs #Network #Lab #XCPng #FreeBSD #DevOps #IPv6
I am looking for a simple self-host, without much maintenance.
It would need to host a local network share in RAID1 or similar
A Windows VM for test purposes
A Wireguard docker container.
I have played with TrueNAS and Unraid, but all seems... off. Would XCP-ng hypervisior with 2 VMs make sense? A Windows for testing, and then a VM for hosting share and docker (could be TrueNAS)?
What do you miss in #Proxmox or #XCPng?
My customers often told me, that when migrating from #VMware based setups, they would miss something like #DRS. As a result I published #ProxLB as a load balancer. Now, I do the same for #DPM and also some other things. What do you miss or what stops you or your business from switching to Proxmox or XCPng?
#virtualization #hypervisor #cloud #vms #homelab #features #opensource #coding
So, I wrote another thing. Deploying Kubernetes automatically with Terraform and Ansible on XCP-NG.
https://godfrey.online/posts/automate_k8s_cluster_deployment_with_terraform_ansible_on_xcp-ng/
Installing XCP-NG on Apple Hardware
XCP-NG is an open source hypervisor platform; an operating system and tools to run virtual machines on a pool of computers, with a powerful web-based management interface. The hypervisor is based on Xen, with extensions to allow it to be managed by a CLI or the XenOrchestra web UI. If you’re familiar with VMware ESXi you’ll pick up XCP-NG very quickly.
XCP-NG will run on most x86 hardware, including those older Intel Apple computers you may have lying about that can be repurposed to set up a home lab or similar.
However, getting XCP-NG (either of the two long term supported versions 8.2.1 or the newer 8.3) installed and running may cause you problems, as the installer will always finish with what appears to be a fatal error. Typically it’s something like:
An unrecoverable error has occurred. The error was:Failed to run efibootmgr: Could not prepare Boot variable: No such file or directory
Not encouraging, right? But don’t worry, we can fix this. There are four steps to recover and get everything running the way it should be. But some serious things have failed that could leave you scratching your head: that root password you set during installation? Gone. The storage space for VMs you configured? Not there. Timezone and keyboard preferences? Forgotten.
First, shut down the computer and disconnect the installation USB. You won’t need it again, and having an extra disk attached might cause confusion. Then, switch on the computer and get ready with your finger hovering over the “e” key on your keyboard. As soon as the Grub loader menu appears, hit “e” and start using the cursor keys to move through the boot argument string. Look for “ro”; change that to “rw init=/sysroot/bin/sh”. What does that do? Instead of booting with the root partition in read-only mode, we’re going to mount it read-write (so we can make changes) and instead of running init to start the usual boot sequence, we’re just going to drop straight into a command shell. Hit C-x to save and continue booting.
When you get to the root shell prompt “#”, type the following commands:
chroot /sysrootpasswdThe first changes the environment for later commands to use the /sysroot jail, so that commands, shared libraries etc. can all be found. If you get strange errors that libc.so can’t be found, you forgot this step. The second lets us set the root password. Enter it twice, make a note of it and remember this process if you ever forget the root password again and need to reset it.
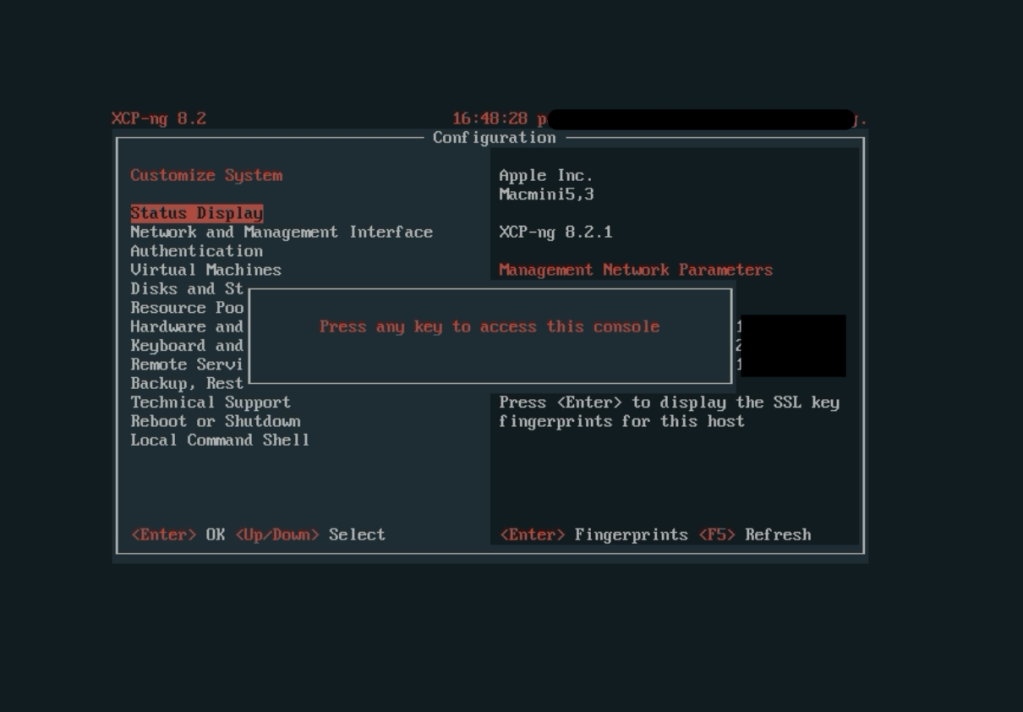
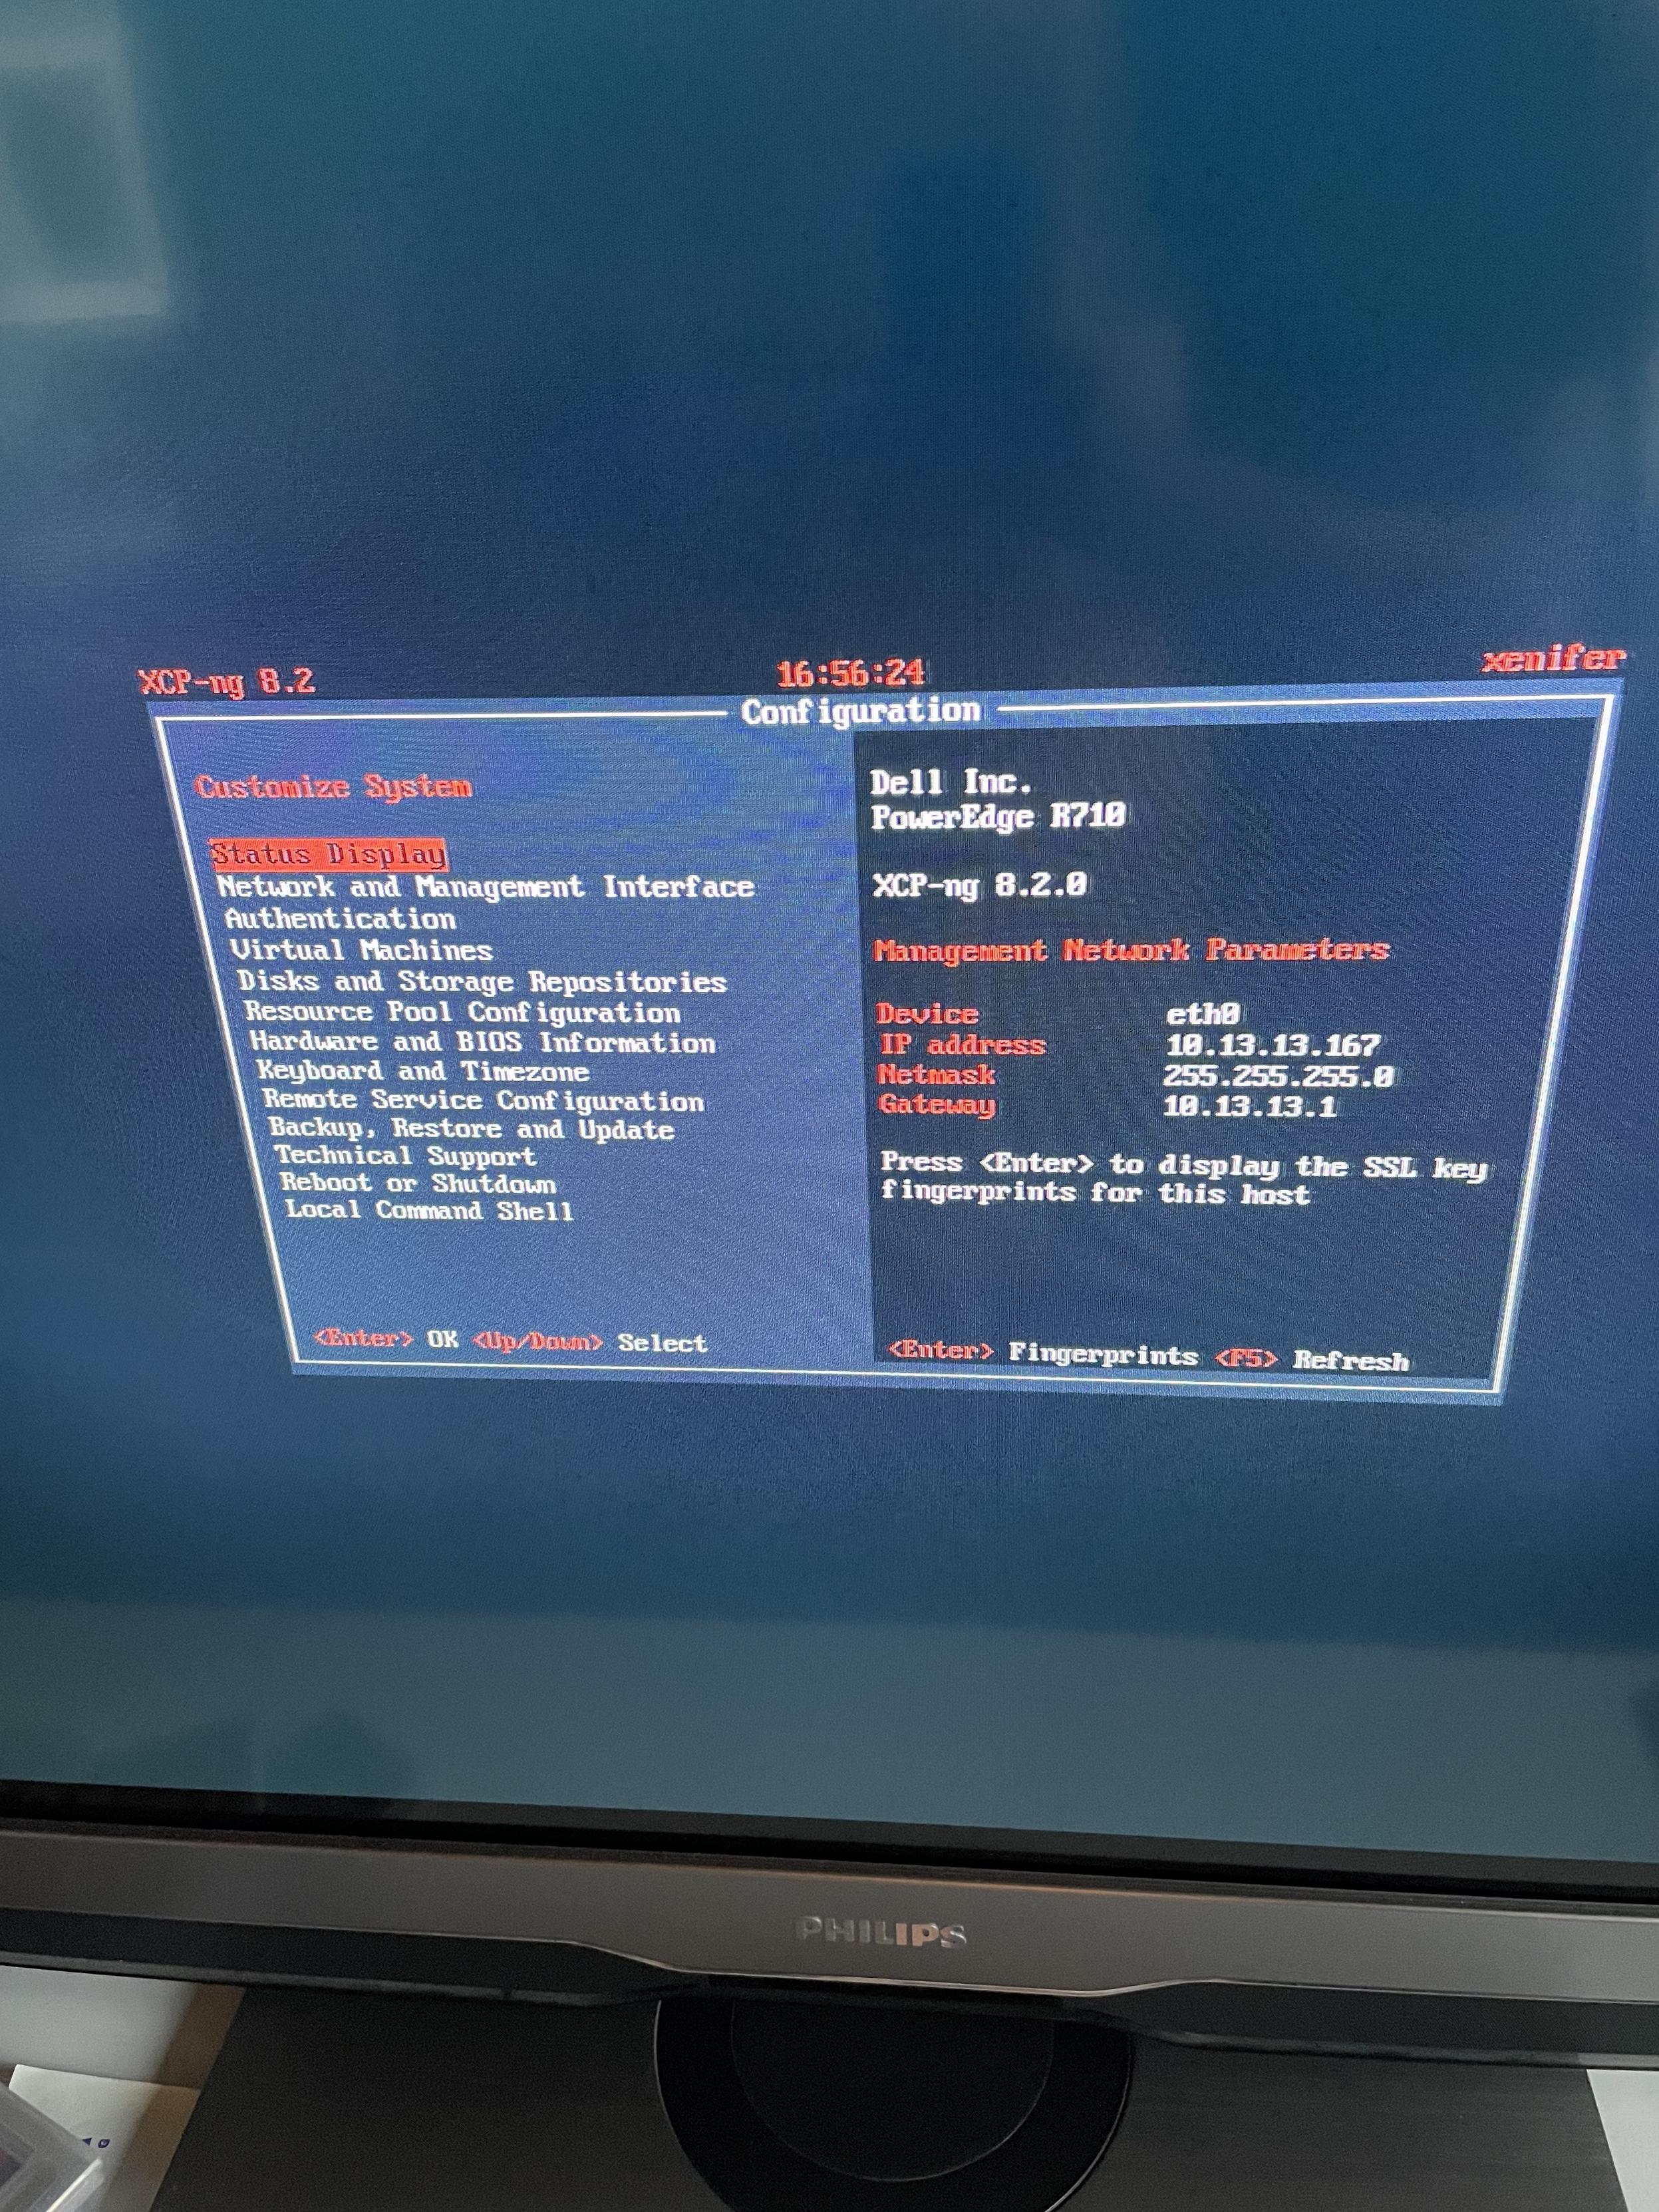
The usual commands to reboot won’t work as they talk to init, but there’s no init process running, just our shell. You might find Ctrl-Alt-Del lets you reboot; I usually resort to the power switch at this point. Turn it off and back on again. This time, let it boot up normally until you see the console screen:
Use the arrow keys, Enter and Escape to navigate the menus. Check the Network and Management Interface details are correct, if they are, you can probably ssh in if that’s more convenient. If you need to make changes you’ll be prompted for the root password you just set.
Next go to Keyboard and Timezone and pick the correct keyboard layout and timezone from the drop down lists.
The final problem is the trickiest bit. The system needs at least one SR (storage repository) to store VMs in. You probably remember during the installation phase being asked if you wanted it for thin provisioning (ext) or thick provisioning1. Without that, you’re a bit stuck, as you can’t set up any VMs, and the best way to manage XCP-NG is through XenOrchestra (usually XOA – the XenOrchestra Appliance), which you’d normally provision as the first VM on your server. You can create the missing SR(s) from the command line, by following the XCP-NG documentation. I did that once, years ago, and I didn’t take any notes. It’s not hard, just tedious and you’ll probably want to ssh in from another computer so you can copy and paste all the long UUID strings.
XenOrchestra is often deployed as the XOA appliance, but it’s just a web application and there’s a handy script to download the community edition sources and build it here: https://github.com/Jarli01/xenorchestra_installer
You’ll need a pre-existing x86 Debian/Ubuntu machine somewhere. If you don’t have one of those already, but you’ve got a new Apple Silicon Mac, you can install UTM and set up a Debian VM there. Just download a Debian or Ubuntu image from the Gallery, then follow the instructions for building XenOrchestra Community Edition above. I don’t think it works reliably on ARM/Apple Silicon yet, so you’ll need an Intel VM, hence using UTM.
One of the great things about XO is you can have multiple installations all talking to the same pool of hypervisor hosts, and can manage them from anywhere. It’s always useful to have a spare XO somewhere to let you manage your pool, so even though this XenOrchestra installation is a temporary bootstrapping step, I’d recommend keeping it around in case you ever need it again.
Log in to your new XenOrchestra web application, using the IP address of the computer you installed it on. The default login is “admin@admin.net” and the password is “admin”, you’ll want to change both of those at some point, but don’t worry about it just now.
Look down the list of options down the left hand side until you find “New”, and choose “Server” from the menu. Fill in the boxes – Label is the name you gave your server, but it can be anything meaningful. The address is the IP address of your server, username is “root” and the password is the root password you set above. Hit Connect, then approve the connection with the self-signed certificate. You can now manage your XCP-NG server easily.
Next go back to New and this time choose Storage. From here we are going to create the missing SR(s). Choose your Host from the pop-up list at the top, give your SR a name (eg “Primary” or literally anything meaningful – don’t worry too much about names for things in XCP-NG, they’re only for your benefit, underneath the system uses UUIDs, so you can rename everything at any time). Give the SR a description, again this is just extra information for you, so “Storage for VMs” will do. Choose the storage type; I recommend EXT for now, you can experiment with the other types later, then put in the device name to use.
If your Mac had only one internal drive the device is very likely “/dev/sda3”, but you should probably check. Log in to your server, either on the console or via ssh and use parted to check the partitions. One of them should be a very large unused one that uses up the rest of the disk. The installer usually leaves that as partition 3. If your Mac had multiple drives you’ll need to check whether you installed on sda or sdb. If your Mac had a Fusion drive (with a combined HDD and SSD) and you installed on the smaller, faster SSD, it’s probably sdb.
Click the Create button, and wait a minute. If you had a second internal drive, go back and repeat the process above for that other drive. You can just use the whole drive so “/dev/sda” or “/dev/sdb” will work.
You’ve now got a fully functional XCP-NG installation. Maybe go to Home / Pools / Patches and install any missing patches, followed by a restart before you start setting up VMs, then just follow Vates’ documentation to install an XOA appliance on your server and start setting up other VMs, access to any NFS or SMB shares you’ll be using to store installation ISOs or backups and set up your backup policy.
- With Thin Provisioning, VMs take up as much space on disk as they are actually using, so virtual hard disks will grow as they fill up. With Thick Provisioning all the space allocated for a virtual hard disk is reserved in one go. Thin provisioning lets you pack more VMs on and makes them way more efficient to copy and move around. Thick provisioning stops VMs from growing and filling up space unexpectedly and is better suited to remote virtual disk storage solutions such as iSCSI, where you’re probably using a SAN. ↩︎
Je valide complètement #XCP-ng, qui tourne en prod depuis des années. C'est du Xen, nickel pour de la virtualisation edge.
RE: https://bsky.app/profile/did:plc:q742xr3ifxaixgvikmecdgfa/post/3liwcdozxlk2s
We are live now! Join us on Zoom or YouTube
Today we Have Tom Lawrence with a presentation about XCP-ng
https://www.mug.org/2025/01/mug-meeting-tuesday-feb-11-2025-virtualization-with-xcp-ng-tom-lawrence/
https://zoom.us/j/92135910114?pwd=MDJhOWxIT0swOGRLRHZwNUYvL3c1Zz09
https://www.youtube.com/live/Z8w4ctmk6qY?si=eCnuJCr3zN1X9fEY
Hey #homelab users!
You probably already know me by my free @BoxyBSD project and I often got asked about IPv4 addresses. Currebtly, I tinker with a new but also honestly not free service. The idea is creating a static IP service for homelab users. I'm aware that there're already some around, so what could be some benefits here?
- Static single #IPv4 & #IPv6 /48 (so you can subnet your homelab to several /64 without breaking #slacc)
- Bigger subnets (IPv4: /29, /28, /27 | IPv6: /32)
- Full RIPE personalization (inc. abuse & Co)
- #OpenVPN, #Wireguard, #GRE Support
- Auto configure (e.g., you load the wireguard config on any client and the addresses Arena immediately bound to that interface)
- Split usage / multiple tunnels: Use different IPs from your subnets at different locations
- Integration into #BoxyBSD
- Location in Germany or Netherlands (selectable)
- Hosted on redundant #FreeBSD nodes
Pricing:
- The starter package probably around 10€/month (not more) + 15€ setup including 2T traffic
- Pricing for addiriinal/larger subnets not yet sure, probably higher setup fees to avoid hoppers and spamers to keep the addresses clean
- Optional traffic packages (when exceeding speed Limit of 10Mbit which should still be ok for most homelabs)
World this be interesting? Im aware that many ones already do this by VPS themselves, so this might just be a bit easier and optionally offering whole networks including RIPE personalizations.
#hosting #Server #kubernetes #Lab #homelab #home #homelabs #homelabcommunity #homelabnetworking #network #networking #tunnel #tunnelbroker #proxmox #XCPng #Virtualisation #virtualization #traffic #BGP
2024 Shook Up the Virtualization Market, Opening Opportunities for Open Source Solutions!
Let's have a look at the details including #Proxmox, #XCPng, #Harvester, #bhyve in #FreeBSD and other ones!
@dexter the things regarding #XCPng are unfortunately completely wrong in the call. Not only about the updates and licenses - you don’t need any license at all and can run completely opensource.
I’m not sure if Patrick had a deeper look into the things. Also you can of course configure LACP with VLANs - even on the UI. I’m not sure if the concept got understood in the right way…
I'm mostly talking about #Proxmox (#ProxLB) & #XCPng - but keep in mind, there're also other ones. Here, we have #OpenStack which is much more complicated but also more powerful! A blog post follows soon!
In my recent blog posts you already found: #bhyve, #CloneOS & #Harvester.
Virtualization - How’s it going? My personal and the @BoxyBSD infrastructure will be shifted. By the end of the year a multi geo located setup (Germany, France, Canada) takes place - running on #XCPng and I’m really excited.
#XCP including #Orchestra perfectly fits my requirements. Not being that nit-picky about latencies also allows me to include nodes located on the other site of the world. @olivier is doing great with XCP!
A blog post why I moved from #bhyve -> #Proxmox -> XCPng follows!
Yep, that’s unfortunately different here and one of the most important features that must be given. I can’t tell more than 6k users why I need to shutdown their VMs almost weekly.
Next to #Proxmox (you maybe also might want to have a look at my #ProxLB project (https://github.com/gyptazy/ProxLB) which brings in some enterprise features from VMware like DRS and Storage DRS), there are also #XCPng (based on #Xen) or Harvester (based on #RKE and #Kubevirt). However, I’m not a big fan of longhorn and Harvester will start supporting external storage as boot bold with 1.3 which is expected to be available in Q1/2025
So what are #FreeBSD folks doing for multi-node, high availability file systems? I looked at #Gluster, but that doesn't work. I'm starting to look at #minio, but it's an S3-oriented API.
So what are #FreeBSD folks doing for multi-node, high... #xcpng #alpinelinux #selfhosted #freebsd
Client Info
Server: https://mastodon.social
Version: 2025.04
Repository: https://github.com/cyevgeniy/lmst