[2025-04-12] Perché i vivi non ricordano... GLI OCCHI DI. Letture e presentazione progetto @ Circolo Arci Ribalta https://balotta.org/event/perche-i-vivi-non-ricordano-gli-occhi-di-letture-e-presentazione-progetto #spoonriverresistente #frequenzepartigiane #presentazione #antifascismo #liberazione #resistenza #istoreco #letture #memoria #ribalta #vignola #modena #storia #teatro #libri #libro #arci #rfa
#vignola
Perché i vivi non ricordano... GLI OCCHI DI. Letture e presentazione progetto
Circolo Arci Ribalta, sabato 12 aprile alle ore 19:30 CEST
𝐒𝐚𝐛𝐚𝐭𝐨 𝟏𝟐 𝐀𝐩𝐫𝐢𝐥𝐞
✮ 𝐈𝐧 𝐨𝐜𝐜𝐚𝐬𝐢𝐨𝐧𝐞 𝐝𝐞𝐥𝐥'𝟖𝟎° 𝐀𝐧𝐧𝐢𝐯𝐞𝐫𝐬𝐚𝐫𝐢𝐨 𝐝𝐞𝐥𝐥𝐚 𝐋𝐢𝐛𝐞𝐫𝐚𝐳𝐢𝐨𝐧𝐞 𝐝𝐚𝐥 𝐍𝐚𝐳𝐢𝐟𝐚𝐬𝐜𝐢𝐬𝐦𝐨 ✮
𝐈𝐧𝐢𝐳𝐢𝐨 𝐨𝐫𝐞 𝟐𝟏.𝟎𝟎
✦ 𝐏𝐫𝐞𝐬𝐞𝐧𝐭𝐚𝐳𝐢𝐨𝐧𝐞 𝐝𝐞𝐥 𝐩𝐫𝐨𝐠𝐞𝐭𝐭𝐨 "𝐆𝐥𝐢 𝐨𝐜𝐜𝐡𝐢 𝐝𝐢". 𝐏𝐞𝐫𝐜𝐡é 𝐢 𝐯𝐢𝐯𝐢 𝐧𝐨𝐧 𝐫𝐢𝐜𝐨𝐫𝐝𝐚𝐧𝐨.
✦ 𝐋𝐢𝐯𝐞 𝐫𝐚𝐝𝐢𝐨𝐟𝐨𝐧𝐢𝐜𝐨 𝐝𝐢 𝐅𝐫𝐞𝐪𝐮𝐞𝐧𝐳𝐞 𝐏𝐚𝐫𝐭𝐢𝐠𝐢𝐚𝐧𝐞 𝐜𝐨𝐧 𝐥𝐞 𝐬𝐭𝐨𝐫𝐢𝐞 𝐫𝐚𝐜𝐜𝐨𝐥𝐭𝐞 𝐞 𝐬𝐜𝐫𝐢𝐭𝐭𝐞 𝐝𝐚 𝐀𝐫𝐭𝐮𝐫𝐨 𝐁𝐞𝐫𝐭𝐨𝐥𝐝𝐢 𝐞 𝐥𝐞 𝐥𝐞𝐭𝐭𝐮𝐫𝐞 𝐝𝐢 𝐆𝐫𝐞𝐭𝐚 𝐒𝐜𝐚𝐠𝐥𝐢𝐨𝐧𝐢.
✦ 𝙄𝙣 𝙘𝙤𝙡𝙡𝙖𝙗𝙤𝙧𝙖𝙯𝙞𝙤𝙣𝙚 𝙘𝙤𝙣 𝘼𝙉𝙋𝙄 𝙑𝙞𝙜𝙣𝙤𝙡𝙖.
ⓘ 𝙄𝙣𝙜𝙧𝙚𝙨𝙨𝙤 𝙤𝙛𝙛𝙚𝙧𝙩𝙖 𝙡𝙞𝙗𝙚𝙧𝙖 𝙨𝙚𝙣𝙯𝙖 𝙏𝙚𝙨𝙨𝙚𝙧𝙖 𝘼𝙧𝙘𝙞
𝙋𝙐𝙉𝙏𝙊 𝙍𝙄𝙎𝙏𝙊𝙍𝙊 𝙙𝙖𝙡𝙡𝙚 𝙤𝙧𝙚 𝟏𝟗.𝟑𝟎 𝙘𝙤𝙣 𝘾𝙧𝙚𝙨𝙘𝙚𝙣𝙩𝙞𝙣𝙚 & 𝙑𝙞𝙣𝙤.
"𝐆𝐥𝐢 𝐨𝐜𝐜𝐡𝐢 𝐝𝐢" è 𝙪𝙣 𝙥𝙧𝙤𝙜𝙚𝙩𝙩𝙤 𝙥𝙧𝙤𝙢𝙤𝙨𝙨𝙤 𝙙𝙖 𝙄𝙨𝙩𝙤𝙧𝙚𝙘𝙤 𝙥𝙚𝙧 𝙧𝙞𝙘𝙤𝙧𝙙𝙖𝙧𝙚 𝙥𝙚𝙧𝙨𝙤𝙣𝙚 𝙙𝙞𝙢𝙚𝙣𝙩𝙞𝙘𝙖𝙩𝙚 𝙙𝙖𝙡𝙡𝙖 𝙜𝙧𝙖𝙣𝙙𝙚 𝙨𝙩𝙤𝙧𝙞𝙖, 𝙦𝙪𝙚𝙡𝙡𝙖 𝙙𝙚𝙜𝙡𝙞 𝙎𝙩𝙖𝙩𝙞, 𝙙𝙚𝙞 𝙜𝙤𝙫𝙚𝙧𝙣𝙞, 𝙙𝙚𝙜𝙡𝙞 𝙚𝙨𝙚𝙧𝙘𝙞𝙩𝙞. 𝘼𝙧𝙩𝙪𝙧𝙤 𝘽𝙚𝙧𝙩𝙤𝙡𝙙𝙞 𝙝𝙖 𝙨𝙘𝙧𝙞𝙩𝙩𝙤 𝙧𝙖𝙘𝙘𝙤𝙣𝙩𝙞 𝙗𝙞𝙤𝙜𝙧𝙖𝙛𝙞𝙘𝙞 𝙙𝙞 𝙪𝙤𝙢𝙞𝙣𝙞 𝙚 𝙙𝙤𝙣𝙣𝙚 𝙘𝙝𝙚 𝙨𝙞 𝙨𝙤𝙣𝙤 𝙤𝙥𝙥𝙤𝙨𝙩𝙞 𝙖 𝙛𝙖𝙨𝙘𝙞𝙨𝙢𝙤, 𝙜𝙪𝙚𝙧𝙧𝙚 𝙚 𝙞𝙣𝙜𝙞𝙪𝙨𝙩𝙞𝙯𝙞𝙚, 𝙙𝙖𝙣𝙙𝙤 𝙫𝙤𝙘𝙚 𝙖𝙡𝙡𝙚 𝙫𝙞𝙩𝙚 𝙘𝙝𝙚 𝙨𝙞 𝙘𝙚𝙡𝙖𝙣𝙤 𝙙𝙞𝙚𝙩𝙧𝙤 𝙖𝙞 𝙡𝙤𝙧𝙤 𝙨𝙜𝙪𝙖𝙧𝙙𝙞. 𝙄𝙡 𝙩𝙞𝙩𝙤𝙡𝙤 𝙙𝙞 𝙦𝙪𝙚𝙨𝙩𝙖 "𝙎𝙥𝙤𝙤𝙣 𝙍𝙞𝙫𝙚𝙧 𝙧𝙚𝙨𝙞𝙨𝙩𝙚𝙣𝙩𝙚" 𝙥𝙧𝙚𝙣𝙙𝙚 𝙞𝙨𝙥𝙞𝙧𝙖𝙯𝙞𝙤𝙣𝙚 𝙙𝙖𝙡𝙡𝙖 𝙘𝙚𝙡𝙚𝙗𝙧𝙚 𝙘𝙖𝙣𝙯𝙤𝙣𝙚 𝙙𝙞 𝘿𝙖𝙣𝙞𝙚𝙡𝙚 𝙎𝙚𝙥𝙚 "𝙋𝙚𝙧𝙘𝙝é 𝙞 𝙫𝙞𝙫𝙞 𝙣𝙤𝙣 𝙧𝙞𝙘𝙤𝙧𝙙𝙖𝙣𝙤 𝙜𝙡𝙞 𝙤𝙘𝙘𝙝𝙞 𝙙𝙞...". 𝙄 𝙧𝙖𝙘𝙘𝙤𝙣𝙩𝙞 𝙗𝙞𝙤𝙜𝙧𝙖𝙛𝙞𝙘𝙞 𝙨𝙤𝙣𝙤 𝙙𝙞𝙨𝙥𝙤𝙣𝙞𝙗𝙞𝙡𝙞 𝙨𝙪𝙡 𝙨𝙞𝙩𝙤: https://www.gliocchidi.it/
https://balotta.org/event/perche-i-vivi-non-ricordano-gli-occhi-di-letture-e-presentazione-progetto

#IonicColumn
#Flutes have a different configuration in the #IonicOrder than they do in the #DoricOrder. In #Doric, the flutes run right next to each other, dividing the circumference of the column into 24 equal sectors, or 15° each.
In #Ionic, there is a small gap between the flutes. This gap used to vary, but over time, Ionic designers seemed to have settled and standardized the measurements by splitting 15° in 4:1 ratio, giving 12° to a flute and 3° to the gap between flutes.
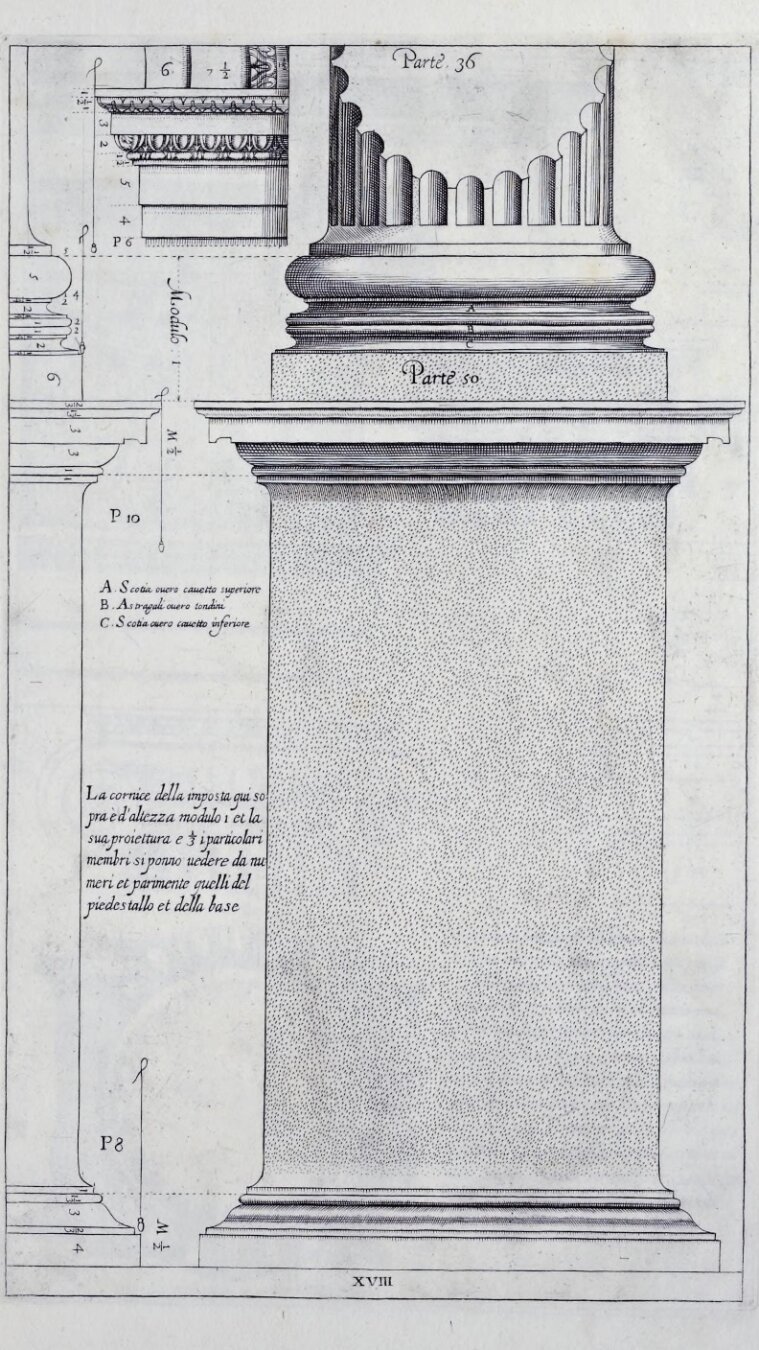
Because of this standardization, there would seem to be little room for variants, but there is. In his #RegolaArchitettura [see https://archive.org/details/gri_33125008229458/page/n37/mode/2up], #Vignola documented flutes with hemispherical tops but flat bottoms, as shown in the image here.
However, it is acceptable to have hemispheres at both top and bottom as long as they are consistently used within a #colonnade or #arcade.
Flute geometry is interesting. Just like the #IonicColumn #shaft, a flute also gradually tapers as it rises from bottom to top. Additionally, it bends along the shaft surface due to #entasis [see https://pixelfed.social/p/Splines/791794072490907090]. In other words, flutes hug the column shaft.
Unlike other decorative elements like #eggsAndDarts and #3StrandBraids, flutes are #subtractive, not #additive to the rest of the design. In other words, we have to carve the flutes out instead of adding them to the design.
#Flutes have a different configuration in the #IonicOrder than they do in the #DoricOrder. In #Doric, the flutes run right next to each other, dividing the circumference of the column into 24 equal sectors, or 15° each.
In #Ionic, there is a small gap between the flutes. This gap used to vary, but over time, Ionic designers seemed to have settled and standardized the measurements by splitting 15° in 4:1 ratio, giving 12° to a flute and 3° to the gap between flutes.
Because of this standardization, there would seem to be little room for variants, but there is. In his #RegolaArchitettura [see https://archive.org/details/gri_33125008229458/page/n37/mode/2up], #Vignola documented flutes with hemispherical tops but flat bottoms, as shown in the image here.
However, it is acceptable to have hemispheres at both top and bottom as long as they are consistently used within a #colonnade or #arcade.
Flute geometry is interesting. Just like the #IonicColumn #shaft, a flute also gradually tapers as it rises from bottom to top. Additionally, it bends along the shaft surface due to #entasis [see https://pixelfed.social/p/Splines/791794072490907090]. In other words, flutes hug the column shaft.
Unlike other decorative elements like #eggsAndDarts and #3StrandBraids, flutes are #subtractive, not #additive to the rest of the design. In other words, we have to carve the flutes out instead of adding them to the design.
#Braids #3StrandBraids
After we #sweepOneRail with the blue #sweepingCurve on the orange #railCurve for the #braid strand, we cap #planarHoles to get a single #airtight strand.
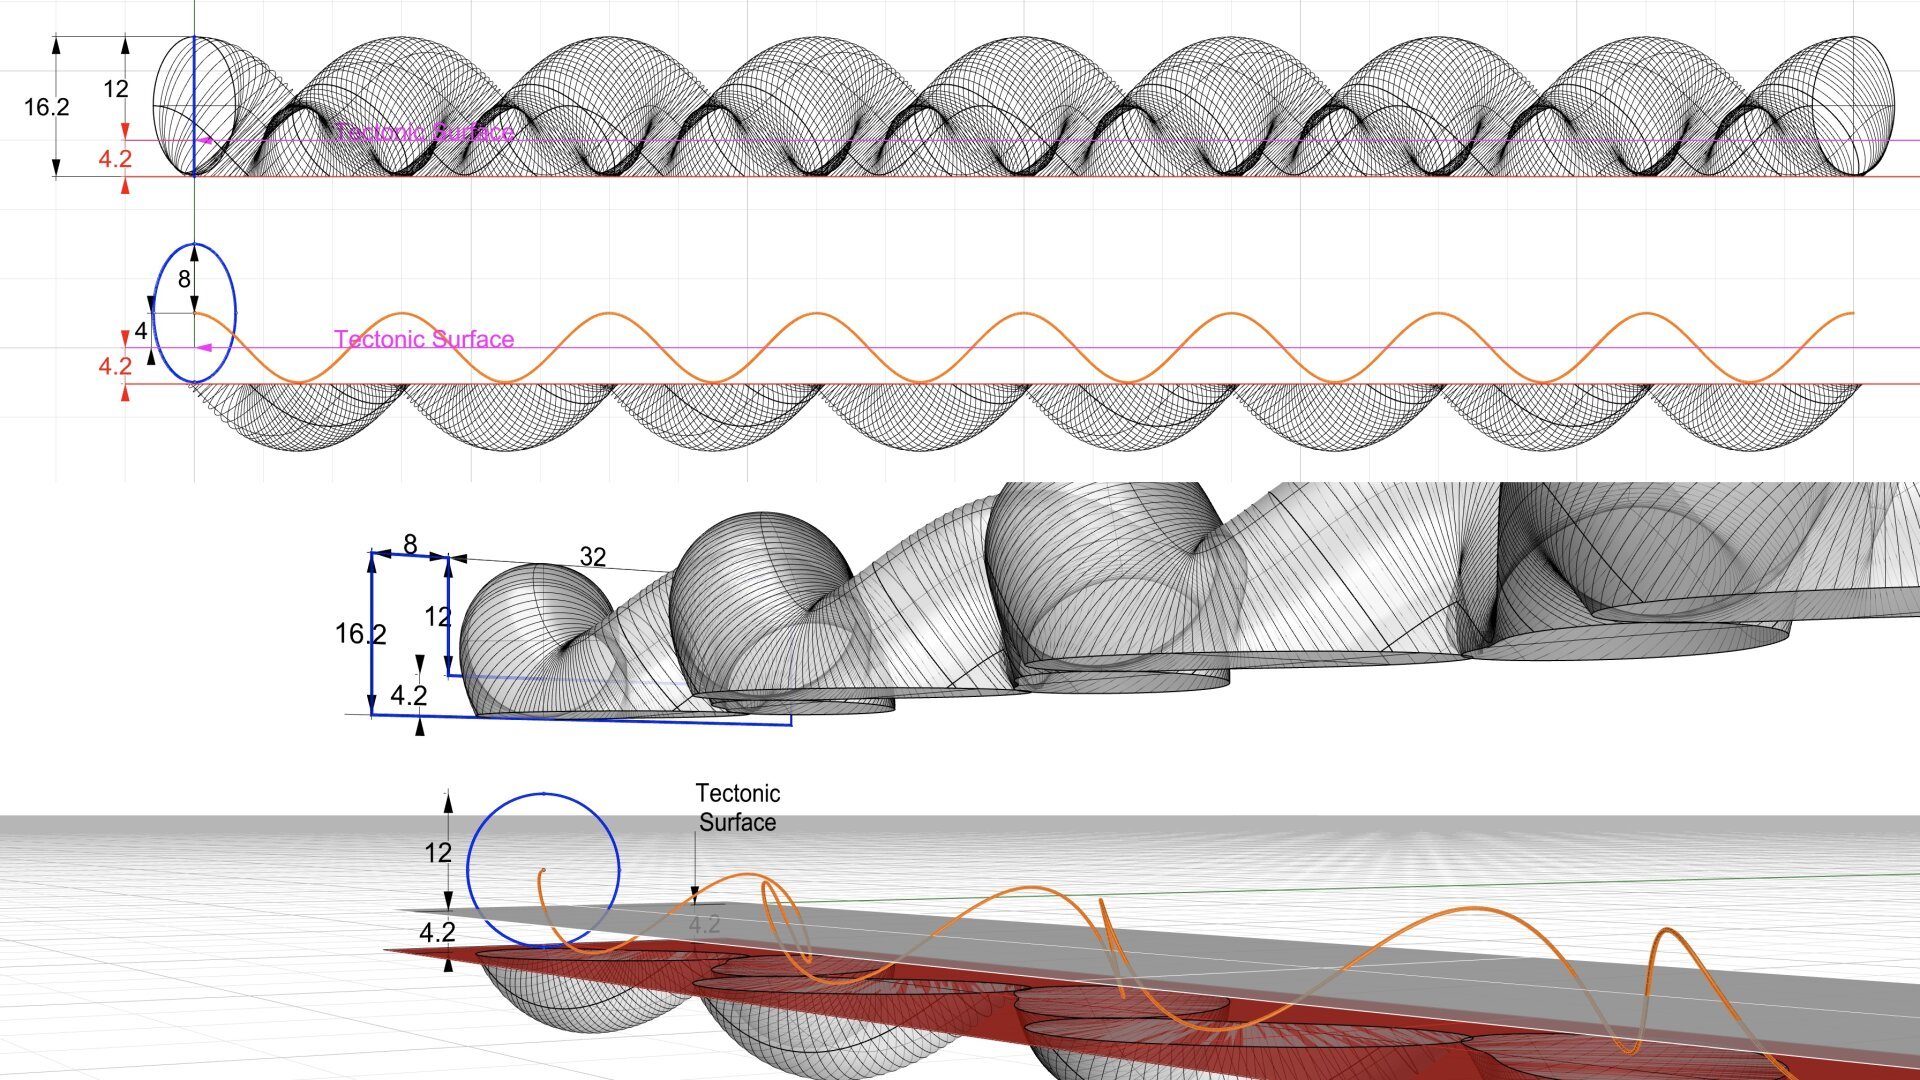
As described in https://pixelfed.social/p/Splines/798015349727305297, the radius of the blue circle is 8 units, and the total height of a strand swept by that circle is 24 units. Half of that is above the #tectonic surface, which is still twice of what #Vignola documented in #RegolaArchitettura.
We will apply #nonuniformScaling in the Z direction to reduce the height in half while keeping the length (X) and width (Y) the same. But before we do that we split and discard some of the bottom portion of the strand that is below the tectonic surface and is not needed.
The top half of the figure shows the front view of a single strand. The bottom shows the perspective view of the same strand.
Note that the orange braid rail starts at the center of the blue sweeping circle which looks like an ellipse in the front view. The orange rail itself looks like a flat sinusoid in the front view, but its beautiful meandering shape is really apparent in the perspective view.
The orange rail curve is centered on the "ground" or XY plane, which is also where the #tectonicSurface for the braid is. The amplitude of the orange curve (maximum or minimum from axis of the curve) is 4 units. We need to preserve the geometry of the strand at least up to the bottom of the orange rail.
If we split the strand exactly at 4 units below the ground plane, we hit a limit that not all #CAD tools are able to handle. To get around, we extend it past that limit by an arbitrarily small fraction, like 0.2, and discard the portions below. We could have extended it by 0.1 or 0.3 but it wouldn't have mattered.
Next, we draw a profile curve for the braid channel which is 32 units wide and its groove is 12 units tall for now. The rims on both sides of the channel are each 8 units wide. Total height of rim and channel is 16.2 units
After we #sweepOneRail with the blue #sweepingCurve on the orange #railCurve for the #braid strand, we cap #planarHoles to get a single #airtight strand.
As described in https://pixelfed.social/p/Splines/798015349727305297, the radius of the blue circle is 8 units, and the total height of a strand swept by that circle is 24 units. Half of that is above the #tectonic surface, which is still twice of what #Vignola documented in #RegolaArchitettura.
We will apply #nonuniformScaling in the Z direction to reduce the height in half while keeping the length (X) and width (Y) the same. But before we do that we split and discard some of the bottom portion of the strand that is below the tectonic surface and is not needed.
The top half of the figure shows the front view of a single strand. The bottom shows the perspective view of the same strand.
Note that the orange braid rail starts at the center of the blue sweeping circle which looks like an ellipse in the front view. The orange rail itself looks like a flat sinusoid in the front view, but its beautiful meandering shape is really apparent in the perspective view.
The orange rail curve is centered on the "ground" or XY plane, which is also where the #tectonicSurface for the braid is. The amplitude of the orange curve (maximum or minimum from axis of the curve) is 4 units. We need to preserve the geometry of the strand at least up to the bottom of the orange rail.
If we split the strand exactly at 4 units below the ground plane, we hit a limit that not all #CAD tools are able to handle. To get around, we extend it past that limit by an arbitrarily small fraction, like 0.2, and discard the portions below. We could have extended it by 0.1 or 0.3 but it wouldn't have mattered.
Next, we draw a profile curve for the braid channel which is 32 units wide and its groove is 12 units tall for now. The rims on both sides of the channel are each 8 units wide. Total height of rim and channel is 16.2 units
#Braids #3StrandBraids
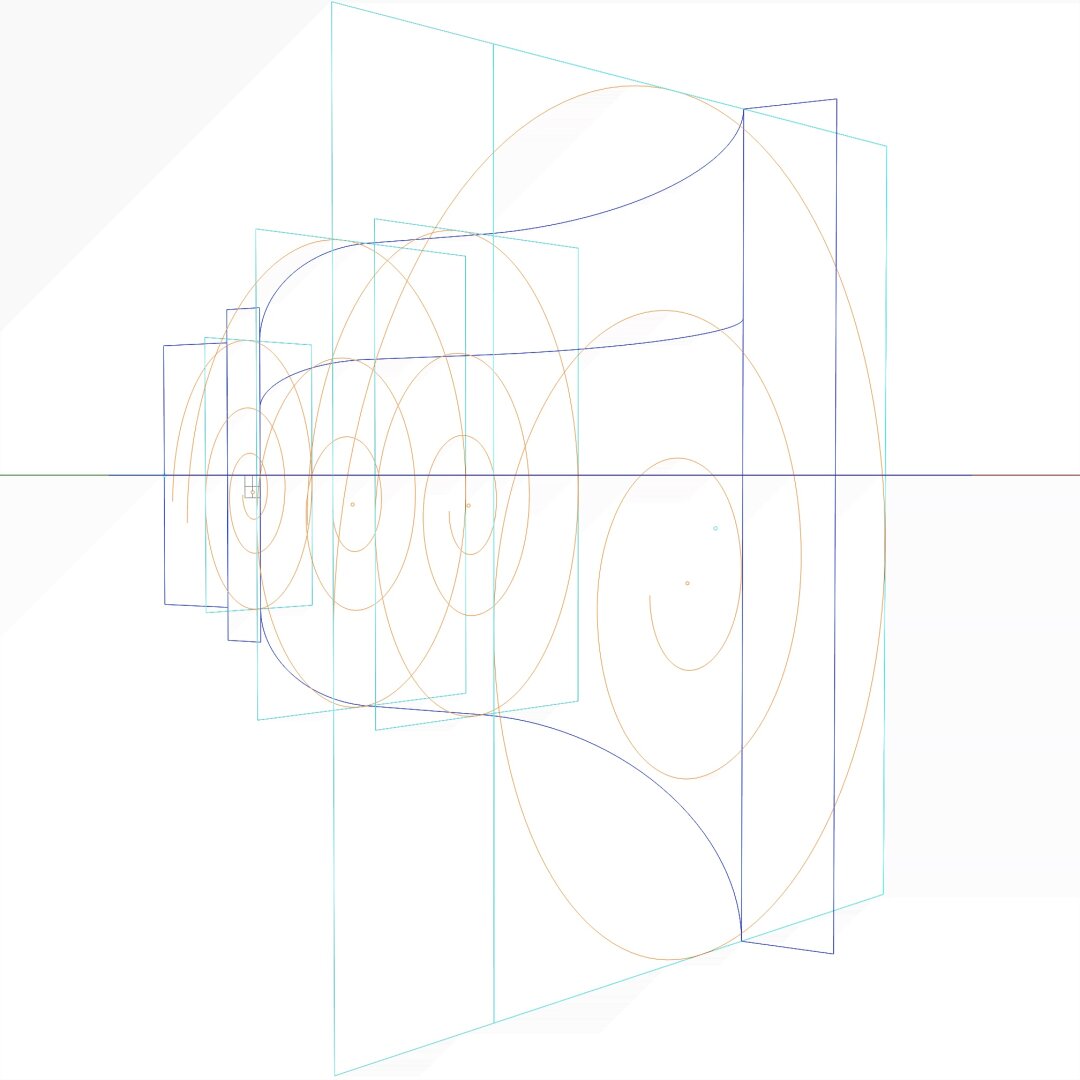
With the #rail curve for a #braid strand in https://pixelfed.social/p/Splines/797916882329430160, we can start the construction of a braid that matches the sketch in #Vignola's #RegolaArchitettura shown in https://pixelfed.social/p/Splines/793215298082967733.
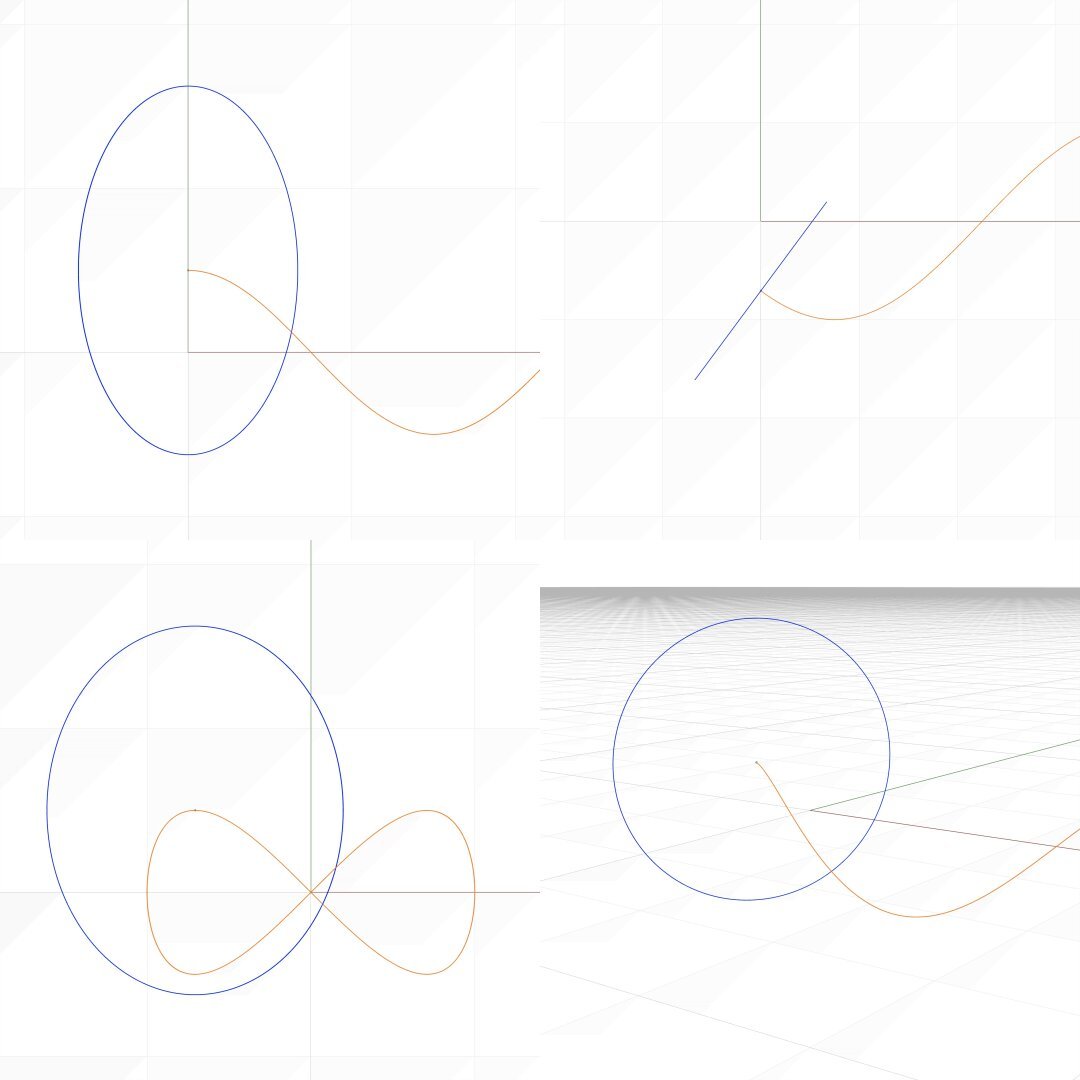
The strands for this braid have a radius of 1 part or 8 units. So their diameter is 16 units, and the braid itself is 32 units wide.
To create one strand, we start with a circle of radius of 8 units perpendicular to the tip of the orange curve. We use the orange curve as a #railCurve and the blue circle as the #sweepingCurve in the #sweepOneRail operation.
Note that the circle appears distorted like an oval in all views — front view is on top-left, top view on top-right, right view in bottom-left, and perspective view in bottom-right. That is because the circle is perpendicular to the rail curve, not to any of the "world" coordinate planes. If the sweeping curve does not appear like an angled line in the top view, something is wrong.
After the sweep, close #planarHoles to get a solid strand and, as always, check for #nakedEdges and #nonManifoldEdges to ensure an #airtight object.
Refer again to the middle portion of the top diagram in https://pixelfed.social/p/Splines/793215298082967733 between the two bell shapes of the scrolls. The total width of the #tectonic surface on which the braid will be laid is 4 parts or 32 units wide. The braid has a rim 8 units wide on both sides that rises 6 units above the tectonic surface. Half of the braid should be above the tectonic surface, meaning that the total height of the braid should be 12 units.
If you check the bounding box of this strand, you find that it is indeed 32 units wide as needed, but the height is 24 units. So we have to apply #nonuniformScaling to keep X and Y scale intact but halve the scale in the Z direction. This will reduce the roundness of the strand and cut its height in half to 12 as needed.
With the #rail curve for a #braid strand in https://pixelfed.social/p/Splines/797916882329430160, we can start the construction of a braid that matches the sketch in #Vignola's #RegolaArchitettura shown in https://pixelfed.social/p/Splines/793215298082967733.
The strands for this braid have a radius of 1 part or 8 units. So their diameter is 16 units, and the braid itself is 32 units wide.
To create one strand, we start with a circle of radius of 8 units perpendicular to the tip of the orange curve. We use the orange curve as a #railCurve and the blue circle as the #sweepingCurve in the #sweepOneRail operation.
Note that the circle appears distorted like an oval in all views — front view is on top-left, top view on top-right, right view in bottom-left, and perspective view in bottom-right. That is because the circle is perpendicular to the rail curve, not to any of the "world" coordinate planes. If the sweeping curve does not appear like an angled line in the top view, something is wrong.
After the sweep, close #planarHoles to get a solid strand and, as always, check for #nakedEdges and #nonManifoldEdges to ensure an #airtight object.
Refer again to the middle portion of the top diagram in https://pixelfed.social/p/Splines/793215298082967733 between the two bell shapes of the scrolls. The total width of the #tectonic surface on which the braid will be laid is 4 parts or 32 units wide. The braid has a rim 8 units wide on both sides that rises 6 units above the tectonic surface. Half of the braid should be above the tectonic surface, meaning that the total height of the braid should be 12 units.
If you check the bounding box of this strand, you find that it is indeed 32 units wide as needed, but the height is 24 units. So we have to apply #nonuniformScaling to keep X and Y scale intact but halve the scale in the Z direction. This will reduce the roundness of the strand and cut its height in half to 12 as needed.
#3StrandBraids
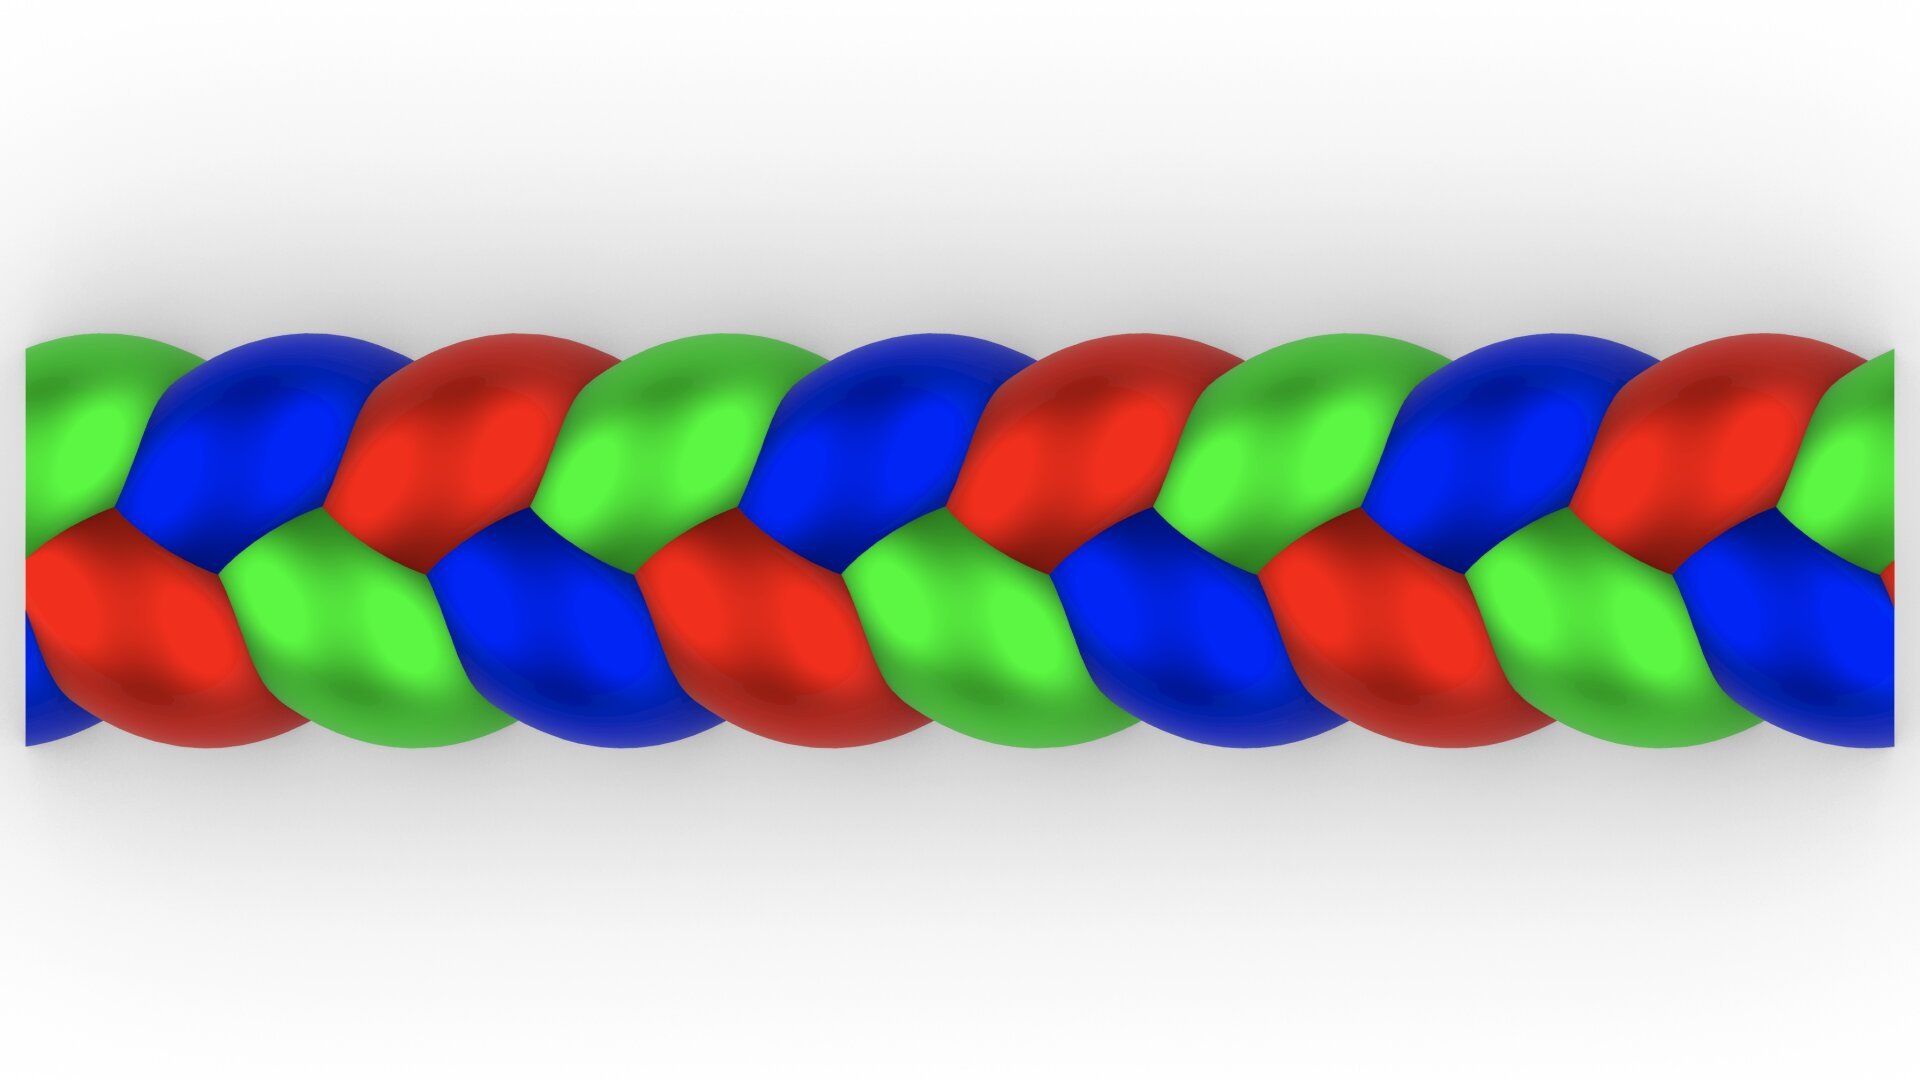
#Braids are the last of the #decorative elements on the #IonicScroll, but like #EggsAndDarts, they are not specific to the #IonicOrder.
Braids are a popular design motif that find wide currency in modern #hairstyle, #fashion, and fashion accessories like #belts and #bracelets.
Braids come in infinite varieties with varying number of strands, thickness of strands, roundness or flatness of strands, and how tightly or loosely they are wound together. Here, I focus on the 3-strand variant mentioned in #Vignola's book and previewed in https://pixelfed.social/p/Splines/792015485979791089. The image here is brightly colored to draw attention to the 3 strands.
The geometry of braid strands is not at all obvious despite how familiar they look. Also, a braid strand is the only feature in the entire iconic order whose geometry cannot be captured with straight lines and circular arcs. Instead, a strand geometry must be defined in a series of steps starting with a basic #sinusoidal curve.
A sinusoidal curve or #sinusoid is a wave form whose function belongs to a family of functions known as #transcendentalFunctions that also include #logarithmic and #exponential functions. I mentioned #logarithmicSpirals in https://pixelfed.social/p/Splines/792499765146596723, and in a future post I will show how to construct one and compare it with the #spiral used in our implementation of #IonicVolute.
They are called transcendental functions because they transcend the math of finite algebraic polynomials and go beyond geometry into trigonometry. Fortunately, we don't have to go there.
Few #CAD tools have a direct primitive for a sinusoid, but almost all have a primitive for a 3-dimensional round coil shape called a #helix which we can use to create the sinusoids we need for a braid strand. To create a sinusoid, all we need to do is #project a helix on a flat surface to convert it into a 2D waveform.
#Ovolo #TectonicSurfaces for #EggsAndDarts
Continuation of https://pixelfed.social/p/Splines/796857354690493749
Reconcile this figure with the figure in https://pixelfed.social/p/Splines/792124787573855518. The points A, B, C, and D are the same in both. The arc from A to D is the profile for the invisible virtual surface that encloses the decorative elements. Arc BC is start of the #tectonic surface where decorative elements rest. Points K, L, M, P, and Q are new here.
Point K is the center of the Ovolo and lies on the #columnAxis. KD is the upper radius of the Ovolo including the decorative elements, and its length is 22 parts of 176.
The horizontal distance between C and D is 1 part (8 units), and the vertical distance between C and P is also the same. PQ is where the eggs and darts are sliced off exposing the wall CP around the entire Ovolo and making it visible.
Normally, the decorative elements rest on the surface swept by arc BCP. In the case of https://pixelfed.social/p/Splines/796786779066451143, we have a fully round egg shape half of which is buried behind the arc AQD. In the concave variant, this means part of the tectonic surface is also carved out.
In other words, instead of limiting ourself to the range CD (or PQ), we are taking liberty to gouge out portions as far back as arc LM, and that's OK. Neither #Vignola nor #Scarlata mention tectonic surfaces or how far back they should or would be. The actual depth will depend on the choice of our decorative elements — in this case, concave eggs that are fully round like natural eggs.
The concave version of the egg is shown on the bottom right and it lines up with the orange wireframe with the round hole on top. The wireframe of the convex egg is superimposed on the concave portion to show where it will be placed if both are used together.
The depth of the dart slab is the same as that of the concave egg. The slab of the convex egg is thinner because we have to leave room for the bulge of the egg.
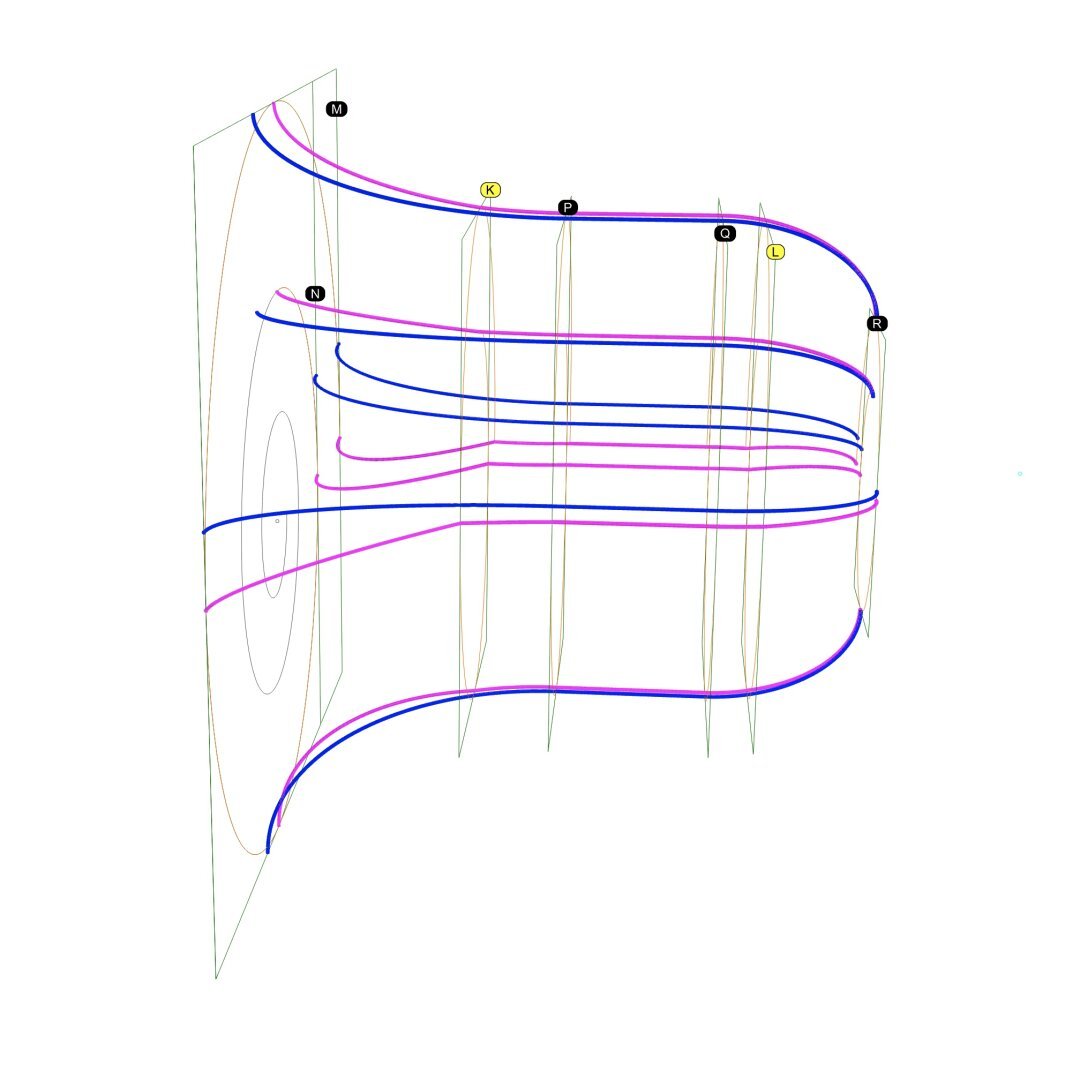
The #secondaryCurves derived in https://pixelfed.social/p/Splines/793641134563617634 with 4 #modulatingSpirals are sufficient for a rough draft when #3DPrinting, but sweeping the scroll surface using these curves still causes subtle wobbles. These wobbles generate undercuts that precludes #CNCMilling with 3-axis machines depending on orientation, and that requires 5-axis #CNC machines instead.
To ameliorate that situation, I added 2 more interstitial frames labeled K and L, where k is 14 units in front of P, and L is 7 units behind Q. The size of K is 58.24 x 81.92 and that of L is 54.88 x 78.72. In other words, K is wider by 2.24 and taller by 1.92 compared to P and Q, while L is narrower by 1.12 and shorter by 1.28 compared to P and Q.
K is offset from P in the front view by 0.64 at top, 1.28 at bottom, 1.44 at left, and 0.80 at right. L is concentric with Q in the front view with top and bottom insets of 0.64 and left and right inset of 0.56. How I derived these is too complicated to discuss within #Pixelfed character limits.
Obviously, the scale factors for the spiral at K are 58.24/112 in X direction and 81.92/128 in Y direction. The scale factors for the spiral at L are 54.88/112 in X direction and 78.72/128 in Y direction.
So, using these 6 modulating spirals, we again identify the tangent points with their respective frames and #project straight lines through these points on the scaffolding surface to get 6 higher-accuracy secondary curves.
The diagram shows 6 blue #primaryCurves we extracted from #imageScans in https://pixelfed.social/p/Splines/793169876757012827 and https://pixelfed.social/p/Splines/793215298082967733 along with 6 new magenta secondary curves. The outlines we extracted from #Vignola’s antique images in 2-dimensions finally leap into 3-dimensions in a modern #CAD tool.
The blue primary curves are no longer needed for this design, but don't discard them. They are beautifully proportioned and can be used in other designs.
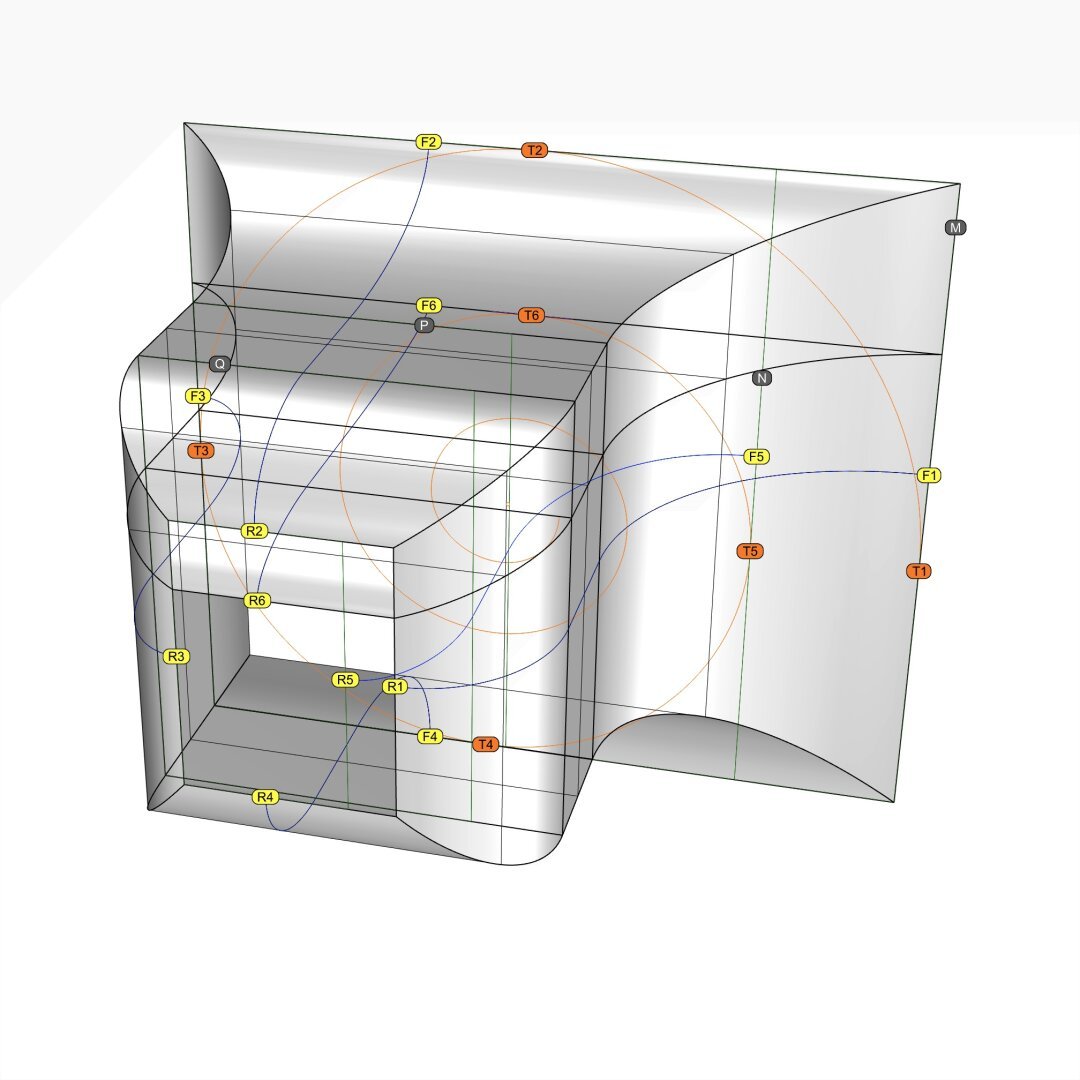
Refer to https://pixelfed.social/p/Splines/793554853964898442 for the backstory on this post.
This is a perspective view showing #scroll #scaffolding surfaces #extruded from #primaryCurves F1-R1, F2-R2,…. Be sure to follow these blue curves from back to front and then back again.
Metaphorically speaking, we want to use these blue curves as #walkingSticks to find the curves that meet at the front tangent points T1 through T6 and corresponding tangent point in the rear (not shown), WHILE remaining faithful to the original curves we extracted from #Vignola's original sketches.
This means that the point F1 should somehow move toward T1, F2 toward T2, and so on, with corresponding movements on the rear rectangle, yielding us 6 new #secondaryCurves.
Being "faithful" to the original means that when secondary curves derived from horizontal #primaryCurves are viewed from the top, corresponding curves are indistinguishable from each other, even though they are clearly different curves with distinct trajectories. Secondary curves derived from vertical primary curves must be indistinguishable from each other when viewed from a side.
In order to accomplish this feat, we need the remaining #volute tangent points on rectangles P, Q, and R. That means we first need the corresponding volutes that are used to #modulate the scroll surface.
In https://pixelfed.social/p/Splines/792616677005177924, we used the #scale operation to scale the original volute down from 3x to match the scale of our model using a #uniformScaling factor of 0.33333333.
In https://pixelfed.social/p/Splines/792966507797633558, we can see that the frame rectangles Q and R have independent scaling factors that are different in the X and Y direction. So here we use #nonuniformScaling.
To get the modulating volute for Q, scale the original volute by 56/112 in X direction and 80/128 in Y direction. Scale factors for the modulating volute at R are 28/112 in X direction and 48/128 in Y direction. P is same as Q.
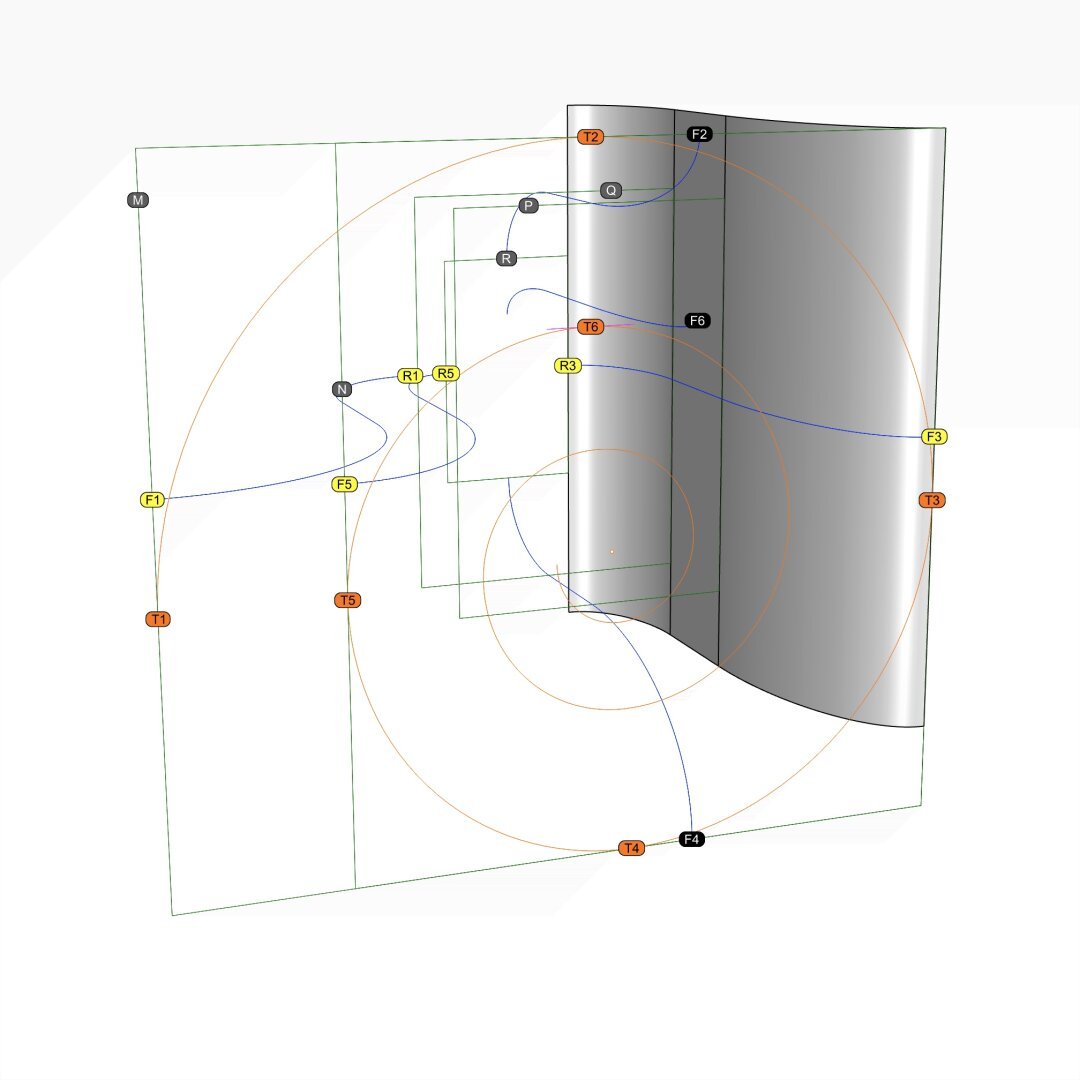
#SeeFeelTouchHug
In both #art and #engineering, one must be able to both #see and #feel things that might not be there (yet).
We were able to "see" the outlines of the #scroll surface from #imageScans of #Vignola's sketches in https://pixelfed.social/p/Splines/793169876757012827 and https://pixelfed.social/p/Splines/793215298082967733.
Vignola's images are on a 2-dimensional surface, as are the outlines we extracted from them. We believe the scroll surface also exists, but it is not yet manifest in 3-dimensional space. So, like a visually impaired person, we try to "feel" our way to the scroll surface using the outlines as our #walkingStick.
This diagram is identical to that in https://pixelfed.social/p/Splines/793493316852849994 but with the rear ends of the horizontal #primaryCurves marked with R1, R5, and R3, which are paired with F1, F5, and F3, respectively.
We know that the scroll surface must #touch the tangent points T1, T2, and so on in front, as well corresponding tangent points in the rear (not shown here to reduce clutter).
In https://pixelfed.social/p/Splines/792906324854792619, I mentioned that a scroll starts with a volute in front and is #modulated by as many as six volutes of different shapes and sizes as it reaches the back, with the scroll surface tightly hugging the volutes at EACH contact point in ALL 3 dimensions. In other words, it is not sufficient for the scroll surface to "touch" the #volute #spirals just in the front and rear. It must also "hug" the intermediate #modulatingSpirals. I will first show this technique with 4 modulating spirals using rectangles M, N, P, Q, and R as their frame, and add more later on.
Intuitively, we know that if we use curve F3-R3 as our walking stick on the straight vertical extrusion of that curve, we will feel the scroll surface *somewhere* on that extrusion along every point from front to back. We can narrow it down further by excluding portions above and below as we approach rectangle R in the rear.
#ReverseEngineer #ImageScans for #restoration.
This is a side view from #Vignola's #RegolaArchitettura at https://archive.org/details/gri_33125008229458/page/n39/mode/2up.
We recover the essential geometry of #primaryCurves using #curveFitting by trial and error — a human endeavor by "eye" and heuristics — not to be confused with mathematical curve fitting by regression analysis.
The heights of rectangles labeled N, P, Q, and R are 128, 80, 80, and 48, respectively. P is halfway between N and R, and Q is halfway between P and R.
The curve labeled S is the counterpart to the curve labeled O in the previous post. The purpose of these curves will be explained when we derive the #secondaryCurves from the primary curves.
For now, just note that curve O in the previous post is derived by simple proportion arithmetic. Width of N is 112 units and width of R is 28 units [https://pixelfed.social/p/Splines/793169876757012827]. Since the gap between start of curve O and the curve closest to it is 32 units at the front, the gap at the rear is 32*28/112 = 8, and 16 in the middle.
Curve S is derived in a slightly different manner because, unlike curve O where we knew the starting point, we know neither the start nor the end of curve S. Instead, we look at another clue that Vignola left for us — The 4 long leaves emanating from the rear and spreading towards the front on each bell shape. So we divide the front height of N and rear height of R into 4, giving us the start of S at 32 units from the top (miraculously in agreement with the start of curve O) in front and 12 units in the rear.
The top profile curve does not seem to "fit" Vignola's sketch. First, this is a hand sketch. Second, I tried to fit the curve more closely, but the design broke down later. Third, realize that if we fit the curve more closely to what's in the sketch, this will be the ONLY curve to have a tangent at the inflection point (switch from convex to concave) that is neither horizontal nor vertical.
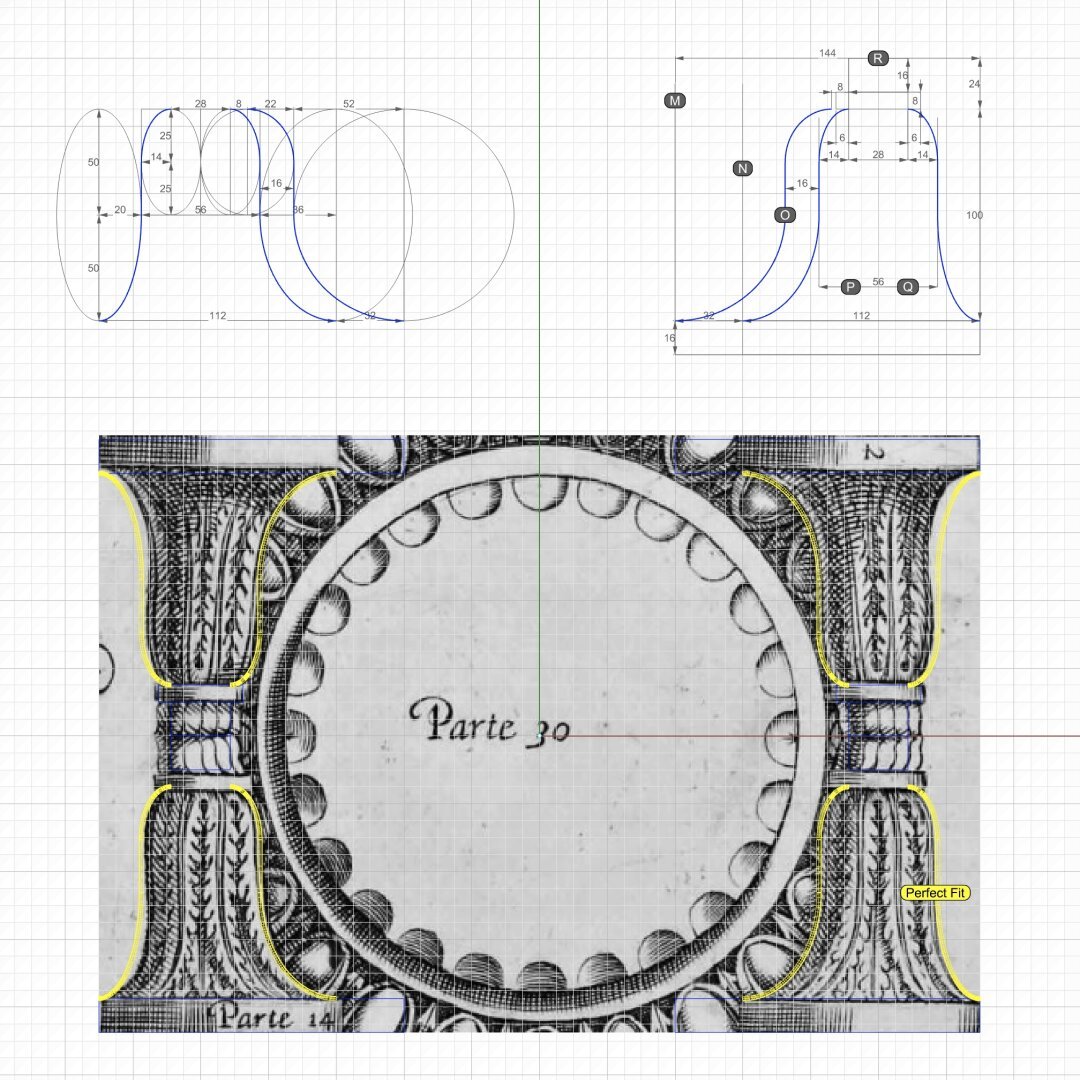
#ReverseEngineer #ImageScans
We now dig into the archives and resurface old sketches for #restoration. This one is from #Vignola's #RegolaArchitettura at https://archive.org/details/gri_33125008229458/page/n39/mode/2up. This lavishly illustrated book with copious notes that also flaunt his #calligraphy was written (in Italian) when America was still a British colony. The book went out of copyright a long time ago.
Straighten the image as much as you can in an image editor and crop it before bringing it into a #CAD tool.
Then, stare at the image for a while and squint occasionally until you "see" crucial features and patterns emerge, while ignoring the "noise."
Finally, try #curveFitting with the simplest of curves — straight lines, circular arcs, ellipse, and so on to get as close an approximation as possible. Remember that with hand-drawn sketches, the fit will rarely be perfect. So use some structure as a guide or #scaffolding as I laid out in https://pixelfed.social/p/Splines/792966507797633558.
In the top left of the diagram, I show the measurements that I was satisfied with after a lengthy process of trial and error because the numbers comport with my understanding of the proportions the original designers intended — many, but not all of which are documented in #Scarlata's #PracticalArchitecture with #VignolaProportions in tabular form.
For measurements that are missing, use plausible heuristics to fill in the blanks and try to justify your choices using simple rules. In this case, the bedrock rules are:
1. The entire #volute is exactly µ = 144 units wide, including #ArcZero, which extends 32 units beyond the portion of the volute that is actually used in the design.
2. The portion of the volute that is actually used in the design is 112 units wide, same as the height of the unadorned #capital.
3. Width of the #scroll bell shape as seen from the bottom is 112 units in front, 56 units in the middle and 28 units in the rear — all in #geometricSequence.
#IonicVolutes are the sinews of #IonicScrolls. Without #volutes, there would be scrolls, but not #Ionic Scrolls. Each scroll starts with a volute in front and is modulated by as many as six volutes of different shapes and sizes as it reaches the back, with the scroll surface tightly hugging the volutes at each contact point in ALL 3 dimensions. This is a key point to remember before we start #reverseEngineering the first #primaryProfileCurves from old image scans.
This diagram shows the #scaffolding we will construct using straight lines and rectangles, first in 2 dimensions, then place them front-to-back in 3 dimensions using precise markers, and finally scale and superimpose the volutes on this scaffolding.
All of this will be done before we derive the primary profile curves from the image scans.
How did I know about this scaffolding? I didn't. It is not documented anywhere that I'm aware of. I developed this after years of striving to derive the correct shape, and I hope that there are people who can still "see" things I might have missed and help improve the design.
So, the actual process went like this: I drew outlines from 2D image scans in the top view, getting close to #Vignola's detailed sketches. Then, I did the same thing with image scans in the side view, and I found that the designs didn't line up.
After several iterations, I got the designs to line up in both views, and it was obvious that the bell shape of the scroll would follow the large volute in the front.
So, I used the large volute as a "rail" and tried to sweep the primary profile curves on one rail. Big mistake! The undulating shapes of the primary profile curves wobbled wildly on the single rail — The middle, 3/4, and back of the scroll were twisted out of shape!
Instead of trying to #sweepOneRail, I decided to clamp down wobbling with another operation called #sweepTwoRails, using volutes at both front and back ends as rails with less wobbling.
You will need a #CAD tool to practice.
The classic #IonicScroll is the most complex of all components in the #IonicOrder mainly because it is poorly documented, if at all, and even poorly understood. It is as if the classical architects deliberately concealed its enigmatic design secrets within the confines of a smooth elegant shell that could only be revealed after intense study and analysis.
I got this impression because I spent years searching for credible and actionable documentation on how to recreate this beautiful design in a #CAD tool. In the Age of Internet and Social Media, my web searches always disappointed me because the results lacked something vital in one respect or another. Over the years, I created hundreds of versions of the scroll that looked so perfect and pleasing that I thought I had cracked it, only to find some flaw or another in my work.
So, it is with caution that I present my work on the scroll in the hopes that someone will build upon this knowledge and either validate the design, or correct it and share it with me and the rest of the world.
Looking back at my progress, I'm now surprised at how remarkably simple and elegant the design is that defied familiar geometrical construction techniques I had been using until now.
As I mentioned in my introductory post, this design can be recreated by drawing simple 2-dimensional lines and circular arcs, but instead of just #primaryProfileCurves, we will use up to three additional sets of curves — #secondaryCurves, #tertiaryCurves, and #quaternaryCurves — each derived from the previous set.
I extracted the #primaryCurves after a lengthy trial-and-error process that involved #curveFitting image scans from #Vignola’s book, #RegolaArchitettura. I had to #reverseEngineer the details because the measurements have either been lost, or are locked away in some library.
Even though we start with lines and arcs, the end results are always #NURBS curves and surfaces, but everything is done by the CAD tool, and no additional math is needed.

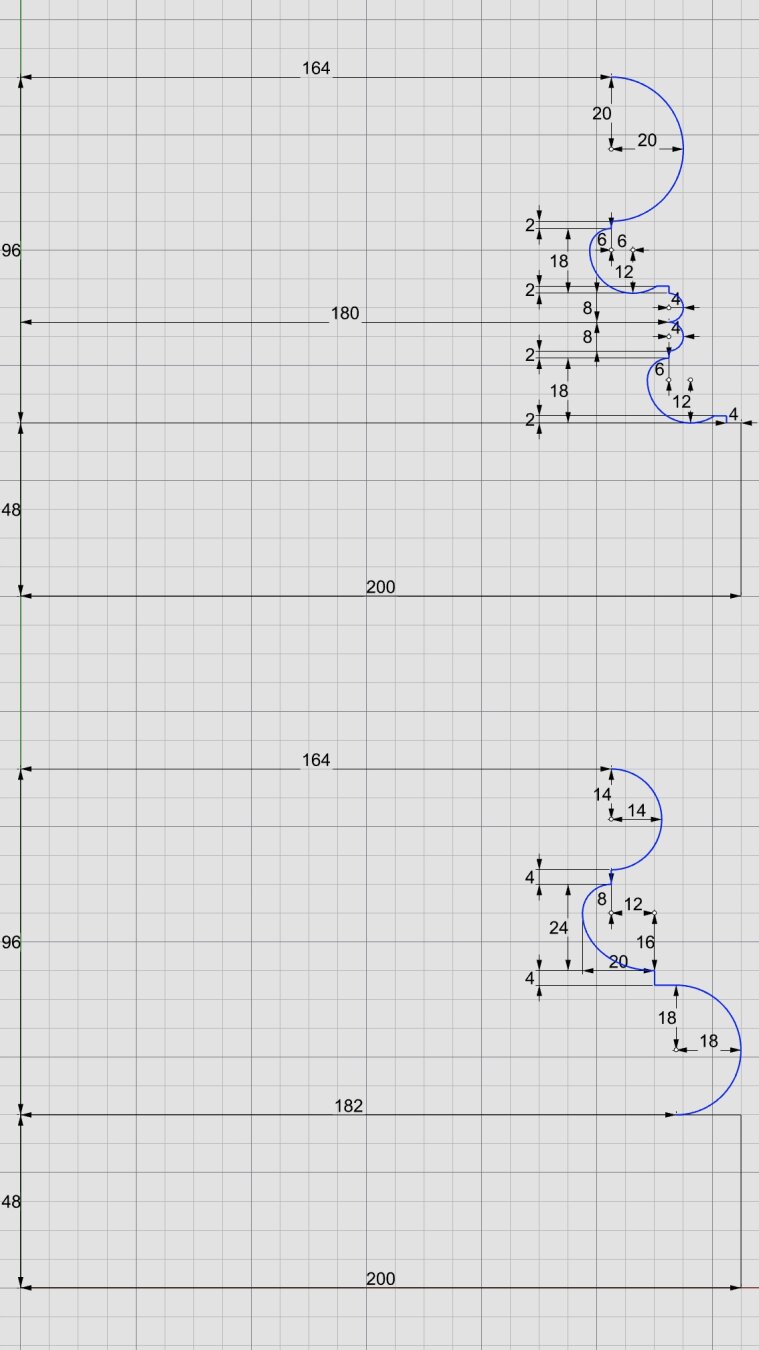
#IonicColumn #VignolaBase and #AtticBase #CAD Plans
Both #Vignola base and #Attic base have the same square footprint of 400 units x 400 units. The #plinth for both is 48 units (6 parts, or µ/3) tall, and the total height for both is 144 units (18 parts, or exactly µ). As such, they are easily interchangeable.
In the Vignola variant, we start at the plinth with a #fillet 2 units tall and a classic #scotia 18 units tall gouging out part of the fillet.
Then there is another fillet 2 units tall, followed by two #reeds, each 8 units tall, followed by another classic scotia as described above.
This is followed by yet another fillet 2 units tall and topped off with a #torus 40 units tall. A Torus is the same as a reed, except larger. When we reach the neck of the shaft, we will see another molding called #Astragal which has the same profile as reed and torus, but sits in the middle in size. Think of reed, astragal, and torus as small, medium, and large of the same profile.
The modern Attic variant is more elegant with fewer moldings. It also gives the impression of more heft for more stately columns. It starts at the plinth with a torus 36 units tall, followed by a fillet 4 units tall, followed by a modern scotia 24 units tall, followed by another fillet 4 units tall, and topped off with another torus 28 units tall.
As in the construction of #IonicEntablature [https://pixelfed.social/p/Splines/791013152244518907], split the construction of the #columnBase into two steps.
Just as we extruded #dentils separately, we extrude the plinth separately. First draw a square 400x400 in the top view. Then extrude the square 48 units in the front view.
For the rest of the base, we need a new 3D operation — #revolve around an axis. Instead of extruding the #primaryProfileCurve, we revolve it around the #columnAxis, and cap the #planarHoles on both ends before performing a #booleanUnion with the plinth. Finally check edges of the solid for #nakedEdges and #nonManifoldEdges.
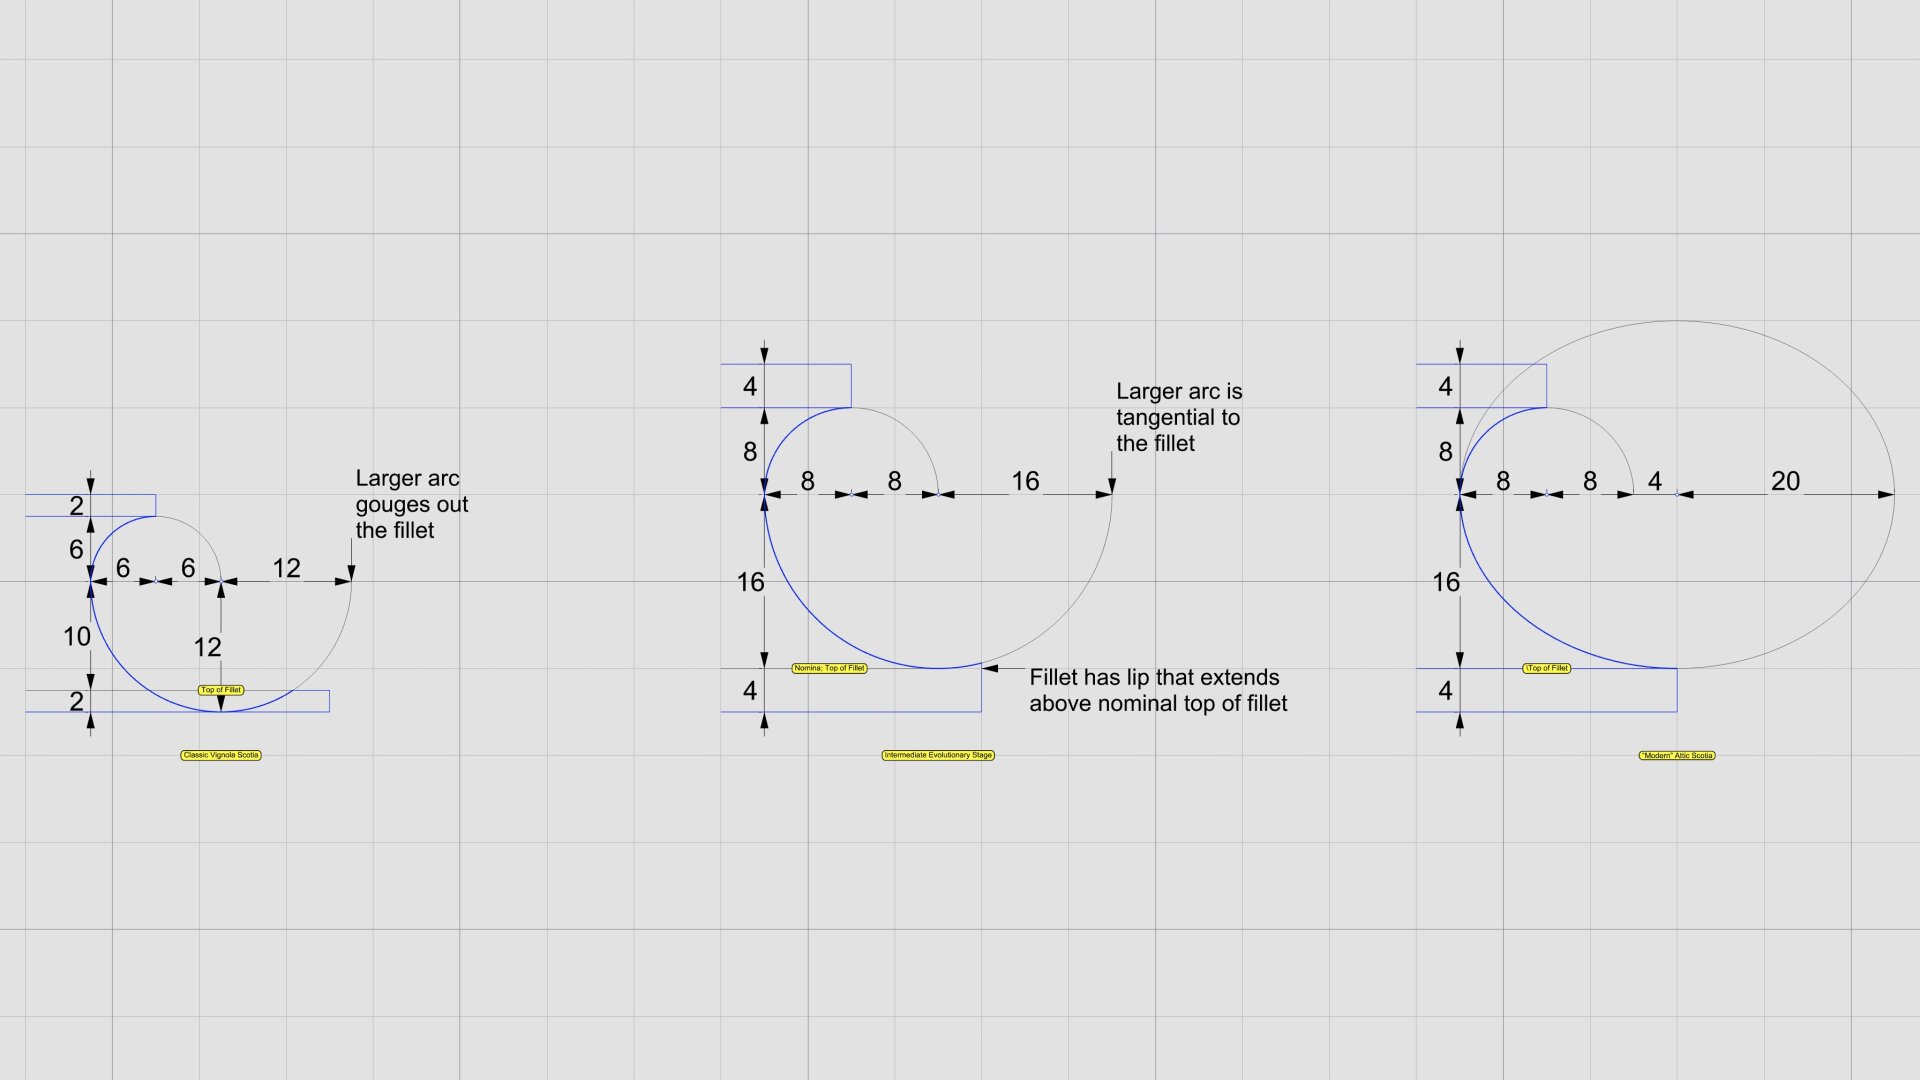
#EvolutionOfScotia
#Scotia is a new concave #molding that we are seeing for the first time in the #IonicOrder. Its #primaryProfileCurve is a compound curve that is always segmented 1/3 and 2/3 from top to bottom. The two segments have different radii, but they also have a common tangent where they meet.
The scotia molding went through some evolutionary stages as shown in the sketch.
In the classic #Vignola version, the scotia used in the column base is smaller and gouges out a portion of the bottom fillet. Vignola did that to accentuate the effect of incident light and bring out the shadows. He must have really liked the #lightAndShade effect because he had TWO of them in the classic column base for the #IonicColumn.
An intermediary variant then emerged in which the larger arc was tangential to the bottom fillet instead of gouging it out. It still allowed for the interplay of light and shade as it had a lip that extended above the nominal fillet. Also, it was 4/3 the size of the Vignola variant and the fillets were twice as tall, ostensibly to make the lip more conspicuous, and provide some utility or justification for the lip.
If you are into #font design or you are an avid calligrapher, you will never look at font #serifs the same way after looking at the intermediate evolutionary stage of the scotia. In particular, the #Optima font is classified as #sansSerif, but the stem in its repertoire of characters has an uncanny resemblance at the tip of the lip.
Unfortunately, the lip didn't seem durable as it was prone to chipping. While Optima still thrives, designers rejected the lip of the scotia as vestigial over time, and used an ellipse for the larger arc so that it was tangential to the fillet right where the fillet ended. This design has endured, and the variant of the column base that uses this molding is called either the "modern" base or the #AtticBase. The etymology is from Latin #Atticus which means ‘relating to #Athens or #Attica region of #Greece.'
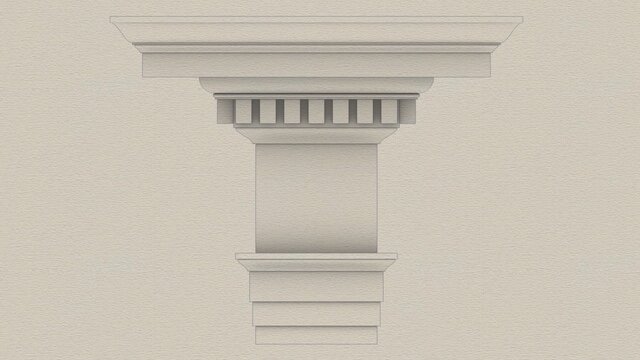
The #column is the most complex component — not least because of the beautiful #capital at the top. It also offers the most opportunities for creative expression, as long as designers differentiate in the #decorativeElements, not #tectonicElements.
There are 3 subcomponents of a column — the #columnBase, #columnShaft, and #columnCapital. In the #IonicOrder, there are variants for each of these components, not just in the tectonic portions, but also in the decorative portions, and it is equally acceptable to mix and match them.
Classic variant of the column #base bears #Vignola's signature in a new #molding called #scotia. There's a "modern" version that has a newer Scotia. I am trying hard to resist the urge to call it #NovaScotia.
The column #shaft is not perfectly cylindrical. It gradually tapers off in the upper 2/3, has a plain unadorned variant, and a #fluted variant.
Classic variant of the column #capital has parallel flat #volute slabs only visible from the front and back, but not from the sides. There's also a modern variant that has curved volute faces on all four sides with pointed ends at all corners and optimized for use in a corner column, but not limited to that.
These variants can be freely intermixed in any combination of base, shaft, and capital. The sketch shows an Ionic column with a modern base, fluted shaft, and classic capital, but any other combination would be equally acceptable as long as all are internally consistent in a single #colonnade or #arcade.
Beyond these tectonic elements, there are decorative elements like the #eggsAndDarts motif in the #ovolo of the capital. The eggs can be convex or concave, the eggs and arrows can look different, or the Ovolo could have a completely different motif, or none at all.
The bell-shaped #scrolls between volute slabs are separated by a ribbon or belt with a 3-strand braid not seen in this sketch. If you design fashion accessories, experiment with other designs while maintaining proportions.

There are two variations of the #IonicEntablature. The classic variation has #dentils, which are teeth-like structures shown here above the #frieze. The modern version has #modillions, which are projecting brackets under the #corona of the #cornice. Well, "modern" is a relative term. For designs that are more than 2000 years old, even an alteration 1000 years ago would qualify as modern.
Although the sketch shows the #entablature with a square footprint, in practice, it runs the entire length of a #colonnade (multiple columns) or an #arcade (multiple arches).
#CAD construction of the entablature is very similar to that of a #pedestal.
The first step is to consult #Vignola's #RegolaArchitettura for the visual appearance, and then consult #Scarlata's #PracticalArchitecture for #VignolaProportions in tabular form.
It is convenient to create a spreadsheet to convert the measurements given in Scarlata's book from module "parts" to your own model units based on your choice of value for the module parameter µ.
Armed with these measurements, it is time to plot the points and draw the #primaryProfileCurves on our standard 2D grid with minor grid lines 8 units apart and major grid lines 32 units apart.
In the first pass, skip the dentils and draw the profile curves for the rest of the moldings. Just as with the pedestal, I will show the macro-level plan as well as the detail plan. So, you don't have to go to Scarlata's book, but you know it's there if you want to.
I will show the dentil arrangement in a subsequent post.
Based on µ = 144, the classic Ionic entablature is 648 units (36 parts, or 4.5*µ) tall. Of this, the #architrave at the bottom is 180 units (10 parts, or 1.25*µ) tall, the frieze in the middle is 216 units (12 parts, or 1.5*µ) tall, and the cornice at the top is 252 units (14 parts, or 1.75*µ) tall.
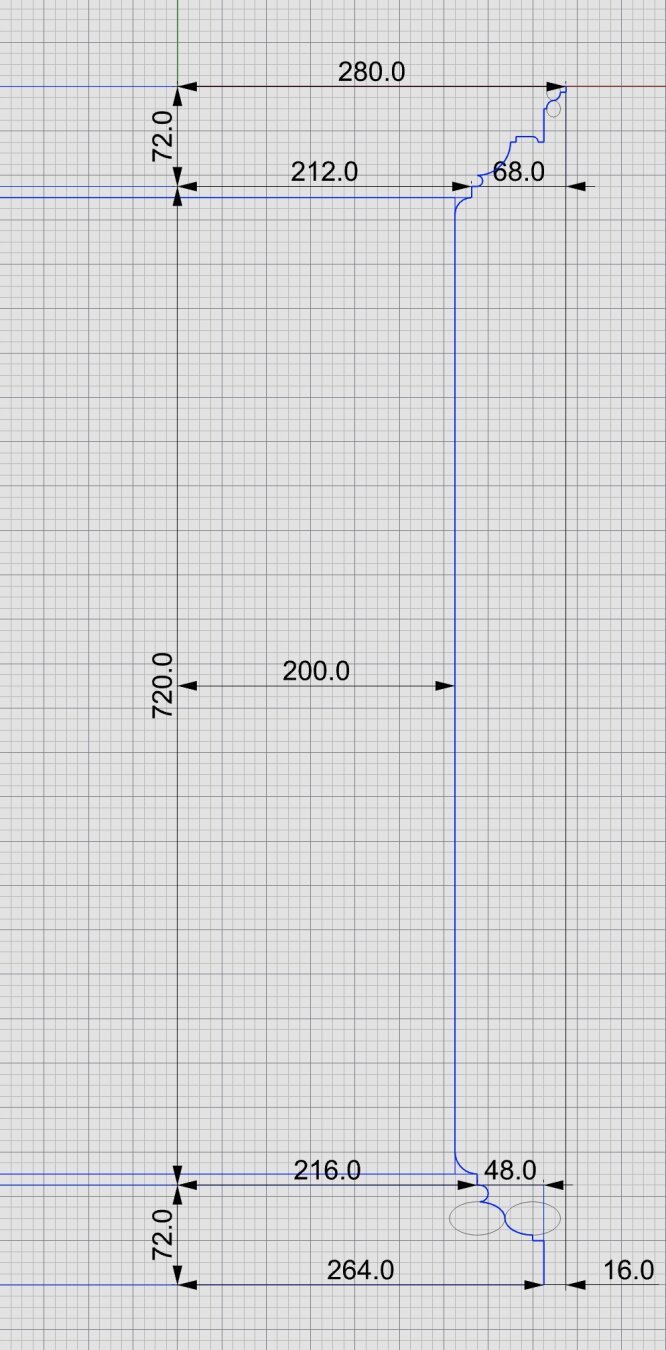
This shows the detailed measurements of the top and bottom portions of the #IonicPedestal. For macro-level measurements, see https://pixelfed.social/p/Splines/790571135473463588
Each of the blue curve segments (lines and arcs) that are marked with a yellow bubble is the #profileCurve for a #molding whose name is inside the bubble.
Starting at the bottom, we have a #plinth, a #fillet, a #cymaRecta, and a #reed as part of the #basement of an Ionic pedestal.
Next up, we have a #fillet and a #cavetto at the bottom of the #dado, and another cavetto and fillet at the top of the dado.
Moving higher up, a reed, an #ovolo, a #corona, a #cymaReversa, and a final fillet top off the cap of the pedestal.
They are called profile curves because each is the outline or silhouette of a 3D molding as seen from one side or in a cross section. In the case of a pedestal, these curves can be used directly to recreate the 3D shape of the pedestal. For this reason and in this case, I call them #primaryProfileCurves.
This is not always the case. For more complex shapes, such as the #scroll surface of an #IonicCapital shown in https://pixelfed.social/p/Splines/789956327130679640, the profile curves recovered by #reverseEngineering the image scans in #Vignola's book cannot be used directly to sweep the scroll surface because the scroll shape is not cylindrical. Like the inside of a rose, the scroll surface follows the outlines of spiral #volutes in the front and back, neither of which are circular. So, additional steps are necessary to derive the curves that we can actually use to reconstruct the surface.
In the case of the scroll surface, the derivation of these curves is not trivial and not obvious, but it is not difficult to understand, and no math is involved. There are multiple sets of curves, and each successive set is derived from a previous set. I call them secondary, tertiary, and quaternary curves.
For now, we stick with the primary profile curves for the pedestal.

This shows macro-level measurements for the #IonicPedestal.
The key to #effectiveModeling is to simplify a complex shape into elementary components. Sometimes, this involves mentally flattening and reducing 3D shapes to 2D shapes, extracting elementary curves from them, and then recreating the 3D shapes from the extracted 2D curves.
This is not always easy for organic shapes (which can still be approximated by Bézier curves). I extracted the #primaryCurves for the #IonicScroll surface in https://pixelfed.social/p/Splines/789956327130679640 after a lengthy trial-and-error process that involved #curveFitting images from #Vignola’s book, #RegolaArchitettura. I had to #reverseEngineer the details because the measurements have either been lost, or are locked away in some library. Web search yields no details on these measurements.
Fortunately, for geometrical shapes like pedestals, this is very easy. Because of its square footprint, mentally slicing it through the middle from top to bottom, it is easy to “see” the outline. Another way to think about #curveExtraction is to shine an imaginary bright light on an object from behind in a dark room to reveal its silhouette.
For the pedestal, even this silhouette or outline can be further reduced because the shape is symmetrical about the #columnAxis. With this realization, we only need to focus on one half of the outline, and methodically proceed from bottom to top, marking every kink and inflection point on the outline.
Fortunately, the other authoritative book, #Scarlata’s #PracticalArchitecture, I mentioned in my introductory post already documents #VignolaProportions in tabular form. So we can skip everything else and go directly to that.
Total height of #IonicPedestal is 864 units (108 parts, or 6*µ) of which the #PedestalBasement and #PedestalCap are each 72 units (9 parts, or µ/2) and the #Dado is 720 units (90 parts, or µ*5) tall.
Client Info
Server: https://mastodon.social
Version: 2025.04
Repository: https://github.com/cyevgeniy/lmst